Leaderboard


Popular Content
Showing content with the highest reputation on 09/22/2021 in all areas
-
I've got a bit more incentive if anyone is still on the fence about jumping in at all. Yesterday I jumped in at the $199 level, my third entry into the GB, after spending an inordinate amount of time trying to figure out if it would work out better in the long run to buy in using the Groove3 coupon code for 15% off 200 gear credits and save my JamPoints for a future upgrade to Total studio 3 when it goes on a sale price I am happy to pay, or to use my JamPoints now to save as much as I can today in case discounting options are different later on. I decided to go with the latter approach, using 42 JamPoints bringing the €160 price down to €112. I was expecting to have a regrettably small number of JamPoints left eg 40-something but it turned out I had 55 which is more than I expected. I'm not sure if I had earned more than I realised on my previous dips into the group buy, or if you earn jam points on the gear credits purchase and then again on the purchase with those gear credits. Anyone know? Either way it was a nice little win I thought. But here's the kicker: when I picked Sampletron 2 as a freebie I got an extra 30 free Jam points! So now I'm back to about the same amount of jam points I had before I used them to buy the gear credits! Epic score in my opinion. And now I don't need to cringe at any lost jam points discount when I upgrade to Total Studio 3 Max down the track, compared to having just sat the group buy out. And if TS3 Max doesn't go down to $299 for a while, I've got the vast majority of things in it for the moment anyway so that will keep me going in the meantime, and at a much cheaper price than TS 3 Max even during a future sale. I have to give it to IK Multimedia. This really is an epic deal. I spent a while sorting the order of freebies I would select and made my choices last night. I can't believe how much I got for free. It's just incredible.9 points
-
Wednesday should provide a big hint about how realistic hitting 20k by the end of the month is. If you compare the situation to the "race to 10k" at the end of August: On the afternoon of August 26th, the "10k by 8/31" promotion was announced. At the time, the August signup rate was around 14.6/hour. To hit 10k in 5+ days, the rate needed to increase to 22.3/hour. The rate didn't change much until the morning of the 27th, but jumped to > 28/hour the rest of the way, coasting past 10k. On the afternoon of September 21st, the "20k by 9/30" promotion was announced. At the time, the September signup rate was around 12.6/hour (but around 9/hour since the 17th). To hit 20k in 9+ days, the rate needs to increase to 14.4/hour. The rate hasn't changed much (as of midnight on the 21st), but... we'll see what happens. The 64-thousand-VST question is: who's left in the tank? Without a surge or two, it looks like the rate would fall short. The pace is currently 50 signups behind the required average, and (counting just from 3pm Tuesday) projected to come in under 19k. On the other hand, the rate didn't jump last time until the next day, and the goose needed this time is far smaller -- or put another way, there's almost twice as much time (9 vs. 5 days) to get about as many signups (3150 vs. 2925). If the 9/hour recent rate is the "baseline", reaching 20k requires just about 1100 "extra" people to come out of the woodwork in a week-plus. Are they in there? And do they need oodles of amp sims? Will someone octuple up? We may find out soon.6 points
-
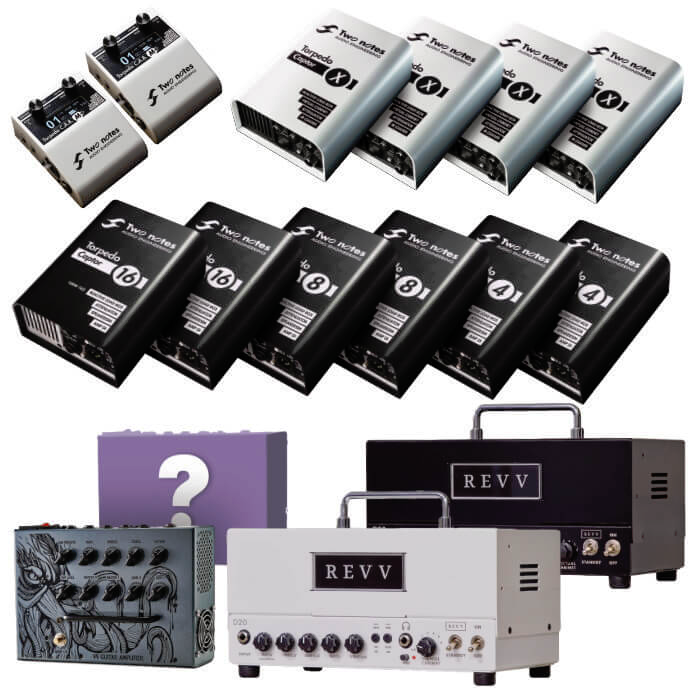
Introducing the Two notes Tone Vault. For a limited time, anyone with a Two notes account can claim this expansive collection of in-demand cabinets absolutely FREE! Featuring a hand-picked selection of our favourite DynIRs, this is one collection that should be in every discerning guitarist's sonic arsenal. No account? No problem - create a free account today and discover a world of tone Two notes style! More info HERE +WIN Free Gear! If that wasn’t enough, we’re kicking-off a series of weekly competitions, arming one lucky weekly winner with the latest and greatest Two notes hardware – it could be something epic from us, or one of our esteemed partners (including Victory Amps and REVV). The bottom line, you need to be in it to WIN it. Fancy your chances? Read on for more details on how to register!
 5 points
 -
I rather have that free IK MIDI keyboard controller4 points
-
We’re no customers. We’re groupies. GB groupies.4 points
-
This was a really fun song to put together. I enlisted the help of my brother, Mark Parsons, on drums and friend, Peter Morgan on lead guitar and pedal steel. I'm doing the rest. Any feedback on production, mixing, etc, is encouraged! https://soundcloud.com/tagruvto/move-it-on-over-9-14-master3 points
-
INTRODUCING THE GEM MOD (Roland Dimension D clone) Overloud releases the Gem Mod, a new plug-in of the Gems series, inspired to the legendary Dimension* 320 modulation unit. The plug-in is FREE for 7 days starting TODAY. Only 1000 free licenses/day will be delivered! REDEEM A FREE COPY AN ICONIC MODULATION UNIT The Dimension unit offers a very soft and organic modulation. It was the go-to unit for vocals in the 80s and 90s but it can also be used on a full mix to increase the space perception without adding reverb. Its input section has a very musical harmonic generation when pushed into saturation. BEYOND THE ORIGINAL HARDWARE The Gem Mod plug-in allows to extend the original tone capabilities by adding many features not available on the analog unit, like: Envelope controlled parameter: all the main parameters can be dynamically controlled by the input envelope. Input Saturation: You can push into saturation the input stage of the unit to drive their super-musical harmonic generation. Custom LFO shapes: you can experiment with LFO shapes different than the original, to change the motion of the modulation, or add resonances to transform the chorus into a flanger. Stereo width control: you can change the amount of the stereo width, from mono to double the original width. REDEEM A FREE COPY The giveaway ends on Sep 27th Overload GEM MOD 1000 free licenses per day for the next 7 days!3 points
-
There we go. 17 free products.3 points
-
I would look at the guys/gals who guessed 17 or 18 free products and could be trying to slow things down so they win3 points
-
The GB is over, IK is out of business, if you didn't get your freebies yet, you are out of luck! Just Kidding! 🍭 🤣3 points
-
1. Freezing tracks is a bit of time and work, but it's the only thing that will flatline track demands. I have a pretty high computer, 32 Gig I-9700 running on SSD's, and I have to resort to freezing rather quickly normally. My current song data is also on an SSD. 2. If you use the "Upsample" feature for 64 bit vst's, I keep mine at upsample on render only. Never upsample on playback. 3. Be strategic about how you apply "common elements" like reverb. Having a single reverb bus and using a send (while adjusting how much signal is sent from any calling track) can reduce VST load, and has the advantage of have one unified "voice" instead of many. 4. Definitely, some VST's are much more resource intensive than others. For me, I like to use Waves Abby Road Plates a lot and that drags my system down quickly; so I think long and hard before I use it. Again, freezing can be your friend. 5. I'd much rather freeze a melodyne track then bounce it for obvious reasons. 6. Shutting off all effects ("FX" button") of course will often make a mix sound a lot different, but you can turn on the effects for specific tracks, thereby reducing load. 7. Sometimes, when I have pushed my system to it's limit despite freezing tracks... OR if I want to add additional tracks while having FULL FIDELITY... I will output the song as is, create a new project, and have that file pulled in the new project. I then can add whatever I want in full glorious fidelity, and then have to bring it into the original project. It is a multi-step approach, but it does get around any resource limitations. Hope this helps.3 points
-
Hi all - please use this topic to post feedback specific to 2021.09. Release-specific feedback is valuable to us, and consolidating it in a single topic is extremely helpful. Thanks in advance! 2021.09 Release Notes2 points
-
Just another track possibly inspired by the Gas Giants of our Galaxy. Created using Toontrack's SD3 Orchestral 1 and EZBass. Arturia's DX7. Cherry Audio's MemoryMood and Mercury 4 ( their take on the Jupiter 4) Korg's Triton extreme. Thanks for listening.2 points
-
People who guessed 16, you know the rules! Pants around your ankles and one lap around the entire world! Go!2 points
-
Way to go!!! Appreciate the update! I'm so glad to see the environment variable problem on exporting file solved in the very last day. This official release solves the problem. Thanks @Noel Borthwick , @msmcleod, @Jesse Jost , and all dev team for the best effort. As always, love you all guys! Thank you so much for everything. Keep up the good work, stay health, and be happy! Love! Jaymz2 points
-
Thank you everyone for the incredible feedback and participation this early access! 2021.09 has now been officially released. Please use the main 09 release feedback thread for any further comments.2 points
-
I hear you, and wish good luck! The hurdle to get past with IK support is getting to someone who is not convinced that you are doing something wrong. I've gone in circles with every contact there, wasting my time. For example, I open a ticket with details, and they usually respond and close the ticket. I respond to reopen the ticket with more details, and they respond again and close the ticket again... I've worked in IT for over 40 years, so do know a thing or two about problem determination and root cause analysis, and could probably run circles around most in tech support.2 points
-
This is most often done by recording two mono tracks then after recording panning one track to the left and the other to the right2 points
-
Nope, app is free for download. They charge only for cabs. It is similar thing to Amplitube CS, you have app and you can try and buy individual cabs or via their web including packages2 points
-
It begs the question why record like that in the first place? Mono instruments most often are recorded by selecting the interface channel for the incoming signal and setting the track interleave to mono. If one forgets to do this, either of these bounce the track using Split Mono channel format, center pan the new audio track and throw away the empty track or set the track interleave to mono will produce a mono track. But to answer the question, one way is add Channel Tools to the FX rack and center the left channel in the plug-in. Select the track and Process > Apply Effect > Audio Effects. Although actually rendering the track is not necessary.2 points
-
It is still down. Now IKM has to extend the GB by at least 16 minutes to make up for the lost sales due to the site being inaccessible.2 points
-
I signed up for 2 buys for the first time yesterday after intentionally waiting. So some are out there... Thinking about also doing a $200 tier by the end of the promo.2 points
-
2 points
-
2 points
-
Added some history background for the SYNTHOX at the OP above for those interested2 points
-
Mothers of Invention - Theme From Burnt Weeny Sandwich2 points
-
That would be unfair getting in the game so late when some have already been removed from the list. Just remember to get your guess in early in the next group buy! 😄2 points
-
Dropouts generate a toast message with a code and a link to the help. This may be useful in diagnosing the cause of the dropouts. As a rule, committing Region FX clips ASAP is a good idea. If one is unsure of the Region FX changes, archive a copy of the original track. Then there is something to fall back to if the Region FX changes need to be undone.2 points
-
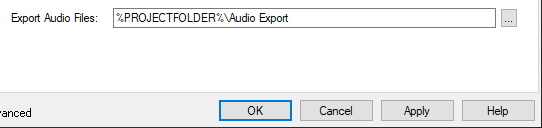
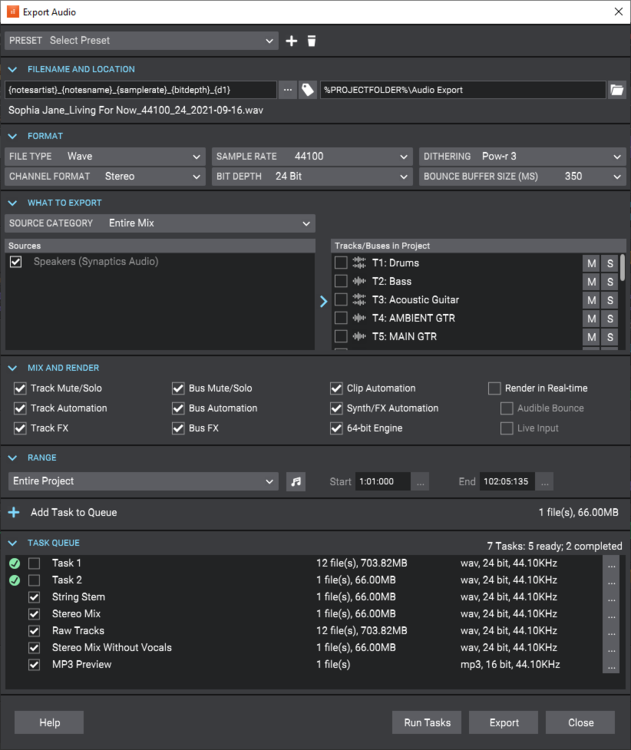
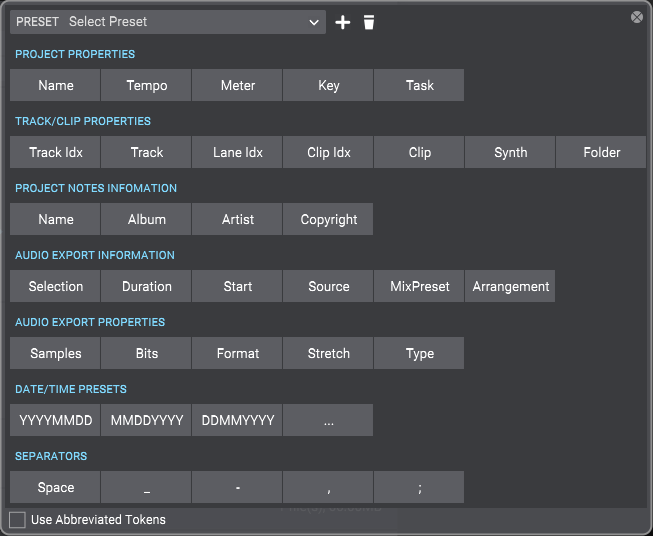
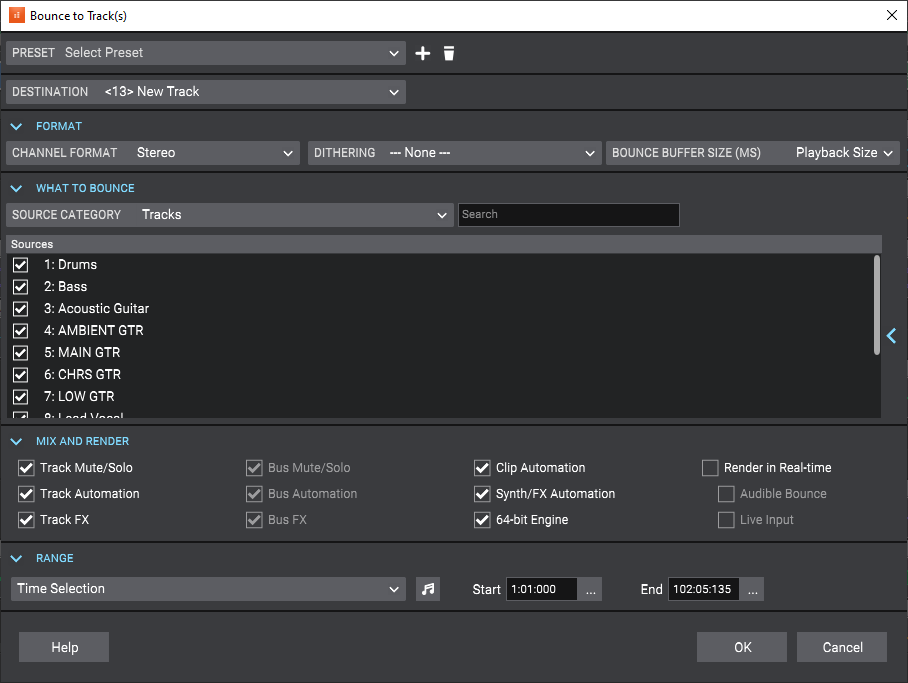
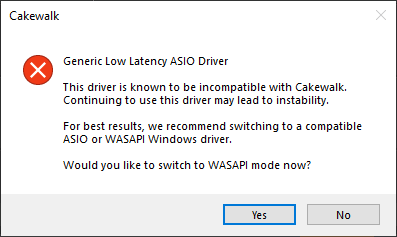
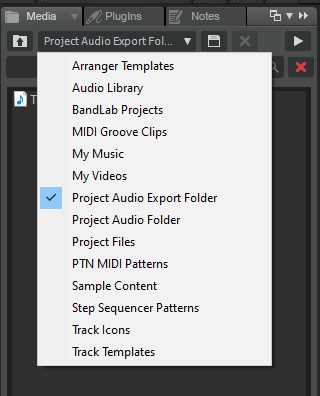
[UPDATE 4-Oct-2021: Cakewalk 2021.09 Update 1 (build 27.09.0.145) now available] We're pleased to announce the 2021.09 release! This release includes enhanced audio file export, batch exporting, filename tokens, completely redesigned Export Audio and bounce dialogs, improved AudioSnap transient detection, several bug fixes and lots of other enhancements and optimizations, all in keeping with our goal of making Cakewalk as reliable and enjoyable as possible. Please note that in order to automatically keep your activation status up to date, Cakewalk will renew your activation status whenever a new version of the application is installed and run for the first time, and when you sign in to BandLab from within Cakewalk. If you have never signed in to BandLab from within Cakewalk, you will be prompted once to sign in. Thanks, The Bakers For new feature details, see New Features. Should you need to revert to the 2021.06 release, you can download the Cakewalk 2021.06 Rollback installer. Update Oct 4 2021: 2021.09 Update 1 (build 27.09.0.145) Bug fixes Stability: S-Gear 2 VST3 plug-in crashes when inserted Intermittent crash when closing Arranger section context menu Exporting audio with plug-ins on a surround bus can hang the export while flushing plug-in buffers In rare cases certain plug-ins could hang export while flushing plug-in buffers Export: MP3 Export Options dialog does not show recalled task settings MP3 Export Options dialog should default to 256 kbps Changes to Notes Browser tab are not reflected in the ID3 MP3 Export Options dialog until Cakewalk restart Export as MIDI exporting whole project if selection at time zero Windows notification sound when opening Export Audio dialog in some projects Export Audio dialog uses default project sample rate instead of actual project sample rate Large bounce buffer sizes cause flatline audio when exporting or bouncing clips with 96K or higher sample rates Export task fails with no meaningful message if drive or path is invalid Export with External encoder was not functional Warn if duplicate filenames in export task queue Expand width of file overwrite prompt when exporting multiple files and make the list scrollable Export as MIDI File should not show audio track warning message Misc.: Bounce to Track(s) dialog forces render sample rate to 44100 always Bounce to Track(s) should always use project sample rate to prevent unnecessary sample rate conversion Bounce to Clips unexpectedly uses bounce buffer size from Export Audio dialog 2021.09 Highlights New export audio features Improved AudioSnap transient detection Misc. enhancements Bug fixes New export audio features The Export Audio feature has been greatly improved and optimized to handle the most demanding rendering tasks. Highlights: An intuitive new UI with collapsible panels to make it easier to get to the most commonly used features,. Task queues for export automation. Complete control over output file names using tag based file name presets. New additional export categories available: "Tracks Through Entire Mix" for track stems, exports the audio from each chosen track as heard through the main output. This is a useful way to create track stems as heard through master effects. "Track Folders" for any non-empty track folders. "Arranger sections" allows you to export each individual arrangement section as a separate audio file. Export uses significantly less memory and runs faster by eliminating making an extra copy of the project in memory. Support for setting the export buffer size independently from the audio driver buffer size. (can speed up export times) Convenient access to select and mute or solo tracks directly from the export UI. Set export time ranges or export entire project directly from the export UI. Automatic effects tail flushing is now part of export/bounce to prevent left over effects tails from leaking into exports or being heard. New default Export Audio Files folder setting in Edit > Preferences > File - Folder Locations. Toast notification on export completion with link to the completed render. More details: Related settings are organized into collapsible panels. The size, position and expanded state of each section is remembered once you close the dialog. The task queue allows you to create multiple export tasks and run them all as a batch. A task in the export queue contains the set of export settings including the mix settings, export file name, selection, location, and the time range. The export queue is saved in the project and can be recalled and re-executed. Any prompts appear at the time of adding the task, so you can run the whole queue without any user intervention. To batch export all tasks in the task queue, click Run Tasks. To export a single job with the current export settings, click Export. Filename and location are shown as two separate fields. Filename is the name of the file you want your exported audio to be called, and location is the directory where it should be saved. When you first open the dialog, the location will be set to the default location as specified in Edit > Preferences > File - Folder Locations under Export Audio Files. The default is \Audio Exports under the current project directory, where the current project folder is indicated by the %PROJECTFOLDER% environment variable. You can change the export directory by clicking on the browse location button , and this location will be remembered for the duration of the project’s session. You can change the global export location for all projects with the Export Audio Files path in Edit > Preferences > File - Folder Locations. Filename tokens. Filenames now support substitution tags for common project and export properties. You can type tags directly into the filename edit box, or use the filename builder pop-up to add them for you. You can still type while this pop-up is showing, so you can mix literal characters with tags, or use backspace to correct any mistakes. Filename presets let you save and recall custom filename formats. The filename itself now supports both literal characters and substitution tags (“tokens”). Substitution tags replace tags within the filename with common project and export properties. Each tag is contained within curly brackets. You can type in the tags directly into the filename edit box, or use the filename builder pop-up to add them for you. It’s worth mentioning that you can still type while this pop-up is showing, so you can mix literal characters with tags, or use backspace to correct any mistakes. A preview of the first audio export filename is shown below the filename edit box. The filename builder pop-up also support filename presets, so you can easily recall a formatted filename by selecting it from the drop-down. As with all Cakewalk presets, you can save new presets, replace existing ones, or delete one’s you don’t want. Export presets can now store a default filename. In the What to Export section, Track Folders has been added as a source category. This setting exports the tracks in each of the selected track folders as heard through the entire mix, as separate files. This provides yet another convenient way to export stems without modifying the source project. In addition to arrangements, individual Arranger sections are available as an export category. This allows you to export each individual section as a separate audio file. Under Format, the Bounce Buffer Size (ms) setting is used to specify the audio buffer size that will be used during export. This value defaults to use the current playback buffer size and can be changed to a max size of 350 ms. While small buffer sizes are useful to minimize latency, they add to CPU load and can slow down export operations significantly. A larger buffer size can speed up the export process in large projects by allowing the CPU to process data more efficiently. Caution: Some plugins can be unstable or crash with large buffer sizes so use this with caution. Depending on the plugins used, we recommend using moderate sizes like 50-100 msec rather than higher sizes. Also if you are using plugin automation, large buffer sizes will not sound smooth if you are using plugins that do not support sample accurate automation. The Bounce Buffer Size settings only applies when Render in Real-time is disabled. The playback latency buffer size is used when Render in Real-time is enabled. Tracks Through Entire Mix has been added as a new source category under What to Export. It exports individual tracks including all downstream bus effects and automation. The result is the same as if you solo one track at a time during export. When exporting multiple files as MP3 or Windows Media Advanced Streaming (WMA) format, the Export Options dialog box has a new Use These Settings for All option that lets you apply the same settings to all files instead of prompting for each file. Export works on the current project selection. The What to Export panel contains a fly-out project selection editor. This allows you to modify the current track selection and the mute and solo status of each track and bus, without exiting the Export Audio dialog box. This is especially convenient if you if you want to create several tasks, each with a different selection, or if you want to export multiple stems. Simply solo the tracks that you want to include in the stem, then add as a new task. A track that is checked means it’s included in the selection. If all the tracks are unchecked, that means there is no selection, and all tracks will be available. Changing the project selection changes which source items are available. A note about selection and the Tracks export category: When the source category is Tracks, the project selection has a special meaning: Having a project selection means there is also a time selection. So if you have tracks selected in your project selection, then all the tracks chosen in your audio source will be exported at exactly the length of the selection. In other words, the length of each tracks’ audio file will be the same. If you have nothing selected in your project, then no specific export time range has been set, and the length of each tracks’ audio file will be the length of each individual track. To the right of the What to export drop-down is a search filter, which lets you search for a particular track, bus, arrangement, section, or Mix Recall preset, should you have a large number of sources to search through. Tip: To quickly select all/none in the source list, hold down CTRL+SHIFT and click any checkbox. To select all, press CTRL+A. To check/uncheck the selected sources, press SPACEBAR. The Range panel specifies the time range to be exported. The drop-down provides the following choices: Entire Project = The entire length of the project. Time Selection = A specified time selection. The Start and End edit boxes allow you to manually enter the start and end times of the export range. Clicking the button to the left of the Start label will toggle between musical and absolute time. The buttons to the right of the Start and End edit boxes will allow you to choose a time based on defined project landmarks, such as the beginning of the project, the now time, or marker locations. Set Time Selection to Loop Range = Set the time selection to the current loop region. Set Time Selection to Punch Range = Set the time selection to the current punch region. Note: The 2021.09 installer will delete the old factory export presets and replace them with new and updated presets. If you have overwritten the factory preset names, those presets will be replaced. Other custom export presets will not be affected. Batch exporting audio files using task queues Using the Export button is fine if you have a single export. But what if you want to tweak your project and export again, or you want several different types of exports? You may want a task for exporting your stems, another task for exporting individual tracks, and another for exporting your final mix as a stereo file. You can now create multiple export tasks, such as stems or different file formats, and add them to an export queue. A task in the export queue contains the set of export settings including the mix settings, filename, location, selection, and the time range. You can add as many export tasks as you like, and run all export tasks as a batch without any user intervention. The task queue is per project and is saved with the project. Adding a task to the queue To create a task, simply go through the normal process of defining your export, then instead of clicking the Export button, click the Add Task to Queue button . This adds a task with the current settings to the task queue. If you are exporting multiple files as part of a task, a list of the filenames will be shown in a confirmation prompt. Any further prompts required for additional format settings will also be shown at this time… that way, you won’t get any prompts when you actually run the task. Once you’ve confirmed any prompts, enter a name for your new task. Simply type the name of the task in, and press ENTER. Tip: The name of the task can also be used in your filename by using the {taskname} tag. Repeat the above steps for any additional tasks you need. To the right of the task name you’ll see the number of files to be exported by each task, an estimated size (if it’s a wave file), and a summary of the file format. Editing tasks in the task queue You can update tasks that you already added to a task queue. To update an existing task: Do one of the following: Double-click on the task within the task list. Click the task’s menu button , then select Recall Task Settings. The task’s settings are recalled in the Export Audio dialog box. Make any desired edits to the current export settings. Click the task’s menu button , then select Update Task with Current Settings. The task is updated with the current settings. All other tasks in the task queue remain unchanged. Renaming a task To rename a task, do one of the following: Right-click the task and select Rename. Click the task’s menu button , then select Rename. Duplicating a task To duplicate an existing task: Do one of the following: Double-click on the task within the task list. Click the task’s menu button , then select Recall Task Settings. This recalls all the task settings in the Export Audio dialog box. [Optional] Make any desired edits to the current export settings. Click Add Task to Queue. Deleting tasks To delete a single task, right-click the task and select Delete, or click the task’s menu button , then select Delete. To delete multiple tasks, select the tasks that you want to delete (Tip: press CTRL+A to select all tasks), then right-click any selected task and select Delete. The task(s) is removed from the task queue. Executing task queue export To execute all checked tasks in the queue, click the Run Tasks button. The tasks in the queue are exported one after another. The status of each task is updated as the queue is executing, and a summary is shown in the task queue header. Once a task is completed, the task is unchecked. Checking a task resets it. Clicking on the Run Tasks button resets all checked tasks before executing each task. While the queue is running, the Run Tasks button changes to a Cancel button, which allows you to cancel the execution of the task queue at any time. The checked status of a task persists when opening/closing the Export Audio dialog box, and with the project. Resetting a completed task Tasks are automatically unchecked on successful completion. To reset a task so it will execute again the next time you click Run Tasks, simply check the task. Canceling an in-progress queue export While the queue is running, the Run Tasks button changes to a Cancel button, which allows you to cancel the execution of the task queue at any time. Opening a task’s export location To open a task’s export location, click the task’s menu button , then select Open Export Location. Using export filename tags and presets You can now use “tokens” to define filenames for exported audio files. Tokens allow you to use placeholder tags that automatically extract the corresponding information (such as the project name, artist, sample rate, bit depth, current date or time, etc.) from a project and adds it to the resulting filename. For example, instead of manually typing the project name and date into the filename edit box, you can enter the following: {projectname}_{d} This will automatically use the project’s name and the current date. Each token is enclosed by curly brackets (aka braces) e.g. {d}. Adding filename tags To enter a tag, do one of the following: Open the Tags panel and click a tag. You can still type while this pop-up is showing, so you can mix literal characters with tags, or use backspace to correct any mistakes. Type in the tags directly into the filename edit box. Be sure to enclose each token by curly brackets (aka braces) e.g. {d}. Tokens are case sensitive. A preview of the first audio export filename is shown below the filename edit box. To see all tokens that can be used to specify the filename, click the Build Filename Using Tags button to open the Tags pop-up panel. To add a tag, click a tag button, or manually type the tag in the filename edit box. Below are some common tokens: Project name = {projectname} or {P} Name field in Notes Browser = {notesname} or {N} Artist field in Notes Browser = {notesartist} or {A} Sample rate = {samplerate} or {sr} Bit depth = {bitdepth} or {bd} Channel format = {channelformat} or {cf} Track name = {trackname} or {T} Track number = {tracknumber} or {t} Date = {d} Tempo = {tempo} or {b} Meter / time signature = {meter} or {m} Key = {key} or {k} Task = {taskname} or {TN} Press the Build Filename Using Tags button to display all available tokens. Most tags have a long token and a short token. For example, the project name token can be {projectname} or {P}. Each tag’s tooltip shows its full and abbreviated tokens. To always use abbreviated tokens when you click a tag, select Use Abbreviated Tokens in the filename builder pop-up panel. You can freely use either format. Tokens can be combined as in the examples below: {notesartist}_{notesname}_{d} {notesartist}_{notesname}_{samplerate}_{bitdepth}_{channelformat}_{d=Ymd} You can combine tokens and regular text, as in the following example: Client Name_{samplerate}Hz_{bitdepth}b_{channelformat}_{d=Ymd} Saving filename presets You can save your custom export filename format as a preset in the filename tag panel. To open the filename tag panel, click the Build Filename Using Tags button next to the filename edit box. To save the current filename as a preset, type a name in the Presets combobox, then press ENTER or click the Create Preset button . To delete a preset, select the preset in the Presets combobox, then click the drop-down menu and select Delete Preset. By using filename tokens to define a naming scheme and saving the filename format as a preset, you can reuse the presets in any project without having to manually type a filename. Misc. export enhancements Improved support for exporting track stems Creating per track mixdowns commonly called track stems is a common post production requirement when exporting projects to audio. There are several convenient improvements to aid with the process of exporting stems without modifying the source project: Use Tracks Through Entire Mix in the What to Export section to quickly exports the audio from each chosen track as heard through the main output. This is a useful way to create track stems as heard through master effects. Aux track and sidechain track dependencies are now automatically included when exporting individual tracks as well as when soloing such tracks. Use Track Folders in the What to Export section, to export the tracks in each of the selected track folders as heard through the entire mix, as separate files. Use the fly-out project selection editor in the What to Export panel to modify the current track selection or set the mute and solo status of each track and bus, without exiting the Export Audio dialog box. This is a convenient way to create export tasks for stems. Simply solo the tracks that you want to include in the stem, then add as a new task. Improved handling of aux tracks and sidechains when exporting or soloing tracks When exporting with source category Tracks, sidechain or aux track sends or outputs are now properly included in the export for the track containing the sidechain. The same applies to aux tracks. When soloing a track that contains a sidechain plugin, any sends from other tracks in the project are now automatically included, similarly to how it behaves with sends to aux tracks. Automatic effects tails flushing during bounce Many VST plug-ins do not properly flush their effects tails via reset state transitions. In some cases, exporting multiple clips or arrangements could result in tails unexpectedly appearing in the export/bounce. To address this, Cakewalk now automatically flushes effects tails during export/bounce operations to prevent left over effects tails from leaking into exports or being heard. By default, tails are flushed until a threshold of -70dB is reached or 20 seconds of silence is detected, whichever occurs first. The dB threshold and max duration can be changed via the following variables in Edit > Preferences > Audio - Configuration File: BounceFlushTailsMaxDurationSec=n (0 to 60; default is 20; set to 0 to disable tails flushing) Effects tails maximum flush length while bouncing (seconds). BounceFlushTailsThresholdDb=n (-120 to -40; default is -70) Effects tails flush gain threshold while bouncing (dB). On export, the audio engine will first hard flush any effects tails from all active plug-ins referenced in the project, including track/bus effects, clip effects, effects chains, ProChannel as well as instruments. Flushing tails is done both pre and post bounce/export in order to prevent unwanted tails from sounding after a bounce or appearing in exports after playing a project. Effects tails flushing is done in efficiently using parallel processing when the multi processing engine is enabled and is normally very fast. Flushing progress is shown on the toolbar during the bounce. If you wish to disable this, set BounceFlushTailsMaxDurationSec to zero. Default ‘Export Audio Files’ folder A new Export Audio Files folder path has been added to Edit > Preferences > File - Folder Locations. This path is used as the default location when you open the Export Audio dialog box. The default path is %PROJECTFOLDER%\Audio Export, which is an \Audio Exports subfolder in the current project directory. The current project folder is indicated by the %PROJECTFOLDER% environment variable. Tip: If you change the folder path in the Export Audio dialog box, you can restore the %PROJECTFOLDER%\Audio Export path by opening Edit > Preferences > File - Folder Locations and clicking OK or Apply. There is also a new content location preset in the Media Browser to jump directly to the Project Audio Export Folder. This preset always takes you to %PROJECTFOLDER%\Audio Export. Toast notification with link to open export location Upon completion of a single export job via the Export button, a toast notification appears with a link to open the export location in Windows Explorer. If the toast notification has been closed you can reopen the project audio folder again by selecting the media browser content location preset Project Audio Export Folder. Updated Bounce to Track(s) dialog box The Bounce to Tracks(s) dialog box has been redesigned similar to the Export Audio dialog box. Improved AudioSnap transient detection The transient detection algorithm has been greatly improved to more accurately detect audio transients in a variety of source material. Transients are useful when using audio snap and are also used for time stretching as well as when snapping to the transient pool. The AudioSnap transient detection method can now be specified in Edit > Preferences > Project - AudioSnap under Transient Detection. There are three methods: Magnitude Spectral (default for legacy projects) Multi-Resolution (default for new projects) Multi-Resolution is the new default transient detection method for new projects, and Spectral and Magnitude are the older legacy modes. The Multi-Resolution transient detection algorithm provides improved transient analysis that works well with most audio source material. The detection mode is stored in the project and older projects will continue to use Spectral until changed via Edit > Preferences > Project - AudioSnap. Note: The new transient analysis will not be used by default on previously saved projects. You must explicitly pick the Multi-Resolution algorithm from Edit > Preferences > Project - AudioSnap before this will take effect for that project. Once you resave the project with this change it will continue to use the new algorithm for all audio. When the detection method is changed, you will be prompted that project audio waveforms will be recomputed. After regeneration of the waveforms are complete, the new transients will be visible when switching the edit filter to Transients. The default transient threshold (available in the AudioSnap palette) is different for each transient detector mode. Note that any edited transients are retained when switching the transient detector mode. Misc. enhancements Mackie Control revspread VPot DataType On the Mackie Control surface, a VPot’s datatype defines the type of control being edited and how it should be displayed on the VPot LED halo. Currently, the Mackie Control surface supports a spread DataType for the LEDs that surround the VPots. The LEDs start in the middle for small values, then "spread" around the VPot for larger values. With certain parameter types, such as an equalizer "Q" setting, where a small Q value means a large spread, and a large Q value means a narrow spread, the VPots show the opposite in the LED spread, which is confusing. To address this, the Mackie Control surface now supports a new revspread VPot DataType that can be assigned in MackieControl.ini (C:\Program Files\Cakewalk\Shared Surfaces). With the revspread VPot DataType, high values show a narrow LED spread, and low values show a wide LED spread. This doesn't affect the actual numerical value being shown, just the way the LEDs spread around the VPot. For details, see the instructions in MackieControl.ini. Allow multiple MIDI files to be dragged into a project simultaneously You can now import multiple MIDI files into a project by dragging from Windows or the Media Browser. By default, multiple tracks are created. To import back-to-back instead, hold down CTRL+SHIFT when dragging the MIDI files into a project. ASIO driver compatibility checking Some ASIO drivers, such as Realtek ASIO, ASIO4All and Generic Low Latency ASIO Driver, are known to be incompatible with Cakewalk and can lead to instability or crashes. Cakewalk will now detect use of known incompatible ASIO drivers and warn the user to switch to a different native ASIO driver or WASAPI Shared mode for a better experience. Note: This warning doesn't prevent you from using these drivers. If you need to use them for some reason you can still select and use them. Bug fixes Stability Crash Freezing Track with synth in project Crash when bouncing with sidechain FX Crash exporting user project as OMF Crash when cloning track with synth envelopes UI Aim Assist draws incorrectly after collapsing/expanding MultiDock Arm Tracks command arms hidden audio track in Instrument tracks Aim Assist can appear unexpectedly when turned off Selection module does not automatically update display after setting display times to SMPTE Misc. Process slide not sliding some track envelopes Paste Special behaves unexpectedly when combining Paste to One Track and Paste Into Existing Clips When the Snap module set to Measure or any value below that in the list, the Snap Value drop box fails to turn snap on/off Save Copy As MIDI interferes with project cwp save Last File 1-4 key bindings are all linked unexpectedly Unable to copy/paste multiple Arranger tracks between projects Modal message boxes do not always disable the main app window Cannot copy special selection with tempos from SONAR to Cakewalk Latest release notes are here. See prior release notes. Check out all new features released to date.


 2 points
 -
NEXT STEPS FROM LABS 72 HOURS ONLY SAVE 40% ON YOUR FIRST SPITFIRE AUDIO LIBRARY* USE CODE LABSFIRST40 AT CHECKOUT Take your music whole new places with your first Spitfire Audio library. Recorded in the same studios as major Hollywood film scores, Spitfire Audio libraries offer unparalleled inspiration, expression and control. *Exceptions apply.1 point
-
Thanks for a great update guys! It is really appreciated! We're not worthy... but we'll take it anyway! 😁1 point
-
That's the best way (IMO) to do a cover - reimagined.1 point
-
In fact normally to have fully working WoS you would have to buy at least 1 cab (~8 EUR with VAT). But as they are giving away a pack of cabs so you have all free. It was how it always worked before because - you are right - the current info page is pretty confusing. Here is their explanation about it https://support.two-notes.com/knowledgebase.php?article=2801 point
-
From what I have seen the range of uses for Modulation (CC01) early on was rather small--Low Frequency Oscillator (LFO) to something like volume for a tremolo effect where the mod wheel controlled the amount [or depth]. But the range of uses has greatly expanded over the past few decades. I have a number of soft synths that use mw (mod wheel) to affect timbre in any of a number of ways, especially brightness / cutoff frequency. Often in contemporary soft synths, different presets will use the wheel to control different effects. In many cases its really up to the individual sound / patch / preset designer. See scook's reply. Hardware and Software Documentation will give you more ideas as to how the mod wheel can be used. BTW, even if a piece of hardware is coded to output CC01 from the wheel, it can be remapped via software.1 point
-
For plug-ins that process MIDI data some are hardcoded to respond to CC1 is a particular way others allow the user to map CC1 to a function This should be in the plug-in documentation. CC1 may be used at the DAW level for remote control1 point
-
Thanks, I appreciate it. I have heard of them before, but I'm not familiar with any of their songs. I do like that distorted guitar, though. Dig the breakdown at about 2:57.1 point
-
I disabled AVG in a test. It might have made a slight difference. I wasn't getting any full fledged drop outs but was getting some significant stuttering. That may also have been the fact that I was on a fresh start up of the computer.1 point
-
Love it! Love the original, but this is so different and interesting. Well done!1 point
-
Been a Beatles fan since 1967....the music is excellent in creating the mood you wanted as are the vocals, really like the singer....the playing, percussion, riffs and production are all great....it's just, imho, the music is not in agreement with the lyrics...which is, i assume, exactly what you wanted. so, as a long time Beatles fan i would pass but this being the 21st century the zeitgeist is not what it was 54 years ago.1 point
-
I think you missed that mine was reference history post for lowest price: On 6/21/2021 at 7:47 PM, cclarry said1 point
-
I think it sounds really good, I might increase the bass just very slightly again but I like a big bottom. Nice work.1 point
-
1 point
-
Would be nice if IK could step up and update MODO Bass to include an Upright:)1 point
-
That was my impression. May be adding "preferred communication language is English" to the TOU as well as one single "International" board (for those who don't want or can't use English, threads like this one can be moved there instead of deleting or confusing some people) is a good idea. But that is up to BandLab. I am so used to be in multi-lingual environment (up to 5-6 different languages in parallel within one room) that I don't feel anything unusual once someone write/speak in any language (known or unknown for me). But I understand that can be confusing (as it was for me 25+ years ago). What I find really confusing is proposal "please write in English" (written in English) to someone who has used some other language... And even more confusing the same proposal to someone who has replied using the language of the question... That make no sense for me (unlike for example a suggestion to repeat the question in English, written in original language).1 point
-
i guess the essential or assistant versions support poly-midi conversion but not the actual poly editing. that's good to know. one trick is to copy the part to be converted, into a new clip, and cut the LF and HF so you get mainly dull notes without rumble and squeaks (unless you need the harmonics which may need more HF to properly "appear as notes"). then commit the EQ to the clip. then drag to midi track or create a region fx. this generally helps the algorithm find the notes better which seems to create cleaner midi.1 point
-
Please Don't Post your songs in other peoples threads, if you have a song or tune to post post it in your own thread. Inappropriate language and behaviour breaches the terms of the forum. Posts or entire threads that breach the terms will be removed with possible consequences. All covers of published music should be licenced where applicable.1 point
-
Well, I'm a guy on a forum AND a professional mixer, as well a mastering engineer who's mastered hundreds of tracks, one of which won an award, and one of which was nominated for the Hollywood Music in Media awards. So I've around the block a few times I've done a lot of research on stereo placement. My favorite tool for doing so is using an M/S encoder, putting the sides in mono in one track, the center in mono in one track, and comparing with exclusive solo. This makes it easy to tell who's doing LCR panning (which has more than one meaning , it also relates to live sound). Doing this also reveals two major philosophical differences in mixing. For example in Madonna's "Ray of Light," the main guitar and synth are panned hard left and right. The sound seems like it explodes out of the speakers, and leaves lots of room for the center voice/kick. It sounds nothing like a live performance (of course, not that there's anything wrong with that). LCR is also good for giving a "vintage" vibe because with limited tracks and ancient mixing consoles, your only choices were left, right, and center. Another advantage of LCR is it translates well over different systems, because you're not dependent on nuanced stereo. When you listen to someone like Peter Gabriel, the sides are used more as a frame around the center to provide ambience. This sounds more live, and flatters the voice because it's the center of attention - it's not competing with the sides. If you hear the way Gabriel and Madonna handle the voice, there's no doubt who wants to put the center of attention on the vocal more than the production. I feel both artists made the correct artistic decisions. Or at least, that's the way I would have mixed them. My personal reference for mixing is live music, for two reasons. First, when someone listens to my music, I want them to feel they're watching a performance. Although I'll place sounds toward the left or toward the right (sometimes quite a bit toward the extremes), I never pan hard left and right because that's not the way live music sounds. Second, if I ever play the music live, I want to be able to reproduce it so it sounds at least somewhat like the album. As to stereo wideners, I totally disagree it's a band-aid if it's based on mid/side processing, not phase differences, which seems to be what the guy in the video is referring to. No one considers mid/side miking (which uses the same principle as quality wideners) a band-aid or amateur technique, in fact, it's considered rather advanced because of the options it gives on mixdown. Of course, you don't want to "widen" things to 200% of the width, but just a little bit can open up some space in the center that would be difficult to do otherwise. However, I prefer a more DIY approach, where I encode the signal into mids and sides, process those components separately, then decode them. For example, I just re-mastered an album by Martha Davis for vinyl. By separating it into mid and side components, I could make sure the bass was 100% centered, as well as keep extraneous bass out of the sides. By increasing the highs a bit on the sides, because highs are more directional, the apparent stereo width was greater. When done this way, it also collapses perfectly into mono, which I also consider important. I could go on but that's enough for now. Feel free to check out my latest album project (link below), which is selective in the approach to panning, and combines the two techniques. Some parts within a song are more centered; in some songs various instruments are panned much more to the sides. I feel the variety makes the album more enjoyable than if everything was panned hard left/right, or treated strictly as framing for the center. In other words, pan, don't pan, widen, narrow, whatever will best serve the song - which will tell you what it wants if you listen hard enough. And whatever the song tells you will be more appropriate than anything you read on a forum, or hear from a guy who knows how to post a video. Good luck with your projects!! https://youtu.be/ONQkKQcuego1 point