


Rickddd
-
Posts
55 -
Joined
-
Last visited
-
Thank you for weighing in because I was able to install .06 that way. There's still a follow-on issue - the 11MB prochannel won't install. No error message, just never installs. I did try to install it as well from the CPC. But I got that new .06 version and that is great. THANKS!
-
I tried to upgrade my 2025.05 to the new .06. The error message I immediately get is "Requires Cakewalk Sonar Version 2025.05". But that is the one I have. On thing that may have initiated this is I saw a 11MB prochannel update that I installed first. Maybe that screwed things up. Help.
-
A week or two ago's update introduced, for me at least, a slightly erratic FX dropdown behavior that is starting to give me a headache. I used to program drop down menu's like the ones that Sonar uses, and it appears to me that the timing has been adjusted. That is, how long the FX menu stays down before it takes action to reconfigure. Normally, a drop down menu should adjust quickly, but not so quickly as to be instant. If it's too quick, then even the slightest miss pointing of the mouse causes the dropped-down menu to snap back. Since the last update, it's instant. As a result, it takes a lot more effort to navigate the menu. A lot of times I now have to "try again" to get the menu choice I desire. At first I thought it was just me, but nah... something definitely has been "adjusted" menu timing wise. Just thought I'd mention and hopefully this will be taken care of in the next update.
-

[solved] fit project to window /song duration too long
Rickddd replied to Sakini's topic in Cakewalk by BandLab
Thank you. I've tried to delete the intervening space, but I was not adding the Ripple Delete "magic sauce". Yum!!!!! Thank you so much Bristol!!!!! -
[solved] fit project to window /song duration too long
Rickddd replied to Sakini's topic in Cakewalk by BandLab
Help. I really don't use arranger tracks. Is there any other way to fix it such that when I select "fit project" it will fill the pane with the actual project width wise instead of crunching it because of something out in the distant right which was never purposely put there. Showing my years here, but I did not have this issue way back in my sonar studio/platinum era. I'm sure there's an easy way to do it or I am doing something wrong. I hope! Any thoughts? -
Thank you for showing how to fix this. I now have mine unchecked. I felt that the resizing feature was not intuitive. Love a lot about Sonar but that was one feature I found decreased rather than increased my mixing efficiency. It certainly was annoying. But happy happy happy now!
-
How to remove automatic underscore in saved file name
Rickddd replied to Rickddd's topic in Cakewalk Sonar
Thanks David, but I've tried as many variations as I could think of, with the same results. As a BTW, exporting audio out of Bandlab sonar still works fine. Thanks for suggesting however. Much appreciated. -
How to remove automatic underscore in saved file name
Rickddd replied to Rickddd's topic in Cakewalk Sonar
Below is an example. I typed in smith.wav, and you can see what it turns into. Rick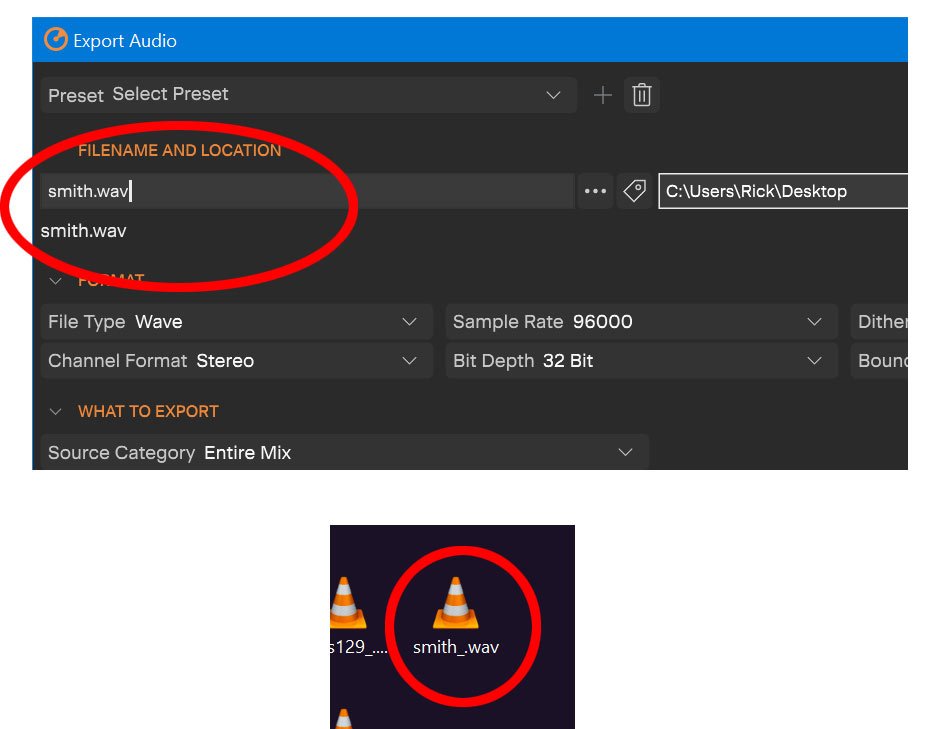
-
A month or two ago I noticed my exported audio file names are automatically appended an underscore, e.g., smith__.wav instead of smith.wav. I figured this is some kind of default setting that came in on some Sonar update, but I can't seem to find where to undo it. Can anyone help? It's a minor thing I know but after the 1000 time renaming the file after export it starts to add up the wasted time... I probably caused it, but it would be great to get rid of it. Thank, Rick
-
When is Sonar going to have some new toys to play with?
Rickddd replied to Cannimagine's topic in Cakewalk Sonar
I've been using Sonar since the before times, and up to last year I never would have plunked down money for the full Kontakt, for the same reasons. Then... with the help of a friend, I discovered that there is a world of 3rd party instruments that ONLY the full Kontakt will play. Now that I discovered this, it's opened up a new world for me instruments wise. -
Hearing a live instrument (e.g., guitar) while running Sonar
Rickddd replied to Rickddd's topic in Cakewalk Sonar
"Did you ever know that you're my hero And everything I would like to be? I can fly higher than an eagle For you are the wind beneath my wings" Bette Midler said it far better than I could ever say it. Thank you @Xoo!!!!!!!!!!!! -
I'd like to do something that I'm confident I was able to do way back in original sonar days, but don't know how to in Cakewalk Sonar or Cakewalk bandlab. 3 scenarios... scenario #3 is the head scratcher for me. 1. With sonar running, On a track, with the record buttons engaged and monitoring turned on I can happily hear my guitar playing live. Works! 2.On a track, with sonar sitting still and the track record button engaged and monitor engaged, I can happily hear my guitar playing live. Works! 3. With sonar running, On a track, with the record button NOT engaged and monitoring turned on I can no longer hear from guitar. The head scratching part is that as best I remember, years ago I could do #3. And without #3 if I want to practice a part, I have to do some "fake recordings" to hear myself. All advice welcome! Rick
-
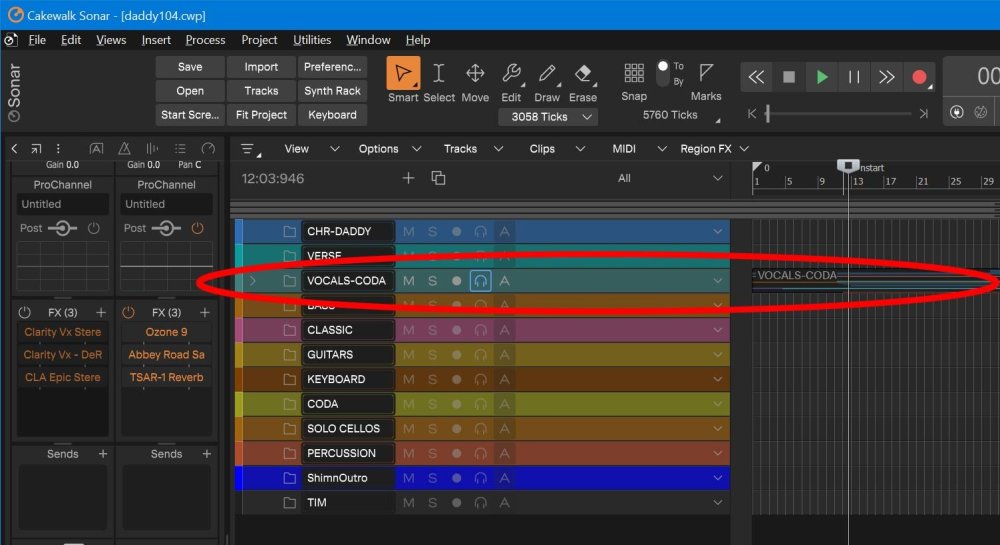
Ever since I started using Cakewalk Sonar over Freebee Bandlab, I've run into one issue on rare occasions. Perhaps I've been using the new Cakewalk for some 6 months. What I am about to describe has happened maybe 3 or 4 times in that 6 month period. Note that I am an avid user, and I am on Sonar mixing etc probably 5 days a week. What happens is this: After setting up track folders and using them with delight, all of a sudden and with no apparent reason, all the tracks move to a single track folder. In each instance, the issue was not observed while I was using the project, until I reopened it. Maybe I'm accidentally putting them in (if that is possible it would be nice to have a prompt that warns multiple tracks are about to be moved.) I would add that it is always an "all" affair - that is - never just a few or many tracks moved. They all are moved into a single track folder. Note that once the "transformation" is done, and saved, opening the project again does not fix it. It is locked in that position. When I open a file that has been so saved in bandlab cakewalk, it also opens with everything in the same track. Any thoughts?
-
Differences Between Sonar & Cakewalk by Bandlab
Rickddd replied to Jerry Gerber's topic in Cakewalk Sonar
Oh that's terrible! Question: is this a fact or conjecture? -
can't sign into Bandlab from Cakewalk, Get Error Message
Rickddd replied to Rickddd's topic in Cakewalk Sonar
I would like to thank those wizards in the sky who fixed the problem. I am whole again. Working perfectly this morning.


