Search the Community
Showing results for 'Ripple'.
-

Alright Already, when Is Sonar being released!!
Starship Krupa replied to jesse g's topic in The Coffee House
IMO, unless Sonar comes out with a bunch of new, major features, it's now playing in the under $100 leagues, not the $199 leagues that it was in 6 years ago. Yes, it's gotten a ton of much-needed bug fixes and smaller new features (nested folders, ripple edit indicator, and on and on). But the only major ones I can think of are Arranger and Articulations. The competition is now Mixcraft, REAPER, Studio One Artist. Still no sampler, no chord track. We'll see what the future holds. I've been a fan of the current development and licensing models. -
Thanks everyone for your kind feedback. I actually now have a remix where I fixed so very very small things that bugged me. First was the very first tick was not loud enough because it was on zero of the time line. I was apprehensive of turning on Ripple edit and dragging the whole song 1 measure but it worked. The other was in the 2 measure of the organ solo I was hearing something wrong. Looking at the midi data I couldn’t see anything out of place. So I thought I’d just re draw the glitch note and after I deleted the note there was a hidden note underneath! That’s what caused the cut off. This is why it takes me 20 years to finish songs. Take Note that I updated the link to on Sept 16 2023 to fix these few mistakes.
-
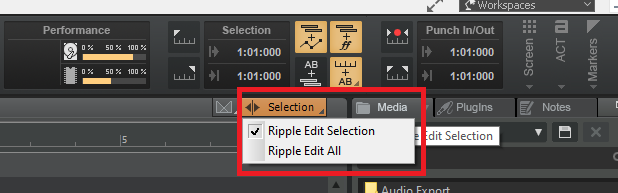
Ripple Edit will delete the hole, shifting everything along to close the gap. Use Ripple Edit selection to only affect the current / selected clips, or Ripple Edit All to affect all tracks. Remember to switch it off afterwards though!
-
Cakewalk has some great features to speed up editing when it comes to dialogue! So, whether it's a podcast, an audio book, or voice over... Cakewalk by BandLab has you covered!
-
Background: I'm practicing at playing in a string instrument. My keyboard skills are basic. I would like to edit piano roll to correct timing and duration issues. My humanization needs some taming. I would like to lengthen or shorten a note and have the rest of the midi sequence slide over to maintain the rest of the sequence. I've seen ripple applied to audio and video. I've googled every term I can think of ... Thanks for any help.
-
 I think there is a way. Select all and ensure no clips are position locked Drag in the timeline to select all clips on all tracks to the left of the "insert point" Position lock the selected clips Enable ripple edit Insert the extra measures where you want to Disable ripple edit Select all clips and ensure they are not position locked
 -
 Seems simple to me. Turn on Ripple edit. Split the song and drag the right hand part 2 measures. TURN OFF RIPPLE EDIT! Important. Now any audio notes that got chopped off at the split point on the left, you slip edit them to the right until they end. Same with midi notes in PVR. Then go to the split point on the right and slip edit those little leftovers out of the new start point. Of course this would take less than 3 minutes on one of my 12 track songs, If your project has 100 tracks then you have my sympathy. There's always 10 ways to do the same thing in Cakewalk.
 -
How to automate volume but still use the track volume slider?
John Vere replied to T Boog's topic in Cakewalk by BandLab
Glad you sorted it out as that old thread sort of ended with no solution. There was a lot of long time users and all of us were sort of stumped. @Kalle Rantaaho was the closest to figuring it out as all fingers pointed at some sort of internal routing issue. I have never used Offset mode so I would have to look it up to understand what it actually does. Sound like something I would defiantly use with extreme caution, like Ripple Edit. The Gain control is often overlooked. It is actually the most important setting on a channel strip. 45 years of live sound mixing teaches you that. You have 8, 12, 16, 24 channels of live inputs, You need to get a mix happening FAST. At sound check- , Mute the Mains, use headphones, you set all the faders at unity and musician, instrument, channel by channel you solo and use the input gain to put the meter where you want it. During the show you are constantly tweaking the gain keeping an eye out for peaking. Once every channel is set at the same input level the mix will be 90% balanced. Even the monitors will be easy to set. That input gain is the way to achieve a balanced mix without touching a fader. I set a basic target, nothing is to go over -6db. Average should be around -10 or -12. Vocals will need the most work and a touch of compression to catch peaks but I will also edit the track with clip gain ( actually I use Melodyne now) to get rid of those manually. It was mentioned that you would not use the gain to turn down a track because it becomes lame, and with that I absolutely agree. To a point So to clarify, turning down a track that doesn't have dynamic effects on it is harmless. What I am saying is all your tracks should be optimized and set at the target level long before you would be automating a fader. This is the Gains purpose. And yes you need to be aware of how the gain will interact with compressors. This is all part of having a workflow that keeps that signal chain in mind at all times. Remember, adding any effects can change the output of the track especially EQ. Its a balancing act of making changes and keeping an eye on that peak level. You want to hear that compressor working? Then keep the gain up and use it's output to maintain the peak. Always observe the peak readings that are found in your effects like in the Pro Channel. Don't clip anything! Keep that fader at unity as you work. Look at the console view to observe all your faders Play the song and observe each tracks peak and hold readings. They should not be exciding your target levels. I have different targets for different types of tracks. Example Keyboards @ -12. Bass and drums @ - 6. Same goes fore the buses. If they are peaking go find the hot spots and either fix them manually of use a compressor /limiter. Then you can start automation to bring stuff in and out of the mix. This step should be the last thing you do. Tip- Mix recall is your friend if you want to start over but don't want to loose the currant mix and all it's effects and automations. -
Ok here’s some answers to how to prevent it from happening . 1- Don’t go for lunch leaving Cakewalk recording. Yes we all do this once. 2- Don’t forget to stop when recording midi parts and then hit your controller at 2 minutes after the song ended. 3- Check that your midi controller is not randomly sending controller data from the joystick. 4-Pay attention when copying and pasting where the paste has gone if it isn’t what you wanted. 5- Always check the Undo list when something you pasted didn’t seem to work. It might have landed on measure 400 6- Don’t use Ripple edit on a complex project 7- Hidden tracks? 8. Your Cat found the R key. 9- Keep projects tidy
-
.thumb.jpg.eaad641f73d276ceb5533b13026779ae.jpg)
How to automate volume but still use the track volume slider?
T Boog replied to T Boog's topic in Cakewalk by BandLab
Thanks Scook. I only had a few mins to try the offset mode but I was sad to see it affected all the tracks and zeroed out the pan knobs visually. I thought there would be a simple toggle per track(like a pre/post kinda thing) that allows u to adjust an individual track slider independent of it's volume automation. Although I don't fully grasp the envelope/offset thing yet, it seems to be kinda all or nothing. The gain vst is a great idea but I can't imagine having to add it on every track I automate volume on. John suggest using the gain knob but I find that changes the quality of the tone too much. I guess I'll spend some time in offset mode and see how it works out. I'm just hoping it doesn't cause more mishaps for a noob like me. (I'm still traumatized from the Ripple All setting 😫) -
I've never lost MIDI spontaneously in all my years except by my own mistake. If you're seeing this in the PRV, it could be due to having Hide Muted Clips enabled, but that would not affect the Track View. The most likely way of actually deleting something indirectly is by having Ripple All enabled when you delete something in another track. Other possibilities would be moving it to a hidden track or inadvertently slip-editing the clip down too nothing or maybe executing Bounce to Clip(s) while it's muted. For future reference, I always advise using Save As to preserve earlier versions of a project as it develops in order to avoid saving irreversible edits. If you haven't already re-saved the current session, you should Save As with a new name now and check the last saved version.
-
 We imported 16 track Fostex E-16 recordings (16 .wav tracks of 30 minutes) into a Cakewalk project. When we cut a 3-4 minute songs into new projects it copies the original 30 minute .wav file for the tracks to the new project. Right now I'm just about to see if Audacity can split the tracks up into individual .wavs of 3-4 minutes. We played with different ripple settings and delete hole but it hasn't helped.
 -
Try Move Now to the expected end of the project Select ALL Select From=Now Enable Ripple Edit All Press the DELETE key Turn Ripple Edid off
-
 There's an old post on how to fix this problem using ripple edit and that usually works for me but it's not this time. I usually have bus tracks hidden but when I showed them today, there are some kind of automation lines or something on bus tracks that continue way beyond the end of the project. Does anyone know what they are and how to get rid of them? Thank you
 -
EDIT: Please see last post for latest updates. Tons of improvements and fixes. Version 6.2 Release Notes (July 18, 2023): New features and improvements: ● “PreSonus Sphere” renamed to “Studio One+” ● Arrangement and Editing o Auto Zoom in Arrangement and Editors o Independent editing of Takes on Layers o Additional tools on Layers (Eraser, Paint, Mute, and Bend Tool) o Move and copy ranges between Layers o Consolidated Takes and Layers menu o “No overlap” option applied to Events on Layers o Option to display Layer name for Tracks and Channels o Improved naming and numbering of Takes on Layers o Event FX context menu for Audio Events o Crossfades for selected ranges o Improved “Tape” time-stretch editing o Song End marker with Stop function o Scale Highlighting in Note Editor o Color Note Events by Scale o Distribute Lyrics to Notes in Score View o Stretch Part Automation when resizing Notes o Arrow Tool options for Note Editing o Modifier for temporary Split Tool o New “Event Editors” folder in Browser for ARA-enabled plug-ins ● Mixing o Copy FX plug-ins including automation o Linked Polarity buttons on stereo Channels o Disabling Folder Track disables linked Bus o Mute/Solo link between Folder Tracks and linked Busses o Search bar in "Add Insert" dialogs ● Macro Toolbar and Organizer o Link to assign keyboard shortcuts from Macro Organizer o Multiple sort options for Macro lists o Text search for filtering Macros by name o Consolidated Macro Toolbar settings menu ● General o [Studio One+] Extended live notifications for Community messages o Customization preset selector for additional smart templates o Edit channel assignment for multiple selected tracks simultaneously o Delete command with no event or range selected now deletes selected track(s) o Event badge on Folder Events is now shown when folder is collapsed o New option to disable Dropout Protection completely - not recommended for regular use o “Send MIDI Clock” option for hardware controllers o Added Sensel Morph and Expressive E Osmose devices o Additional presets for Ampire and Pedalboard The following issues have been fixed: ● [macOS] Random crash when trying to open the panner pop-up from context menu ● [Track Presets] Some Pitchlist presets are not restored properly ● [Windows] SoundCloud client freezes when uploading from the Project Page ● “Add Tracks” dialog audio output list order changes when the master and listen bus positions are reversed ● Applying crossfades for short ranges is not accurate ● Audio not playing back when switching time stretching mode in certain situations ● Can’t create custom folder in Browser under "Track Presets" ● Deleted Volume and Pan automation of a bus folder return after reopening song ● Drag and drop stomp effects from Ampire to Pedalboard does not transfer parameters ● Event playback drops out after transforming to rendered audio in certain situations ● Focus issue with certain user macros created in Studio One 5.x ● Inspector panel size is not remembered correctly ● Japanese translation errors ● Lyrics not syncing correctly with 2nd and 3rd notes in 1/8 Note Triplets ● Note event editing via numeric input not working below bar 1 ● Metronome routed to Main Out no longer enabled on Listen Bus by default ● Mono button on Main Out doesn't work when Listen Bus is active ● Plus symbol is shown when removing effect via drag&drop ● Ripple Edit on video track causes overlaps instead of swapped events ● Scripting error in Tascam Model 12 device ● Track/Channels are not muted when muting folder or bus ● User interface becomes unresponsive when FX Chain loads too long ● X-Trem presets can set Pan mode on mono track New commands: ● Edit - Toggle Note Audition ● Track - Layers follow Events ● Track - Unpack Last Take to Layer ● Track - Add Bus for Folder Track ● Track - Add VCA for Folder Track ● Track - Layer follows Events ● Zoom - Toggle Auto Zoom ● Zoom - Toggle Auto Zoom Full ● Zoom - Toggle Auto Zoom Horizontally ● Zoom - Toggle Auto Zoom Vertically ● Zoom - Zoom Full Vertically
- 20 replies
-
- 6
-

-

-
- presonus
- studio one
- (and 1 more)
-
-
Yay, I figured it out! Thank you, again, for the documentation. I do have another quick question, if I want to delete all muted clips, can I do that in one fell swoop? I tried right clicking and selecting "Delete muted clips" but it deletes all of the audio. How do I delete all of the muted clips in the take lanes at once? Thanks! ***Nevermind*** I figured it out, just turn off Ripple edit and it works perfectly!
-
I wonder if you have some automation event or something off the end of your project that is making the project think this is a super long track or something? Turn on Ripple Editing and set it to All (look for the icon up near the top right of the track view). Then, click at the end of your project and go to Edit > Select > Thru = End This will select every part of your project past where you clicked. Then press delete. Make sure you turn off Ripple Editing! Save your project and try uploading it again. This will at least rule out some length issue as one potential failure point.
-
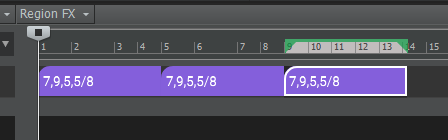
How? Time signatures and tempo changes are independent from the Arranger Track. After fiddling around with that a bit, I see what you mean. It's fairly easy to break, however. Here's what I mean. Here, I want a sequence that's 7/8, 9/8 then 5/8 twice. I do the time signatures first, then create the section. Then I start duplicating it so it repeats in this sequence. The first and the second do that, but... For some reason, the third one decided it doesn't want to do that. It only respects that if I duplicate the first one and only the first one. Sure, you could use Ripple Editing to do that and, while that does work, you're not safe from the same issue: Why did it do it right until bar 20, then it stopped working? Simply because I wanted to make the workflow faster and copied more than one section.

-
If you go into Views > Meter/Key, what do you see? It's possible that there was a time signature baked into your default template that has 4/4 already in there (worth checking that in a new project made from that template). Possibly something to do with Ripple Edit being on and things shifted along?
-

bug report I'd like to talk about a very, very old bug.
OddSox replied to OddSox's topic in Cakewalk by BandLab
It seems to work fine for all tracks except for the arranger track. with 'ripple edit all' option my sections in the arranger track disappear after pressing delete key, with 'ripple edit selection' the sections remain in place and they are not shifted. but I found a workaround. basically the problem is that I don't have a section within the selected part and before it so I just made them! and now it is working correctly. I still think this doesn't work the way I imagine it should but at least there is a simple workaround. thanks again for all your suggestions and help! PS. I noticed on your profile your birthday is April 2. So is mine! 🍻 -
When I listen back to a project I'm finding some clips moved much further down the timeline than they should be. Ripple edit is always off, I make sure of that. Is there any other reason why this would be happening? It's probably user error but I don't know where to start looking for an answer. Thank you
-
Make sure Ripple Edit All is not enabled.
-
Sounds like you've got ripple edit on - turn it off.

-
 According to CbB documentation: "Caution: Ripple editing can cause unexpected results when editing multiple tracks, so use caution and check the results before you proceed with additional edits." Source: http://www.cakewalk.com/Documentation?product=Cakewalk&language=3&help=Arranging.22.html Recently I have used ripple editing to edit 4 track podcasts but not so much to cut sections of bigger projects. Everyting seems to work perfectly but the documentation hints of possible problems. What's your experience with ripple editing? Can you trust it without checking results and making backups every time? How does it deal with varying time signatures and tempo maps, stretched clips, audiosnap enabled tracks, frozen tracks etc.?


.thumb.png.cdc79b2d9ae925373019871bec794f76.png)