msmcleod
-
Posts
6,131 -
Joined
-
Last visited
-
Days Won
26
Everything posted by msmcleod
-

How to bounce multiple tracks to one new track
msmcleod replied to norfolkmastering's topic in Cakewalk by BandLab
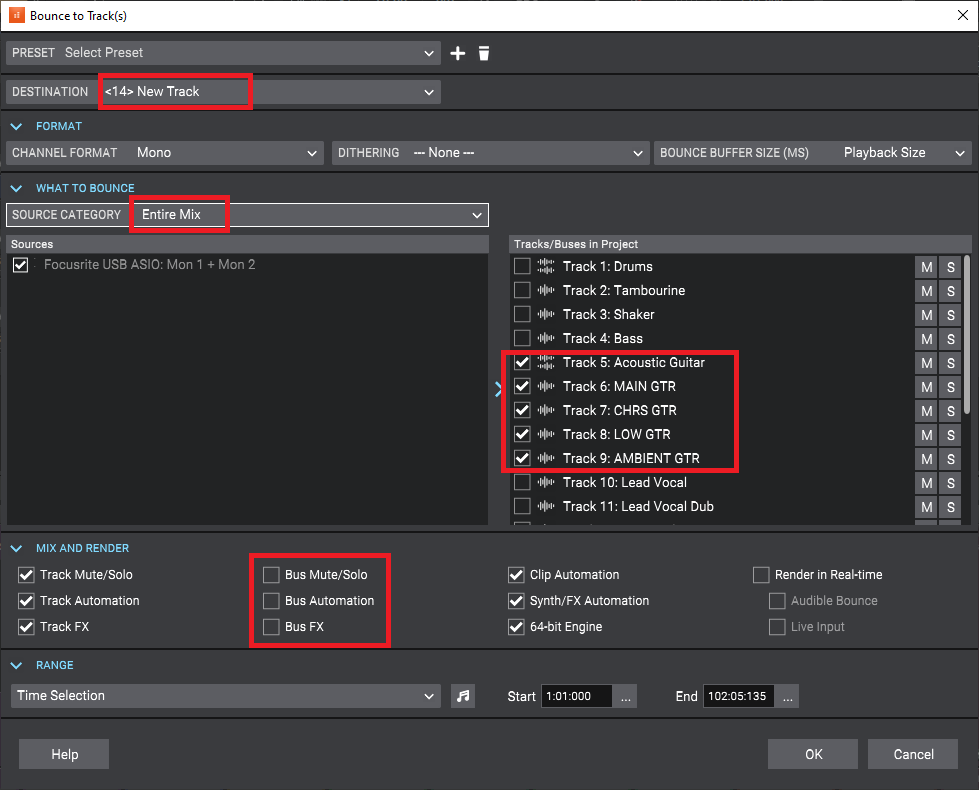
Specifying a source category of Tracks will create an individual track for each of the tracks. What you want is a source category of "Entire Mix", with only the tracks you want bounced selected, and possibly the Bus options unchecked, e.g.: If you're bouncing with FX, you might want bus FX/Automation included - if that's the case obviously leave them checked. You may also need to select any Aux tracks if this is the case.
-
@dahjah - The first thing to do is make sure you're running MIDI in MME mode in Cakewalk. 1. Start Cakewalk with no project loaded. 2. Go to Preferences, and look at the the driver mode within MIDI -> Playback and Recording. 3. If it's set to UWP, is set to MME, restart Cakewalk and set up your MIDI devices/control surfaces again. If this doesn't work, the issue here is either with Windows or the ICON QCON Ext drivers. Using multiple USB based MIDI devices of the same type can confuse Windows. Cakewalk will only show the second ICON QCON Ext MIDI device if it's available in Windows, so if Windows isn't registering it as a separate device, this could be the issue. If the issue persists, you probably want to start with a clean slate, both with Windows and Cakewalk. Windows: 1. Unplug all of your ICON QCON G2 devices. 2. Uninstall any ICON QCON G2 drivers. 3. Go to Device Manager (press windows key + X, then press M), and make sure "Show hidden devices" is checked under the View menu. 4. Open the "Sound, video and game controllers" section and delete any ICON QCON G2 drivers. 5. Reboot your PC. 6. Open up Device Manager and confirm there are no ICON QCON G2 drivers present. 7. Shut down your PC. 8. Decide which USB ports you'll be using for your ICON QCON devices. You want to use the same ports every time for each device to avoid this situation in the future. 9. Plug in your ICON QCON devices, and switch on your PC. 10. Go through any steps needed to install any drivers. Cakewalk: 1. Within Windows Explorer, go to %APPDATA%\Cakewalk\Cakewalk Core, and rename: - TTSSeq.ini to TTSSeq.old - ctrlsurface.dat to ctrlsurface.old 2. Start Cakewalk with no project loaded. 3. Go to Preferences, and ensure the driver mode is set to "MME" within MIDI -> Playback and Recording. 4. Close preferences, and start a new a blank project. 5. Go to Preferences, add your MIDI devices, and set up your control surfaces again. Moving forward: 1. Always use the same USB ports for your ICON QCON devices. 2. Ensure the ICON QCON devices are plugged in before you start your PC. This will help to ensure that they are given the same MIDI device index every time. If this doesn't help, Icon support is probably your first port of call. Explain to them that your second G2 EXT MIDI output isn't being seen by Windows. Hopefully they'll be able to offer a solution. Another solution might be to connect the second ICON QCON G2 Ext to your PC using a USB hub... this might make it look different enough to Windows to allow it to appear.
-
Can Korg nanoKontrol Studio play nice with Arturia Keylab MKII? [SOLVED]
msmcleod replied to Sal Sorice's question in Q&A
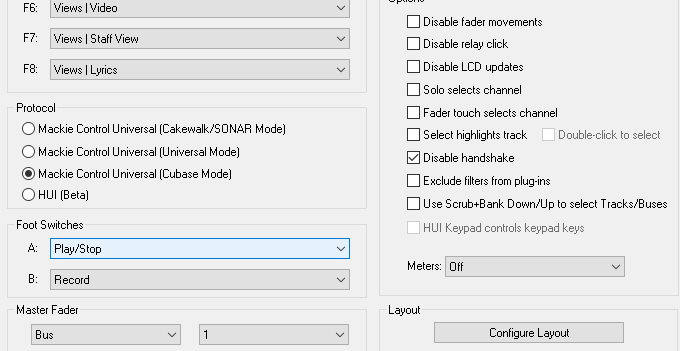
@Sal Sorice - I've PM'd you with the answer, but will repeat here for the benefit of other users: The MackieControl.dll actually contains three control surface interfaces, which are designed to "act as a team": - Mackie Control (the main MCU) - Mackie Control XT (an 8 fader extender) - Mackie Control C4 (a 32 v-pot extender) Adding more than one Mackie Control, will cause Cakewalk to think you have two MCU's that are trying to act as a team, so it's likely that two MCU emulated control surfaces from different manufacturers just don't want to play nice together. The solution is to download my own version of the Mackie Control surface: https://msmcleod.co.uk/cakewalk/MMcLMackieControlSetup.zip The installer in the zip file will install three new MackieControl.dll's alongside the existing Cakewalk one. The surfaces are exactly the same as Cakewalk's control surface, the only difference being that the registered GUID for each control surface is different. As a result, MMcL Mackie Control #1 will be seen as a different control surface to Cakewalk's Mackie Control, and will not try to act as a team. This allows you to use up to four independent Mackie Control surfaces within Cakewalk. It allows each control surface to have their own separate options - e.g. one controlling buses with the other controlling tracks, or one set up as Cubase emulation with the other using the standard Cakewalk/SONAR mode. Just set one of your control surfaces to use Mackie Control, and the other to use MMcL Mackie Control #1 and it should work fine - make sure you pick the correct MIDI IN/OUT pair for the KeyLab II. The nanoKONTROL Studio should be set to Cakewalk/SONAR mode and the Scene button set to "Scrub" using KORG's editor program. The dialog setup within Cakewalk should be as follows: This will allow you to use the "Scene" button as a shift key to switch between tracks & buses in conjunction with the Bank up/down keys. It also makes the track select buttons work by double clicking them (out of the box, they don't work at all with Cakewalk, and KORG says as much in their documentation). The KeyLab II works better in Cubase mode, with Cubase mode being set in the Cakewalk's Mackie Control dialog: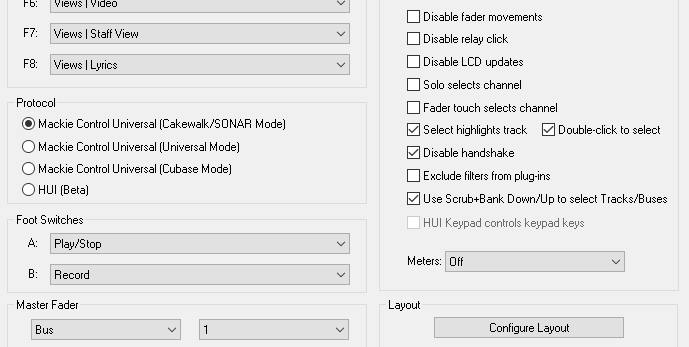
-
Help on Offset Tempo Map by half or double
msmcleod replied to mgustavo's topic in Production Techniques
For the hidden contents, put your content in a spoiler tag: {spoiler} your content here {/spoiler} Replace the curly braces with square brackets. -
Help on Offset Tempo Map by half or double
msmcleod replied to mgustavo's topic in Production Techniques
If you want to double the tempo, but keep the speed of the performance the same as it was: If you followed any previous steps to enable AudioSnap/Follow Tempo for audio clips - you want to revert that. So CTRL + A, go to clip properties, and disable Audio Snap. The other important step is to ensure all audio clips have their time base set to Absolute - you can change it back to Musical afterwards, but they should be set to Absolute before we change tempo. The reason being, is that for example... at 120bpm bar 4 is exactly 3 seconds into the performance. If we double the tempo, then any audio at bar 4 will now play 1.5 seconds into the performance. We don't want this - we want it to play at exactly 3 seconds in. Setting it to absolute will change the clip so it starts at "3 seconds" rather than "Bar 4". If ALL of your audio clips start at 001:01:01, then you can skip setting them to absolute. Unhide this section to see how to do this: Then: 1. CTRL + A to Select All 2. Choose Process -> Length from the main menu 3. On the dialog, the the percentage to 200 Percent. Ensure "Stretch Audio" is UNCHECKED, then click OK 4. Choose Project -> Offset Tempo Map from the main menu 5. Choose % and 200 percent, then click OK -
You can synchronise wordclock over SPDIF - this is completely different from synchronising playback and tempo.
-
Help on Offset Tempo Map by half or double
msmcleod replied to mgustavo's topic in Production Techniques
Try this: 1. CTRL+A to Select All 2. Click on Clip Properties, and click on Audio Snap 3. Enable Audio Snap, and check "Follow Proj. Tempo" 4. While holding down CTRL, change the track filter back to "Clips" 5. Process->Offset Tempo Map 6. Choose % and 200%, and click OK -
The localhost address is the callback address for Cakewalk after successful login. Since Google removed OAuth support from browsers embedded in applications, this is how all OAuth based authentication works nowadays - i.e. the application launches a browser for the user to log in, then listens on localhost on a particular port for the final log in response.
-
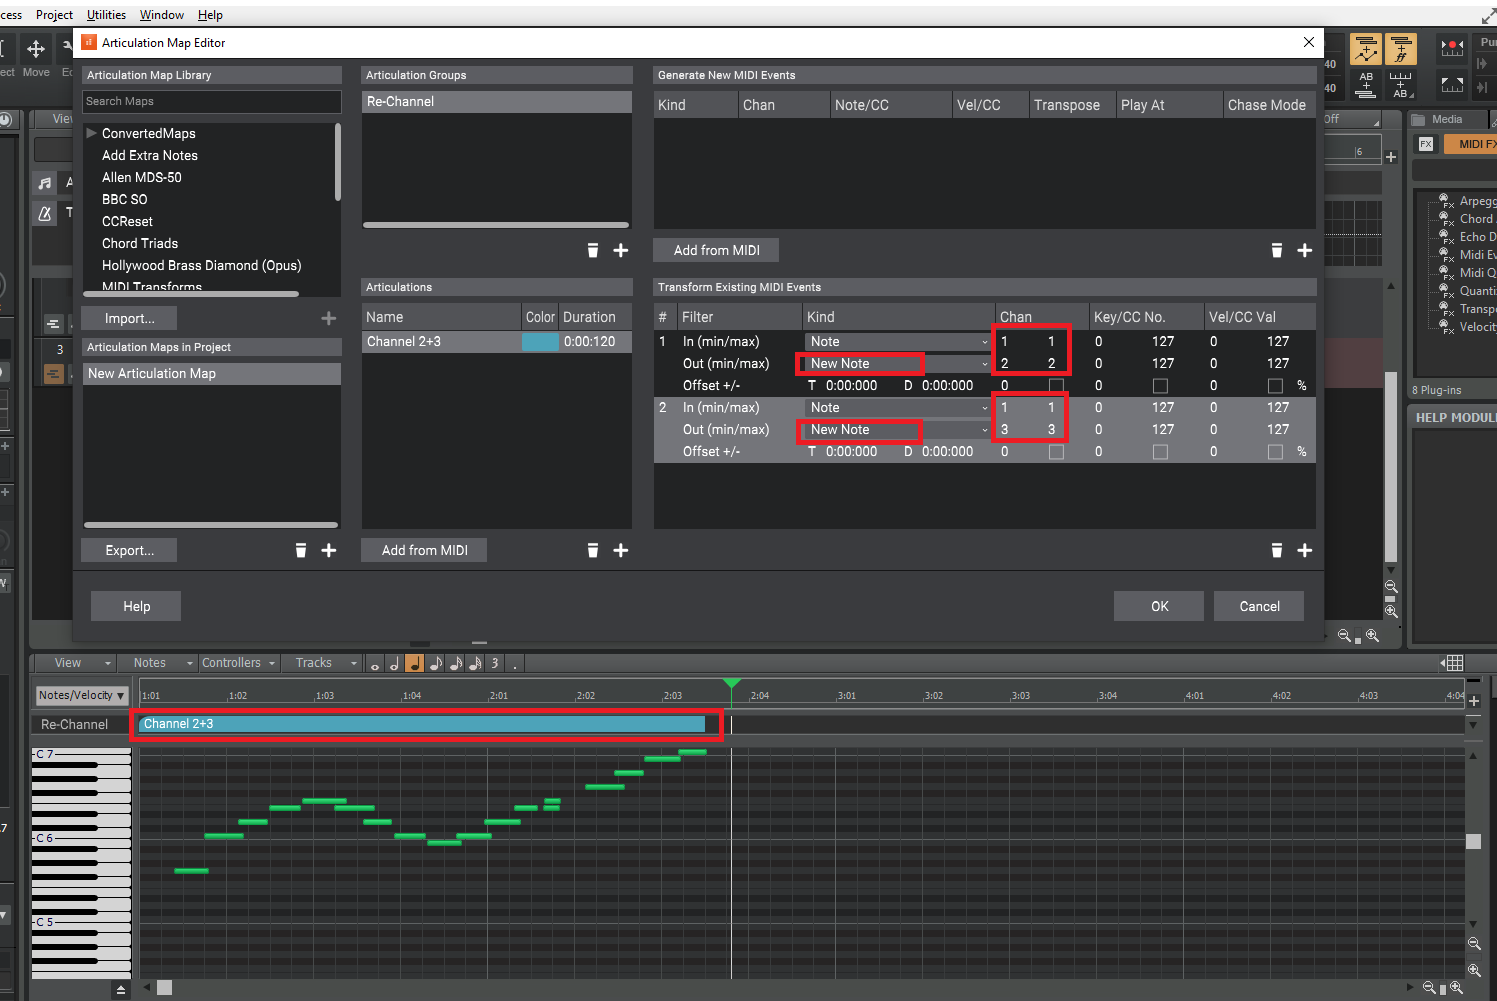
You could use articulation maps to automatically duplicate the notes on other channels. Here I've got TTS1 with Piano on ch1, Fantasia on ch2, and Strings on ch3. The following articulation map will duplicate any notes on channels 2 + 3: This results in the notes being played on all three MIDI channels. What it won't do is duplicate CC or Pitch Bend messages though.

-
I've got 2022.11 running on my Windows 7 boot with no issues. Without seeing a screen-shot, I can only speculate but: 1. Does widening the track header pane allow it to be seen? 2. Does changing your track control filter to "All" make it re-appear (i.e. does the current track control filter have "Track State" unchecked) ? 3. Are you maybe using an out of date theme?
-
Yes, this is the way to do it. If you copy the clips as linked clips, it would also mean any edits would stay in sync across all copies. Unfortunately you can't change the input MIDI channels on TTS1, and we can't change it to allow this either either - it's a discontinued Roland product, and we don't have the source code.
-
How to merge two tracks consecutively into one output file
msmcleod replied to Alan Megna's question in Q&A
You could bounce the tracks to a single track, which would include effects - i.e. select both tracks, then go to Tracks->Bounce to Track(s). Alternatively, you could freeze the guitar track, copy the frozen audio to another track, then unfreeze it. The copy will have the effects on it. You could then copy your spoken word clip after it. -
Both the PRV and the Track Inspector show the focused track, so the easiest way is to click on the track number within track inspector. You can also narrow the track inspector to give yourself a bit more screen real-estate:
-
@Jordi - just re-read your original post. So you press Play on the master Cakewalk instance, and everything works fine... You press Play on the slave Cakewalk instance, and it says it's waiting for SMTPE... This sounds like correct behaviour to me. You can only press play on the master - that's the whole point of it being the master. Slaves can't initiate playback.
-
How to use melodic MIDI loops to follow MIDI Chord track?
msmcleod replied to Misha's topic in Cakewalk by BandLab
You should take a look at Band in a Box - it makes most of these arrangers look like they're in the stone age. -
I've you've got Cakewalk set to SMPTE in the Clock settings, you're telling it to act as a SMPTE slave, not a master. When acting as a master, Cakewalk's clock should always be set to Audio - unless you've got no audio tracks and no software synths, in which case set it to Internal. In fact, as the audio timer is usually more accurate than "internal", adding a blank audio track and keeping the clock set to Audio is usually a better option. So SMPTE... IIRC, Cakewalk can't operate as a SMPTE master only a SMPTE slave. Cakewalk does however transmit MTC - so use that instead if you can.
-
It's worth mentioning, there's a few conditions that will allow this to work: You need Melodyne installed, as Cakewalk uses Melodyne's audio-to-MIDI to perform this operation. Polyphonic audio to MIDI will only work during the Melodyne trial period or if you have purchased Melodyne Editor or Studio edition. Celemony removed free access to audio to MIDI conversion in Melodyne 5, so if you have Melodyne 5 installed, then audio to MIDI will cease to work after the end of the trial period. After the trial period has ended, you'll need Melodyne Essentials or Assistant for monophonic audio to MIDI; polyphonic audio to MIDI will require Melodyne Editor or Studio edition. Melodyne 4 doesn't have this restriction, but will revert to monophonic audio to MIDI after the trial period has expired.
-
You should first check the motherboard actually supports more than 4GB. A lot of older boards were specifically designed for 32bit Windows, and won't support more than 4GB.
-
Adding Drum Track To Imported Song In BandLab
msmcleod replied to Evris Mitchell's topic in Tutorials
The drag-to-timeline method is the recommended one, but requires Melodyne to be installed. There is also the (very) old method of using "Fit to Improvisation", which works pretty well. To do this: 1. Insert a MIDI track and arm it. 2. Start recording and tap a single note on your MIDI keyboard for each beat. 3. Stop at the end of your song. 4. Select the clip you recorded, then from the main menu: Process->Fit to Improvisation This will alter the tempo map to match the "beats" you played. It'll follow all of your beats as you speed up and slow down, and match that in the tempo map accordingly.- 3 replies
-
- 1
-

-
- imported songs
- drum machine
- (and 3 more)
-
The main issue is that Windows doesn't give MIDI devices a unique identifier - all you get is an index number and a name. If your MIDI interfaces/devices are plugged in to the same ports every time at the time you boot up your PC, they almost always get given the same index number. If you arbitrarily plug them in, there's no guarantee the index number will be the same. Cakewalk uses a the index number give by Windows, then falls back on matching on the name if the index number/name is different from what it was previously. The problem with a lot of class compliant interfaces, is they come back with exactly the same name. There's nothing we can do in this scenario. What Cakewalk doesn't do now (which it used to do), is just re-assign Control Surface ports if it's previously assigned port is missing - it now just disables that control surface. We've discussed having different configuration presets within Cakewalk - not just for control surfaces, but also for MIDI / audio interfaces etc. There's nothing scheduled as yet, but I hope this is something we'll see sometime next year.
-
Duplicate my mixing effort on another recording
msmcleod replied to grannis's topic in Cakewalk by BandLab
If the track hierarchy is basically the same (i.e. they were based on the same template), you might be able to use this method:- 1 reply
-
- 1
-
-
How to use melodic MIDI loops to follow MIDI Chord track?
msmcleod replied to Misha's topic in Cakewalk by BandLab
Another solution might be to use Articulations, but you'd end up having to make a LOT of them, catering from every source to destination chord. -
How to use melodic MIDI loops to follow MIDI Chord track?
msmcleod replied to Misha's topic in Cakewalk by BandLab
You could take a look at Groove clips combined with pitch markers. Pitch markers will transpose any groove clip by the pitch specified in the marker. This will work with both audio and MIDI groove clips. The only things to you need to be aware of: 1. You need to tell it the reference pitch, so if your source chords are constantly changing, you'll need to split the clips up for each chord and tell each clip what chord it's actually playing. 2. Groove clips can only transpose - they can't change major->minor or vice versa. 3. For MIDI notes, make sure the markers appear BEFORE the notes you want transposed are actually playing (which I didn't do in the example below!). MIDI notes cannot be transposed after they've been triggered. Audio clips can be transposed at any point however. -
Only this to internal if you're using pure MIDI tracks, and there are no audio tracks or softsynths in your project. In all other cases, this should be set to Audio.
-
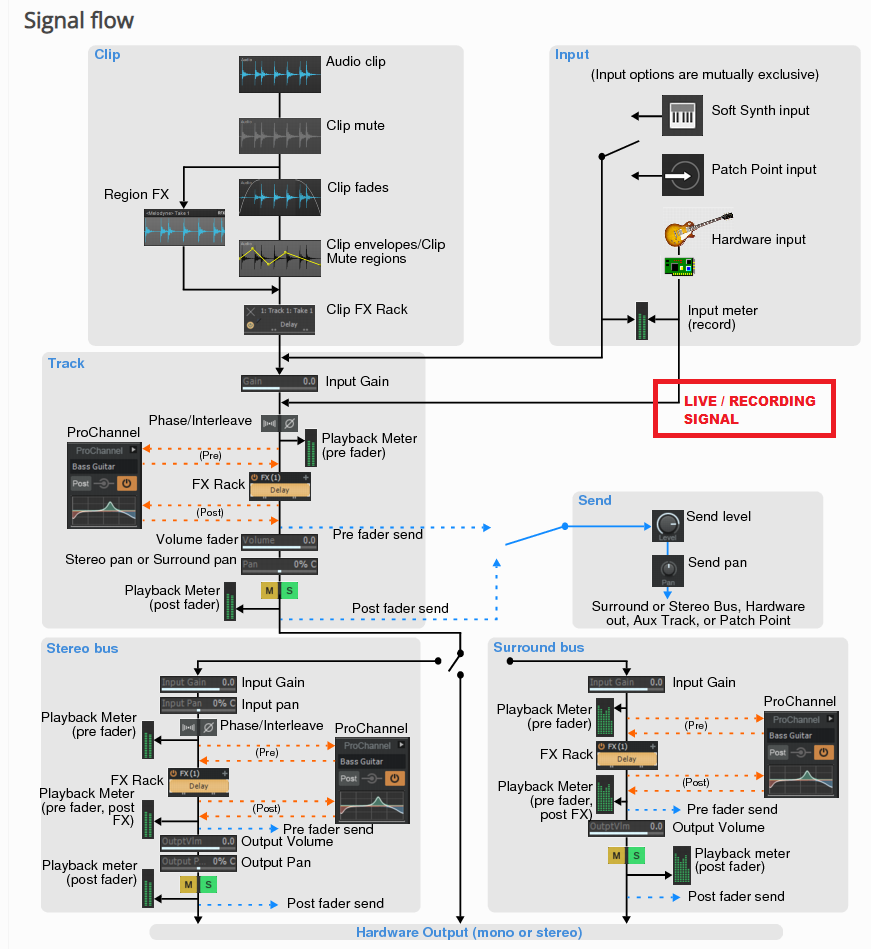
The gain control on a track within Cakewalk has no effect when recording. It only affects the output level of already recorded clips, prior to sending them to any effects. Refer to the signal flow diagram - note that the live/recording signal appears AFTER the track's input gain: http://www.cakewalk.com/Documentation?product=Cakewalk&language=3&help=Mixing.07.html