msmcleod
-
Posts
6,134 -
Joined
-
Last visited
-
Days Won
26
Everything posted by msmcleod
-
CTRL + F does this, at least for MIDI clips. Audio clips aren't included as they then wouldn't match the db scale.
-
I'm using iLok dongles. Melodyne gives you the choice though. IIRC, if it's registered to your PC (i.e. not using iLok at all), you can authorise/de-authorise and move the authorisation about as you please, but once you've authorised to iLok you can't go back. My main reason for using iLok is that I've got 4 operating systems on my boot menu ( 2 x Win 10 and 2 x Win 7). Most software sees that as 4 separate machines, so having it on the iLok saves me messing about with swapping auths.
-
That's usually because the algorithm isn't set, or isn't set properly. This was a known issue with earlier versions of Melodyne where it was losing it's default algorithm. If you're running the latest CbB and the latest version of Melodyne 5, you'll get a dialog asking you to choose the algorithm. If you've not got the very latest version of Melodyne 5, you can set the default algorithm by either: 1. Opening Melodyne standalone and setting it there; or 2. Creating a region FX (so it opens up Melodyne) and setting it there.
-
I upgraded my SONAR X3 Melodyne Essential 2 to Melodyne Essential 4, then bought an upgrade to Melodyne Editor 4 pretty quickly because I wanted polyphonic editing ( I've got this nasty habit of fingering too hard on the guitar pulling the strings slightly out of tune - Melodyne sorts this out!). IIRC I authorised on my laptop first, then managed to use my 2nd authorisation on iLok... I was lucky, 'cos if I'd have done the iLok first, it would have taken up both authorisations. I later upgraded my Studio One Melodyne Essentials 4 to Editor as well, and put that on my other iLok. When I upgraded to Melodyne 5, it merged both Editor licenses into one. Apart from the initial install of X3's Melodyne, I think all the upgrades were done via Melodyne itself.
-

Don't Create Loop Markers when Importing ACIDized/REX2 Loops
msmcleod replied to Maestro's topic in Feedback Loop
Doesn't unchecking these solve it?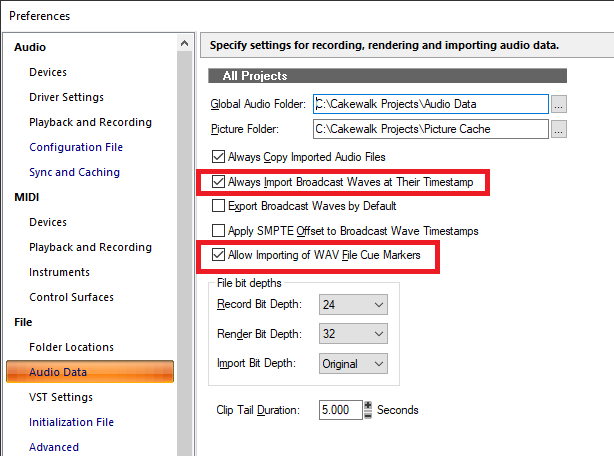
-
I'm pretty sure its still there when used via Cakewalk - i.e. dragging audio to a MIDI track.
-
Presonus Faderport 8 in use in Cakewalk by Bandlab
msmcleod replied to Blades's topic in Cakewalk by BandLab
No, I replaced the PMW IC's in my Mackie MCU. My Presonus hasn't had this issue... but it could be a similar cause. It could equally be a firmware issue tho. It's boxed up at the moment, I'll need to check which version I'm running. -
Presonus Faderport 8 in use in Cakewalk by Bandlab
msmcleod replied to Blades's topic in Cakewalk by BandLab
This used to happen on the original MCU when the PWM IC's were on their way out. I replaced mine and it fixed the issue for me. I've got a FaderPort 16 here as well though, and I've never seen that issue with the FP. -
Refresh Activation on Bandlab Assistant NOT WORKING
msmcleod replied to It's Big Brain Time's topic in Cakewalk by BandLab
Are you running BandLab assistant as a different user to Cakewalk (e.g. BA as Admin, Cakewalk as normal user) ? This might explain things. -
@MisterGreen - Looks like it's a pretty involved process getting multiple outs: https://support.native-instruments.com/hc/en-us/articles/209584489-How-Can-I-Use-my-DRUMMER-Product-with-Multi-Outputs-in-KONTAKT-5-
-
The Kontakt mixer can have as many outputs as you configure, so you'll have to add them and map them to the Studio Drummer outputs. You may want to save the output configuration as a preset within Kontakt so you don't have to manually do it again.
-
The key is to ensure your outputs are correctly mapped in Kontakt first... then add the track in Cakewalk. Cakewalk won't retrospectively rename its output names once it's created the track, as it's not expecting them to change (and AFAIK there's no mechanism for it to tell Cakewalk they've changed names). AFAIK Kontakt is the only VSTi that does this - most VSTi's have a fixed number of outputs when the VSTi is inserted. So in other words: 1. Add Studio Drummer in Kontakt 2. Make sure the audio outputs are correctly created/mapped within Kontakt. 3. Add the instrument track in Cakewalk. Looking at your screenshot, It looks like you might be doing something wrong in step 2. Kontakt is not particularly intuitive with regards to audio outputs, so you might have to refer to both Kontakt's documentation and the documentation for Studio Drummer.
-
If you're using the Mackie Control / Mackie Control XT / Mackie Control C4 surfaces, they do interact with each other. In other words, if you've set up 2 x Mackie Control, selecting track 3 on one surface will automatically select track 3 on the other. If you need more than one Mackie compatible surface to act independently, download my version which will give you up to 3 extra independent "sets" of Mackie controllers: https://msmcleod.co.uk/cakewalk/MMcLMackieControlSetup.zip I use this so that one Mackie controller can control tracks, while the other controls buses.
-
Ok, what is happening is that tracks that have no events between the project start and measure 21 are excluded from the selection, and as a result those tracks don't have the hole deleted. Incidentally, if I force Cakewalk not to use ripple edit under the hood for delete hole, the old delete hole behaviour is exactly the same... in other words, it only deletes the hole in clips that actually had something deleted. If you want it to delete everything in the project regardless, then use Ripple Edit All. It's much quicker in any case:
-
If you registered your copy of X1 LE, you should be able to download it from www.cakewalk.com with your old Cakewalk login details. I used V-Vocal a couple of weeks ago on another machine, as I was backing up my DAW PC at the time else I'd have used Melodyne. That machine has X1, Platinum and CbB on it, so the V-Vocal must have come from X1. Took me ages to work out how to use it again! But the results were great.
-
Cut Special / Delete Special should now be using Ripple edit under the hood in most circumstances - it's done this for over a year now. If you've got a project where it's not doing this, please share it.
-
I think what the OP is talking about is a routing diagram of how the project's tracks / aux tracks / busses are currently connected. There's nothing like that currently within Cakewalk, although it has been talked about within the team. Whether or not it sees the light of day all depends on resources & priorities.
-
Cakewalk takes 3 seconds delay untill it starts to play.
msmcleod replied to Gilbert Lachin's question in Q&A
Have you using any look-ahead plugins in that project? -
EW Articulation map doesn't work - why?
msmcleod replied to willard cottrell's topic in Instruments & Effects
Is there any reason why you've got the the Channel set to "Follow" for the first key-switch, and not the second? Normally you'd keep them the same (usually Follow). If you're using "Follow", you also need to ensure the MIDI channel of your track OR the MIDI channel of your "drawn" articulation is set correctly, e.g.: Bold means the articulation is being used on one or more tracks within the project. The "Generate MIDI Events" section does not contain articulations. It contains the MIDI events that will be sent when you use the selected articulation. So, within your screen-shot, you've got "Pizz" set to send a C1 on the track/articulation's MIDI channel, and a D0 on channel 2. So if you drew a "Pizz" articulation in at measure 3, it would send a C1 and a D0 at measure 3 just before sending the other notes.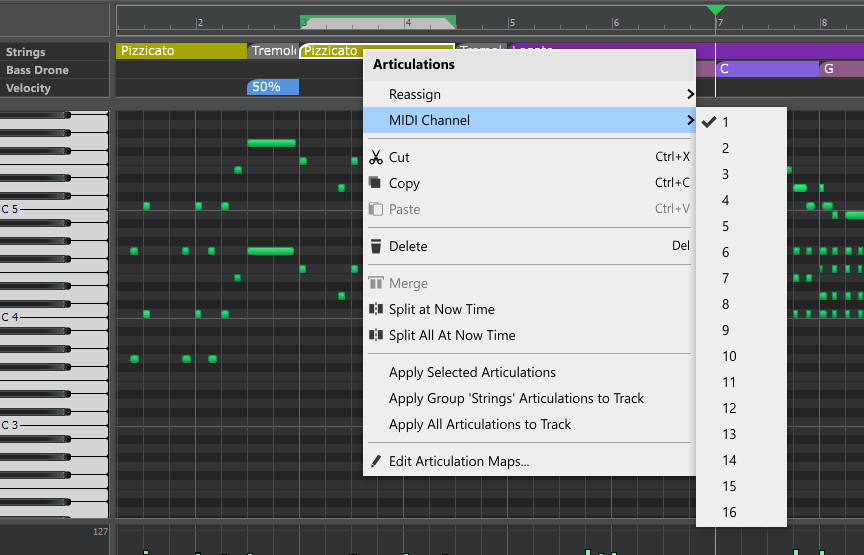
- 4 replies
-
- 1
-

-
- ew strings
- cbb
- (and 1 more)
-
FWIW my new RME Digiface USB is recording 32 simultaneous channels over USB 2 absolutely fine. That's both at 48K and 44.1K. As it's an ADAT based interface using 96K would just halve the number of channels available, so there'd be no difference in the amount of data transferred. The Digiface is bus powered, but it's only powering 8 x ADAT ports and a headphone socket. There's no other I/O.
-
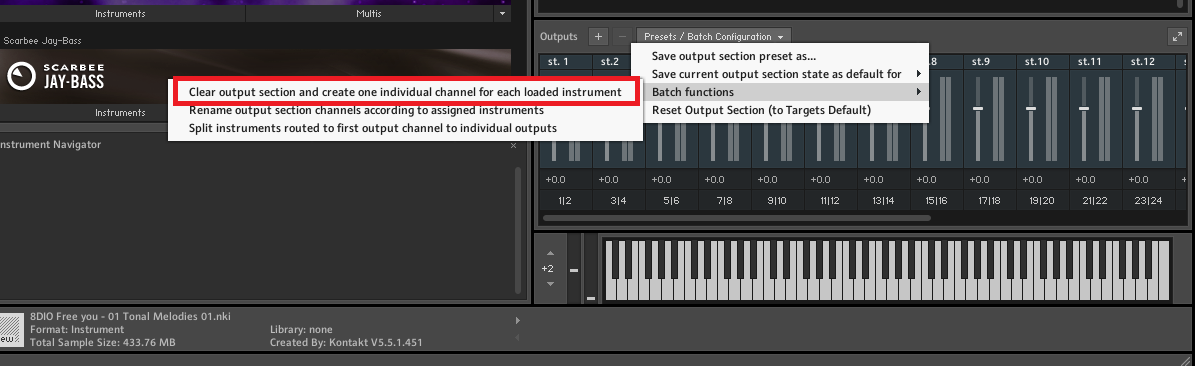
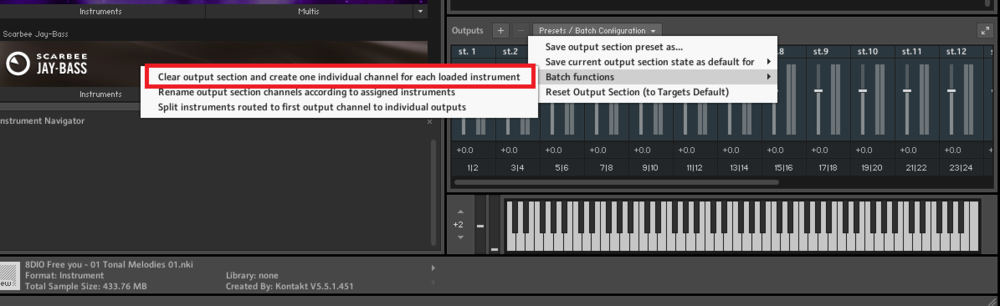
For Kontakt, what I tend to do is add a single per-output track for the first instrument, then: 1. Add another instrument in Kontakt 2. Run the outputs batch script to add the outputs 3. Use "Append Instrument Track" for each of the instruments. You can do this for each time you add a new instrument.
-
Once you've added your Kontakt instruments, select the following from the Output section: This will create separate audio outputs for each of the instruments loaded.
-
Can you check there aren't any filenames with non-ASCII characters in the filenames within your Drum Map directory?
-
I take a two step approach to EQ'ing guitars, quite often using two EQ's (e.g. one in the FX bin, and one in the ProChannel). 1. The "sound design" part - this involves EQ'ing the guitar to how I want it to sound on its own, but I'll also do a high pass as you've done in your example. The trick here is to bring the cut-off frequency up until you can just hear it taking effect, then back it off so you can't hear a difference. 2. In the mix - anything goes here, and 50% of the time if I solo the guitar it usually sounds pretty thin and nasty. This does not matter. The only thing that matters is how it sounds in the mix. The reason it sounds ok in the mix and awful in solo, is that the frequencies I've removed to get it to sound good in the mix are being provided by other instruments... but if I left them all in, it would sound muddy. It depends though... if the guitar is more musically dominant than say the keyboards, it'll be the keyboards that get their frequencies cut instead.
-
All it takes is for the levels to be slightly out (i.e. one slightly louder than the other) for it not to null completely.