Nigel Mackay
-
Posts
898 -
Joined
-
Last visited
Everything posted by Nigel Mackay
-
In the Track Pane menu, not main menu: View -> Display -> Vertical Grid Lines -> In Front of Clips
- 1 reply
-
- 1
-

-
Right-click the on the timeline.
-
If you use Pro Channel you don't have to get any other FX. Watch this video. Much better than reading what someone writes. 😀
-
Great
-

Aren't sound/music supposed to be similar for both before and after freeze synth
Nigel Mackay replied to Lummy Keen's question in Q&A
There is a thing about the fx when you freeze/unfreeze. No personal experience of it. To convert to audio, select the MIDI track and the synth track and then Tracks -> Bounce to tracks. Then you can mute those tracks. When all tracks are audio, then you can create a new project and import all the audio tracks. -
It seems the only currently downloadable version is 32-bit. Trouble is, not easy to Google because sfz is a file format as well as a VST. (I remember a marketing guy at work saying you NEVER name a product the same as the technology.)
-
Not necessarily 32-bit problem. Could be sfz. Maybe have a look again at sforzando.
-
Not giving a decent name in the title bar is specific to sfz. 🙄 Also, it is 32-bit. I presume sforzando doesn't give you the same control over your sound as sfz does? It does put the correct name in the title bar. 😀 You can set the icon for the synth in the synth rack. That might help. A bit.
-
Point 2) Add 5 copies of a VSTi and Cakewalk names them xxx 1, xxx 2, xxx 3, xxx 4 and xxx 5. Those names appear in the synth rack. Those names appear in the instrument tracks in the track pane. If you change the name from xxx to yyy, they keep the numbering. And you can't get rid of the numbering. If you open the GUI, look at the left side of the title bar - that same name appears there. So if you change VSTi 1 one to violins it will say violins 1. Point 1) The order of the synths in the synth rack is actually irrelevant. Give them names that you can spot easily and you will find each one easily enough. Doesn't matter if strings and percussion are mixed up. You see the name clearly: Fred's Bongos, Pizzicato Violin, Tambourine, Frame Drum. If you disagree with any of this, please give us a screenshot or 2 so we can see your exact problem.
-
Will higher specs/newer notebook produce better sound quality?
Nigel Mackay replied to Lummy Keen's question in Q&A
Does your current setup struggle with anything? -
Cakewalk only allows one track of TriplePlay
Nigel Mackay replied to KSband's topic in Instruments & Effects
Yes. When you add a VST to Triple Play add a copy to Track Pane at same time. When done recording, route that MIDI track to the VST, add a new MIDI track that is pointed to Triple Play, add new VSTs, record, etc. This is not very much different from having multiple copies of Triple Play and recording to each instance one after the other. -
Cakewalk only allows one track of TriplePlay
Nigel Mackay replied to KSband's topic in Instruments & Effects
Had a look at their site and on YouTube. Nowhere do I see more than one instance being used to see if there is any advice/comments. -
Go to Utilities -> Cakewalk plugins manager, select Show Excluded and see if it is perhaps disabled.
-
I also can't see any loop packs there. Try this: Add the SI Drums to a track. Open up its GUI. It has drum loops of various genres. If you double-click on one it plays, so you can audition them. You can drag and drop onto a MIDI track. Most drum synths do that. Google free drum vsts plugins and have a look at the 10 top free drum kits. That should get you started. If you need help with doing that, start working through these tutorials
-
Can't change Project path + Audio path using "save as"
Nigel Mackay replied to gmp's question in Q&A
But I am using CbB and I have no problems. Are you (user) maybe not allowed access to the drive? -
Can't change Project path + Audio path using "save as"
Nigel Mackay replied to gmp's question in Q&A
Have a look at my dialog when I use Save As. Any path I want for the audio files.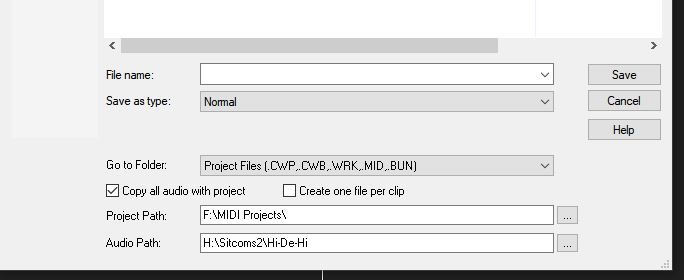
-
Entonces no podría ser gratis 😀
-
AS for the 808 pack you downloaded, you need to add a sampler synth as your "instrument." Then you load what ever sounds you want into the sampler. Which sample player to use is another subject.
-
With the SI Bass Guitar the problem is MIDI routing. When you try to play the bass you are more than likely playing the piano in TTS-1. Drag a copy of SI Bass Guitar onto the track pane. In the dialog box select Midi Source, First Synth Audio output. You get two tracks - the synth and a MIDI track. On the synth track, the one called SI-Bass Guitar 1, click the little picture of a keyboard with a DIN connector hiding behind it. The GUI for the SI Bass opens. Click on any of the guitar strings, on the image of the guitar or the fretboard. You get bass guitar sounds. On the left, under the Cakewalk logo you see default.prog. Click on it and double-click on an y of the presets and then any of the strings. You get different bass guitar sounds. When you have the one you want, close the GUI. Click on the MIDI track, on its track number. Use Views -> Inspector to make sure the panel to the left of the track pane is open. You now have 2 channel strips visible. On the left-hand one, right at the bottom, there are 2 dropdowns - I for input and O for Output. Hold your mouse over Output to get a better view of the setting. It goes to the SI Bass Guitar. Now go to your original MIDI track and see where it is routed to. If not he SI Bass Guitar, click the dropdown and select the SI Bass. Now test it. Do you get the bass guitar now? The standard routing is MIDI track -> Synth -> Audio out (will default to Master on the console.) If you don't specifically add the MIDI Source when you add the synth you will need to add a MIDI track and manually route it to the synth.
-
How do I remove other track's midi date displayed behind piano roll?
Nigel Mackay replied to Tyler Cline's question in Q&A
You can also see in the track pane that both tracks 7 and 12 are selected. People forget that if the track name is highlighted then the track is selected. 😀 -
Are you perhaps using WASAPI Exclusive mode?
-
No. If you have more than one disk, think about free space. If they came with a drum VST, then make sure the VST knows where they are. You would probably do this during installation of the VST.
-
How do I clone a VST's settings onto a new midi track?
Nigel Mackay replied to Bevan's question in Q&A
Right click and Duplicate. Then make the necessary changes. -
Watch the video. When he starts talking about Show Disabled, you do the same, except be on the row VST Instruments when you do. In fact try Show disabled on each row one by one and see what you find. 😀
-
Have a look at this tutorial.