msmcleod
-
Posts
6,155 -
Joined
-
Last visited
-
Days Won
26
Everything posted by msmcleod
-

When to do "Render in real-time"?
msmcleod replied to A Tolerable Quietude's topic in Cakewalk by BandLab
There are probably only a handful of plugins that don't support high speed bounce, but if the plugin is written properly, it should support bouncing at high speed. Unfortunately it's a matter of trial and error to find out which ones don't behave - some crash, some give unexpected results. -
Midi and audio sync is off only while recording
msmcleod replied to Paul Ertel's topic in Cakewalk by BandLab
For Cakewalk to record in sync, it needs a reliable clock. The most reliable clock is the one from your audio interface, so make sure... 1. Before you start recording MIDI, make sure you have at least one audio track or instrument track in your project - it's fine if it's and empty track. As long as there is an audio track, the audio engine will be engaged and Cakewalk can get its timing from this. 2. Your record/playback timers are set to the correct audio device in preferences: 3. Your project clock is set to Audio: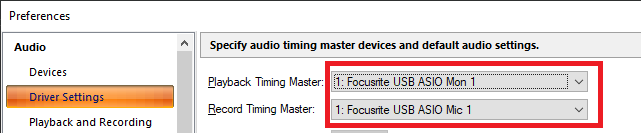
-
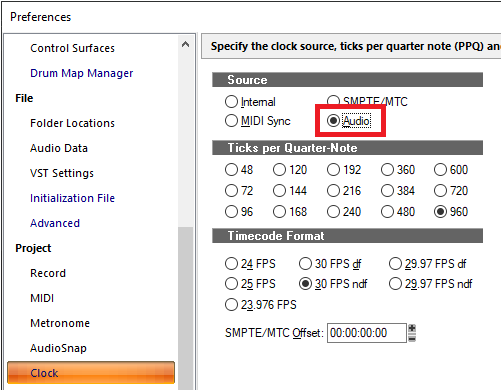
Ample Guitar VST3 pitch bending not working
msmcleod replied to Humair Ijaz's topic in Cakewalk by BandLab
Check that Pitch Wheel messages are enabled in preferences: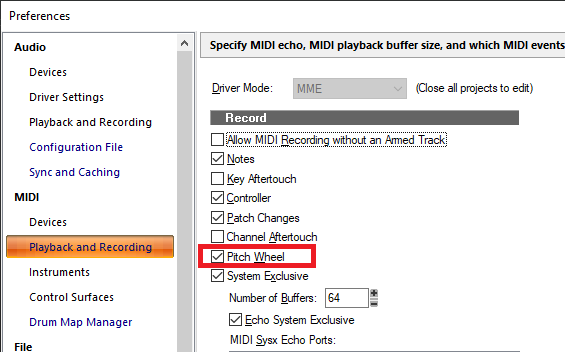
-
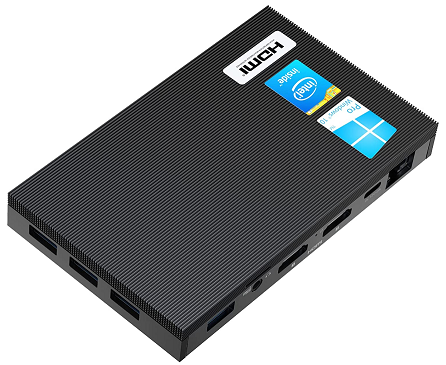
FWIW - I tried a MeLE Silent PC running at 2GHz + 8GB RAM with a 1st gen 18i8, recording 16 simultaneous tracks whilst playing back 32 tracks I'd previously recorded. The MeLE had zero problems with the recordings. Obviously this is nowhere near powerful to mix on (I didn't even bother trying to add plugins), but for straight multi-track recording, it did the job with no issues. Considering this thing is only slightly larger than an old cassette case and has literally no moving parts, I was impressed. I tried recording both to the internal SSD and an external SDD connected via USB3 - it was fine in both scenarios. This is the rig I used for recording:
-
There is no facility in the PRV to edit Poly Aftertouch. The only way to edit Poly Aftertouch is via the Events List View. I'm sure adding something to the PRV has been discussed in the past, but since the majority of keyboards don't even support channel aftertouch, let alone poly aftertouch, it was probably deemed too much effort vs the number of users who'd benefit.
-
This is possible, but not while Cakewalk is running. You'd need to: 1. Shutdown Cakewalk 2. Unplug your nanoKONTROL Studio, then plug it back in setting the new mode 3. Make a backup your ctrlsurface.dat, then delete the original 4. Start Cakewalk, and set up your nanoKONTROL Studio as a different control surface within Cakewalk again. Also, given how Windows does it's port indexing, there's a likelihood that any other hardware ports would now be renumbered, so you may have to go into MIDI devices in preferences and re-order the MIDI Output ports appropriately. The alternative is to reboot your PC after step 3. So while technically possible, it's really not practical.
-
Please explain how/why this is a security issue? Because due to security issues, OAuth no longer supports general request/responses - well, not easily. Google has disabled the use of embedded browsers, and raw traffic over http - unless you specifically create an "application" within the developer section of your google account, and supply the host application with the unique application/security keys. Each individual user would have to go through this process. By contrast, opening a browser and listening for the response is now the preferred method, as it benefits from security updates to both the operating system and the browser.
-
Yes, this is the case. The Mackie Control Universal, and control surfaces that emulate it are tied to specific functions. Moreover the MIDI ports connected to Mackie devices are exclusively grabbed by the Cakewalk's "Mackie Control" surface DLL, so MIDI data is not available to the rest of Cakewalk. Given how the MCU protocol works, this makes sense - buttons are generally Note On messages, and the slider/V-pot movements are not easily translated into simple CC messages. For MIDI learn, you need a generic controller. If you're only going to do one parameter at a time, then using MIDI learn on you're MIDI keyboard's Modulation wheel can be handy - you can always unlearn it afterwards and use it again for something else. Personally, for adhoc assignments I use a Philip Rees C16 for this as it has 16 assignable sliders and a pretty small footprint. I've also used a KORG nanoKONTROL 2 in CC mode, but the sliders are not great for detailed movements. The Akai MIDIMix is a decent modern alternative.
-
@Jim Fogle - this type of toolbar is shown whenever a plugin is wrapped by BitBridge: It's got the BitBridge icon in the top left hand corner, and doesn't have any of the options or menus that appear when using a plugin directly.

-
There's a few ways I can think of doing this: 1. Create additional buses, one for each of the groups you've listed. The buses would normally be muted, but if you wanted to solo a particular set of instruments, you'd just exclusive solo that bus; or 2. Use the Track Manager to create presets to show only the tracks in your groups. Once switching to a preset, you can then select all, quick-group mute/solo them, then go back to the Track Manager to unhide the other tracks. 3. Use Mix Recall to switch between different mixes with various groups of tracks muted and/or solo'd. For this, you probably want your Mix Recall settings are set to only include solo/mute. 4. Use Track Folders / Sub-Folders - mute/soloing the folder will mute/solo all the tracks within it. Clever arrangement of the folders might get you close to what you want.
-
Can Korg nanoKontrol Studio play nice with Arturia Keylab MKII? [SOLVED]
msmcleod replied to Sal Sorice's question in Q&A
@Sal Sorice - try using MMcL Mackie Control #2 for the KeyLab and see if this makes a difference. It's strange you're seeing issues though, as I've got a similar set up in my studio: I'm using Mackie Control / Mackie Control XT / Mackie Control C4 for my MCU/XT/C4 on my studio desk, and MMcL Mackie Control #1 for my nanoKONTROL 2 which is mounted on the wall next to my vocal mic. At one point I also had a Behringer BCF2000 using MMcL Mackie Control #2, which I used exclusively for controlling buses (leaving the MCU/XT/C4 controlling tracks). -
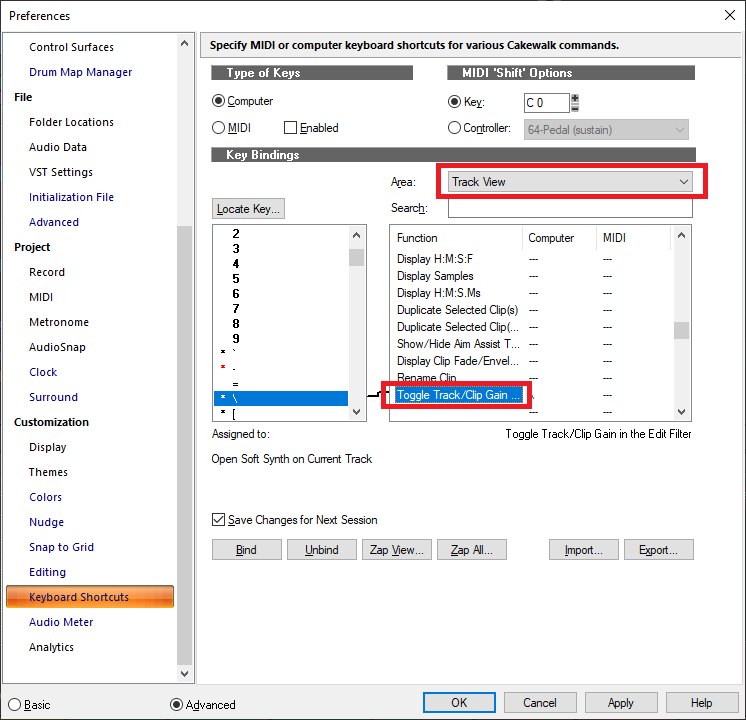
@Bill Phillips - your video example shows the track edit filter as "Clip Automation", whereas the CTRL + drag in lower part is the smart-tool behaviour for clip-gain when the track filter is set to "Clips" (step 1 in your highlighted part of the documentation). The smart tool behaviour is as follows: Track Filter = "Clips": CTRL + drag in the lower part of the clip to alter the level of the ENTIRE clip-gain envelope Track Filter = "Clip Automation": Select the area at the lower part of the clip, then drag from top using the shelf tool - no modifiers are involved. BTW - the way I'm switching the track edit filter between "Clips" and "Clip Gain Automation" is by using the "Toggle Track/Clip Gain in the Edit Filter" key binding in the "Track View" area. I've got this set to the key between SHIFT and Z - this is "\" on a UK keyboard. IIRC, this is " ` " (backward single quote) on a US keyboard:
-
Can Korg nanoKontrol Studio play nice with Arturia Keylab MKII? [SOLVED]
msmcleod replied to Sal Sorice's question in Q&A
It looks like you're using the wrong MIDI ports on the KeyLab II - you've got it set for KeyLab port 1 for MIDI IN, and Port 2 for MIDI OUT. They should both be using the same port - I suspect it should be MIDIIN2 (Keylab mkII 88) and MIDIOUT2 (Keylab mkII 88) -
Don't be afraid to compare your performance with Multiprocessing Engine or plugin load balancing off. There are a lot of factors that can affect how effective these options are. In a busy project, sometimes the effort in context switching between threads can outweigh the benefit. Also, more and more plugins are becoming multi-processor aware (more so in synths, less so in effects). Plugin load balancing plugins that are already load-balancing themselves will probably have a detrimental effect. Cakewalk doesn't load balance soft-synths, so these are less of a problem. But it's worth comparing on/off to get the best for each project.
-
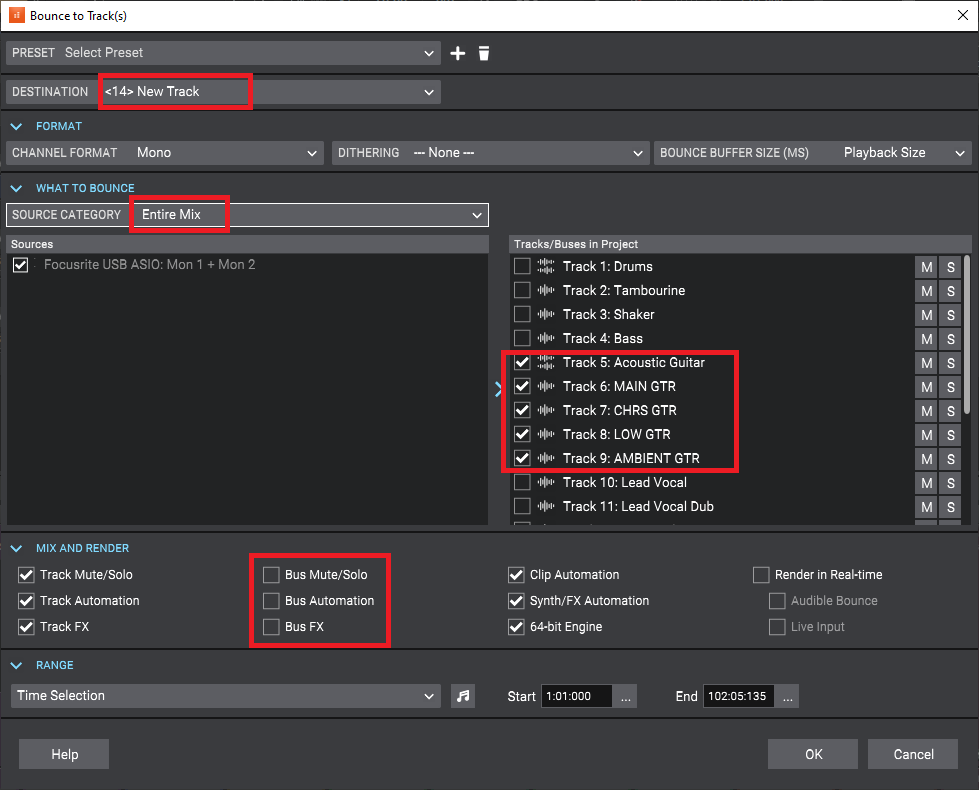
How to bounce multiple tracks to one new track
msmcleod replied to norfolkmastering's topic in Cakewalk by BandLab
For bouncing a version of your track(s) with FX and/or automation baked in. -
How to bounce multiple tracks to one new track
msmcleod replied to norfolkmastering's topic in Cakewalk by BandLab
Specifying a source category of Tracks will create an individual track for each of the tracks. What you want is a source category of "Entire Mix", with only the tracks you want bounced selected, and possibly the Bus options unchecked, e.g.: If you're bouncing with FX, you might want bus FX/Automation included - if that's the case obviously leave them checked. You may also need to select any Aux tracks if this is the case.
-
@dahjah - The first thing to do is make sure you're running MIDI in MME mode in Cakewalk. 1. Start Cakewalk with no project loaded. 2. Go to Preferences, and look at the the driver mode within MIDI -> Playback and Recording. 3. If it's set to UWP, is set to MME, restart Cakewalk and set up your MIDI devices/control surfaces again. If this doesn't work, the issue here is either with Windows or the ICON QCON Ext drivers. Using multiple USB based MIDI devices of the same type can confuse Windows. Cakewalk will only show the second ICON QCON Ext MIDI device if it's available in Windows, so if Windows isn't registering it as a separate device, this could be the issue. If the issue persists, you probably want to start with a clean slate, both with Windows and Cakewalk. Windows: 1. Unplug all of your ICON QCON G2 devices. 2. Uninstall any ICON QCON G2 drivers. 3. Go to Device Manager (press windows key + X, then press M), and make sure "Show hidden devices" is checked under the View menu. 4. Open the "Sound, video and game controllers" section and delete any ICON QCON G2 drivers. 5. Reboot your PC. 6. Open up Device Manager and confirm there are no ICON QCON G2 drivers present. 7. Shut down your PC. 8. Decide which USB ports you'll be using for your ICON QCON devices. You want to use the same ports every time for each device to avoid this situation in the future. 9. Plug in your ICON QCON devices, and switch on your PC. 10. Go through any steps needed to install any drivers. Cakewalk: 1. Within Windows Explorer, go to %APPDATA%\Cakewalk\Cakewalk Core, and rename: - TTSSeq.ini to TTSSeq.old - ctrlsurface.dat to ctrlsurface.old 2. Start Cakewalk with no project loaded. 3. Go to Preferences, and ensure the driver mode is set to "MME" within MIDI -> Playback and Recording. 4. Close preferences, and start a new a blank project. 5. Go to Preferences, add your MIDI devices, and set up your control surfaces again. Moving forward: 1. Always use the same USB ports for your ICON QCON devices. 2. Ensure the ICON QCON devices are plugged in before you start your PC. This will help to ensure that they are given the same MIDI device index every time. If this doesn't help, Icon support is probably your first port of call. Explain to them that your second G2 EXT MIDI output isn't being seen by Windows. Hopefully they'll be able to offer a solution. Another solution might be to connect the second ICON QCON G2 Ext to your PC using a USB hub... this might make it look different enough to Windows to allow it to appear.
-
Can Korg nanoKontrol Studio play nice with Arturia Keylab MKII? [SOLVED]
msmcleod replied to Sal Sorice's question in Q&A
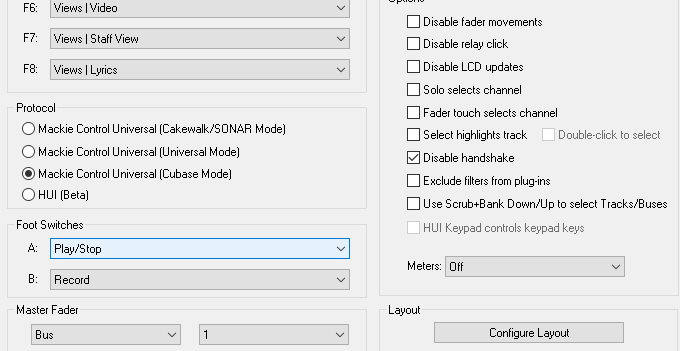
@Sal Sorice - I've PM'd you with the answer, but will repeat here for the benefit of other users: The MackieControl.dll actually contains three control surface interfaces, which are designed to "act as a team": - Mackie Control (the main MCU) - Mackie Control XT (an 8 fader extender) - Mackie Control C4 (a 32 v-pot extender) Adding more than one Mackie Control, will cause Cakewalk to think you have two MCU's that are trying to act as a team, so it's likely that two MCU emulated control surfaces from different manufacturers just don't want to play nice together. The solution is to download my own version of the Mackie Control surface: https://msmcleod.co.uk/cakewalk/MMcLMackieControlSetup.zip The installer in the zip file will install three new MackieControl.dll's alongside the existing Cakewalk one. The surfaces are exactly the same as Cakewalk's control surface, the only difference being that the registered GUID for each control surface is different. As a result, MMcL Mackie Control #1 will be seen as a different control surface to Cakewalk's Mackie Control, and will not try to act as a team. This allows you to use up to four independent Mackie Control surfaces within Cakewalk. It allows each control surface to have their own separate options - e.g. one controlling buses with the other controlling tracks, or one set up as Cubase emulation with the other using the standard Cakewalk/SONAR mode. Just set one of your control surfaces to use Mackie Control, and the other to use MMcL Mackie Control #1 and it should work fine - make sure you pick the correct MIDI IN/OUT pair for the KeyLab II. The nanoKONTROL Studio should be set to Cakewalk/SONAR mode and the Scene button set to "Scrub" using KORG's editor program. The dialog setup within Cakewalk should be as follows: This will allow you to use the "Scene" button as a shift key to switch between tracks & buses in conjunction with the Bank up/down keys. It also makes the track select buttons work by double clicking them (out of the box, they don't work at all with Cakewalk, and KORG says as much in their documentation). The KeyLab II works better in Cubase mode, with Cubase mode being set in the Cakewalk's Mackie Control dialog: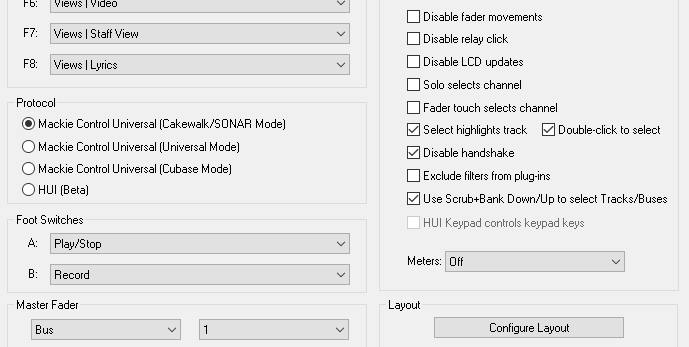
-
Help on Offset Tempo Map by half or double
msmcleod replied to mgustavo's topic in Production Techniques
For the hidden contents, put your content in a spoiler tag: {spoiler} your content here {/spoiler} Replace the curly braces with square brackets. -
Help on Offset Tempo Map by half or double
msmcleod replied to mgustavo's topic in Production Techniques
If you want to double the tempo, but keep the speed of the performance the same as it was: If you followed any previous steps to enable AudioSnap/Follow Tempo for audio clips - you want to revert that. So CTRL + A, go to clip properties, and disable Audio Snap. The other important step is to ensure all audio clips have their time base set to Absolute - you can change it back to Musical afterwards, but they should be set to Absolute before we change tempo. The reason being, is that for example... at 120bpm bar 4 is exactly 3 seconds into the performance. If we double the tempo, then any audio at bar 4 will now play 1.5 seconds into the performance. We don't want this - we want it to play at exactly 3 seconds in. Setting it to absolute will change the clip so it starts at "3 seconds" rather than "Bar 4". If ALL of your audio clips start at 001:01:01, then you can skip setting them to absolute. Unhide this section to see how to do this: Then: 1. CTRL + A to Select All 2. Choose Process -> Length from the main menu 3. On the dialog, the the percentage to 200 Percent. Ensure "Stretch Audio" is UNCHECKED, then click OK 4. Choose Project -> Offset Tempo Map from the main menu 5. Choose % and 200 percent, then click OK -
You can synchronise wordclock over SPDIF - this is completely different from synchronising playback and tempo.
-
Help on Offset Tempo Map by half or double
msmcleod replied to mgustavo's topic in Production Techniques
Try this: 1. CTRL+A to Select All 2. Click on Clip Properties, and click on Audio Snap 3. Enable Audio Snap, and check "Follow Proj. Tempo" 4. While holding down CTRL, change the track filter back to "Clips" 5. Process->Offset Tempo Map 6. Choose % and 200%, and click OK -
The localhost address is the callback address for Cakewalk after successful login. Since Google removed OAuth support from browsers embedded in applications, this is how all OAuth based authentication works nowadays - i.e. the application launches a browser for the user to log in, then listens on localhost on a particular port for the final log in response.
-
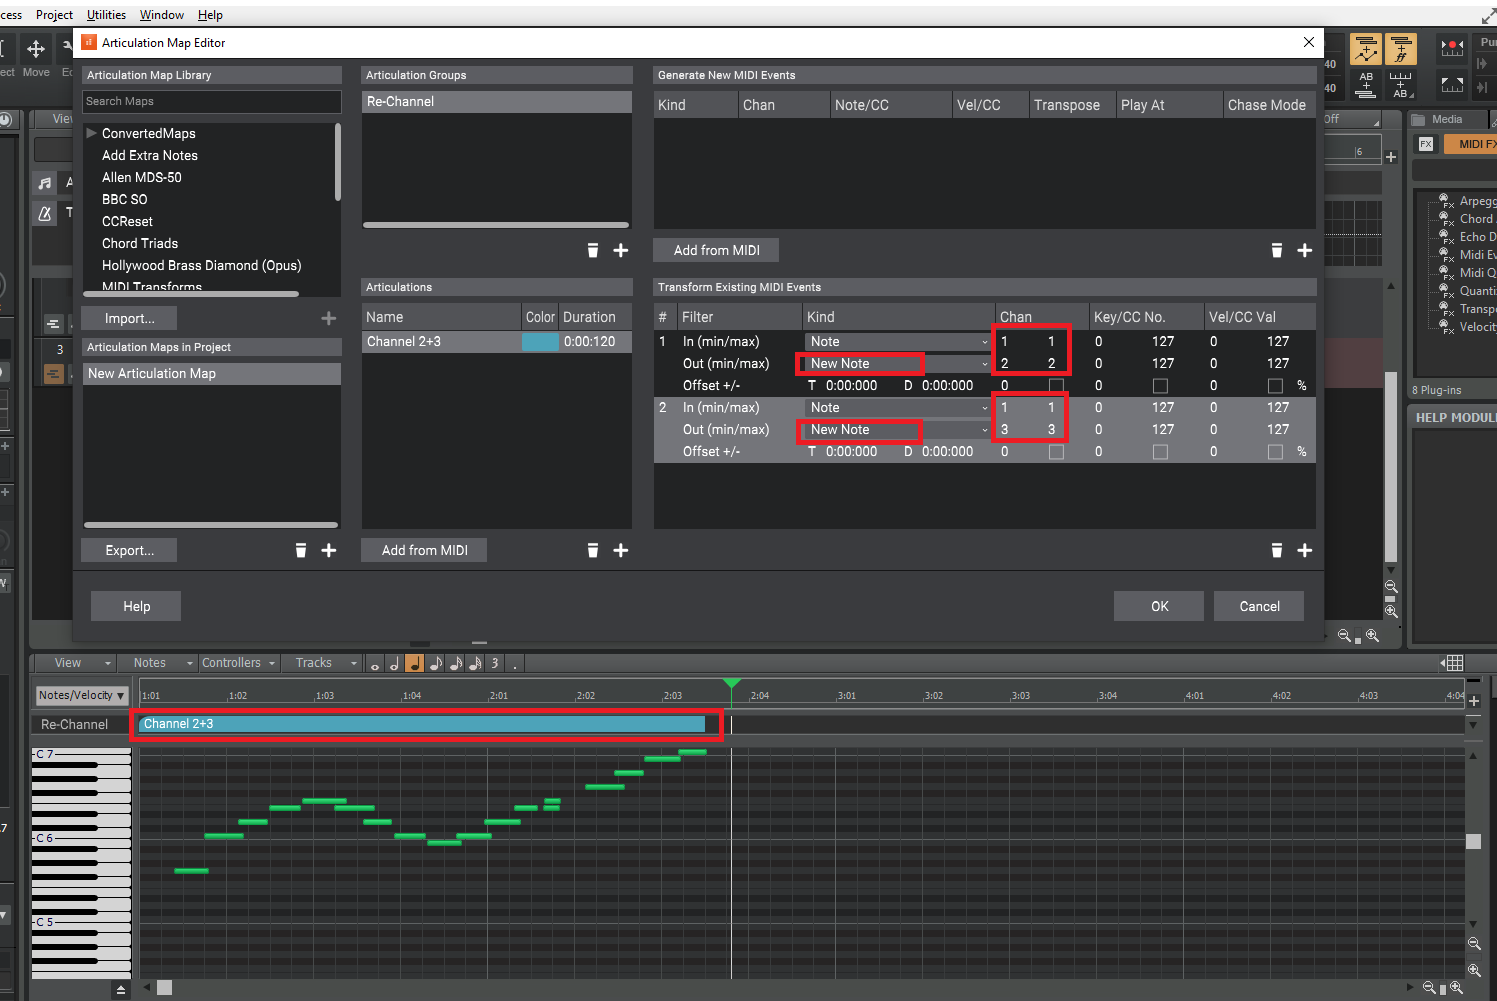
You could use articulation maps to automatically duplicate the notes on other channels. Here I've got TTS1 with Piano on ch1, Fantasia on ch2, and Strings on ch3. The following articulation map will duplicate any notes on channels 2 + 3: This results in the notes being played on all three MIDI channels. What it won't do is duplicate CC or Pitch Bend messages though.

-
I've got 2022.11 running on my Windows 7 boot with no issues. Without seeing a screen-shot, I can only speculate but: 1. Does widening the track header pane allow it to be seen? 2. Does changing your track control filter to "All" make it re-appear (i.e. does the current track control filter have "Track State" unchecked) ? 3. Are you maybe using an out of date theme?