


Rickddd
-
Posts
22 -
Joined
-
Last visited
Everything posted by Rickddd
-
I love Cakewalk, and appreciate what bandlab has done over these last years to make it even better. Back in the day, before there was Bandlab, I bought cakewalk. First the basic one, then upgraded to Studio, then upgraded to "Platinum". I forget how much I paid but I believe a full copy of Platinum was selling for something like $600. This was some 10 years ago. I don't expect the bakers to give a copy away, but it would be a nice gesture if there was some consideration for people like myself who invested real dollars into the program for when the new Sonar comes out. Maybe a 10% discount or something like that. Just a thought
-

Recording Audio direct from midi track... lost feature?
Rickddd replied to Rickddd's topic in Cakewalk by BandLab
This is so cool! -
Recording Audio direct from midi track... lost feature?
Rickddd replied to Rickddd's topic in Cakewalk by BandLab
Thank you so much @scook -
I vaguely remember years ago cakewalk adding a feature that allowed one to record a midi (e.g, piano) direct to audio wav file, instead of creating a midi file. Is that feature still present?
-
1. Freezing tracks is a bit of time and work, but it's the only thing that will flatline track demands. I have a pretty high computer, 32 Gig I-9700 running on SSD's, and I have to resort to freezing rather quickly normally. My current song data is also on an SSD. 2. If you use the "Upsample" feature for 64 bit vst's, I keep mine at upsample on render only. Never upsample on playback. 3. Be strategic about how you apply "common elements" like reverb. Having a single reverb bus and using a send (while adjusting how much signal is sent from any calling track) can reduce VST load, and has the advantage of have one unified "voice" instead of many. 4. Definitely, some VST's are much more resource intensive than others. For me, I like to use Waves Abby Road Plates a lot and that drags my system down quickly; so I think long and hard before I use it. Again, freezing can be your friend. 5. I'd much rather freeze a melodyne track then bounce it for obvious reasons. 6. Shutting off all effects ("FX" button") of course will often make a mix sound a lot different, but you can turn on the effects for specific tracks, thereby reducing load. 7. Sometimes, when I have pushed my system to it's limit despite freezing tracks... OR if I want to add additional tracks while having FULL FIDELITY... I will output the song as is, create a new project, and have that file pulled in the new project. I then can add whatever I want in full glorious fidelity, and then have to bring it into the original project. It is a multi-step approach, but it does get around any resource limitations. Hope this helps.
-
The following scenario has happened quite a bit over the last couple of months for me. I have Melodyne 5 Studio and the latest CwB. I fortunately have found a work around, still this never happened in the past and I am just hoping it resolves itself in the future. So here is teh scenario: 1. I edit a track using melodyne. 2. when I come back to the project, the edits are physically there, but when I play the song no output is heard from that particular track. Zero output. 3. When this happens, if I "freeze" the track, the frozen track shows zero waveform ('tho the edits and wave form are present in the pre-frozen track). Now this has resulted in several "gotcha" moments but fortunately there are two work arounds. 1. Freeze the track before I save the project, or, 2. If I forget and no output is heard, I do this: a. Right mouse click remove melodyne b. Immediately "undo" (for me, CTRL-Z). Doing #2 restores the clips ability to output and preserves the edits. It works, works every time actually, but is annoying. The dead-output melodyne clip in CwB doesn't happen always, but maybe that's because I now freeze the tracks right after editing.... IN am in WIndows 10 pro, 32 GB, my CwB is healthy as a horse so far as I know and this has been happening over at least 2 of 3 updates.
-
Why physically cut the end of the song off? Why not use automation (depending on how you end your song, e.g, fade), and just export to the shorter length using adjusted markers?
-
Good organizing ideas for new Bandlab installation
Rickddd replied to Sven's topic in Cakewalk by BandLab
I'm not an expert at all, but your SSD can eat regular hard drives for supper. However.. a 1 TB SSD system drive doesn't leave oodles of space for decent future growth. I bought a second SSD 1 TB and run both my projects and cakewalk off of it. Just say'in. -
Prefs> Customization> display > show start screen (uncheck)
-
I wanted to point out an alternative to randomization and approaches to "doing it yourself". And that alternative is hiring a session drummer for your song. I'm not here to push this business, I am a home recording musician and that's it. But "Fiverr" has over 900 session drummers of varying talents and varying genres many of which will do your song for $20-$40. I haven't hired any drummers from it, but I regularly hire singers, lead guitarist and a pianist. Not for all my songs, but for those where I want to add something that I myself simply can't provide. Here's a link to the session drummers on Fivrr. By the way, Fivrr has a really good system in place to protect you the buyer- artists are paid after you approve what they provide you. So you are in control. Most artists have samples of their work for you to judge. Again, I have no connection to Fivrr other than I use them for singers, guitarist and pianist. If I ever decide I want real drums, I will definitely use that service. Just say'in.
-
I'm not getting that. Mine works fine. What Martsave suggested could very well be the culprit. As a quick test, disable all effects universally - does it still have silent moments?
-
Man. I have missed SONAR (uhmm Cakewalk)
Rickddd replied to Stephen Rybacki's topic in Cakewalk by BandLab
I do love this software. I still have CTD issues from time to time when a project gets large or complex, but I work around it. Aside from that, my concentration is on the music and the software just makes it so easy to focus on that. I came into Cakewalk before there was Sonar.... so glad I stuck with it. -
Velocity marking in Pianoroll.
Rickddd replied to Paw Vester Kristensen's topic in Cakewalk by BandLab
I would think it would impact everything in a particular clip. So yeah, high hat etc. But there's a work around for that. 1. Create a new take lane, copy the clip into it. So you have lets call it identical clips A & B. 2. Now, the goal would be to take the kick out of say clip A, and ONLY have the kick in clip B. 3. Different ways to do that, but here's one way.... but there is a better way I'll mention at bottom. a. Lock the data in clip B (Right mouse click > click lock > lock data) b. Click on Clip A, click on the piano note for the Kick, hit delete. It will look like it did not delete it because the other clip is there as well. c. Now lock data in clip A, and unlock B. Remove all but kick in B. d. Now you have two clips, one atop another, that will work exactly like teh single clip e. Now, on clip B, the one holding the kick, do teh midi effect thing. Remember, you are not working the track now, but the take lane. That's it. BTW, if you don't want to go through the lock, unlock thing, another way to quickly do it would be to create a temp midi track. MOve a copy to it, delete the kick in one and the rest in the other, then move it back. The other way you might approach things in the future, depending on what drums you use, is to have a track for just the kick, just the snare etc. I use Kontact, it's a bit of a pain to do this, but it works. But you may want to stick with the 1st method. I'm just a self-taught country boy some others may have a better way to accomplish it. But I don't think it's too awful bad after you do it once. -
Is there a way for trim volume automation?
Rickddd replied to Michael Zagas's topic in Cakewalk by BandLab
Craig... I was very interested in your post... I have always had a frustration doing that same thing because I would always nudge the automation track ahead or behind in time. Even if just a little it can sometimes cause issues for me.... so I was following your instructions and drum roll... discovered that if I held down the shift key (left) when I drag the automation it stays exact in terms of time placement. I can't tell you how much of a pain in the A%$% this has always been for me. I'm free!!!! Free!!!!!!! Yeah!!!!!! Rick -
Velocity marking in Pianoroll.
Rickddd replied to Paw Vester Kristensen's topic in Cakewalk by BandLab
GREAT POST... never thought about the problem... but I found an elegant solution!!!!! Select the midi clip of on interest. Add the midi effect "Velocity". There is a setting within that effect called "Limit". Limit can select a lower limit and and an upper limit. For your particular goal, set the lower limit. Be sure to click on the little circle above it to make the limit active. In the image below, I have set a minimum velocity of 75. At this point, all of your notes in that clip will have a minimum velocity. You can choose to stop right here... and keep the Midi effect active... or... drum roll... BOUNCE the clip. You are left with a midi clip, no more MIdi effect, but all your notes will have the desired minimum.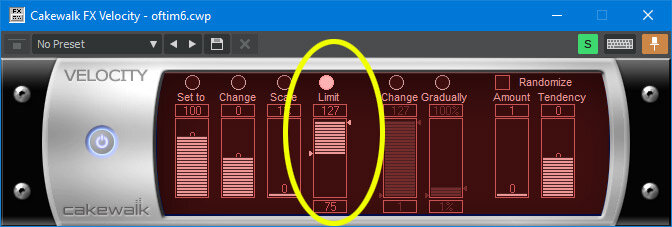
-
I have a couple of ways I handle this. One way is surgical but limited, the other way is absolutely perfect but a bit more time consuming to pull off. First way - surgical but limited: Shut down all effects using the global effects off button, then select just the effects I want to hear. When I do this, I can set the buffer size in preferences (ASIO for me) to minimal so there is almost no latency. Now, there is a chance when you shut down the effects that things will sound so "off", like vocals too low because compressors aren't engaged etc. I deal with this in a couple of ways: a. I almost always "Freeze" my tracks, which of course locks those track effects in and reduces CPU load. There are still bus effects to contend with, but the larger the number of tracks, the more benefits you get from freezing a track. I always freeze my tracks where possible. b. Cakewalk allows you for 64 bit VST's to "upsample". There are two settings for each VST: upsample on render, and upsample on play. I personally always have upsample on render, and always have upsample on play off. Did also want to mention that the better you balance things before mixing, the less impact shutting off effects tends to have on the overall sound. Consider what happens if you use a compressor on vocals, but you crank up the gain on the compressor. When you shut off the effects, the gain goes back to none for the compressor. To that I always manually up the gain on recorded tracks so that an approximate gain is baked into the track itself. Then if I shut off the effects it has less of an impact. Second Way, Absolutely Perfect But More Time Consuming to Pull Off: Let's say I don't want to sacrifice sound quality during recording, and I still want very small latency. I will output the song, usually from time 0, with all effects on and the song in all its glory. Then I will create a new blank Cake project, and import that song (Single audio file). Then record any midi (or audio) stuff I want. I do this as well for other instruments and vocals if I really want the best of all worlds in terms of latency and sound. Since I am recording against the full version of the song I get to have my "cake" and eat it too.... When I am done, I take the new work (e.g, midi) and bring it into the main project. Perfect!!!! Caveat: If you vary the tempo in your songs, the temporary new cake project must include the same tempo data. If your tempo is fixed, then you are all set! Just set the tempo to match the main project. ( I copy the tempo by just making a copy of the original project, then stripping out all the tacks and effects. (There may be a more graceful way to do it... )
-
Automatic Switching of ASIO Buffer Size Possible?
Rickddd replied to Rickddd's topic in Cakewalk by BandLab
I was thinking of a way to explain better. So I thought I'd use I of course are in awe of much of the technical end of things. And I take a very simplistic approach. So I thought I would use a metaphor. Let's say I go to the eye doctor, and I can't read the eye chart; it's out of focus. The eye doctor says, "what prescription do you need?" My answer would be "I don't know, lets use some of this very sophisticated test equipment and your training as a doctor to measure my eyes". Now lets say, instead, I come into the eye doctor and sit in the chair. Only in this scenario, I can see the chart perfectly without any glasses at all. I can read the finest print. The eye doctor says to me "what prescription do you need?" My response is "none at all". In the first scenario, equipment and testing is needed. In the 2nd scenario, none of the equipment in the docs office is needed. In the same way, the audio card I have (which bypasses all the slowness of usbs), is so fast that my midi notes are always spot on no matter how fast I pound the keys, as are audio recordings that I do in to the daw. If there is a latency, my ears can't hear it and my eyes can't see it. And I am very aware of what poor latency looks and acts like. My card lacks things like condenser mic inputs etc, but I have a mixer before it that does all I need to do in that regard. So for now, I'm happy with the card. -
Automatic Switching of ASIO Buffer Size Possible?
Rickddd replied to Rickddd's topic in Cakewalk by BandLab
I appreciate the time you took to provide this information. But I do have to disagree in part. The Creative Labs Soundblaster Z card is a high end card specifically made for audio production, with a very high s/n ratio, low latency and ASIO support. As I can't offer proof of this with my own scientific measurements, suffice to say when I am running that puppy at 2ms whether to record midi or audio there is no detectable delay. My midi notes hit their mark precisely. For years I found recording in daws annoying even with minimal latencies. But this card is one half hair width short of zero latency. I'm not saying its the best of the best, I'm sure there are better. But it really works remarkably well. sound-blaster-zxr I can live with having to switch buffer sizes (round trip time), its just me wanting it all! All the best, Rick -
Over the last 4 or 5 updates, I have seen it swing from ok to worse and now much better. So I am in a happy place. I get an occasional crash when I am freezing tracks, but can usually get past that so I am good. I am a sonar veteran, having purchased platinum. And I am so appreciative of what Bandlab has done with it since. I love creating music, and it's especially made the last couple of years a positive experience. Am happy with the stability overall.
-
Automatic Switching of ASIO Buffer Size Possible?
Rickddd replied to Rickddd's topic in Cakewalk by BandLab
>>> Although I can understand why one might come to the conclusion you did, I simply click on the ASIO button, and select the MS that I want to try. See image below. So, for recording, I set 2ms and effects off, and for playback if I want live plug ins I set some higher number. The example below shows 60. Note that my audio card has ASIO, and is PCI based. So it doesn't have to deal with USB connections, hence it can be super fast. I've been switching back and forth since Sonar 1, so I obviously can live with it. I just thought... wow it would be nice if.... PS: did want to mention that the program 100% of the time remembers my latency (hence, buffer) settings, no matter if I shut down the program or not. That part works beautifully, as does the super fast midi recording because of the 2MS latency. Love it. He Scook - great idea on the Autohotkey. I forgot about keyboard automation. For years I used something called macro express in my programming life. I will ressurect that and see what I can do. Thanks!
-
Automatic Switching of ASIO Buffer Size Possible?
Rickddd replied to Rickddd's topic in Cakewalk by BandLab
I'm not sure I communicated well what the issue was, and why a static setting is not the best choice, for me. Hopefully in this post you see a graphic that I created for it. This is in CW prefs. Shutting off effects allows me to set the ASIO buffers to an incredibly fast setting of 2 MS. This makes it a pleasure to precisely record midi stuff - be it drums or piano or whatever. No delays. No manual fixing needed. But when I want to work with the effects on, I must increase buffer size. The amount depends on how many live effects I have. Often, I try to freeze tracks as much as possible but that's not always convenient. In the graphic, you see where I set it to 60MS. This works fine for playback, but recording introduces significant delays in the midi not recording. So I do not use it for recording. And so if I am recording, editing etc and if I want plug ins enabled for playback, I must constantly go back and forth on the ASIO setting. If there was a way to set an ASIO buffer override setting for all effects off and/or recording, that would work. Like I said, I work around this, but it's just tedious after the millionth time. It's not a Bandlab caused issue, been like this at least from Sonar 1 which is when I started with Cake.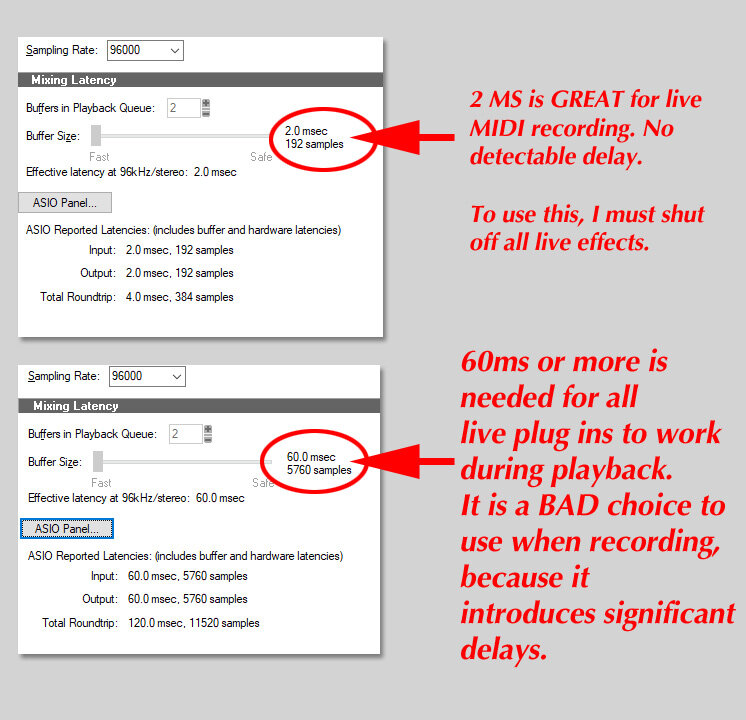
-
When I am recording in Cakewalk, I shut off all the effects and I turn down the ASIO buffer size. I can get it down to 2MS. When I want to play things back with all effects on, I go into preferences and set the ASIO buffer size to some higher number - anywhere from 20-40MS or even more. I do this manually, and as you might guess, I end up doing it a million times a day if I am recording and listening and building and going back and forth. Is there any way that I can have one ASIO buffer automatically when effects are off and one on when they are on? I'm guessing no. Although I love Cakewalk, I have just passed my 1 millionth time having to do this manually.


