JnTuneTech
-
Posts
296 -
Joined
-
Last visited
Everything posted by JnTuneTech
-
Set global reverb with wet/dry setting for each channel?
JnTuneTech replied to Louis Miles's topic in Instruments & Effects
To my ear, the difference could be in the synth or sample control itself. I would guess the game sound is applying an envelope to the sample, which is very commonly used to vary note cutoff & resonance, etc., and can be done dynamically with MIDI control as well. -But that is just my guess. As @John Vere points out, there are many virtual synths out there, and if the synth itself doesn't provide the FX you want internally, using a VST in Cakewalk involves an audio track that can have many routings & FX inherently. -Multiple choices for how reverb is mixed, for instance, some reverb FX have a "wet/dry" setting, which again really only applies relative to how the sound is routed, as a send with return routing can achieve the same thing as well. -Just keep looking for the sounds you need, as that is usually the hardest part, then the mixing is easy. -Or so I like to think anyway! -
Nice! - Yes, a bit spendy though, but at least there are options other than long term. Just the material you reference from Ken Scott looks quite worthwhile, he sure has a hell of a lot of experience in the "glory days" of studio recording, going on way past the Beatles days, so I hope he does more of those videos. It would have been even more sweet if Geoff Emerick (Respect...) was still around to share what he knew! I do have his book of anecdotes & recollections.
-
Normally I just use screen capture for things like recording settings that are visible (but not reportable in any other easy way), even though that can be tedious, I know. That being said, if I understand what seems to be the initial problem outlined in your post, my first instinct is to point out that, unless something else was changed with the new audio interface setup, all the necessary instrument definitions are still in place in Cakewalk. What happens when you change the MIDI interface connection(s) entirely, in these older versions of Cakewalk, is that in my experience, the MIDI instrument to port mapping randomly changes, or goes away entirely. I have dealt with that also recently. This also exhibits if you move a project file to any other system with a different I/O setup in fact. I have done that a few times as well! As I mentioned above, I often save screen captures of some setup screens (though I know some things are also available in preference files as well under the hood), and the main MIDI instrument mapping for my hardware ports was one I had snipped, and so I was able to resume my original mapping from there, when I lost it. After that, my older projects went back to working with the proper bank & patch assignments. This is possible because unless you save over the original project with different assignments, or delete/change any Instrument Definition setups in your Master .ins, the old references will still work once the original port mapping is re-established. -That answer may or may not help you, but hopefully it gives you a place to start. As a note, I believe I also had to make sure the MIDI ports were loading in the same order as ones on the old device did - for me that was tricky. I think the OS assigns the MIDI port loading number, and Cakewalk then assigns an order based on that. For me, if it was different, often the instrument mapping was broken or just off if that also wasn't recreated, which as I say, can be tricky. -So, depending on how you organized your Instrument Definitions originally, before the interface change, it may be as simple as re-establishing the Instrument-to-Port (number) mapping you originally used. Provided of course you haven't already overwritten the original projects in question with newer mapping. For instance, if you already had all your various Korg Kronos 88 Instrument definition material under one logical group - in the Instrument list, and you get the new interface MIDI port(s) to the same loading number, you may be able to simply re-map the Korg Kronos 88 instrument to the same port (number) it was on originally, and all the older projects should just recall the bank & patch mappings they had. -I know that worked for me several times now, to not only with the default Instrument Definitions, but the custom ones I created as well. -Which reminds me: Backing up the Master,ins file once in a while is very recommended if you create custom definitions! -Anyway, I hope some of this helps.
-
Or, if you want to start (or join) a gossip column here, just go to the "Coffee House" sub-forum. This thread is specifically for feedback on the CbB 2023.09 release... Or, it was, I thought!
-
Instrument Definition Files - Technical Documentation
JnTuneTech replied to Scott Cupstid's question in Q&A
In my recent experience, there indeed seems to be no concrete "manual" or list of commands in any searchable generally available source. -I have had many passes at working with the format manually though, and I still just find it best to copy, analyze, modify existing .ins files. -I also had to recently remind myself that Cakewalk will properly format .ins entries in your current Master.ins file, when you create a definition setup using the Preferences - MIDI - Instruments - Define... dialog in the GUI. I would suggest taking that process, creating a very simple definition (made up or otherwise) - using the Patch, Bank, and Note Names functions at minimum, and watching the way the GUI notates that process as you create & associate them, and then also analyzing the corresponding result in your Master.ins as well. -
That definitely sounds frustrating, and hard to deal with! Your basic information is very helpful, but a few things should also be examined: Does the activity meter on each MIDI track respond the same each time you play through? Save before playing after loading the sample(s) - does the Cakewalk project show as "dirty" - changed - after the first playthrough? Can you confirm in the sampler GUI that the settings seem to remain the same each time you play through, -especially of course after the first play through? Are there any instructions in the sampler documentation that refer to specific MIDI configuration considerations? I would try to narrow down the source of the playback change. Is it volume somewhere in the process, or is it a change in the MIDI response, etc. Try testing it with one track - instrument in a test project. Turn off MIDI input/echo, and just place notes in a blank MIDI track manually in PRV. Play that back, look for changes you or Cakewalk didn't accidentally introduce somehow. That would be my first suggestion.
-
I really don't find that solution (unchecking outputs first) faster, or easier in day-to-day usage. For one thing, when you open a MIDI file in Cakewalk, all MIDI outputs are set to the same thing, and it is very easy to change them all at once. I use it all the time. 1 - use the "Open" menu to open the MIDI file. 2 - insert (at least 1) TTS-1 instrument. 3 - Select all the opened MIDI tracks, and change the output to TTS-1. -Viola. (-Tip - lower the default output level of the TTS-1 track.) Play. Additionally - optionally, you can then spend time assigning the Bank & Patch selection/display, and even Volume, Reverb & Chorus on each MIDI track - Inspector view to your taste. -The catch there is that sometimes MIDI files contain embedded commands that override those initial track settings as you play the file back. -But really, is that so hard? It requires changing no system settings at all. Oh, also be careful, as with TTS-1 opening some types of MIDI files, this is where the infamous no-warning crash happens - for me anyway. Right after setting it up as above, and hitting play. So, if I am concerned about that, I will save the project, usually as a proper project file, and then hit play! 😅 Your mileage may vary!
-
Set global reverb with wet/dry setting for each channel?
JnTuneTech replied to Louis Miles's topic in Instruments & Effects
No, the volume always remains the same. This is also a disadvantage of this sound engine, that is that the channel volume does not affect while playing a note. So, for example, if a Channel Volume (7) command occurs while a note is playing, it will not affect that note, but will only affect the next note after that command. But am still researching what this tremolo command is used for! Again, perhaps I am mistaken, the brain sometimes chooses to interpret sounds in different ways 😅. But perhaps the instrument note level was changing, not the channel level. This is common in MIDI programming, and typically Expression (11) is used to change an active note level, separately from the overall Channel Volume (7), since the latter does not normally change an otherwise already keyed note. I can't help answering questions about use of sforzando, I haven't used that app. I am fairly versed in using multi-timbral synths, in Cakewalk of course the TTS-1, and you seem to have the hang of that. There is basically 1 mini sampler/synth for each channel there, and while each synth can be somewhat customized initially - thus having its own saved parameters, each synth then uses the dynamic channel specific controls of 7 and 11, as well as pitch bend, modulation, etc. On each synth output there is a reverb and chorus mix level, but the type of reverb, as well as chorus is set on an overall settings page that is common to all channels, and the reverb & chorus actually mixes at the point of each main output. Whereas the other MIDI control items like modulation, pitch bend, vibrato, etc. dynamically activate the feature on a channel-by-channel basis within the saved synth - relative to the saved synth settings determining how those commands will exhibit in each instance. Hopefully you can examine the packets of individual channels and their respective control one at a time, and just find a way to emulate each instrument with a synth that sounds the same - or close anyway, one part at a time. If it were me, I would separate the instrument/control MIDI stream into separate tracks in Cakewalk. Perhaps you are already doing that - but either way, I have no doubt you can find some combination of techniques to get this working! Just keep at it. 😎 -
Midi map for Superior Drummer 3 for TD50x extra kit pieces
JnTuneTech replied to Tony Carpenter's topic in Drum Maps
@Tony Carpenter - I guess I should apologize then for going off the deep end! If you are only using SD3 to analyze things, then carry on. I will repeat my initial response - going back to basics might be easiest. You should be able to bring up the kit pad/note assignments on a TD50x master unit, and just write those down for reference. Then you would probably want to bring up that TD50x MIDI input map in SD3, save it as a different name, and edit/add the appropriate kit assignments to taste. - Mapping can be a bit of a task, but you will get it, and once done, you will forget all about it and just play on - right? 😎 -
Midi map for Superior Drummer 3 for TD50x extra kit pieces
JnTuneTech replied to Tony Carpenter's topic in Drum Maps
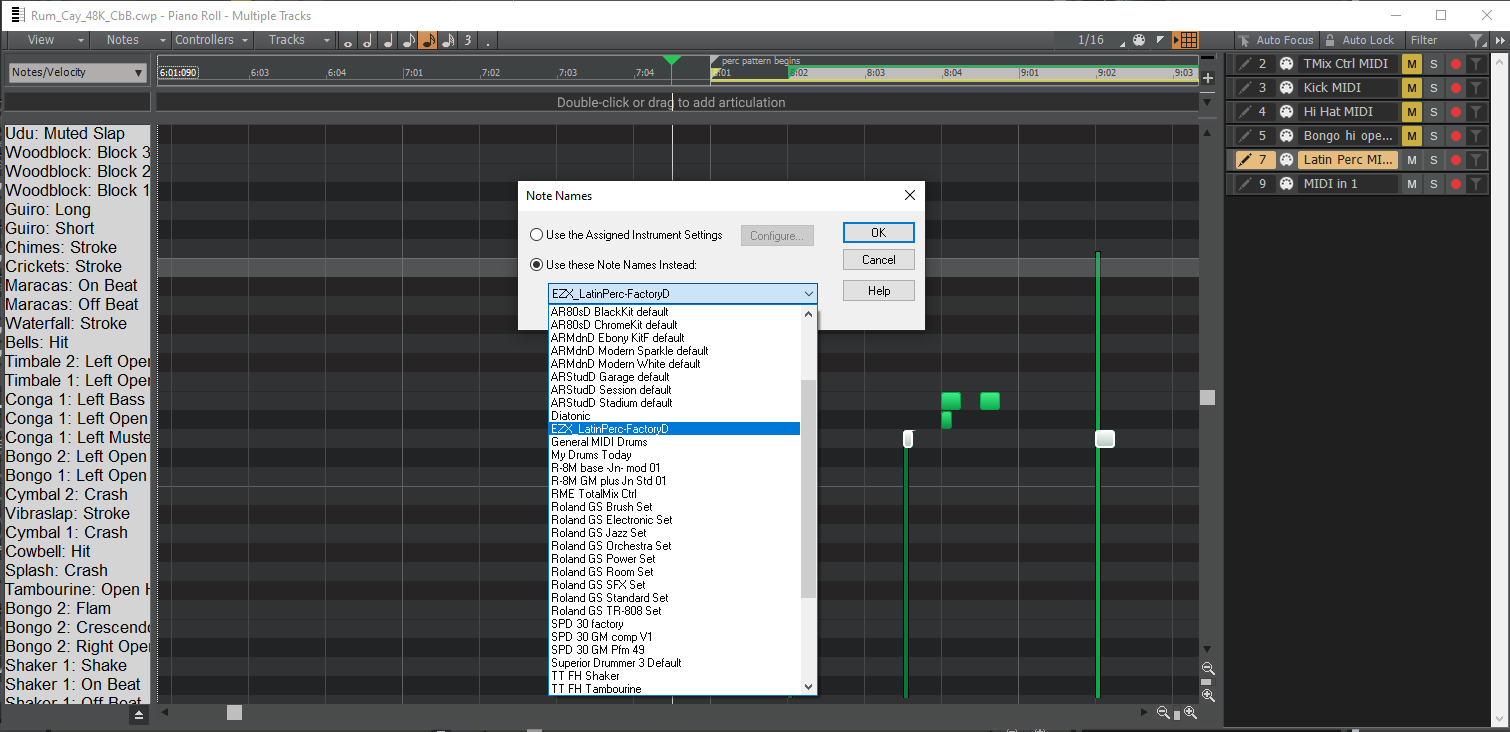
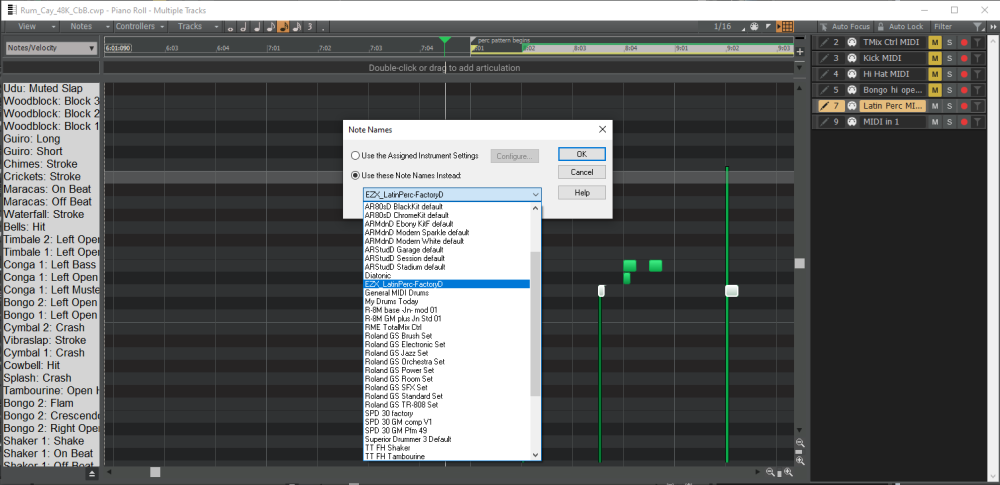
You may need to look more into the method SD3 uses for modifying & saving customizations, as it sounds as though you may only be making temporary mapping changes. -Each software package has its own methods to follow, and SD3 is usually good at providing documentation. It may be worth learning how some of the mapping options for standard MIDI percussion works in Cakewalk as well, since once you modify a map, and in fact even when just using the default mappings on various rhythm instrument samplers, being able to quickly use them in MIDI input & editing can be very important. -I just recently worked with a project that needed some percussion, and here's what I used to make it easy for input & editing on the PRV in Cakewalk: I decided to use a basic percussion MIDI track, and create a 4-bar sequence using the PRV in Cakewalk, with my sampler target being SD3 with the EZX - Latin Percussion library loaded. -All fine & well, as the default instruments in that sample set cover what I needed, and can easily be tuned & tweaked if needed in the SD3 GUI. One problem: Trying to use the sample set quickly by either note numbers or pitches is very tough. Lots of articulations, and even a few duplications, even with the default note mapping. -So, what worked for me - creating a note map that I can apply in the PRV to visually identify the correct map by kit piece name, instead of the default MIDI note number. As it happens, SD3 has a decent set of tools for viewing and printing the MIDI note mappings of the library you are using. So, I printed out a PDF of the Latin Percussion EZX default note mapping, and saved it. Then, I opened it on my PC running Cakewalk, and resized & moved the windows for each app so I could see what I needed from each app (as in my case, I was using a single-monitor) simultaneously. -This particular procedure will also apply in the Instrument Definitions sub-section in this forum, by the way-. I decided to create an Instrument Definition (or optionally at the minimum a note map section) for the Toontrack - Latin Percussion EZX library, since I didn't already have one to import. -It is fairly easy, but somewhat time consuming, as there are up to 128 notes to define, but with some keyboard shortcuts, and copy-paste operations, it can go by quicker, FYI. The Preferences - MIDI - Instruments - Define... dialog in Cakewalk is the easiest entry point for creating these note name maps (though you can also do it manually with a text editor). -The Cakewalk documentation covers the options & keyboard shortcuts, and in my case I often refer to that by using the "Help" in the Define Instruments and Names dialog (or by just searching the Cakewalk documentation). Another recent post in this forum has a great animated example of using the input method described here: So, with the PDF map from the SD3 printout, and the Cakewalk dialog both visible, I created a note map to the sample kit. -I mostly made use of the keyboard shortcuts to enter the data, also copy-paste sped up entering the Instrument: format used here to preface each articulation. Then, once saved, I was able to put the MIDI track I was creating in PRV, and apply the Note Names map I had just created. -And as a result, I was able to use the sample library fairly quickly in PRV in Cakewalk. Similarly, Drum Maps can be created & modified, shared, etc. using their own set of tools, and can be just as helpful (and/or tedious to create), - just another option that works somewhat differently. They both can really help your workflow, so check them out! In the context of the original post here - if you were to create and save a custom mapping layout for a sample library, and you wanted to quickly use that instead of the default view during PRV entry or editing in Cakewalk, that could be something you may also find useful. -Do also note (no pun intended!) that you can use the Define tool to update & correct the entries you already have, as well, as often as you need to, - I definitely have found that quite helpful. 😅 Otherwise, using a text editor to copy & paste when creating slightly modified similar sample sets can speed that procedure up a lot. -Your mileage may of course vary, but when you manage to get your own custom mapping working properly, this technique can really help in repeated usage going forward!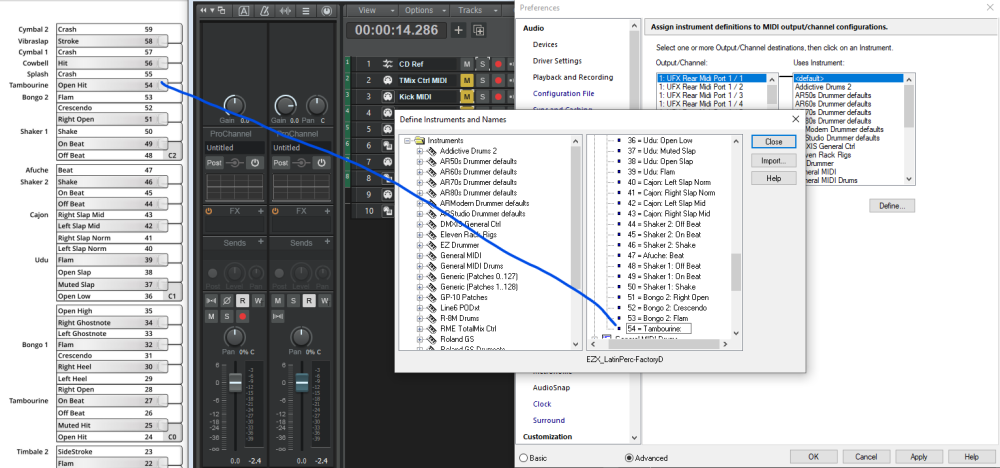
-
Midi map for Superior Drummer 3 for TD50x extra kit pieces
JnTuneTech replied to Tony Carpenter's topic in Drum Maps
I would suggest starting with the basics - if you have a customized set of kit pieces/pads. Literally write (or type) out a list of the note/control numbers your kit pieces/pads are using first. Then using the note mapping options in SD3, figure out what is and isn't properly matching. -Going from there might be easier, as there are only so many kit pieces/pads, but many, many options for the software mapping. -That would be my basic suggestion. -
Strange New Characters When Typing in Windows 11
JnTuneTech replied to sjoens's topic in Computer Systems
Isn't it just wonderful that these things get added in and automatically turned on by default? I mean really, many of these kind of features may actually become properly helpful (once they use our collective "anonymous " data we never properly know we consented to be collected - to bug-check & refine them), but having no real actionable warning and/or usage instructions that allow us a chance at dealing with them initially, is the biggest issue I always have with this kind of thing. And you would think with simple word processing - typing, the initial default would be to type exactly what I've tried so hard to learn to properly type... But no. As far back as the mid-90s, I was convinced that there should be some kind of office-centric computing system & software that remained closed-featured, as in basically not connected to anything outside of the device itself. There are a few old word-processing typewriters like that if I recall correctly. Being an office systems admin, I wanted (and still do) some way of allowing modern use of computer processing, for tasks like word processing, spreadsheets, accounting, what have you, that would only work primarily as designed without possibility of constant change, and of course intrusion and malware. -Sometimes I just want to go back to a physical typewriter and paper. Actually, I make sure to at least try to watch for those settings when setting up new computers from the get-go, but it really is discouraged by most PC OS setup routines, and unless you read the reams of EULA text that may give a clue to a seasoned lawyer on a good day, it's almost impossible to even know your choices, isn't it? As far as inking & typing feature "enhancement" in Windows, there is an initial option to (ostensibly) turn that off, as well as the option to not use "advertising ID", and the general category of "optional diagnostic data", but how much really still goes on behind the scenes... well good luck controlling that. I started thinking of Sting's lyrics for "Synchronicity" as I read that, for some reason. 😶 I know, -we 've all pretty much walked into this willingly though, wanting technology to work as much as we do. And when it's used positively (as I hope that Cakewalk does - I am trusting anyway...) it really can be great, no argument. I truly hope things like AI can help us really gain power against things like cancer and other massive problems. However, I hope I don't lose much more of my privacy, and choice, than I already feel happened with the advent of always connected computing devices - especially in our phones and media players. Typing in Windows is just the top layer of it all. And I still remember when I could type physically on a typewriter, take the paper out, file it and lock it in a cabinet, which was inside a lock-able living space, which in most environments was at least lawfully recognized as protected space with legal, or even physical repercussions upon those who trespassed. -Not anymore. Phones, and often PCs - now on, connected, 24/7, and if Windows wants to change your typing, or read it into Bing AI automatically, or of course some cracker wants to hack it all and sell it, and blame you for "allowing it to happen", well, -here we are! -Where's our sign? 🤠 OK, back to regularly laughing along with everyone here, -pardon my rant! -
Drum programming shortcuts/alternatives?
JnTuneTech replied to BassMasterGeneral's topic in Cakewalk by BandLab
One procedure that has sped things up in drum MIDI editing, for me over the years, was the move to putting most of the primary kit piece programming on separate MIDI tracks. -Either after the initial note entry, or even before, as often I will be transcribing from an audio track, and doing it part by part, -That is my method of choice, but it all really has to be done which ever way fits your own workflow of course. When using the PRV for drum programming, I most often rely on note mapping via instrument definitions, and so each track can have its own map, and can even be customized with some prep work. Drum maps can work in a similar way, and take just about as much work to set up, but I still like to use standard PRV note view for most acoustic-style drum programming, as many samplers may actually make use of differing note length values for some instruments. Again though, it varies - it's highly dependent on your workflow needs. For instance, programming drum-machine style instrumentation using drum notation view or the drum map setup can actually work better than the single-track method I use for acoustic-style sample use. So, the best shortcuts can vary depending on many factors. -
How do I set the time ruler so that 1 is where the actual beats start?
JnTuneTech replied to El Diablo's question in Q&A
Yes, it definitely is a digital - MIDI representation factor that dictates that for any application that uses MIDI as a basis for programming. -As far as whether or not it matches other standards in musical notation, I can't really recall if starting things from 0 or 1 is a thing, I will admit. But it brings to mind the differences between cultures, like how some places ground floor of a building is called the 1st floor, and some places the 1st floor is the one starting above the ground floor... Whether those points help the OP or not, is not immediately clear, but I also happen to use a lead-in on almost all my projects, and as in another post, agree a good method of moving that point if needed is by using the ripple-edit method (and as mentioned, turn it off after using it!). Set your first beat wherever you feel it works best, but the time ruler numbering is set and dictated by MIDI programming rules, and changing/offsetting that visually could become rather confusing, I would think. -
Phase & Latency for Overhead / Snare / Kit recording
JnTuneTech replied to Edward Allen's question in Q&A
I would be camp-less I guess! In my mixes, I will find what sounds best. If time shifting OH for phase issues sounds better, I may use it. If it sounds fine as is, I just use it. -But it definitely can be a subject one can over-think, so be careful! -
Per the initial post - The amount of variables, and information on what you have actually set up and tested, make it unlikely that anyone else can repeat what is described here, and in fact even given the information regarding the update to the post. But it is good that you seem to have found some kind of solution! Quite often, you may find simple testing and reporting here, with full details on setup of the tracking at the very least, can help with getting questions answered here. As it is, I would suggest looking into the MIDI routings in your project, and whether or not the correct channel assignments are in place, as most often those details are what can make all the difference in using a MIDI input to trigger various MIDI instruments. Understanding and confirming all the choices, from MIDI keyboard output settings, the Cakewalk track input assignments, through to the MIDI instrument input settings, are often the culprit with the kind of response you are describing. And those variables all change with different MIDI instruments, and not all plugins will initially respond alike. I hope that helps going forward.
-
Instrument Definition file for Yamaha DX7II or TX-802
JnTuneTech replied to james harknell's topic in Instrument Definitions
@msmcleod I sure hope this, and so many of the illustrated, task specific functional use clips & text you have been providing wind up in an easily-searchable compiled format somewhere soon. -For me, these often beat the heck out of basic user guide information. I would suggest Cakewalk provide these - along with, and cross-linked, to the standard PDF user guide as the new offerings roll out. IMHO. Or do you already have a database of this stuff linked somewhere? -If so, where... and carry on!! -
Opinion: Addictive Drums 2 "minimalist" drum map
JnTuneTech replied to Dave G's topic in Instruments & Effects
One of the first thoughts that comes to my mind, regarding your post, is that "common basics" are really going to be individual, rather than common. -For instance, in what I mostly program, hi hat variations are one of my pet peeves, as there are never enough in any sample set to match real world variations. -For me-. And, as to a ride & choke combo - I have played plenty of drum passages using expression on the ride - I would never leave that out. -But again, that's me-. I suppose our OCD nature needs to be recognized as personal, and although it's natural also to compare, and even helpful to learn some other viewpoints, one might want to try and focus on what method actually suits us best going forwards. Sometimes it's about interoperability - between projects, or established standards, so then there's that too. -Way back when, as I began to program early MIDI drum modules that started with GM drum mapping as a basis, I was initially frustrated at some of the groupings and limitations of that system. I still never found a "perfect" distribution of drum parts in mapping, and now with the depth of some drum sample sets, I find I can hardly make an "optimized" map that always covers the basics in any given sample set. In fact, I bounce back & forth between maps, depending on the material I'm covering, and whether the default sample sets are sufficient, or need to be customized (which for me it's about 50/50). -I'm just glad I can create & use alternate note name maps in Cakewalk for use in the PRV, that one ability alone helps me navigate my drum mapping OCD much more comfortably. -All the programming still eats up so much time though! -
That's a really good point, and it's true, VST3 has mostly done away with the older GM MIDI patch change options. -In this case however, there is only a VST2 at present for Sound Canvas VA, but as I explained earlier, it also doesn't actually follow the old system, on purpose, due to the design of the synth. -It will respond to bank/patch changes in basic GM mode, but to switch to all the other sound options during playback, you have to program using CC changes, using the provided map in the manual.
-
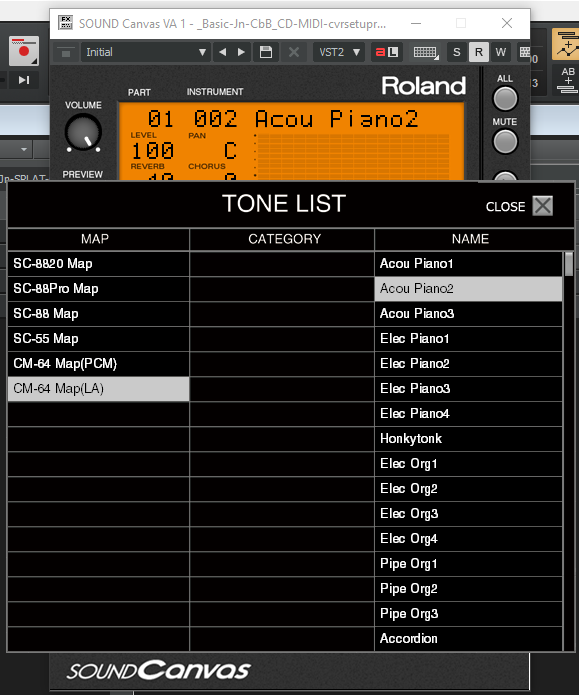
My guess is that, since the Sound Canvas VA has multiple internal instrument maps, unlike the GM 1 bank/patch defaults in TTS-1, it isn't possible to do a good job of linking the instrument names in banks (kind of ironic since Roland helped define GM MIDI) - and the alternate instrument maps probably don't conform to common GM banks that Cakewalk has built in either. -As in the screenshot, this plugin has its own GUI for changing the per-channel instrument sounds, some sorted additionally by category as well, here called a Tone List, each of which are defined by emulations of the original Roland hardware models of the Sound Canvas series they replicate, many of which probably didn't conform to GM standards, or are variations - duplicates better represented by the model series, rather than banks anyway. -And though the TTS-1 has quite an extensive set of instruments/samples across its many banks, it seems to be set up to work as a straight GM MIDI sound set, with no reference to a particular piece of legacy hardware, per se. So, as it is, we cannot use the old GM MIDI bank/patch selection method to call these SC-VA sounds up visibly in CbB -from the track itself. The sound names do still show up visibly in the plugin GUI though, as you change the patch number in the track. I do know basically, that when I have selected the GM Tone List - Map in the plugin GUI - SYSTEM menu, and then selected the appropriate CbB MIDI track-channel-patch number (adjusting for 1 number offset as Initial = 1), in my project I got the GM default sound I wanted on that channel, and it holds when I save & re-open a project later. -That changes if you select GM2 or GS (all Roland GM variants) in the plugin - and that latter one has all the various Sound Canvas hardware emulation banks/categories -and so then it gets confusing - for me! Apparently the extensive sound/category/instrument variations, in groups of hardware emulation used, etc., can all be selected via MIDI commands, which are mapped out in the downloadable PDF manual - which for me worked just fine when I clicked on the SC-VA plugin GUI - OPTION button HELP (yes please!). - It is of course many, many pages long, so have some spare time set aside for using it that way - but often we tend to overlook the actual documentation... I know. -But wow, this plugin has zillions of instrument/sample choices, so many that trying to decide sometimes gets me sounding a lot like the SC-8820 Map - FX - Laughing patch on a loop... But I digress. -And so, in practice, for this plugin, I recommend, and usually just use "None" in the CbB MIDI track bank/patch selection, and then set the instruments per channel manually in the plugin GUI, and again, it holds when I save the project. Fairly quick and easy. -For me anyway! -Hope that helps!!
-
I will just point out, that indeed the video tutorial is excellent, and very quickly does cover a possible alternate way of saving the custom patches & setup of the entire plugin, within a CbB project. I haven't tried that with TTS-1. -Sometimes I forget that saving the plugin state from the plugin window, rather than using the internal patch & bank creation tools in the plugin itself, can be possibly better, especially with older DXI & VST plugins. -Great suggestion. It's just that a lot of us tend to try the "save" tools within the plugin itself first. And as another note, it can be confusing the way it works with TTS-1 User Patches, because although you set them up and can then even use them by selecting via the GM Bank/Patch dialog, they won't persist in the plugin that way, contrary to the method I find works in most other plugin save dialogs - up to and including other Roland designed plugins I use even today. -At least for me, as I say, on my system. I would try both methods suggested here. Save the plugin state from the plugin window, -or back up your custom TTS-1 bank file, and reload the User Bank when you start a new session.
-
Yes - as @David Baay has answered, TTS-1 User Presets are not automatically re-loaded in the plugin itself, or the projects they may be used in. You will have to re-load the saved preset Bank file into TTS-1 every time you close and re-open the project. -I used to have to do that for some tracks I played live, and it was a pain, so eventually I just exported those parts to audio tracks. -At least you can still save part customizations (of any and all 16 parts) - regardless of what some folks say, TTS-1 can actually tweak a lot of its synth & sample playback, & MIDI mapping customizations, etc., but the catch is you can only just save a custom patch as a file, as unfortunately it won't automatically reload the User Bank on the next use of the plugin. - At least in my past, as I experienced the same issue as the OP. -Another glitch in an otherwise robust tool, that Roland probably would have fixed if they had just held on to SONAR long enough. -I wonder, now that Cakewalk may be back into paid support soon, if someone couldn't nicely call up the Japanese programmers to do some small updates. They are probably very nice people, corporate politics aside, and if asked politely, I bet they would be able to help. -Ya never know! We can only hope.
-
I (finally) began using them when I started programming some MIDI for several sample-based instruments, primarily creating horns/brass & some string parts that use the keyswitch method of changing the sample variations. I have found the articulations track to be much more useful than trying to program the keyswitches in MIDI manually. -Yep - pretty basic, but you asked!
-
I bought a different model DR recorder a while back, took it out field recording, and was dismayed by the lack of any wind noise mitigation options in the box at all. -And I probably am just lame for not looking into after-purchase windscreen options, but it seems with the stated low frequency audio range of the built-in condenser mics, that would have to seemed in engineering terms like an absolute necessity, when using them anywhere else than a closed room with no motion going on whatsoever. -I see also a lot of folks bypass the integrated mics and use the external inputs on my model with other mics (and probably wind covers). -Rather on a tangent, but have you ever used a condenser mic with no pop-filter or screen, and amplified through a pair of those subs like you bought? -I once created a very realistic earthquake simulation, in a small theater, by recording my breath in the proper faux-sequence, blowing across the condenser diaphragm of an SM-81, and mixing it in the audio track along with some earthquake footage on a big screen. -2 powered subs, plus sustained ultra-low frequency wind flutter - wow! -I didn't blow any speakers luckily, even with minimal limiting, because I recorded it manually in advance - carefully watching/listening that the subs were not being overdriven... Fun! - Anyway, be careful playing back that 2 hours of wind rumble.... you may find it numbs your prospective new guitarist's brain (or wrecks some headphones, etc.) without correct warnings and/or running a hi-pass on the entire file ahead of time!!
-
Do you mean export to a .wav file? What are you exporting from? -Which options are you confused about?