msmcleod
-
Posts
6,114 -
Joined
-
Last visited
-
Days Won
26
Everything posted by msmcleod
-
 Tempo maps are created by generating transients of the audio file you dragged, and calculating the tempo from them. Because you now have the transients, it's seen as AudioSnap data.
 -
I guess you've been lucky with your room. I've used ARC 2.0 since it came out, and for me it's made a massive difference. Mixes done before I got ARC had no bass whatsoever, and hyped frequencies in the upper mids. ARC has sorted all of that out for me. @Doug Steinschneider - the only thing I can recommend is to try it. It is completely dependent on your room/speakers, and everyone will get different results. One thing having ARC has done, is enable me to experiment with different placements of my speakers so I can get closer to a flat response. You may also want to check out Sonarworks - again whether ARC or Sonarworks works better will depend on your room/speakers.
-
I guess I was lucky - I've used a Shure SM58 for vocals for more than 20 years. I've tried various condenser mics, but none sound as good with my vocals as the SM58. I suspect an SM7B would sound better, but with software upgrades and the constant need to buy bigger SSD's, I've never managed to get around to committing the funds for one. One thing I would say.. the Rode NT1 & NT1A both sound fantastic. The NT1 is very flat, and the NT1A hypes the top end, but both are great depending on what or who you're recording.
-
Yes, there's a lot more going on behind the scenes in order for undo/redo to work properly. There's a fair amount of bug fixes/improvements to track templates in this release, so it might be worth using smaller project templates and inserting track templates as and when you need them. Also, don't forget about the right click context menu on tracks and folders. A lot of the time, the "Move To Folder" command is a lot more convenient than using drag/drop.
-
You can do this by selecting the top folder (which will select all the child tracks/folders), right clicking on one of the tracks and saving it as a track template. Importing the track template will recreate your folder hierarchy plus all the tracks.
-
Disc image backup choices?
msmcleod replied to The Dispossessed Orangutan's topic in Computer Systems
Oh, almost forgot... I did some tutorial videos a while back on using Clonezilla, as it can be a bit quirky for first time users. It's using an older version, but the options are basically the same: Backup: Restore: -
Stretched audio doesn't bounce down
msmcleod replied to Moving Air Productions's topic in Cakewalk by BandLab
This was a bug, which has been addressed for the next release. You can get the early access of this release (which has this fix) here: -
Disc image backup choices?
msmcleod replied to The Dispossessed Orangutan's topic in Computer Systems
Yes, you can boot from a USB stick. I personally boot from a CD. Clonezilla is actually the Clonezilla program plus a Linux distribution in one, so it's completely separate from whatever operating system is living on the disks you're backing up. I prefer this, as there's no way the OS on your disk can interfere. I've used it to back up disks containing Linux, Windows ( XP, Vista, 7 & 10 both 32/64bit), and Mac OSX, as well as general data disks. -
I am freezing multiple tracks to save CPU - help
msmcleod replied to Max Arwood's topic in Cakewalk by BandLab
Rather than freezing, you might want to consider bouncing groups of tracks to an audio track, and archiving the original tracks. You can then just swap between groups of "live" tracks, and the bounced ones. -
Disc image backup choices?
msmcleod replied to The Dispossessed Orangutan's topic in Computer Systems
Personally, I use Clonezilla which does complete disk images. I doesn't support incremental backup, but it's free. -
I'm running 21H2 on all my PC's (apart from my dev laptop which is now on Windows 11). The only issue I had was a printer sharing issue, but apart from that everything is working fine both within and outwith Cakewalk.
-
Navigate Between Only Markers (Not Sections) (SOLVED)
msmcleod replied to murat k.'s topic in Feedback Loop
Add the following to the Initialization File settings in Preferences: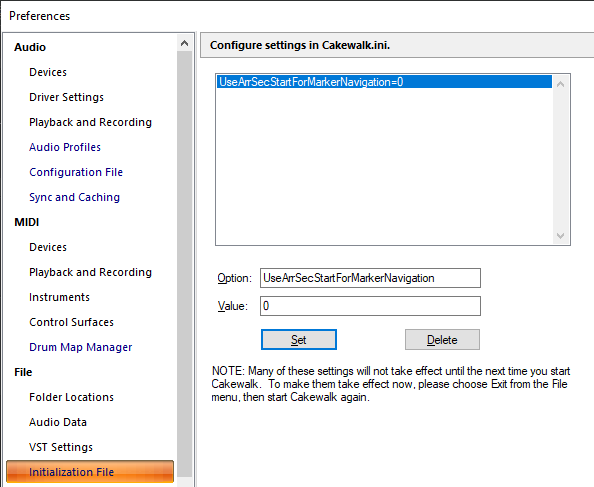
-
Either: 1. Put it in a shared location (e.g. DropBox, Google Drive etc) and send Jon the link; or 2. Go to "Messages" at the top right of this page, and compose a new personal message to @Jonathan Sasor adding your project as an attachment.
-
These video tutorials were invaluable for me - very long, but very detailed: Jamstix Tutorial 1 of 4 - Easy Way to Create Drum Tracks: https://youtu.be/o96TLgRjAq8 Jamstix Tutorial 2 of 4 - Covering All The Basic Operations: https://youtu.be/CzXMingzgBw Jamstix Tutorial 3 of 4 - Drum Module Mode, Song Sheet, & The Brain: https://youtu.be/gLpmv6XwsVk Jamstix Tutorial 4 of 4 - Options, The Bar Editor, & Final Thoughts: https://youtu.be/dVW9H20F94Y The tutorials cover Jamstix 3, but are equally applicable to Jamstix 4. The most useful for me was the third video, which gives an explanation as to how the Jamstix brain works. This is what you need to know if you want to push Jamstix in a particular stylistic direction, or want it to play something based on existing MIDI tracks.
-
@Herbert Miron - can you send a copy of of your project to @Jonathan Sasor ? We'll take a closer look as to what is going on here.
-
Set project tempo from an audio clip?
msmcleod replied to Starship Krupa's topic in Cakewalk by BandLab
I normally just drag the clip to the time ruler. -
1. Open Settings from the Windows Start menu 2. Click "Update & Security" 3. Click "Windows Security" on the left 4. In the main window, click "Virus & threat protection" 5. Under the "Virus & threat protection settings" header, click "Manage settings" 6. Scroll down to "Exclusions" and click "Add or remove exclusions" 7. Click the "+ Add an exclusion" button, selecting folder for each of the following, and any other VST folders/sample directories: C:\Cakewalk Content C:\Cakewalk Projects C:\Program Files\Cakewalk C:\Users\[yourusername]\AppData\Roaming\Cakewalk C:\Program Files\VstPlugins C:\Program Files\Steinberg\vstplugins C:\Program Files\Common Files\VST3 C:\Program Files\Common Files\VST2 C:\Program Files (x86)\VstPlugins C:\Program Files (x86)\Steinberg\vstplugins C:\Program Files (x86)\Common Files\VST3 C:\Program Files (x86)\Common Files\VST2 If your global audio folder is different from C:\Cakewalk Content, add that too. You may also want to add any plugin specific directories within your Documents folder. WARNING - because you're disabling virus protection for VST plugins, you should manually scan any VST plugins / plugin installers before you install them. If you're using any cloud sync apps (e.g. OneDrive / Dropbox etc), you should either also exclude these directories, or at least make sure those apps are disabled when running Cakewalk.
-
The key thing is to ensure that nothing is watching any of the Cakewalk files/folders when you're using it. Switching off the internet may help to an extent, but it doesn't stop AV / cloudsync programs trying to access the files - they may give up if there's no connection, but they'll still try - especially if they're changing a lot. OneDrive should be fine as long as it's not trying to sync Cakewalk files. Unfortunately by default, it'll sync the %APPDATA% folder, which is why I disabled it - it's a pain to re-configure it. Dropbox should be fine, as long as you're not syncing any of the Cakewalk files while they're in use... however it could be using up resources in the background, especially if the network adapter & audio device are sharing an IRQ. FWIW, I have Dropbox as well as Mega running in the background and it doesn't cause me issues. Neither of them go anywhere near Cakewalk files though - I have batch files to copy my project/config files over to their sync directories when I want stuff backed up to the cloud. It's worth mentioning that these cloudsync devices work by watching the modified date on the folders. If nothing changes, they'll do nothing. So making sure they're only watching directories that change when I want them to ensures they don't cause issues.
-
You might find these tutorials useful:
-
You might find some of those optimizations are the cause of the issues. What may have made sense for Windows 7, might not be appropriate for Windows 10. My DAW machine has no special optimizations at all. The only thing I've done is disable OneDrive, and exclude all Cakewalk / Plugin folders from Windows Defender. I'm able to run most projects at an ASIO buffer size of 64 with my Scarlett interface. All of my drives are SSD's though, which does make a difference.
-
Yes, it is technically outdated, but FWIW I'm running the i7-3770 @ 3.4GHz with 16Gb or RAM, and it's still more than adequate for me. You won't be able to upgrade to Windows 11 on this, but there's still a good few years to go before that becomes an issue.
-
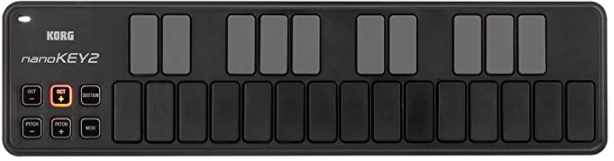
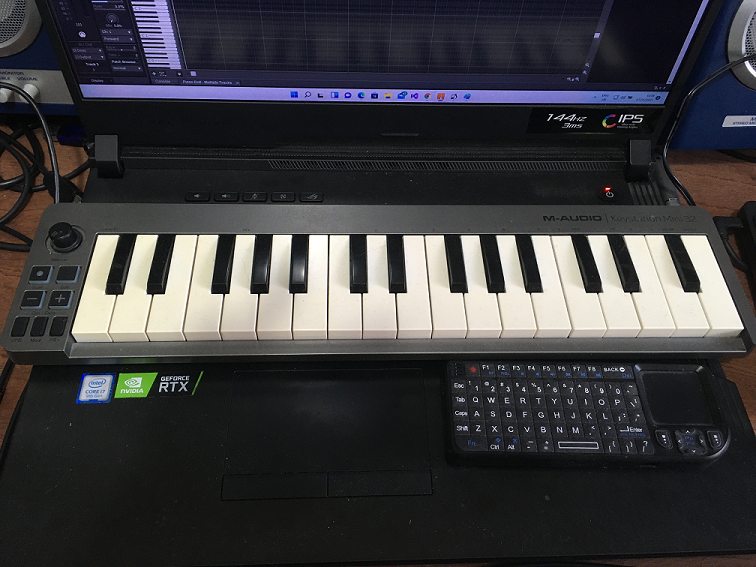
I agree with @abacab - a MIDI controller is a far better option. I use a M-Audio MINI-32 when I'm on the move. It's highly playable, velocity sensitive, and fits easily into my laptop bag alongside my laptop: I stuck some larger rubber feet on the bottom, so it fits nicely over the keyboard or mouse-pad area of my laptop allowing me to use it on my lap when travelling by train. The Korg nanoKEY is also a good option for portability: Both are around the same price ( £40 / $50 ) and a similar size. Here's my "on the move" setup: I added a mini wireless keyboard as well so I can use keyboard shortcuts as well as using the mouse pad.

-
Although in principle this sounds like a reasonable (and quite useful) request, it's problematic due to where in the signal flow the phase is actually shifted. The clip wave form shows clip properties only, which are the waveform itself plus any changes in clip pan automation, clip gain automation, and fade in/out. It's a view of the waveform before it goes through the clip effects bin, or any of the track effects. The phase is set at a track level, which is way further on in the signal chain. Apart from the clips not being directly aware of the track's phase, it's also not aware of any processing being done in the meantime by plugins (which could also be flipping the phase). So the issue is, that while it might be useful for a very simple track, in practice it might be confusing for users by giving them a false representation of the waveform. As it stands it's unambiguous - it's a view of the waveform before it goes through the clip effects bin, or any of the track effects.
-
Cakewalk and screen reader accessibility
msmcleod replied to Keith Wessel's topic in Cakewalk by BandLab
@Keith Wessel - we've done some work on the Audio Export dialog to support accessibility / screen readers. We've also removed the default binding of the Tab key to "Move to Next Transient Marker", so that the tab key is available for general control navigation. Of course users are free to manually re-bind this key within Keyboard Shortcuts. This will be available in the next release. -
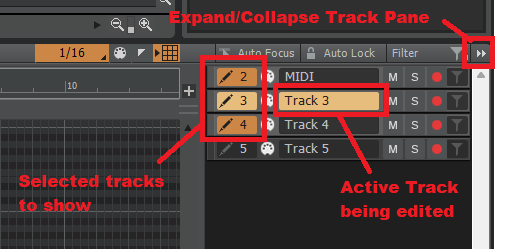
This happens when you've got more than one track showing in the PRV. Notes that aren't on the active track are greyed out to stop accidental editing, but there so you can line your current edits up with notes on other tracks. You can choose / see which tracks are being shown/editing by looking at the PRV Track Pane: