msmcleod
-
Posts
7,191 -
Joined
-
Last visited
-
Days Won
39
Everything posted by msmcleod
-
The biggest issue with AI is the amount of data that is needed for it to be effective, and more importantly the fact that the results are so incredibly skewed to the data that you give it... which of course means, a lot more data, and a lot more varied data. Personally I think AI in music has huge potential, but as far as the Cakewalk team is concerned I'm almost certain we couldn't spare the resources to collect enough quality data to get anything useable (well, not unless you'd all be happy to sacrifice any Cakewalk updates for a year or two). And even if you consider BandLab as a whole, who you could argue has access to a lot of material to use as source material for learning, is it varied enough to become usable in all genres? Here's a good example of not only how AI works, but also how inaccurate it can be - even when given 1000's of examples. BTW - if you're into AI in music, or even basic music DSP, this guy really does know his stuff - it's worth watching the whole series. But having watched hours of these videos, it's clear that you can get impressive results, but in order to do so you need a vast amount of good quality, and preferable pre-labelled data.
-
You can reset Cakewalk to it's default settings by holding down CTRL while opening Cakewalk.
-
If at any time you want to see all of the projects that are loaded, choose "Tile in Columns" from the main "Window Menu" You can tell Cakewalk to only allow one project at a time by checking "Allow Only One Open Project at a Time" within File->Advanced in preferences.
-
No, because they're running as different processes... but they could be running on the same core.
-
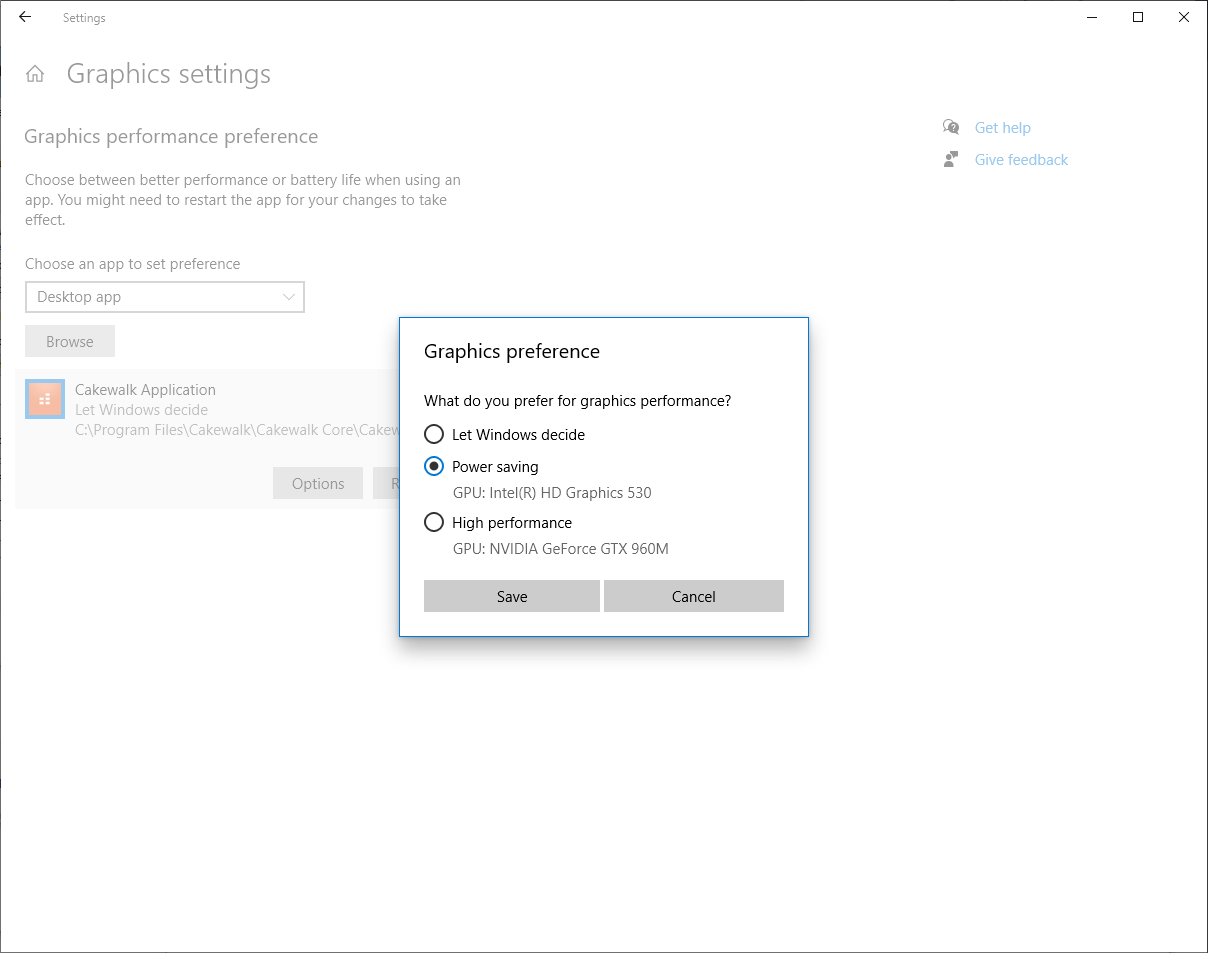
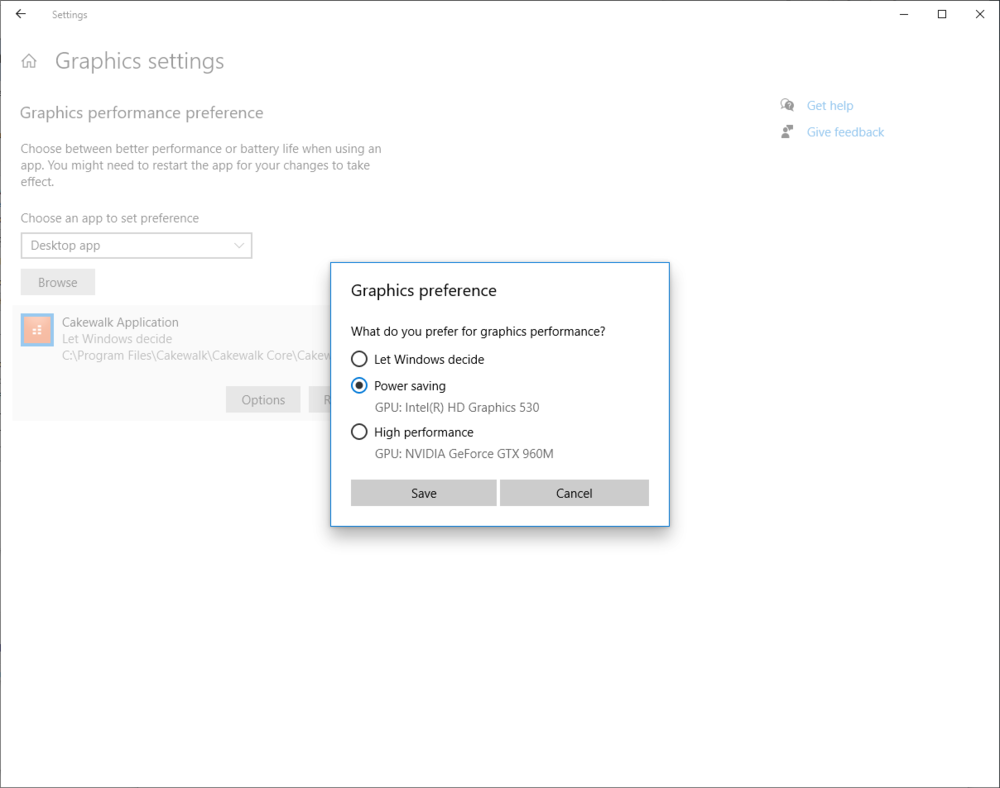
You should be able to force Cakewalk to use the Intel graphics instead. That's what I did on my gaming laptop, as there were a few plugins that weren't compatible with the its NVIDIA card:
-
You can create as many arranger tracks as you need. Right clicking on the time ruler will allow you to create arranger sections from markers and vice versa. If you're not using the arranger track for moving around events, I recommend unchecking "Select Events with Sections". This will stop you accidently moving around parts of your project by accident.
-

How do I get a copy of the Sonar X3e upgrade (fix)
msmcleod replied to Dan Laskowski's question in Q&A
@Dan Laskowski - what edition of X3 do you have - Sonar X3, Sonar X3 Studio or Sonar X3 Producer? The update has to match the version you have. Let me know and I'll PM you a download link for the X3e update. -
The first core is almost certainly the UI thread, which explains why it's the most busy. This thread is responsible for all UI updates and the majority of notifications. The fact that you do have activity in the other threads would indicate the effects are being load balanced.
-
New Tempo Track UI: What do people think?
msmcleod replied to Jeremy Murray-Wakefield's topic in Cakewalk by BandLab
There is no need to double click - a single click is enough. What I suspect is happening, is you are moving the mouse slightly between the two clicks and depending on your snap settings, it's creating two nodes on a different snap point. -
Audio Engine Dropout after 2 years of using Cakewalk
msmcleod replied to Captivitas's question in Q&A
Also check your network activity... I've been caught out on at least 3 occasions in my studio, wasting an hour or so trying to troubleshoot drop-out issues only to find that Windows was downloading an update in the background. -
Delete hole will only delete a hole in what is selected. Track 15 has nothing selected, so nothing from it gets deleted. You're better off turning on ripple edit all, then deleting the selection.
-
Is There a Way to Run Multiple Instances of Cakewalk?
msmcleod replied to david40's topic in Cakewalk by BandLab
An easier way to switch between hardware profiles is in the works. It probably won't make the next release (which should be out later this month), but hopefully the following one. -
What version of Sonar/Cakewalk Began ASIO support?
msmcleod replied to david40's topic in Cakewalk by BandLab
I believe Sonar 2.2 was the first version to announce ASIO support: https://www.cakewalk.com/Press/Release/1004/01-16-03-SONAR22. -
The laptop I used was a Dell Vostro 1500 (I also used a Vostro 1700, which is the 17" version) - however IIRC, the Vostro 1500 is basically a budget version of the Inspiron 1545. AFAIK the only difference is the Vostro is missing the docking port. I swapped the drives in both laptops with SSD's. The Vostro has a Ricoh firewire port, which works fine with mLAN for the 01X/i88x on Vista/Win 7 32bit, but crashes on shutdown with Win 10 64 bit. The wireless LAN had to be disabled in the BIOS to get any sort of performance.
-
What can cause issues is installing older software that forces an install of earlier versions of the Visual C++ runtime libraries. It amazes me that some software vendors are still releasing software and distributing VC++ runtimes as far back as 2013. Installing these earlier versions can upset more recent versions. The first thing I do whenever I get an mfc related error that I wasn't getting before is re-install the latest VC++ runtimes. 9/10 this fixes the issue.
-
PRV Control Data + Event List WHEEL stuff
msmcleod replied to sadicus's topic in Cakewalk by BandLab
From the screenshot, it looks very much like this issue. I've had the same issue myself with modulation wheels. Sometimes you can get away with just cleaning it or opening it up and re-seating the potentiometer (it can slip, so the wheel never reaches zero). As a last resort you could disconnect it completely.... or just get a new keyboard... but try cleaning or reseating it first. -
Don't just turn on airplane mode - disable the driver in device manager. You can always enable it again afterwards. Make sure: 1. You're using ASIO mode using the official Focusrite drivers. 2. Uninstall ALL other ASIO drivers - especially ASIO4ALL, Steinberg or other ASIO wrapper type drivers. 3. Run LatencyMon to track down exactly what's causing the glitches: https://resplendence.com/latencymon 4. Ensure your Cakewalk Projects directory and Cakewalk's global audio directory are excluded from any anti-virus, or cloud-sync applications (e.g. OneDrive, DropBox etc).
-
FWIW I've successfully recorded: 24 simultaneous tracks on a 2008 2Ghz Core Duo laptop with 4GB RAM, through a Yamaha 01X / i88x / ADA8000. 16 simultaneous tracks on the same hardware using a Scarlett 18i20 / ADA8200. 16 simultaneous tracks on a MeLe 2Ghz silent pc (slightly bigger than a compact cassette case) with 8GB RAM through a Scarlett 18i8 / Fostex VC8. 32 simultaneous tracks on the MeLe through a RME DigiFace USB and 4 x Fostex VC8. In this scenario, I was also playing back 32 tracks of previously recorded audio as well. Bottom line is you need very basic hardware just to record audio. If you're using VST's as well though, that's another issue. I wouldn't even attempt to mix on either the core duo laptop or MeLe. What I would add though - make sure any unnecessary stuff (like Wifi) is switched off, and if possible use internal SSD drives rather than external drives.
-
Set the output of the track to an aux track or bus, then put your fx on that aux track or bus.
-
FWIW, I use Mega to backup my project files to the cloud... however the Mega sync app is never backing up directly from my project folders. Instead, I have a "mirror" directory which I copy the project files to/from, and Mega syncs from this directory instead. I've got two batch files: CopyToMega.bat and CopyFromMega.bat (for which I have shortcuts on my desktop ), which copy the project files to and from the sync directory. CopyToMega.bat looks like this: ROBOCOPY F:\SEQUENCE F:\Projects\SEQUENCE *.* /XO /E /COPYALL /DCOPY:DAT ROBOCOPY F:\PICTURE F:\Projects\PICTURE *.* /XO /E /COPYALL /DCOPY:DAT ROBOCOPY F:\WAVEDATA F:\Projects\WAVEDATA *.* /XO /E /COPYALL /DCOPY:DAT CopyFromMega.bat looks like this: ROBOCOPY F:\Projects\SEQUENCE F:\SEQUENCE *.* /XO /E /COPYALL /DCOPY:DAT ROBOCOPY F:\Projects\PICTURE F:\PICTURE *.* /XO /E /COPYALL /DCOPY:DAT ROBOCOPY F:\Projects\WAVEDATA F:\WAVEDATA *.* /XO /E /COPYALL /DCOPY:DAT Where: F:\Projects is my mirror directory F:\SEQUENCE is my Cakewalk projects folder F:\PICTURE is Cakewalk's picture cache folder F:\WAVEDATA is Cakewalk's global audio folder The /XO option in ROBOCOPY ensures only newer/different sized files are copied over... so it's very quick.
-
You could have a look at this utility: https://midi.org/forum/9914-wrk2mid-v1-0-0-cakewalk-wrk-to-standard-midi-files-open-source-translator-released It'll compile on Linux or Windows, but I'm not sure it'll compile on Mac without modification. Of course you could install VirtualBox and run a Linux distribution on that.
-
The refresh is sent out many times a second. The refresh includes a status - this is a bit mask, so there could be more than one flag set. One of these flags is the REFRESH_F_TOPOLOGY flag. If AZ Controller is looking for the REFRESH_F_TOPOLOGY flag on its own, that may be the issue.
-
That would make sense. Cakewalk only tells you things it's changed. If you know you've changed via the API, why do you need Cakewalk to tell you what you've changed?
-
You might be pleasantly surprised in the next release.... and it's much more than an indicator.
-
Just checked that now. In every project I've tried, the REFRESH_F_TOPOLOGY flag is definitely being set when a send destination is changed. This code hasn't changed since 2006. Are you actually changing the send destination, or just renaming it?