


msmcleod
-
Posts
7,191 -
Joined
-
Last visited
-
Days Won
39
Everything posted by msmcleod
-
To remove the trimmed audio from clips, either use "Apply Trimming" or "Bounce to Clip(s)". Apply Trimming simply removes the trimmed-out audio, whereas "Bounce to Clip(s)" will also combine all selected clips into a single clip , and also apply any clip automation to the new clip. To remove unused audio files, use "Save As" and save the project to a new location.
-
Check your import bit depth within Preferences->File->Audio Data. If it's set to 64, then it'll be converting everything to 64 bit on import. IIRC, the default setting is "original".
-
There is definitely a bug here. It looks like it was introduced a few years ago, when we refactored the "Slide Over" to use Ripple Edit Selection under the hood. The way it should work, is it should slide everything over you've checked in the Paste Special box, regardless of whether you've got that type of event in the clipboard or not. The only exception is clips themselves - it won't slide clips in tracks you're not pasting to. If you need this, use Ripple Edit All. As it stands, it's only sliding over if you've copied that type of event with Copy or Cut special. Tempos however, aren't sliding at all. We'll get this fixed.
-
When using a wave editor, the wave file is permanently changed. This is how the whole mechanism works - i.e. when you launch the external tool, you're giving control to the wave editor to edit the file directly. When you save, Cakewalk recognises that the file has changed and updates the clip accordingly. To be honest, I very rarely use this workflow - it's only ever as a last resort when I actually need to edit the waveform in detail. For scenarios like the OP's one, I'd probably re-record, but if this is not possible, then a wave editor is probably the next best thing. Yes, you can split the clip and mess around with clip gain and fades to hide it, but smoothing waveforms out by hand can be quicker for one-off clipping issues. FWIW I've compared editing mistakes to just re-recording over the years, and in most cases I could record another 10 or so takes in the time it took to edit the mistake. And of course I'm improving my playing at the same time.
-
 Although you can't bind a shortcut to previous/next arrangement section, you can bind for previous/next section. So to get around this: 1. Bind "Go to Next Section" / "Go to Previous Section" to a key or MIDI note within Preferences->Keyboard Shortcuts 2. When you load your project, commit the arrangement for the setlist you want (don't save your project tho!) Hit play, then use the shortcuts to navigate. If you need the transport to pause after playing each section, you can insert MCI commands at the end of each section within the event list, e.g. this will pause the performance just before measure 33. It's important to put it just before the end of the section, so it's seen as part of that section and not part of the next one. If you're using the MCI commands, you could skip committing the arrangement and just use the navigation keys/midi notes to go to the next section you want to play. Note: There are two MCI commands you can use: "pause" and "stop". Pause will stop the playhead at the current position, whereas stop will potentially rewind to the last marker / zero, depending on your settings.
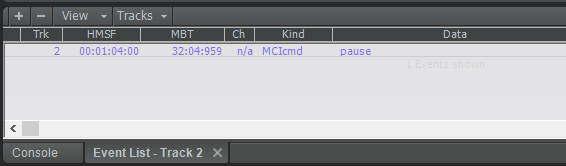
-
Unless it's changed very recently, Audacity is unsuitable for the CbB Utilities menu because it doesn't save to the original filename. I guess you can get around it by doing a "Save As", but the given that there could be many .wav files in the project's audio directory there's a danger you could pick the wrong one. Personally, I use SoundForge for the most part, but I don't have licenses for all the machines I've got CbB installed on, so Acoustica 6 BE is a good alternative for the very rare cases I need it.
-
Until you bounce to clip(s), each split clip contains a copy of the entire waveform. It's up to the program that is launched to recognise the trim points (as SoundForge does), or not (Acoustica).
-
Once you've installed Acoustica 6 Basic Edition, run the attached reg file. CbB_Acoustica6_BE.reg
-
Advice needed for using a 4 port MIDI interface with CbB
msmcleod replied to Philip Jones's topic in Cakewalk by BandLab
This is one of the few MIDI "cables" that will probably be fine - cheaper ones are a waste of money due to the buffer issues I mentioned in an earlier post. However, you will still have issues when using more than one of these: neither you, or Cakewalk will be able to tell which is which, and unless you leave them permanently plugged in to the same USB port on power up every time, they're likely to randomly switch around as Windows decides which order they should be in. -
Advice needed for using a 4 port MIDI interface with CbB
msmcleod replied to Philip Jones's topic in Cakewalk by BandLab
I've no idea what a MIDI hub is? A network hub or USB hub merges data from several ports into one... so I guess a MIDI hub is a MIDI merge device? This isn't a MIDI merge device. This is an 8 in / 8 out MIDI interface. It's USB powered (USB3), although I've had zero issues using it with USB 2. I don't see why it would need to have a separate power supply. USB power is more than enough to power 16 x serial ports (which is all MIDI is). It's not as if it's powering anything external - unlike say, a Scarlett 2i2 which has audio preamps and has +48V phantom power... all over USB 2. The MIDI spec is 31.25K baud over 5 pin DIN connectors. USB Midi connectors running at USB speeds are part of the problem everyone is having. The computer sends data to it at USB speed, but it has to send it out at 31.25K. For it to do this, it needs to "hold on" to the data it receives in a buffer and send it out at a slower speed. Lower quality interfaces have a very small buffer, which gets full way before it has time to send it out. All I can say is, I've used this interface for a number of years now with heavy MIDI traffic, and it's never let me down. -
ALT+SHIFT+5 now toggles the Tempo Inspector and the Tempo Track (just underneath the arranger track), both of which have replaced the old tempo view.
-
BBCSO Template - Reduce volume MIDI or Audio track?
msmcleod replied to sadicus's topic in Cakewalk by BandLab
I hate it when manufacturers do this. CC 7 is for volume - and there's a good reason for it: When a synth receives a "Reset all controllers" message, it's meant to reset all of the CC's to their default. For everything apart from CC 7 and CC 10, and CC 11, this is zero.... which means CC 1 gets set to zero. For CC 10 (pan) it's 64 which is centre, for CC 7 (volume) it's 96, and for CC 11 (expression) it's 127. If volume is CC1 and it's reset, it gets set to zero which means no volume. Native Instruments are guilty of this too with some of their instruments. I really wish plugin manufacturers would respect and follow the MIDI spec. -
Go to the Downloads section of the website, then scroll down to "Old Versions and Discontinued Products" - you can still download Acoustica 6 Basic Edition.
-
We've no plans at present to introduce an integrated audio editor. However, it's fairly straightforward to add a 3rd party audio editor to the Utilities menu. I use both SoundForge, and Acon's Acoustic 6 Basic Edition (which is free). Once added, you just select the clip then pick the audio editor from the tools menu and it'll load with your waveform ready to edit. Once you save, Cakewalk picks up the edited waveform.
-
Unable to Drag & Drop files from Media Browser & Vocal Recording
msmcleod replied to D'Layna's topic in Cakewalk by BandLab
Unless you've specifically changed Cakewalk to run as administrator, it should be running as a non-elevated app. To check if it's elevated, you can right click on the Cakewalk shortcut, select "properties" then go to the Compatibility tab of the properties dialog. If it has "Run this program as administrator" checked, then it'll be started as elevated. It's worth checking Cakewalk.exe itself too. To make it not run as administrator, just uncheck this setting and click "Apply". -
One thing to note: Before you bounce, the split clip is a complete copy of the original - it's just trimmed at the start and end. If you bounce however, you will lose everything that is hidden by the trim. If you're lining up individual drums, this may be exactly what you want... but not always, so something to bear in mind. Another thing to bear in mind: When a region effect such as Melodyne is "active", Melodyne has ownership of the clip until you render the region FX. Rendering or bouncing gives ownership back to Cakewalk. As such, you should avoid editing any active region fx clips outside of Melodyne until you've rendered the region fx.
-
When did we get VST versions of Sonitus plugins?
msmcleod replied to Keni's topic in Instruments & Effects
I meant, that the sonitus pluigns themselves are only DX plugins. dxshell and dxishell are wrapper DLL's to wrap up DX plugins. Those wrappers aren't supplied by Cakewalk though. -
I'm not really sure what you mean by move part of a clip, but here's an example of two things it could mean:
-
When did we get VST versions of Sonitus plugins?
msmcleod replied to Keni's topic in Instruments & Effects
The No, they're just still dx. dxshell.dll / dxishell.dll are not installed by, or distributed by Cakewalk. These must be have been installed either by yourself or by another application. Some users use these to access Cakewalk DirectX pluigins in other DAW's. -
When did we get VST versions of Sonitus plugins?
msmcleod replied to Keni's topic in Instruments & Effects
Both VST plugins and DirectX plugins are DLL's. The difference is the API / methods those DLL's expose. 64 bit programs can only load 64 bit DLL's, and 32 bit programs can only load 32 bit DLL's. Although you can use 32 bit plugins in a 64 bit DAW, the DAW isn't actually loading the plugin directly. Instead it uses JBridge or BitBridge (or equivalent). These are 32 bit applications that communicate with the DAW using RPC calls - this is usually via network protocol, even though it doesn't ever pass over an ethernet cable. dxshell.dll and dxishell.dll are indeed DirectX wrappers. They essentially translate between the VST and DirectX API's. For those interested, you can get them here. -
General MIDI Assignment of Instrument to TTS-1?
msmcleod replied to dalemccl's topic in Cakewalk by BandLab
When you load a MIDI file into Cakewalk, the first volume, pan and bank/program change for each track is transferred to the track properties. As they've been transferred to the track properties, you won't see them in the event list, but you can edit them via the track inspector. Any further pan/volume/bank select/program changes in the track will appear in the event list. When you export/save as a MIDI file, the volume/pan/bank select/program changes that were transferred to the tracks will be added as MIDI events at the beginning of the MIDI file. The most common workflow for users is to start with a MIDI file, then continue as a Cakewalk (CWP) project, so it makes more sense to reflect these in the track properties rather than having to edit MIDI events in the event list. For more details, refer to the Reference Guide PDF (page 1455). -
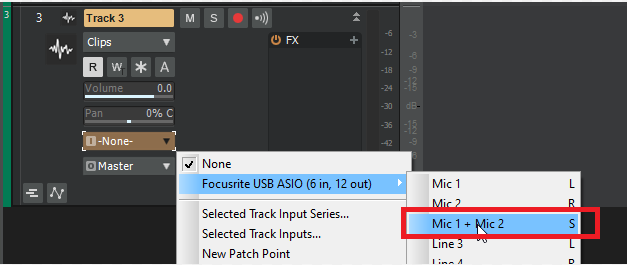
why does my vocal track look like this?
msmcleod replied to charles kasler's topic in Cakewalk by BandLab
To record in mono, set your track input to either the L or R, depending on which input you're plugged into - i.e. "L" for odd numbered inputs, "R" for even numbered inputs: To record in stereo, pick the stereo (S) input: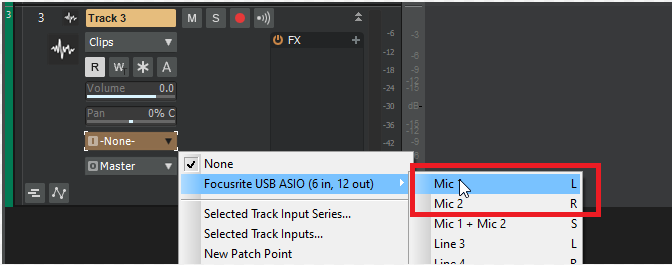
-
how to reduce gain only in a portion of the clip
msmcleod replied to charles kasler's topic in Cakewalk by BandLab
You can adjust existing envelope shelves by holding down CTRL and moving the shelf: -
how to reduce gain only in a portion of the clip
msmcleod replied to charles kasler's topic in Cakewalk by BandLab
-
Advice needed for using a 4 port MIDI interface with CbB
msmcleod replied to Philip Jones's topic in Cakewalk by BandLab
I really wouldn't use those MIDI -> USB cables for a couple of reasons: 1. The internal buffer is tiny, and are liable to stuck/missing MIDI notes especially during heavy MIDI traffic (i.e. when using pitch bend, modulation etc). 2. If you use more than one of them, they're impossible for both you or Cakewalk to tell them apart, as they'll all show up as the same device.

