


msmcleod
-
Posts
7,191 -
Joined
-
Last visited
-
Days Won
39
Everything posted by msmcleod
-

Keep the Notes When the Start is Beyond the Clip
msmcleod replied to murat k.'s topic in Feedback Loop
You're not stretching the clip, you're trimming the beginning so that the clip starts after the start of the note. Use CTRL + SHIFT to stretch. -
The ASIO driver spec was devised by Steinberg, which places a limit of one ASIO driver per process (e.g. an application such as a DAW) in Windows. Some ASIO drivers allow more than one process to open the same ASIO driver, but no process can open more than one ASIO driver in Windows. Some ASIO drivers also allow more than one ASIO device to be seen by a single driver - RME is an example of this. However as @scook says, there aren't any manufacturer's ASIO drivers that will talk to different ASIO devices by different manufacturers. The only way around this is by having separate processes each open a different ASIO device, then having an aggregate ASIO driver "talk" to those processes to mix the audio. The DAW then opens the single aggregate ASIO driver. The only one I've seen that does this is ASIOLink, which is unfortunately no longer maintained as the original developer passed away. It does work, but it's extremely complicated to set up and use. However, even if you do manage to get several ASIO devices being shared, you still need the word-clocks of each device to be synced up. If this isn't done, then the audio playing on one device will start at a different time from another. This involves one of the devices being a word-clock master, and the rest being slaved to it. This is usually done by connecting the ADAT, SPDIF or BNC word-clock output of the master device to the corresponding input on the slave, and telling the slave to sync via that connection. Such a setup is so ridiculously complicated that it's really not worth the effort. I had a setup like this for a while, and it took 20 mins to get it stable every time I switched everything on. There are a bunch of audio interfaces that will give you 16 input channels (using an additional 8 channel ADAT mic-pre for 8 of the inputs). If you need more than that, the Tascam Model 24 or Soundcraft Signature 22MTK will give you 22 channels. Personally I opted for the RME Digiface USB, which has 32 inputs and 34 outputs via four ADAT ins, four ADAT outs, and a stereo analog out. At the time it was a bargain at around £300. Of course I had to buy pre-amps / ADAT converters to plug into it, but you can start off with cheaper ones (e.g. Behringer ADA8200, ADA8000 or Fostex VC-8) and upgrade as needed.
-
[Solved] Updating Saved Info in MP3 Options Dialogue
msmcleod replied to Keni's topic in Cakewalk by BandLab
One way I guess is if you save that sentence in your default template, it should be picked up by any new project made based on that template. -
When you use the fade handles on audio clip, what you're doing is fading out the clip. Using automation on the audio track volume, fades out the track:
-
CBB, MPE, MIDI 2.0 and Expressive Controllers Discussion
msmcleod replied to RexRed's topic in Instruments & Effects
Yes No - it's in the works: https://www.kvraudio.com/focus/amei-to-fund-open-source-midi-2-0-driver-for-windows-56224 Cakewalk is waiting on Microsoft supporting it. Too much to mention. But the main points are: - higher resolution velocity / controllers - devices can now "ask" which capabilities another device has You can read about it here: https://www.midi.org/specifications/midi-2-0-specifications -
CBB, MPE, MIDI 2.0 and Expressive Controllers Discussion
msmcleod replied to RexRed's topic in Instruments & Effects
Per-Output Instruments are a type of Instrument track in Cakewalk, not a type of VSTi,. In Cakewalk you have three types of Instrument tracks: Simple Instrument Tracks - a track strip that contains an Audio Track and a MIDI Track, but shows as one strip. The output of the MIDI track is set to the VSTi MIDI input, and the Audio track input is connected to the first stereo pair of the VSTi outputs. By default, the MIDI track is set to transmit on all channels (i.e. it plays back exactly what you recorded). Split Instrument Tracks - one or more separate MIDI tracks / Audio Tracks. The MIDI tracks outputs are set to the VSTi MIDI input, and the Audio Track inputs are connected to the output(s) of the VSTi audio output(s). The MIDI and Audio tracks appear as separate tracks in the Track View. Per-Output Instrument Tracks - These are a special type of Simple Instrument Track, where you have several combined Audio/MIDI tracks connected to a single VSTi. For each MIDI/Audio track pair, the MIDI output of the MIDI track part is set to a specific channel, and the Audio Input of the Audio track part is connected to a specific VSTi audio output. This allows you to have several "Instrument Tracks" playing different sounds (and each having their own audio fx bin), but using a single VSTi instance. For this to work correctly, you normally have to set the MIDI inputs and Audio outputs of each instrument within the VSTi itself. In essence, a Per-Output Instrument Track is exactly the same as a Simple Instrument Track with the exception that it has it's MIDI output channel set to a single channel. As MPE requires the use of all 16 MIDI channels, you can't use Per-Output Instrument Tracks, because they're set to transmit on a single channel only. -
AFAIK Ear Master & Band in a Box are also written in Delphi... although they may be using FreePascal/Lazarus for Mac support. CbB is Microsoft Visual C++.
-
CBB, MPE, MIDI 2.0 and Expressive Controllers Discussion
msmcleod replied to RexRed's topic in Instruments & Effects
MPE requires the use of all 16 channels, so for MPE to work in CbB, make sure the Track MIDI channel is set to None - this will ensure that on playback, each MIDI event will be played back on its original MIDI channel. For VSTi's that support MPE, you can use either a Simple Instrument Track or a Split Instrument track (with a single MIDI track / single audio track). Per-Output Instrument tracks are unsuitable for MPE instruments. -
"You Have Not Selected Any MIDI Inputs/Outputs"
msmcleod replied to sjoens's topic in Cakewalk by BandLab
Double check your OneDrive settings... the enabled devices are stored in TTSSeq.ini, which is in %APPDATA%\Cakewalk\Cakewalk Core\ IIRC, %APPDATA% is one of the directories backed up by OneDrive by default. It can get itself in a bit of a muddle sometimes though, forcing a re-sync to older versions. If you've got more than one machine logged in using the same Microsoft account, this can also cause OneDrive to get confused as to which machine it's restoring to. Personally, I just disable OneDrive... but you can also change the OneDrive settings to leave this directory alone if you wish. -
Just an observation, but you really shouldn't be using .wrk files in 2023 - these were deprecated over 20 years ago when Cakewalk Pro Audio 9 was replaced by Sonar 1.0. Sticking with .wrk files will mean you're potentially losing a lot of things added to your project, simply because they don't support all of the new features. A while back I went through a process of upgrading all my CWPA9 .wrk files to .cwp files in SONAR Platinum. It only took a couple of hours to do around 150 projects.
-
Two questions about cutting and pasting arrangements.....
msmcleod replied to Rok TheKasbah's question in Q&A
@Rok TheKasbah - the Arranger Track was specifically designed to be both as an edit tool as well as a traditional arranger. There's no need to create an arrangement to use it - quite often I'll create temporary sections to move or copy things around in a project. There's things it can do that normal selection/drag can't do, such as work on both your tracks & buses at the same time. -
@Rok TheKasbah - I've just pushed a fix for this - it'll be available in the next release.
-
Latency, LatencyMon and Audio Engine dropout
msmcleod replied to Harley Dear's topic in Cakewalk by BandLab
Wdf0100.sys is the Windows Driver Framework - which means some driver is taking up most of your CPU time. Try disabling your WiFi drivers. This makes a huge difference on one of my old Dell Laptops. Battery life in itself shouldn't affect performance, however a lot of laptops will default to slowing the machine down when running on batteries in order to preserve battery life. This will definitely lead to dropouts. You can change the profile used for on-battery/plugged-in in your Windows power options. The laptop should always be running in "High Performance" mode when you're using it for audio. Of course, this will mean a drastically reduced battery life - probably less than an hour on most laptops. If you really need the battery life, you might get away with it on a reduced power mode but with your ASIO buffer size set to maximum. -
Reproducible bug: Synth automation not automatically visible
msmcleod replied to GreenLight's topic in Cakewalk by BandLab
Personally, I never noticed it because I always have the dialog set to show. I almost always either use Simple Instrument Tracks, or more often Per Output Instrument tracks, but since I normally want to set the number of tracks for per-output instrument tracks, I have the dialog showing. The extra "click OK" step never bothers me. -
Problems migrating project from Sonar 8.5 Producer
msmcleod replied to sean72's topic in Cakewalk by BandLab
Take a look at some of the suggestions in this thread: -
I personally use CloneZilla which is completely free. I burn the ISO image to a CD, then boot off the CD to make the images. Because CloneZilla is Linux based, it doesn't get upset if you've got multiple drives with the same Windows partition on it. This animated gif is a bit old, but AFAIK the instructions are pretty much the same in the latest version: Drive Backup: Restore:
-
Just to add to @Lord Tim's solution... If you first save the tracks from the old project as a track template, insert the track template into the new project, then copy the tracks from the old project on to the tracks you created via the template, you'll preserve any automation/routing from the old project. The selection in the old project will be preserved during the process, so: In the old project: 1. Select the tracks you want to transfer over 2. Save as a track template In the new project: 3. Insert the track template you saved in step 2 In the old project: 4. Copy Special In the new project: 5. Click on the first track inserted by the track template to make it the active track, and make sure the Now Time is at time zero 6. Paste Special In some cases, you might get extra blank tracks created at the end of your tracks - you can just delete these.
-
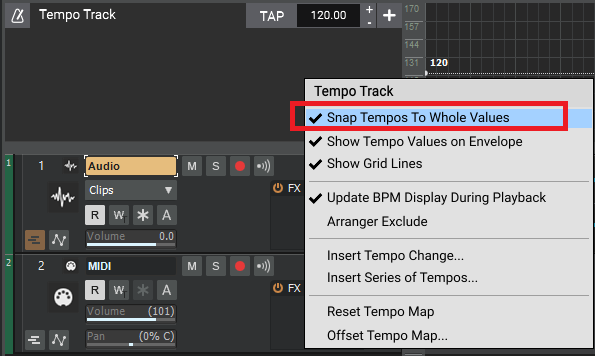
If you enable "Snap Tempos To Whole Values", it'll always use integers regardless of the scale:
-
Reproducible bug: Synth automation not automatically visible
msmcleod replied to GreenLight's topic in Cakewalk by BandLab
The issue is now fixed and will be available in the next release.- 25 replies
-
- 3
-

-

-
- bug report
- fixed
- (and 1 more)
-
Reproducible bug: Synth automation not automatically visible
msmcleod replied to GreenLight's topic in Cakewalk by BandLab
@GreenLight - I can reproduce the issue. We'll look into it.- 25 replies
-
- 1
-
-
- bug report
- fixed
- (and 1 more)
-
@pulsewalk - can you PM @Jonathan Sasor a link to your project, along with a video showing the repro? I can recommend ScreenToGif for screen captures.
-
PRV Controller Events Editing with the Smart Tool Issue
msmcleod replied to murat k.'s topic in Feedback Loop
There's no real automation in the PRV - what you're actually doing is adding MIDI Control Change events. As each control change is an individual event, the snap settings are applied to it. You can either continue to use CC events in the PRV with snap off (which by the way will potentially add hundreds of CC events), or use actual MIDI automation in an automation lane in the tracks view. -
I tend to just use clip gain automation, normally after consolidating all my comps to a single clip.
-
@pulsewalk - I can't see any bug here. If you have "Select Track Envelopes with Clips" enabled, when you select a clip, any track envelopes are selected for the time range the selected clip occupies. So doing a CTRL + drag to copy the clip, will also copy the track envelopes. However, lanes are only created for parameters that actually exist for the envelopes in the destination track.
