


msmcleod
-
Posts
7,191 -
Joined
-
Last visited
-
Days Won
39
Everything posted by msmcleod
-

Switch between midi channels while i playing
msmcleod replied to צביקה שמואלי's topic in Instruments & Effects
IIRC Articulations don't work for live MIDI input. Short of a hardware solution to re-map channels, the only other way I can think of is to use the down arrow key to switch track focus while you're playing. This won't work for recording though. Other solutions spring to mind: 1. Record arm all and echo enable all 3 tracks, but use mute automation to mute the tracks you don't want to hear when recording. Then just trim the clips afterwards to remove the parts you don't want. 2. Use something like TTS-1 with program changes for piano at bar 1, guitar at bar 3, and harmonica at bar 5. Record your performance on that track, then split/copy the clips on to your Kontakt tracks. It's less than ideal, as the sounds you're playing won't be the same as what Kontakt is. However, I have used this technique in the past, except using hardware instruments rather than TTS-1, to avoid latency when recording additional parts in an already busy project, and it's not quite as bad as it sounds. -
Keystation 49es midi keyboard not working
msmcleod replied to Joe Burns's topic in Cakewalk by BandLab
This error message is Window's cryptic way of telling you the device is open by another application. Check Task Manager to see if any other programs are still running that may be stealing your MIDI device. -
Sustain Pedal Data Not Recognized by Windows. Any ideas?
msmcleod replied to PavlovsCat's topic in Cakewalk by BandLab
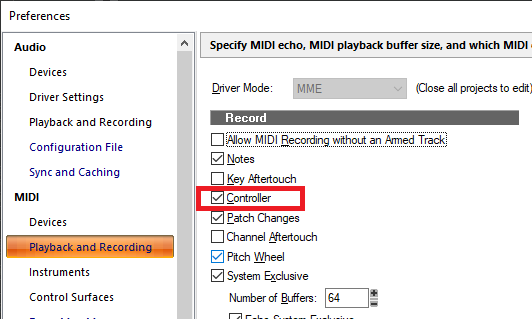
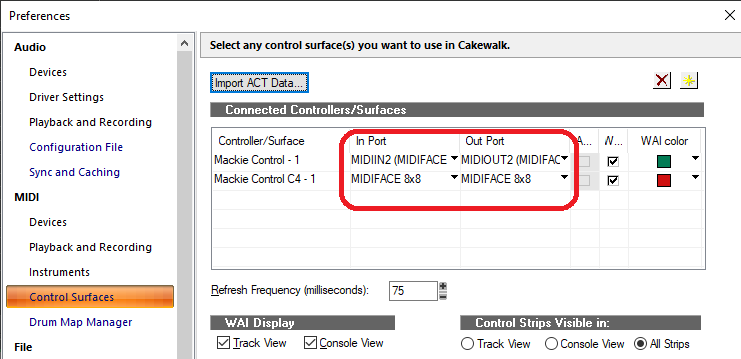
First rule out a config issue: 1. Check your Keyboard Shortcuts aren't configured to use the sustain pedal as a SHIFT key: 2. Make sure Controller events are enabled: 3. Make sure you have no control surfaces using the MIDI port your pedal is coming in on: Once you've ruled those out, check the hardware configuration of your pedal. Quite a few pedals have a polarity switch. Some keyboards automatically detect the polarity on start up, whereas others require it to be set a particular way. If your pedal has such a switch, try flipping it and trying again.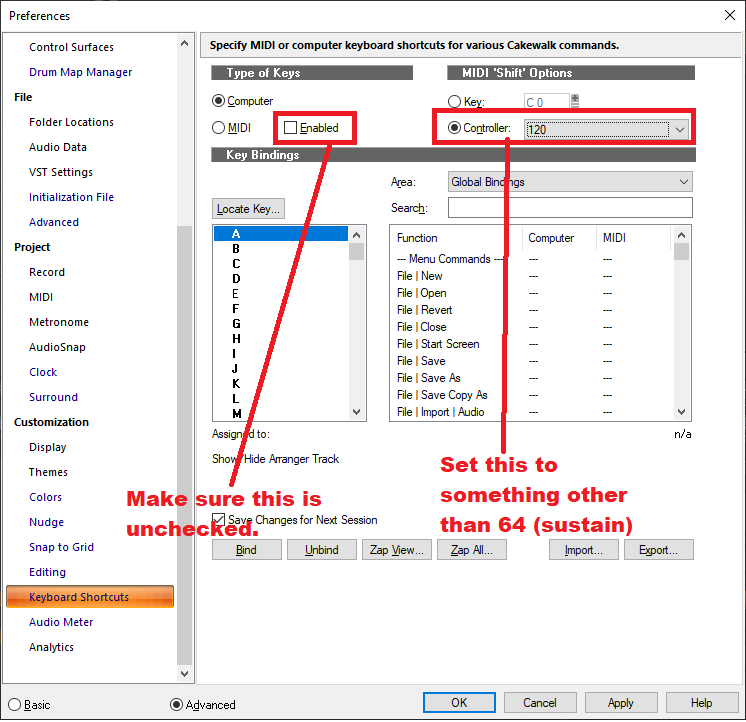
-
Cakewalk File bloat makes multiple copies of source files
msmcleod replied to Karmic Beats's question in Q&A
When you make edits or copies of clips (also splitting a clip will make a copy), copies are made of the waveform files to support the undo process. Once you undo, most of the files should be deleted. Some commands however, such as freeze will keep the files to support the "quick freeze" process. You can delete any unused files by choosing "Clean Audio Folder". Be really careful with this command though, as once those files are gone, they're gone. Avoid searching any directory other than the current project directory. Also, do not use this method if you use Cakewalk project versioning / auto save, or you save copies of your project in the same folder, as it can only find files that it knows aren't part of the current project - it has no idea what files the other projects might be referencing. So check the files before you delete them. In the example below, I know the project is MIDI only for the time being, so any audio was either a bounce/freeze or possibly some temporary guitar recordings. -
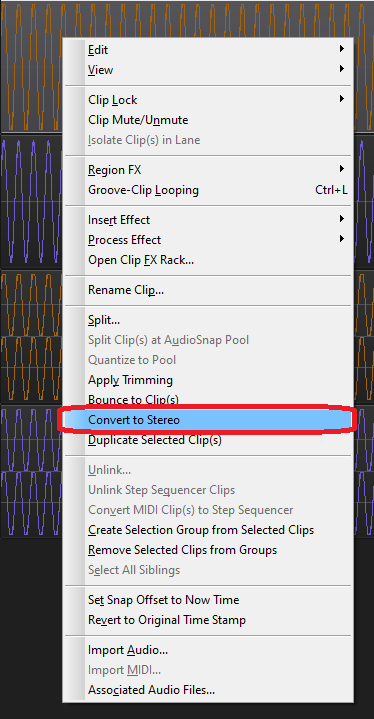
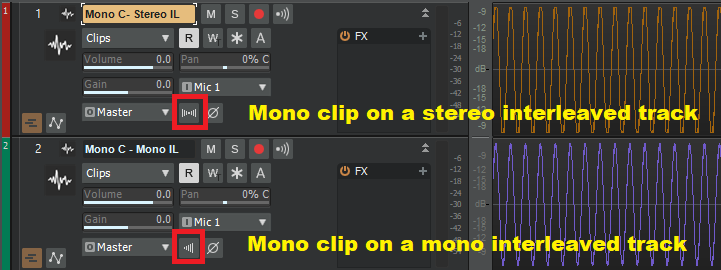
If you want to make a mono clip into a stereo one, just right click on the clip and pick "Convert to Stereo". I'd have recommended this in your other thread, however the question in the other thread was how to combine two mono clips into a stereo one (and I assumed the two mono clips were actually different).
-
Switch between midi channels while i playing
msmcleod replied to צביקה שמואלי's topic in Instruments & Effects
Use per-output instrument tracks with Kontakt. It won't matter what MIDI channel your keyboard is set to, it'll just use the correct MIDI channel for whatever the focused track is using: Note there is only ONE instance of Kontakt in use here - all the instrument tracks are sharing the same single instance of Kontakt. -
^^^^ This.
-
The lyrics view is primarily used for adding lyrics to Karaoke MIDI files. IMO it's not really suitable as a prompter. This is how I do lyrics prompting using Melda's free MNotepad and automation:
-
Control Surfaces for Korg Nano Kontrol2.
msmcleod replied to Leighton Cooper's topic in Instruments & Effects
You can't use the the nanoKONTROL2 as an ACT controller when it's in Mackie mode. You need to re-boot the nanoKONTROL in CC mode in order to use it for ACT, and IIRC this will only work if you come out of Cakewalk first, then reboot in CC mode, then restart Cakewalk. Even this has potential issues, as your previous Mackie assignments within Cakewalk will be remembered. The only way I've found to do this reliably is to : 1. Configure your nanoKONTROL2 to Mackie mode, 2. Start Cakewalk and set it up as Mackie Control within Cakewalk's control surfaces 3. Exit Cakewalk. 4. Copy TTSSeq.ini and Ctrlsurface.dat from %APPDATA%\Cakewalk\Cakewalk Core to a "Mackie Control" backup directory. 5. Reboot your nanoKONTROL2 in CC mode. 6. Start Cakewalk, delete the Mackie Control surface within control surfaces, and set it up as an ACT control surface 7. Exit Cakewalk 8. Copy TTSSeq.ini and Ctrlsurface.dat from %APPDATA%\Cakewalk\Cakewalk Core to a "ACT Control" backup directory. From then on... 1. While Cakewalk isn't running, decide which mode you want to work in, making sure you've rebooted the nanoKONTROL2 into the correct mode 2. Copy TTSSeq.ini and Ctrlsurface.dat from the appropriate backup directory into %APPDATA%\Cakewalk\Cakewalk Core 3. Start Cakewalk. You could create batch files to do this, and place shortcuts to it on your desktop. IMHO however, the best solution would be to get a different controller for ACT and use the nanoKONTROL 2 for Mackie mode exclusively. That way you can use the new controller for controlling synths via ACT, and the nanoKONTROL 2 for controlling transport/faders/pan etc. I wouldn't recommend getting an additional nanoKONTROL2 though, as the MIDI device names will be the same and you'll not be able to tell them apart (Cakewalk will probably get them confused too). -
Keep track focus between Console and Track view
msmcleod replied to Sven's topic in Cakewalk by BandLab
If the track is in a collapsed folder, that might explain it. There's an "Expand Track Folder on Track Focus" option under the Track View options. If this is checked, then changing focus to a track in the console view will automatically expand the folder the track is in, giving it focus in the tracks view too. -
Templates are definitely the way to go. For whole group recordings I have a project template ready to go, with tracks matching the channels I've labelled on my interface/mixer for each instrument. In the studio, I tend to use track templates with the inputs assigned to the appropriate input ports I use for each instrument.
-
Best workflow for editing MIDI CC data?
msmcleod replied to James Boddie's topic in Cakewalk by BandLab
We're renaming "Freehand Smoothing" to "Automation Smoothing" so it'll affect other areas such as recording automation and also CC to envelopes. So in the next release, you'll be able to choose jumps, lines or the standard curve smoothing it uses at present. -
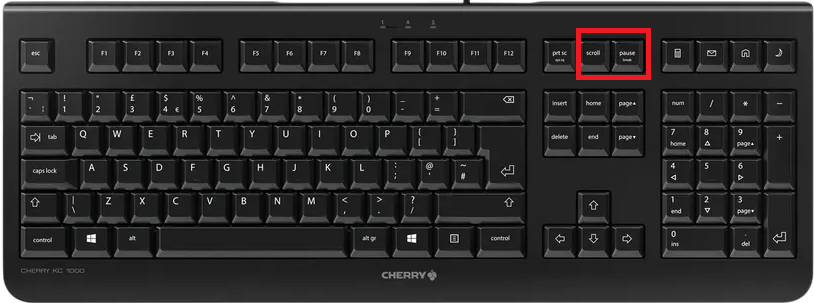
You can't stop the playhead moving in Cakewalk, but if scroll-lock is engaged it will stop the screen scrolling. Also, if you're worried about performance, engaging the pause key will clamp UI updates to once per second during playback/recording.
-
Ironically, I went from a 2 screen setup to a single screen setup. This was mainly due to me travelling a lot at the time, so I adjusted my workflow to use a single 1080P display, using screensets in my projects for the various views. I also means I can have a fairly large single monitor in my studio for my aging eyes...
-
I quite often use a combination of mono & stereo inputs. Guitar for instance... I use a stereo track from the output of my VG88, and a mono track for the DI signal. Other stereo sources I use are hardware synths and drum overheads / room mics.
-
Chord Analyser can't be used as an offline effect. It's purpose is to analyse chords as you are playing, so you need to add it to the MIDI FX bin. If you're using an instrument track, you can access the MIDI FX bin in the track inspector, within the MIDI tab:
- 1 reply
-
- 3
-

-

-
Scrub tool in track window makes Cakewalk freeze. Bug?
msmcleod replied to pulsewalk's topic in Cakewalk by BandLab
I'm not seeing any issues here with scrub in the PRV. It's worth noting that AFAIK the MIDI scrub tool only works in the PRV - so using it on the track pane won't work (unless you switch to inline PRV), but it shouldn't freeze up. Do you have any custom mouse drivers installed? I've certainly had problems in the past with some custom mouse drivers - most recently with the Kensington software for my trackball. Uninstalling them and switching to the generic Microsoft driver fixed it for me. -
bug report I'd like to talk about a very, very old bug.
msmcleod replied to OddSox's topic in Cakewalk by BandLab
Looks like this is a bug with Ripple delete and arranger tracks set to absolute time. We've got a fix - it'll be in the next release. In the meantime, adding a temporary section like you've suggested will work as a workaround. -
Try holding down SHIFT when opening Cakewalk - this will force Cakewalk to re-initialize it's config files. It may be that they've been corrupted.
-
CbB doesn't support native bus folders, but you can get a similar result by clicking the folder to select all the tracks, then while holding down CTRL set the track output of one track to "New Aux Track". You can then rename the aux track to the name of the folder. You may also want to move the aux track to the top of the folder so it's easier to locate. You just need to remember to change the output of any new tracks you add to the folder to the folder's aux track.
-
IIRC Guitar Rig 4 LE was bundled with Sonar X1 Producer. You can't install that via Cakewalk Command Center, but you should be able to download the installers from your account at www.cakewalk.com .
-
The +/- buttons on the numpad work in the inspector key widget.
-
White noise is all frequencies at the same volume. Pink noise is all frequencies with the volumes of each frequency adjusted to "how we hear them" - i.e. we don't perceive loudness in each octave the same, so pink noise adjusts for this so it sounds like all frequencies at the same volume.
-
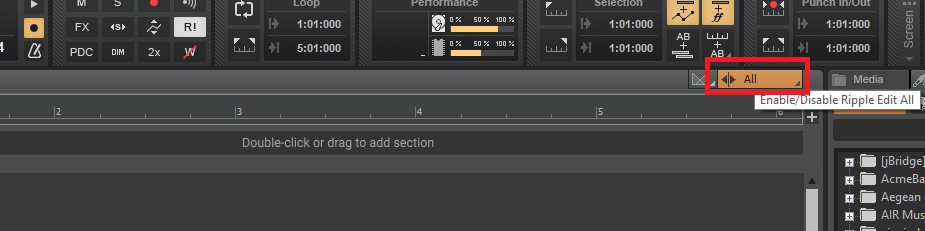
Not sure what is causing the crash, but the other behaviour sounds like you've got Ripple Edit on:
-
One of the things in the roadmap is "configuration presets", to allow you to easily swap between configurations. No ETA on this at present I'm afraid tho. In the meantime, something I've done for a number of years now (I've got 3 different audio device setups): 1. Set up your system for your first device 2. Copy TTSSeq.ini, Aud.ini, Cakewalk.ini & ctrlsurface.dat from %APPDATA%\Cakewalk\Cakewalk Core and put it in a "System A" backup directory. 3. Set up your system for your second device 4. Copy TTSSeq.ini, Aud.ini, Cakewalk.ini & ctrlsurface.dat from %APPDATA%\Cakewalk\Cakewalk Core and put it in a "System B" backup directory. Whenever you need to swap configurations, just copy those files from the relevant backup directory to %APPDATA%\Cakewalk\Cakewalk Core. I've got a batch file on my desktop for each configuration, so I just double click that before starting Cakewalk.
