


msmcleod
-
Posts
7,191 -
Joined
-
Last visited
-
Days Won
39
Everything posted by msmcleod
-

What are the 4 white dots in a MIDI track view?
msmcleod replied to RobertWS's topic in Cakewalk Sonar
That's telling you that if you double click on that clip, it'll open the PRV. You can change the default in TV Options->Click Behavior->Double Click->Midi Clips The Optons are: Nothing Clip Properties Event List View Staff View Piano Roll View Inline Piano Roll View Long holding the left button down will show a pop-up menu to change it for individual clips. Set it to Nothing if you don't want those to appear. -
Dithering keeps reverting back from Pow-r to Triangular
msmcleod replied to JazzP's topic in Cakewalk Sonar
Confirmed this is an issue. The issue is that the dither settings are being read in before the membership status has been retrieved. We're looking into it. [EDIT] - Fixed for next update.... which will hopefully be imminent. -
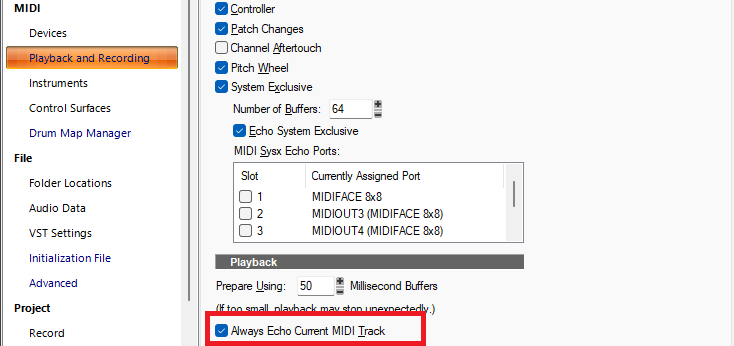
You'll always get this behaviour if "Always Echo Current MIDI Track" is checked:
-
2025.11 Early Access Feedback [CLOSED]
msmcleod replied to Jesse Jost's topic in Early Access Program
"Go to time" is translated as "Zu Zeitposition" in Sonar, so "Gehe" wouldn't find a match for that. However, the current trigram tokenizer ignores words less than 3 characters, which is why "Zu" didn't find anything. This has been fixed for the next update by adding an additional tokenizer. Searching for "zu", will show the following in the next update: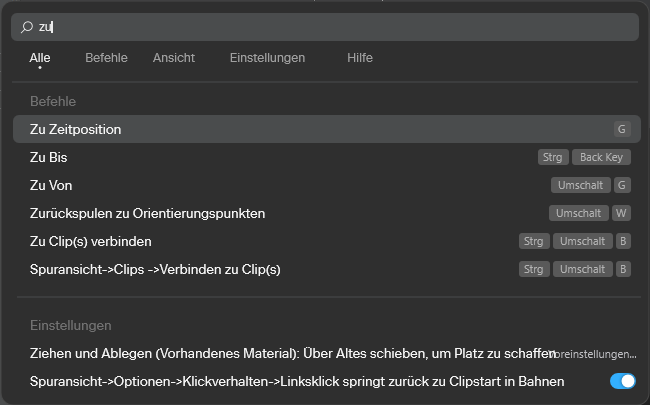
-
2025.11 Early Access Feedback [CLOSED]
msmcleod replied to Jesse Jost's topic in Early Access Program
Thanks - we'll look into this. It definitely should support searching / results in Chinese. Fixed for next update. -
2025.11 Early Access Feedback [CLOSED]
msmcleod replied to Jesse Jost's topic in Early Access Program
Thanks - we'll look into this. It definitely should support searching / results in Chinese. -
Use the right mouse button to lasso the nodes - it won't select a region.
-
Open the Track Manager and check you've not got any hidden tracks. It might be that you've saved a template with hidden tracks, and one a track with that trackId is created, its hidden status kicks in.
-
Sonar has no in-built audio editor, but you can easily add one to the utilities menu - by editing the registry using regedit. Just create a new key under Computer\HKEY_LOCAL_MACHINE\SOFTWARE\Cakewalk Music Software\Tools Menu and add ExePath, MenuTest and Type string values. This is an example for Sound Forge 12: To use it, just select a clip then select "Sound Forge 12" (or whatever you're using) from the Utilities menu. Sound Forge will fire up with your clip loaded. You then edit, save then exit, and Sonar will pick up the modified wave file.

-
Square Highlighted Box Around Take Lanes in Track View
msmcleod replied to Jerry Gerber's topic in Cakewalk Sonar
Oh actually I mispoke... the indicator appears AS SOON as there is a clip available. There's no way of removing it at the moment. I've edited my original reply. -
Square Highlighted Box Around Take Lanes in Track View
msmcleod replied to Jerry Gerber's topic in Cakewalk Sonar
Ok, the box is there to indicate that you have at some point enabled take lanes and there are clips in one or more lanes. When you first record on to a track, the clip has no lane and so no indicator is visible. As soon as you open the take lanes, it is placed into the first lane. From then on, all clips on that track will be placed into a lane. [EDIT] - actually it appears this is wrong... the indicator appears as soon as a clip is placed on a track. It's there to show that data is there. -
Square Highlighted Box Around Take Lanes in Track View
msmcleod replied to Jerry Gerber's topic in Cakewalk Sonar
@Jerry Gerber - a screenshot might help identify what it is? -
Can't speak for anyone else, but I bought a Windows 7 Pro license (back when you could), upgraded it to Windows 10 Pro when it was free, then recently upgraded it to Windows 11 Pro. Never had to purchase a new license at any point. I've also upgraded about 6 other Windows 10 PC's to Windows 11 (both Pro and Home edition) and it's not required a new license.
-
IIRC, all the Cakewalk Product Center is doing a "HEAD" request from https://www.bandlab.com - this will be on port 443. If it doesn't get a reply in 3 seconds, it will show this message. First check you can access bandlab.com in a web browser - if you can't, then check your Firewall settings, both on your router and Windows Firewall. If the browser works fine, check that Cakewalk Product Center isn't blocked in Windows Firewall.
-
Move existing tempo track events 4 measures right.
msmcleod replied to Ray Yates's topic in Cakewalk Sonar
Looks fine here... perhaps your browser doesn't like my bargain basement SSL certificate 😉 -
Move existing tempo track events 4 measures right.
msmcleod replied to Ray Yates's topic in Cakewalk Sonar
Here's one... -
Move existing tempo track events 4 measures right.
msmcleod replied to Ray Yates's topic in Cakewalk Sonar
I find by far the easiest and fastest way is Project->Insert Time/Measures. -
Can I do this edit technique with Elastique Pro?
msmcleod replied to Debris Oliveira's topic in Cakewalk Sonar
To be clear... when the smart tool is active: ALT + Left Click will make the split, or alternatively pressing the "S" key will split all selected clips at the current now time. ALT + Shift + Left button moves the waveform within the clip If you want everything to be moved together, add all the clips to the same clip group - e.g. select all the clips, then right click and pick "Create new Selection Group from Selection". When you do this, selecting one clip will automatically select all other clips in the group. Depending on your workflow, you may also want to check "When Splitting Clips in Groups, Create New Groups" within Preferences->Customization->Editing. As an alternative to using ALT+Shift+Left, you could use the keypad to nudge the clips. This might be more appropriate if you're using selection groups, as it'll nudge all related clips by the same amount e.g.: -
I'd avoid using Windows 7 unless you absolutely need to. Getting Windows 7 to authenticate is near impossible nowadays, short of a phone call to Microsoft and jumping through hoops with them. Sonar 7 should be fine on Windows 10, but you may need to install the older VC++ redistributable packages, potentially going back as far as VS2005 . You can download them from Microsoft here: https://learn.microsoft.com/en-us/cpp/windows/latest-supported-vc-redist?view=msvc-170
-
E.R. means "Early Reflections". Treat this as part of the reverb - i.e. you probably don't want this at 0.0db, but it may be less than the reverb level, depending on how loud you want them to be.
-
There are four main ways to get a tempo map from audio: Automatic Detection 1. Drag the audio clip to the time ruler: This uses Melodyne to detect transients within the audio, and Melodyne will create a tempo map for the project. 2. Use the AudioSnap palette: Select your clip, open the AudioSnap palette and click "Set Project from Clip" Both methods above are very much dependent on the material within the clip. If there aren't enough strong transients within the audio, results might not be satisfactory. Manual 3. Set Beat At Now: This involves moving the now time to various points in the audio, then invoking "Set Beat At Now" to tell it what measure/beat this part of the audio should be. Start at measure 2, then work forward through the project. If the audio tempo is fairly static, you may get away with skipping several measures at a time, whereas complicated tempo changes may require you to do this every beat. The tempo map is refined on every call to "Set Beat at Now". 4. Fit Improvisation: The method involves recording a MIDI guide track. Insert a MIDI track and arm it, start recording and tap the same note at every 1/4 note along with your audio. Once you're finished, select the new MIDI clip and select "Fit Improvisation" from the Process menu.
-
In your reverb plugin, there should be either a Mix control, or separate Dry/Wet controls. You want dry at 0%, and wet at 100%. Once you've done this, you may have to reduce the send level from your tracks, and increase raise the output fader (because the dry signal is no longer being "added" by the reverb). Having the dry at 0% / wet at 100% is standard practice when sending to an effect bus. The only time you'd want a different mix of wet/dry is when you're using the effect inline.
-
The exported lyrics conform to the karaoke standard for MIDI files, which IIRC was it's main purpose. You use a dash to separate the syllables, so they line up properly with the notes. This is different to the lyric prompter view in Next, which is literally just a prompter.
-
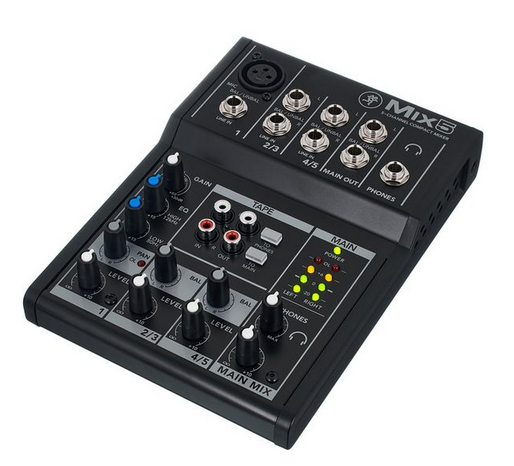
Personally, I find a small analog mixer works the best for me. Messing around with virtual cables is just a configuration nightmare. Mic goes directly into the mixer (or via some outboard fx) along with the output of your main audio interface. I then feed the mixer output into the line input of my onboard sound card, so that OBS (or whatever you're using) is just recording from that. I've got something similar to this for the job:
-
Does the DXI plugin no longer recognize it?
msmcleod replied to happen135's topic in Instruments & Effects
More likely, the sound just happens to have more mid frequencies, which is why it seems that way - after all, an EQ is just a volume knob restricted to a certain frequency range.


