


msmcleod
-
Posts
7,191 -
Joined
-
Last visited
-
Days Won
39
Everything posted by msmcleod
-
I checked this yesterday - it's working perfectly for me. Obviously if you have "Keep track/console visibility states in sync" checked, there will be no difference between the "Track View" and "Console View" settings, but if that isn't checked you can have different sets of hidden tracks and the MCU correctly hides them according to the setting.
-
As long as the plugin ID is the same, Cakewalk will automatically use the updated version. Most plugin manufacturers keep the same plugin ID when they release new versions. Kontakt is a different matter however, and arguably for good reason. Unlike most plugins, Kontakt is more of a host for 3rd party libraries most of which rely on Kontakt's scripting language to facilitate their functionality. Take this hypothetical example: Say you have a library that used the scripting language in Kontakt 3. The scripting language doesn't do what the developer needs, so the library developer uses some workaround to get around the issue. However this workaround relies on a bug which is fixed in Kontakt 4... now, the library no longer works in Kontakt 4. Given that the vast majority of film/tv/media composers rely on Kontakt for their work, they can't be put in the position where a library they rely on no longer works when they upgrade to the latest Kontakt. Given there are literally 100's (if not 1000's) of 3rd party libraries, there is no way for Native Instruments to test them all with their latest release. So instead Native Instruments release the new Kontakt as a new plugin with a different plugin ID. This allows multiple versions of Kontakt to be installed - so if you've got a library that only works in a particular version of Kontakt, as long as you have that version installed it'll keep on working with that version.
-
IIRC, Overloud changed the way automated parameters work. This thread in the old forum covers the solution ( scroll down to comment #16) : forum.cakewalk.com/Solved-30th-Anniversary-CAX-Amp-Sim-FX-Chains-No-Longer-Work-with-TH3-349-m3791681.aspx
-
Are you using ASIO with the on-board audio device? If so, switch to WASAPI. I had exactly the same issue with the on-board Realtek device on my laptop - the ASIO drivers were rubbish and causing Cakewalk to constantly retry failed ASIO calls. In the longer term, I'd recommend considering buying a dedicated audio interface, especially if you're ever going to record audio.
- 10 replies
-
- 3
-

-
- freezes
- slow response
- (and 1 more)
-
I've heard Scan are pretty good - not that expensive (but obviously not as cheap as a home build), however they do build PC's specifically for DAWs: https://www.scan.co.uk/3xs/custom/daw-digital-audio-workstation-pcs I have used them in the past, but it was literally decades ago. IIRC their customer support was excellent.
-
Just a quick note regarding presets vs tasks: Presets - these specify the filename tags, general format settings and source category. They are meant to be global, so they don't contain any project specific information. Tasks - these are project specific, so in addition to everything the preset contains, they also contain the checked sources under source-category, the track/bus selection, the time range, and any encoder settings (e.g. MP3 settings / tags ). Additionally, although tasks are project specific, you can save them as part of a project template. Setting this up is slightly convoluted, as you need to create the tasks with audio clips present in the tracks, but then delete the audio clips when you save the template. But this can be useful if you do several common exports types for every project.
-
"Entire Mix" is the source category - which means, as you say, it's grabbing audio from the hardware outputs. This is totally separate from what you're actually sending to the entire mix.
-
It's not a bug. The export dialog is selection based. To export everything you either need to: 1. Select everything; or 2. Select nothing ( CTRL + SHIFT + A selects nothing ) The OP's screenshot shows "Track 10 Drums" selected, so none of the unselected tracks will be exported. Also, as Track 10 is a MIDI track, no audio will be exported unless it's corresponding audio track is also selected. The difference between selecting everything or selecting nothing is subtle: Selection: 1. A selection specifies both tracks and a start time/duration. If you save this as an export task, then the task won't pick up any new tracks or change in duration (assuming you've chosen Range = Selection). 2. When choosing Tracks or "Tracks Through Entire Mix", all tracks will be exported at the same length, i.e. the length of the selection. No selection: 1. No selection implies all tracks. If you create an export task, any new tracks will automatically be picked up. 2. No selection + Range = Entire Project will always export everything for the whole project duration 3. When choosing Tracks or "Tracks Through Entire Mix", each track will be exported at its own specific duration.
-

Recording V-Drum MIDI - Question about the MIDI Notes
msmcleod replied to Joel Pixton's topic in Cakewalk by BandLab
Sorry for chiming in so late in this discussion - last week was a busy one. I don't use any of the Roland TD modules, but I do use both the Alesis Nitro Mesh and DM5 with AD2. The Nitro is used for the standard kit pads, and I'm using the DM5 for extra cymbals (I modded some Remo practice pads to turn them into triggers). I've got both modules going to a separate input in my Miditech MIDIFace 8x8. The first three inputs/outputs are used by my Mackie MCU, XT and C4, with the Nitro Mesh on input port 4 and DM5 on input port 5. My main MIDI controller keyboard is connected to my Focusrite 18i20. Despite the heavy MIDI traffic, I've never experienced any glitches. If you want to use both the TD6 and the TD8, I'd recommend using a similar set up - i.e. have them connected to their own separate MIDI IN ports. Cakewalk will merge all of the inputs for you, but personally I prefer to set the MIDI filter to only listen on the two drum module ports and my main controller keyboard. This ensures that it never picks up anything from anywhere else. I had to build my own map within AD2 due to my strange hybrid setup, but mine is pretty close to GM. IIRC AD2 has drum maps set up for the Roland TD modules, but you can tweak the AD2 drum maps to adjust velocity curves as required. -
How can contact help support by e-mail
msmcleod replied to Maimchajim's topic in Instruments & Effects
-
Did you download the Focusrite ASIO drivers from their website? If not, do this. Windows will not automatically install the ASIO drivers, only the class compliant WDM/WASAPI drivers.
-
Why not just use articulation maps? Key switches are exactly what they were designed for. Also, there's no way for Cakewalk to know what keys match what instrument. Even if you based the keys/colours on the articulation map definitions, there's still no way for the the PRV to know which articulation map to pick, as 1. you could have many articulation maps in your project, and 2. you could have more than one articulation map defined for the same VSTi. If you've recorded key switches by playing them in real time, you can easily convert them to articulations by adding the articulation map to the project then right clicking on the articulation lane header and choosing "Extract Keyswitch Articulations". If you want to turn articulations back into notes, select "Apply Group 'xxxx' Articulations to Track" or "Apply All Articulations To Track" from the same context menu.
-
Difference between sending to Aux track vs stereo bus
msmcleod replied to Michael Reynolds's topic in Cakewalk by BandLab
There is no difference in CPU usage either way. -
What happened to my "Insert Audio FX" Menu?
msmcleod replied to Spectrum424's topic in Cakewalk by BandLab
This was changed a while back to get around a long standing (> 11 years old) Windows bug that has gotten worse since Windows 10 - if you go beyond around 1000 menu items, it starts removing items. This wasn't an issue in the past, because not only was the menu limit much larger (around 4000), most people didn't have that many plugins. So the workaround is to popup a brand new menu using a different UI framework. -
Uncheck "Select Events with Arranger Sections" within the Track View Options menu.
-
Either: 1. Export a selection; or 2. Create arranger sections for the parts you want, then use "Arranger Sections" as the source category when exporting.
-
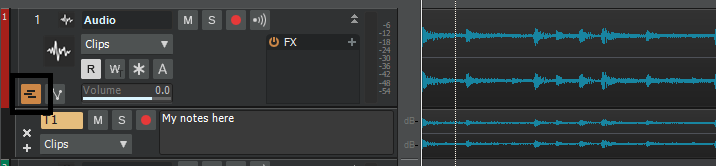
Each take lane has a notes section. Just expand the take lanes, and you can enter in the notes there: If it absolutely has to be at the track level, Melda's free MNotepad can be added to the FX bin.
-
I believe Scaler can do this
-
Sorry, I meant to reply to this sooner. I did try automation out on a real MCU, and things were far more straightforward. I didn't see the behaviour you're seeing with the G2. The MCU faders are touch sensitive, so automation recording starts as soon as I touch the fader. IIRC Cakewalk was correctly punching out as soon as I stopped touching the fader, however if I left my finger on the fader without moving it, it would automatically punch out after 250ms. I spoke with Noel regarding this, and this is expected behaviour. At no point did it switch to latch mode, or behave as if it was in latch mode like you are seeing.
-
Thankfully, keyboard shortcuts and menus are pretty much centralised by their command handler - i.e. it doesn't matter whether the command is invoked by a menu or a keyboard shortcut. The only tricky part is determining context, which for the most part is determined by focus and/or selection.
-
Are you leaving the Melodyne region effect active? If that's the case, then that's your issue. When a region FX is active, Melodyne has ownership.
-
Note that control surfaces are COM DLL's, so simply copying them to the Shared Surfaces directory isn't enough. They'll need to be registered: 1. Right click on the desktop, and select "New->Shortcut" 2. Type in cmd as the location, then click "Next" and then "Finish" 3. Right click on the new shortcut, then select "Run as Administrator" 4. In the command prompt, execute the following: regsvr32 "C:\Program Files\Cakewalk\Shared Surfaces\alphatrack.dll"
-
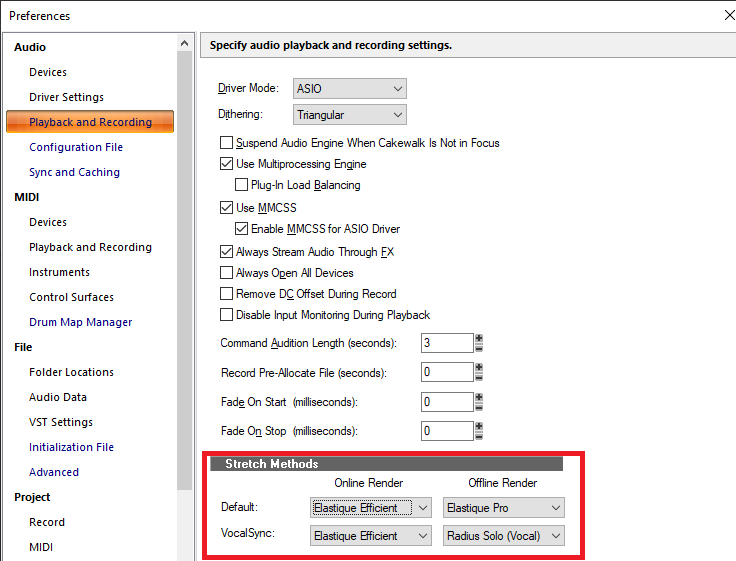
Cakewalk uses two different pitch/stretch algorithms used, one for online render (i.e. playing in real time), and one for offline render (bouncing/exporting). The idea is that the online render is quick and dirty so as not to impact your flow at the expense of audio quality. The offline render is higher quality, but much slower due to the computation involved. The intended workflow is to use the online render until you get the timing right, then use Bounce to Clip(s) to apply the pitch/stretch using the higher quality algorithm. However, not all algorithms are suitable for every type of material. So it's likely in your case that the offline algorithm is better suited to your material than the offline render. This can happen if you've chosen a totally different offline render algorithm to the online render - e.g. you're using Elastique for online, and Radius for offline. You'll get much more consistent results if you choose the same type of algorithm. The algorithms are specified in preferences:
-
Bard, AI, Computer Programming is a short lived career
msmcleod replied to Variorum's topic in The Coffee House
From a job security point of view, AI honestly doesn't bother me - I by that I mean not just for me personally, but for programmers in general. Everything I've seen from AI (especially ChatGPT) is either "variations on a theme" - i.e. regurgitated code it's scraped from various online resources and paraphrased accordingly, or it requires an incredible in depth of knowledge of how to build an appropriate AI model and source training material. Also, if you speak to any AI experts, they'll usually try out a few different approaches before settling on the best compromise. From an analytical point of view, AI is incredible at seeing patterns in huge amount of data that humans would be incapable of. But from a creative point of view - either in art or engineering, in my opinion it's not there yet. I've yet to see anything that is really "new", creatively speaking, from AI. Sure it'll get you results quicker by giving you example code, but you still have to understand it in order to maintain it. -
I've been weaning myself off Waves plugins for a while now - the biggest reason being the license seat restrictions. At one point, I was buying two licenses for each plugin but of course that pretty much waved goodbye to the WUP cap. The cap is still there, but it's per machine - so the cap is essentially twice the normal amount. For analog emulations, I mostly now use Analog Obsession; for more clinical/creative work, I use MeldaProduction. I'd bought enough Melda plugins over the years to get the complete bundle for a fraction of the price. To be honest though, 99% of the time, the stock ProChannel EQ and compressors work fine for me. I've also started using the Sonitus plugins more - they may not look great, but they're very good at what they do, and the CPU usage is very low. One set of plugins I do find very useful, albeit as a temporary solution, is the CLA Drums/Guitars/Vocals/Bass etc bundle of effects. If you've just done a tracking session, and want a very quick rough mix, slapping appropriate plugins on the appropriate tracks can give a pretty good approximation to a finished mix. Very useful if you've just tracked a local band and want to give them something to take home with them. It's far from perfect, but sounds orders of magnitude better than just a balance of the raw tracks.
