


Nigel Mackay
-
Posts
898 -
Joined
-
Last visited
Everything posted by Nigel Mackay
-
I'll look
-
try sometimes youtube is a PAIN
-
 Would never be removed. Click the dropdown for Workspaces - mine syas Instruments and Bus. Select Manage Workspaces. Expand Views. Switch on Event List. You will then have it. (Whichever Workspace you are set to has switched Even List off.) Then read up about Workspaces - they are very useful. 😀
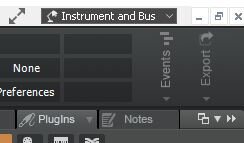
-
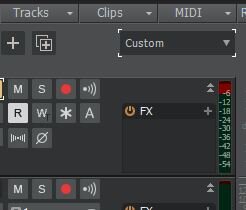
The workspace dropdown above the track pane is probably set to a vew which disables the Event List. Change it to All. Here it says Custom.
-
Your audio settings on the PC probably got changed. Right-click on the speaker icon, select Open Sound Settings. In Input section click on Device Properties and turn the level down.
-
X.E.L. Ohh does it in one of his recent tutorials. He has a link to download the CAL scripts. Have a look in the Tutorials section. One of his 808 tutorials, I think. Very recent.
-
When it works for others, it tends to be a Windows quirk.
-
I think there is a bit that can help in this video. Where he matches the tempo to the inserted clips.
-
How to fit song to project tempo and viceversa
Nigel Mackay replied to Michel Camacho's question in Q&A
Maybe this will help. Or this. -
You select the track and copy. Sure, it copies the data in the clips in that track. But it selects ALL the clips. If you specifically try to select the clips directly, if they are disjointed you could miss some.
- 26 replies
-
- 1
-

-
- midi
- bug report
- (and 2 more)
-
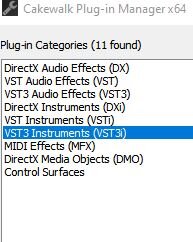
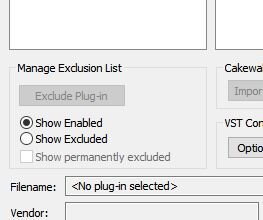
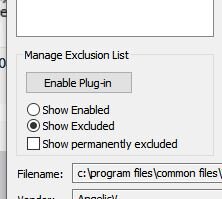
Impossible to just say. Utilities -> Cakewalk Plug-in Manager. Click on VST3 Instruments (VST3) If you see it in the right pane (It isn't in this screenshot) Click on it and then on Exclude Plugin. Now click on VST Instruments (VSTi) Do you see Iota Mini in the right hand pane. If you do, great. Close the plugin manager. Add Iota Mini to your project again. It will be the VTS2 version now. Probably all ok. If you don't see it. Click on Show Excluded. If you see it in the right hand pane, click on it and then on Enable Plug-In Close Plugin manager Insert Iota Mini in project. If it is not in the right-hand pane, install the VST version of the plugin, restart Cakewalk and insert Iota Mini into your project.

-
Run Cakewalk. In Start Screen use either Recent Projects or Existing Projects to see the problem project listed. If it is in Recent Projects, hold down the Shift Key, click on the project name. If you need to use Existing Projects, use it to navigate to the problem project, hold down the Shift key, double-click the project file. The first time through, say No to All. The 2nd time say yest to the first plugin, no to the rest. The 3rd time through say yes to the 2nd plug in then no for the rest When it crashes, the allowed plug in is causing problems. Shift-open again, saying one by one yes to all the plugins except the problem one. Save the project. Investigate the problem plugin. If it is a VST3 a good start is to use the VST2 version.
-
@tonemangler If you stay in Smart mode, add the nodes where you want them and then use Ctrl click and drag on the actual line segment it does not add any nodes. No changing modes No moving nodes No deleting modes 😀
-
Open in safe mode. Hold down shift key while opening. So no to everything when it asks should it load xxx, should it load yyy. If it opens without shutting down, close it without saving. Then: Open in safe mode Only allow it to load one thing Close without saving. Each time, let lit load something else. When it closes by itself, that thing that you loaded is a problem. Safe load, add everything except the problem. Save. Make a plan with the problem. (Try adding at and see if successful. If not try a substitute.) Good luck. Can be a long painful process if a large project.
-
@Lord Tim's suggestion is the best. Just insert the 4 nodes where you want your fades to start and and Ctrl-dgrag the line.
-
@tonemanglerJust add the nodes where you want the fades to start and end.
-
Create the 4 nodes. Switch to Edit. Click and drag the actual line segment. Don't get the 2 extra nodes that need deleting.
-
Open the automation lane on an audio track. Add a few nodes to Volume. Right-click on the line between 2 nodes. You get options for Jump, Linear, Fast Curve, Slow Curve. You can't really expect any more/better than that.
-
Assuming you are correct when you say you imported a MIDI file. MIDI has no sound. It is only a set of instructions. You need to send those MIDI instructions to a drum synth, which will make the sound. You can use the SI-Drum kit. But watch this tutorial about MIDI first. Start watching from time 2:53. At time 5:02, insert the SI-Drum Kit, NOT the TTS-1. Stop watching. Paste your drum MIDI file onto the track. Press Play. You should hear the drums playing. Right-click on the track and select Split Instrument Track. You now have 2 tracks - track 1 is the drum synth audio, track 2 is the MIDI track. Go Views -> Inspector and then look at the section that opens up to the left of the tracks. Click on the MIDI track. The extreme left of the screen shows the MIDI track from a different view point. Look at the very bottom. There where it says In/Out. O for Out says 1SIDrumKt1. So the MIDI data is being fed to the SI Drum Kit synth. In the track pane click on track 1, the synth. Now look at the left, then bottom. It shows input is SDrumKt1..... That track is receiving the audio that is coming out of the Drum synth. The output is to the Master fader. Ask questions at this point if you need to. Go back to your tutorial, see what you missed, what went wrong.
-
Uninstall Sonar X3 Without Losing Synths and EFX Plugins?
Nigel Mackay replied to David Noll's question in Q&A
The actual X3 DAW software is quite small, so the easiest is to just leave it. By removing it you won't suddenly have all this disk space freed up. -
You see the 4/4? Click on it and set the time signature. Click on the 120 to set then tempo. For something such as EW orchestra, you can: 1) have a track per articulation, and insert as many instances of that instrument as you need 2) have one instance, one track, and send the keyswitch codes from the track Watch all these tutorials (in no particular order) about doing that. d a b c Then go to the Tutorials forum and watch any tutorial that looks promising. On YouTube search for Cakewalk and subscribe (with notification) to all the channels. Have a look at the tutorials, see which channels you like. Unsubscribe the ones you don't.

- 3 replies
-
- 1
-

-
- tempo and ticks non multi vsts
- ew strings
- (and 2 more)
-
👍
-
Whatever the range the meters are set to, the actual reading stays the same. If the actual level is -6db: If the meters are set tom -100 to -1 it will show -6. If the range is set to -7 to -5, it will show -6. If the range is set to -4 to -2, you will see nothing because -6 is below the bottom of the meter. If the range is set to -20 to -9 the reading will shoot through the top of the meter, because -6 is more than -9. What you are looking at is "meter resolution", not volume adjustment. It doesn't matter how strong your magnifying glass is, if there are only 3 tots left in the whiskey bottle it is 3 tots. No matter how big they look, it is still only 3 tots. Put them in a test tube - 11 inches of whiskey - still only 3 tots. Empty the bottle into the swimming pool - level goes up less then a millimeter. But it WAS 3 tots. Really, it was. Track 1 with the recorded audio ranging from -12 to -6 is just fine. Be happy. When you are recording from the Korg the level is a bit on the low side. Look for level controls on the Korg and the audio interface (if you have one). Open Windows' volume control and find a record/input level there. If you find somewhere to turn the level up, record at about -18. This gives you headroom to mix (which adds everything up, more or less.) If you can manage that, use Input Gain on prerecorded audio to match your successful recording level. Even if -24 is the best you can manage, you cam turn the pre-recorded audio down to match. BTW It could be that your Korg just has a very low output level.
-
New Install: What should I put on internal / external drives?
Nigel Mackay replied to albertpc@ameritech.net's question in Q&A
It depends on the HDD's performances, rather than internal/external. VSTs with large sample files will be much better off on an SSD, whether external or internal. What is the data rate of your external drives? That depends on the interface. -
Check that you don't have it in the event view.
