msmcleod
-
Posts
6,909 -
Joined
-
Last visited
-
Days Won
35
Everything posted by msmcleod
-
@gimmexlz1 - thanks for pointing this one out. It's been fixed and will be available in the next update.
- 3 replies
-
- 10
-

-

-
What is in your audio file is largely irrelevant during playback, as everything is clamped to 0db at the point it gets sent to your audio interface, as it needs to be converted to either 24 bit or 16 bit (depending on what your audio interface is set to).
-
There's no real advantage in exporting at 32 bit vs 24 bit. 32 bit is a floating point format, whereas 24 bit is an integer format... so although 32 bit may technically support a greater dynamic range, for all practical purposes in a final export, they're equivalent in quality. 32 bit has an advantage when recording/mixing, because it's basically impossible to clip even when going to 1000's dB, and you can go incredibly quiet without losing information. This is why all DAW's use either 32 bit float / 64 bit float internally. This is essential when mixing multiple tracks, but of little use with a single exported file - unless of course the file is incredibly loud or incredibly quiet. In 99.9% of cases, your final export will be in the normal dynamic range of human hearing. So 24 bit is fine. In fact I'd argue that 16 bit is more than adequate as a final export format, as it more than surpasses the dynamic range of human hearing.
-

Why tickets are so expensive but artists aren't getting the money
msmcleod replied to bitflipper's topic in The Coffee House
You also need to bear in mind that in the 70's, 80's & 90's, a band's primary income was from album sales. Singles were just another way of promoting the album, as was touring. As long as the band broke even on the tour, they were happy - they'd even take a loss on the tour if they were confident it would translate to an overall profit in album sales. Nowadays, most people stream music for a fraction of the cost, with the band getting fractions of a cent for each play. Now the primary source of income is a percentage of ticket sales and the merch they sell at concerts. -
As far as I know, Next only supports a single tempo at the moment. A release with a tempo track is imminent though. I think what you're talking about is tempo detection - i.e. automatically building the tempo track from an existing recording, so it effectively snaps to the grid (because your "grid" is changing to match the audio). Tempo detection is on the roadmap, but won't be available in the first cut of the tempo track. What you will be able to do however is record at a tempo of say 120, alter the tempo in the tempo track, then get you're recording to follow your tempo changes.
-
Seeking clarification on purchasing Sonar
msmcleod replied to norfolkmastering's topic in Cakewalk Sonar
I quite often record things in Sonar or CbB, then open in SONAR Platinum - I don't have any issues. Even features such as the tempo track are handled properly - i.e. tempo changes are properly shown in Platinum, and if I save / re-open in CbB or Sonar, it converts it to a tempo track envelope. Arranger sections are obviously lost, but that can be easily worked around by saving your arranger tracks as an arranger template and re-importing it. -
Can't Get 2nd iCon P1-X to Pick Up in Sonar
msmcleod replied to minminmusic's topic in Cakewalk by BandLab
The Mackie Control surfaces are designed to work as a group - i.e. as if they're a single control surface. So for example, if I had an MCU, 2 x XT and a C3 and I want them all to work together as one, I'd set them up as: MMcL Mackie Control XT #1 MMcL Mackie Control XT #1 MMcL Mackie Control #1 MMcL Mackie Control C4 #1 If I had an additional MCU that I wanted to use for controlling buses, while the others are controlling tracks, I'd set it up as follows: MMcL Mackie Control XT #1 MMcL Mackie Control XT #1 MMcL Mackie Control #1 MMcL Mackie Control C4 #1 MMcL Mackie Control #2 <- additional MCU But unless you want them to work separately, there is no reason to use the MMcL version of Mackie Control - just use the one shipped with Cakewalk/Sonar. -
No. Tempo isn't actually automation - it's just shown as an envelope. Automating tempo makes no sense - tempo underpins everything in the engine. Automating it would be like changing your car wheel size while you're driving it.
-
Seeking clarification on purchasing Sonar
msmcleod replied to norfolkmastering's topic in Cakewalk Sonar
Sonar is officially released, and has been for a few months. There is always a continuing beta program as is common with many software products. This allows us to get early feedback on new features / enhancements, and fix any newly introduced issues before it is released to the wider public. -
Sharing your Bandlab masterpiece with other musicians...
msmcleod replied to Dreamer's topic in Cakewalk by BandLab
I still think uploading to BandLab is the best solution. Not only is it free, but you could have the tracks marked as private so you can limit access to each client. -
Looking for solutions for lead sheet with lyrics
msmcleod replied to John S Swanson's topic in Cakewalk by BandLab
You can use MNotepad from Melda Production - it's part of their free plugin collection: -
Experiencing Latency Issues with CbB 2024.07 – Anyone Else?
msmcleod replied to M Ahmad Hanif's topic in Cakewalk by BandLab
It's Windows update time again... I bet Windows is preparing the update in the background... -
Sustain Pedal Issue - CbB 2014.07 Build 108, Roland A-800PRO
msmcleod replied to D_Maynard's topic in Cakewalk by BandLab
The most common reason for this: Best to set the controller to something you're unlikely to use, e.g. 120. If you're not using MIDI events for triggering commands at all, uncheck "Enabled".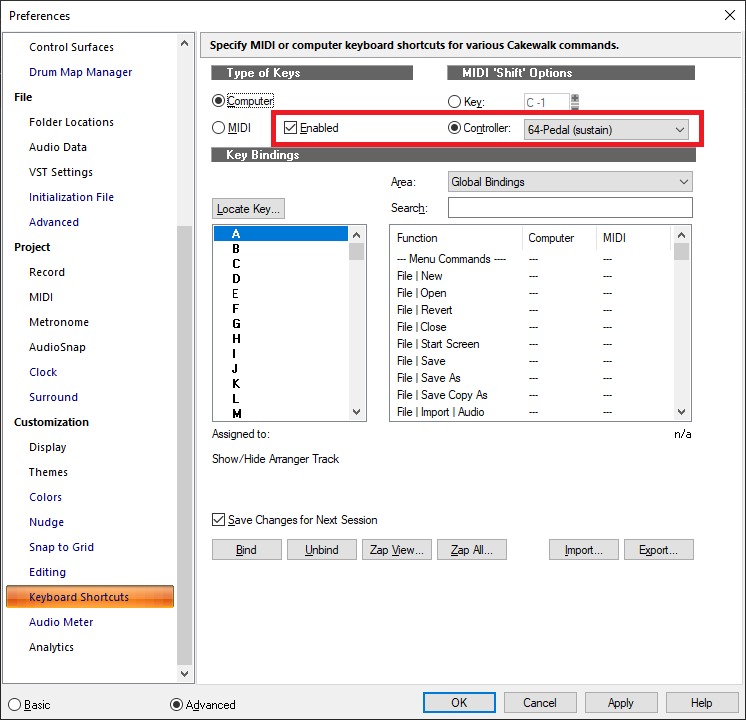
-
Interesting... zip up your project folder and send it to @Jonathan Sasor... we'll see if we can repro the issue.
-
It might also be worth recomputing the waveform picture... maybe it's gone stale somehow.... Right click on the clip, and pick "Associated Audio Files", then on the dialog select all the files and click "Recompute Pictures"
-
Usually when this error occurs it's either one of the following: 1. Disk is out of space 2. Disk is read-only 3. Disk has errors
-
Audio clip goes into "phantom" mode
msmcleod replied to Cobus Prinsloo's topic in Cakewalk by BandLab
There is more than one way to mute a clip. You can mute the clip itself, but you can also mute the lane. Check both. -
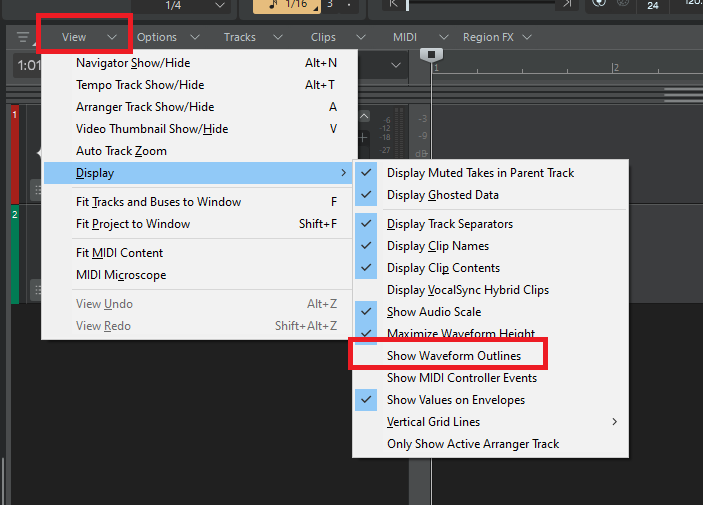
Can you confirm that this doesn't happen with waveform outlining disabled?
-
Looks to my like it's the waveform outline algorithm doing it's thing. The spike is just some waveform detail that is being highlighted at a particular zoom level, and is then "smoothed away" at different zoom levels. Personally, while the waveform outline makes things look a bit prettier, I prefer working with it off for exactly this reason. It's not exactly wrong per se, but it's distracting.
-
If you need a high number of I/O's, a cheaper alternative to the UFX / UCX is the RME DigiFace USB, which goes for around £375 (as opposed to £2,250 for the UFX) and uses exactly the same drivers as the UFX / UCX. It has 4 x ADAT in, 4 x ADAT out and a 1/4" stereo out, so you'll need at least one ADAT converter to get audio into it (e.g. Behringer ADA8200). I'm using 3 x Fostex VC8's, and my old Focusrite 18i20 for my inputs/outputs. This gives me the maximum of 32 inputs and 34 outputs. The advantage of this system, is that you add / upgrade your ADAT converters as and when necessary. What you don't get is the hardware EQ/FX, but having had that before in my Yamaha DS2416 and having to give it up when moved to Windows 64 bit, I find the in-built DSP more of a curse than a blessing once you start relying on it! Also, with regard to multi-client ASIO drivers... be careful here, because it can mean one or both of the following: 1. One ASIO driver can control more than one physical hardware interface. 2. The same ASIO driver can be opened by more than one application at the same time. So double check it can do what you think it can before buying.
-
Make Scroll Lock stop scrolling in Event List
msmcleod replied to Starship Krupa's topic in Feedback Loop
Looks like the code attempted to check for scroll, but another Windows API call was causing it not to work. It's now fixed for the next Sonar update. -
This was fixed in Sonar earlier this month. The issue arises when adjusting the note length causes the clip length to change. In CbB the workaround is to extend the clip length before you change the note length - alternatively just adjust the other notes afterwards. Another method (which I prefer) is to bounce to clip(s) regularly to merge all separate MIDI clips in the track into one.
- 8 replies
-
- 1
-
-
- cakewalk
- piano roll
- (and 5 more)
-
Beginner help , still dont have midi playback (correctly).
msmcleod replied to Mike Rothacker's question in Q&A
I use this as a convenient alternative to my Yamaha MU10 / MU100R. Bear in mind though, it's a 32 bit plugin - although it does work with BitBridge, I get better results with JBridge. FWIW, unless the MIDI files were specifically written for a sound canvas, in general I think the syx50 sounds better than the TTS-1 -
[FIXED] 32 bit Instruments and FX In The FX Bin?
msmcleod replied to sjoens's topic in Instruments & Effects
If you've put 32 bit plugin DLL's in your other search paths, then yes.