


msmcleod
-
Posts
7,209 -
Joined
-
Last visited
-
Days Won
39
Everything posted by msmcleod
-
Dirty CTRL key perhaps? It is a key that is used a lot.
-
 Personally, I'd set up a project template that matches the track setup you have - so basically, 20 tracks named and ordered in the same way you've got it set up on your Ui24R. When it comes time to import, just create a new project based on that template and drag the tracks into it.
 -
Older Cakewalk/Sonar projects with new Sonar?
msmcleod replied to Codefreq's topic in Cakewalk by BandLab
A few years ago, I went through all my old projects and converted them to CbB projects. For years, I only used hardware synths/modules, so I used SampleRobot to create samples of all of my hardware instruments, and saved them in SoundFont format (I could have used Kontakt, but my SF2 player is much lighter on CPU). I've got a lot of modules, so it took a while to sample them all. On average, it took 24 hours per bank of 128 patches, preceded by an hour's prep choosing the options for each sound (i.e. length of the sample / is it looped or a one-shot / number of keys & velocity layers). Once the prep work was done, I just clicked go and let it do it's thing. I then went through all of the projects converting the MIDI tracks so Simple Instrument tracks using my SF2 player loaded with the appropriate sample. So not only have I got all of my projects in the latest Cakewalk format, I can play them on any of my PC's without needing the hardware modules - and of course I now have access to all of my hardware sounds on all of my PC's. The only downside is editing a patch, which means editing it on the hardware module and re-sampling (although the re-sampling for one patch only takes 10-15 mins). -
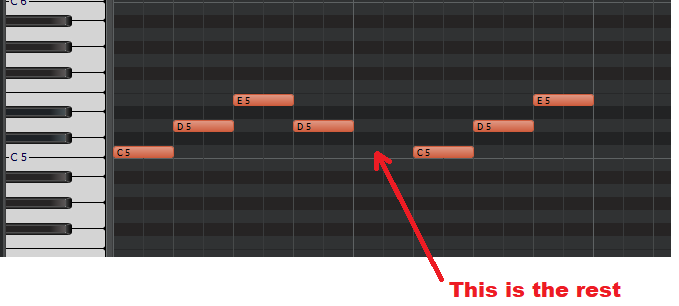
There's no need to "write" rests in the PRV. A rest is simply an absence of a note. Take the following phrase: This is how it looks like in the PRV: The PRV works in exactly the same way as an old Piano Roll Player piano does... ... i.e. it only has holes for where it has to play a note, and the length of the hole is how long the note is held down. It doesn't need to be told not to play one. Drawing a note in the PRV is the exact equivalent of the holes in a piano roll.


-
^^^^ This
-
I find Melda's MLoudnessAnalyzer more useful than MAnalyzer for LUFS, as it shows a summary of all the levels as well as the usual analyser window. AFAIK this is also in their free bundle.
-
Although you can set the metronome to play during playback, the count-in only works for recording. If you need a count-in during playback, the only way to do this is to shift your project along by a measure or two. You can do this by: Set the Now Time to the beginning of the project From the main menu, select Project->Insert Time/Measures Enter the number of measures you want to shift by, make sure all the check-boxes are checked, then press OK.
-
recording with Autotune and input monitoring
msmcleod replied to Jordi's topic in Cakewalk by BandLab
You should be able to have effects on and hear them while recording (just enable input echo on the track), but obviously latency is the thing to watch out for. There are quite a few auto-tune type effects around now, so you could try some of them out to see which is the least heavy on CPU. Another approach that might work, would be to bounce the backing into stereo mix, and temporarily archive all of the other tracks / bypass all effects on your master bus. This would mean the only effect being used in the project is your auto-tune on the vocal track, and should allow you to reduce your buffer size. -
I think @Lord Tim's post with the baker's analogy and @azslow3's post sum the situation up quite nicely. Cakewalk by BandLab/SONAR are heavily reliant on the Windows operating system, and are extremely "Windows Compliant" in that regard. That's why much older versions of SONAR will work on more modern versions of Windows, largely without issue. This is mostly due to historical reasons. Cakewalk/SONAR has always been based on Microsoft technologies - first on DOS, and then on Windows. It leverages as much as it can from the operating system to make it perform well, which was very much needed on the slow hardware of the past. The SONAR for Mac project (which was before my time as a staff member) looked into ways at getting it to run on a Mac with help from the guys at Codeweavers. It did pretty well to be honest, but there were a bunch of performance issues and plugin support was a nightmare. To cut a long story short, to make it work well would have taken too long to develop, and cost far too much - something Gibson at the time was not prepared to fund. As @azslow3 has mentioned, various versions of SONAR have run on Linux in the past under Wine (in fact our CTO, Noel was on the Wine team for a number of years), and again this was due to the tight integration with Windows, enabling Wine to handle the various calls correctly. Plugin support and performance were yet again the main issues though, and the same time/cost issues apply to making it a Linux native app. I developed on / managed developers working soley on Linux for 11 years prior to joining the Cakewalk team, and for many years prior to that had to work with both Windows and Linux. I personally think it's an awesome operating system, but not for running a DAW on (in fact, I've pretty much Linux for everything apart from running a DAW). It's not that it's not capable - it certainly is - but lack of professional driver support and lack of commercial plugin support make it a non-starter for the majority of users.
-
A droppout has stopped the audio engine (1)
msmcleod replied to Giacco's topic in Cakewalk by BandLab
If it sounds different under WASAPI, then it could be that you've got some of the Windows "sound enhancements" switched on, such as: Low Frequency Protection Room Correction Loudness Equalization Spatial Sound Go into the "Sound" part of settings, then look at the device preferences. You definitely want these switched off when using any DAW. -
recording with Autotune and input monitoring
msmcleod replied to Jordi's topic in Cakewalk by BandLab
I used the older TC-Helicon VoicePrism Plus live for years - not for auto-tune, but for the voice modelling & feedback destroyer. There was a setting that would make normal singing sound as if you were belting it out... fantastic for a 3 hour gig and being able to still speak afterwards! It could also add rasp to your vocals, and the weird thing was by practicing with the rasp on, I actually managed to develop a natural rasp myself... I wonder if that'd work for tuning too? I later upgraded to the VoiceWorks Plus, which has improved voice modelling... but both the standard "Voice Prism" and "VoiceWorks" will do autotune... as will other boxes like the DigiTech vocalist series. They're all probably discontinued now, but you should be able to get used ones on eBay/reverb. -
HELP! Glitchy audio playback after switching to new SSD
msmcleod replied to Michael Menser's topic in Cakewalk by BandLab
I was recording 16 simultaneous tracks to an IDE HDD 20 years ago without any issues at all. A lot of effort was put into Cakewalk to make audio streaming from disk as efficient as possible - it had to be on those slower machines. From what I've found, using an SSD has generally improved the speed of the OS, and drastically improved sample loading time (e.g. an Omnisphere patch has gone from 45 secs to 2 -3 secs). If you're not noticing much difference, it just means your bottlenecks are elsewhere... plugin processing I suspect, which is mainly CPU bound. -
I started out on a 1K ZX81 - I got a good year and a half's joy out of it before I got a 48K ZX Spectrum (which also, BTW was my first 8 track MIDI sequencer using the Cheetah MIDI interface). If you want to see a feat of 1K engineering, take a look at ZX 1K Chess - almost a full chess implementation in 1K (you can't castle or promote to queen): https://users.ox.ac.uk/~uzdm0006/scans/1kchess/
-
Cakewalk will always send NoteOn vel = 0 for note off. There is a performance benefit, as it can effectively cut down the amount of MIDI messages being sent by up to a 1/3rd by using MIDI running status. The MIDI specification requires any MIDI compliant software/device to treat NoteOn vel = 0 as a Note Off. We've looked into ways of getting Cakewalk to send an actual note off instead (based on user preference), however it's relying on some fairly old Microsoft MIDI API's that are difficult to get around without rewriting a fair part of the MIDI engine.
- 1 reply
-
- 2
-

-

-
When you use effects in your project, your computer has a small amount of time (a few milliseconds) to grab the audio data from disk (or from the output of a synth), run all the DSP code in all of your plugins, and send it on to your audio interface. The size of each chunk of audio data, and the length of the time slot it needs to process it in, is determined by the ASIO buffer size and your project sample rate. If your computer runs out of time before the next buffer is due to be sent to the audio interface, you'll either get clicks/pops/stuttering if it's just a little bit late, or a drop-out if it's really late. Doubling the ASIO buffer size doubles the time slot the the computer has to do the processing, but in most cases doesn't double the amount of time it takes to do the processing - i.e. it's not double the effort. Increasing the buffer size gives the computer more time to do the processing, preventing or reducing clips/pops/stuttering. That time it's been given is the latency between the audio being read from disk, and it coming out of your audio interface. So the downside of a larger buffer size is increased latency. Decreasing the buffer size has the opposite effect: it reduces the latency, but increases the likelihood of clicks/pops/stuttering as your computer has to work extra hard to get all of the effect processing done in a smaller amount of time.
-
Windows 11 is quickly becoming as sour as Waves Audio was...
msmcleod replied to GTsongwriter's topic in The Coffee House
You've obviously not been in the game long enough. Microsoft has changed their underlying driver model several times over the past 25 - 30 years. My Yamaha DS2416 cards were released with 16 bit drivers for Windows 95/98, but they later released 32 bit drivers for Windows NT/2000. These cards continued to work with the NT drivers up to and including Windows 7 32 bit. No 64 bit drivers were ever released, so I'm stuck with a Win 7 32 bit boot (with SONAR Platinum) if I want to load older projects. I did get 20 years use out of them though, which is pretty good. My 01X / i88x however didn't last as well. These had Windows XP 32 bit/64 bit drivers, which stopped working properly in Windows 7 64 bit. You can get it working on Windows 10, if it's running in test-mode and with a few driver hacks... not the best solution though. I have a bunch of Roland/Korg equipment that simply doesn't work in anything later than Windows XP 32 bit. As far as ASIO... it's not been my experience that custom ASIO drivers have been buggy - Realtek being the notable exception. The ASIO standard is more efficient than any of the other driver models, however WASAPI in exclusive mode does come pretty close (which is Microsoft's answer to Apple's CoreAudio). Ironically, the more pro the equipment, the less stable the WASAPI drivers are. RME for example has (IMO) the most solid ASIO drivers out there, with an incredibly low latency. Their WASAPI drivers are not good though. Focusrite have been pretty stable for me for the most part, with good WASAPI support. -
From what I can tell, they used Spleeter (which is AI based) to separate John's voice from the rest of the music, but beyond that there's no AI. It reads like, "It's not John singing, it's AI" - but that's not the case. It is John singing - they just used AI to get rid of the other instruments. It's really not that much different from Queen's "Heaven for Everyone", which used Freddie's vocal track from the same song on The Cross's "Shove It" album. I've listened to both versions, and the vocal performance is identical.
-
VS700 Functionality with Cakewalk Bandlab in Win 10
msmcleod replied to Silvan7's topic in Cakewalk by BandLab
AFAIK there is no modified driver to download, you just need to manually adjust the existing installation files so that Windows 10 will accept them. It's detailed here on the old forum: http://forum.cakewalk.com/How-to-use-V700-win-8-driver-in-win-10-also-applies-to-some-other-Roland-drivers-m3206046.aspx -
@Robert Hale - can you post a screenshot of the application running? (CTRL + PrtSc will take a screenshot) This will clear up any confusion.
-
Different browsers? seriously? How that could possibly have anything to do with it is beyond me. I'd recommend re-installing the latest VC++ redists, which both CbB and many other plugins rely on: After installing the bundle that Noel links to, you could also try installing the latest one from Microsoft: https://aka.ms/vs/17/release/vc_redist.x64.exe (link taken from this page: https://learn.microsoft.com/en-us/cpp/windows/latest-supported-vc-redist?view=msvc-170 ) Make sure nothing else is running when you install these... you may also need to restart your PC after installing.
-
Introducing Cakewalk Next and our new brand identity
msmcleod replied to Jesse Jost's topic in News & Announcements
Despite CAL being deprecated long ago, we've no plans to change its existing behaviour for Sonar, so any CAL scripts that currently work in CbB will work without issue in Sonar. -
Windows 11 is quickly becoming as sour as Waves Audio was...
msmcleod replied to GTsongwriter's topic in The Coffee House
I use both Windows 10 & Windows 11 - to me there's no difference when using CbB/Sonar. I'm stuck on Windows 10 for some of my machines due to the age of the CPU (one is a 3rd gen i7, the other a 6th gen i7), but personally I would upgrade them to Windows 11 if I could. I do however keep up to date with all Windows 10 updates. There's two schools of thought here (well probably more, but lets say two to keep it simple ) 1. You have a stable system running in Windows 10 - if it's not broken, why fix it?... but some day you'll stop getting updates. 2. Upgrading to Windows 11 gives you the latest features/fixes, but at the risk of upsetting your current setup (e.g. audio interface driver incompatibilities). So the real question is, what is more suited to you? -
BR: Export does not include new track
msmcleod replied to Jacques Boileau's topic in Cakewalk by BandLab
If all you're doing is exporting an entire mix (i.e. all tracks), by far the easiest way to do this is via the Export module, and not use the Audio Export dialog at all. You get the choice of project (the equivalent of selecting none), or Selection, and you just choose the output format from the menu: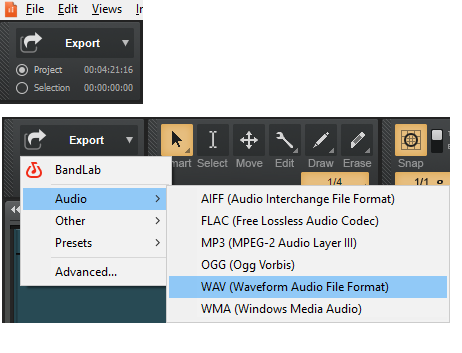
-
They were never part of the Cakewalk Command Center, as they weren't "connected" products. For those older products, log in to your old Cakewalk account at https://legacy.cakewalk.com
-
Pressing the "Pause" button ( next to Scroll Lock / Prn Scr buttons) normally fixes this. The Pause button is used to toggle CPU throttle mode, which limits screen updates to give more CPU to audio processing if you start getting clicks & pops.
