


msmcleod
-
Posts
6,114 -
Joined
-
Last visited
-
Days Won
26
Everything posted by msmcleod
-
 The drag indicator indicated it was going to move it into a folder. This is because you had moved it to the right hand side. If you had moved it to the left half, it would have appeared directly above Track 17. Keep an eye on the left edge of the indicator - it shows the level at which the track will be placed.
 -
Control Surface compatibility
msmcleod replied to Studio Brasil Producer's topic in Cakewalk by BandLab
Normally all you need to do is enable the meters in the Mackie Control Surface panel: I normally enable "Select highlights track", and set the Master Fader to bus 1 ( otherwise the master fader ends up only changing the left channel).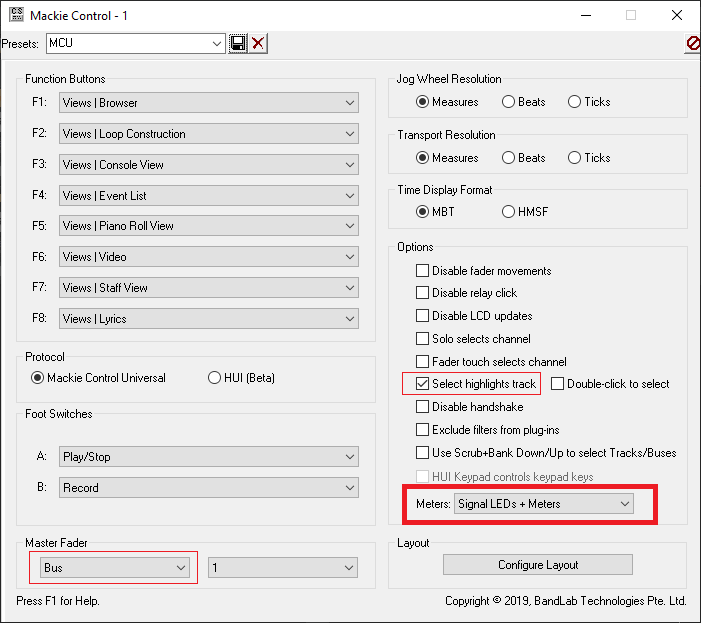
-
New Tempo Track UI: What do people think?
msmcleod replied to Jeremy Murray-Wakefield's topic in Cakewalk by BandLab
@Jeremy Murray-Wakefield - The time line scale is always displayed in musical time. Even though you can display tempo entries as SMTPE time, the tempo entries are actually always stored in musical time. The tempo itself, directly affects SMPTE time - in fact SMPTE times and sample times are actually calculated from the tempo map. As MIDI notes are musical time based, MIDI clips will change size with the timeline as the tempo changes. So a 4 measure MIDI clip remains a 4 measure MIDI clip regardless of tempo. As audio clips are absolute time based, they will change size as the effective time in absolute time changes for each measure. So, as an example if you record an clip that is 4 seconds long. At 120 bpm, this will be shown as a exactly 2 measures long in the timeline. At 60bpm, it will be shown as exactly 1 measure long. -
This weird hissing sound in my DAW (VST Plugin problem)
msmcleod replied to Bagel Company Co. Games's question in Q&A
Most probably a VST that hasn't been authorised. Quite a few VST's emit periodic white noise once their trial period has ended. -
@Craig Thiem - can you PM me one of your projects that has this issue? Also, can you confirm which version of Cakewalk you're using, and whether it's a bounce or export you're doing.
-
This is certainly not new to 2021.12. I can get it in SONAR X2, SONAR X3, SONAR Platinum and CbB: 1. Open the PRV 2. Make the main window floating 3. Undock the PRV 4. Lock the PRV View 5. Set PRV to "Disable Floating" 6. Make the PRV full size. Here it is in X2:
-
No, it's the locked view indicator - see : http://www.cakewalk.com/Documentation?product=Cakewalk&language=3&help=WindowManagement.05.html Locked views are particularly useful for things like the PRV, as it means you can have multiple PRV's open with each one locked to a particular track.
-
This is because the images are stored on a non-secure server, whereas the rest of the site is being served up from a secure server. Either: 1. Change the start of the website address to http:// instead of https:// or 2. Set your browser to allow mixed content for cakewalk.com
-
This is a focus rectangle. This was added as part of the accessibility support for the dialog.
-
Thanks for that - I've got your project file and can repro the issue... now to find out why it happens... [Edit] - this has been fixed. The fix will be available when we release the the main 2021.12 release.
-
You can assign a keyboard shortcut to CAL scripts within Preferences -> Keyboard Shortcuts
-
Export presets don't save the file location because they are global presets of the export settings - in other words they store the source type and format settings, but not any project specific information like specific tracks/buses and location. The Export Tasks however, do store all of this information. So the way to do it is to create an export task in each of your album's projects set to your album location.
-
How can I put an audio in reverse on Cakewalk?
msmcleod replied to Scott Pismire's topic in Instruments & Effects
1. Select the Clip 2. Process -> Apply Effect -> Reverse -
Audacity features that Cakewalk is missing.
msmcleod replied to John Bowles's topic in Feedback Loop
This is my go to method for moving stuff along, especially with larger or more complex projects. Comparitively speaking, from a code point of view, the implementation is very simple and therfore much quicker than moving sections or using ripple edit. -
Can you send us a copy of your project? I've tried to reproduce this and can't.
-
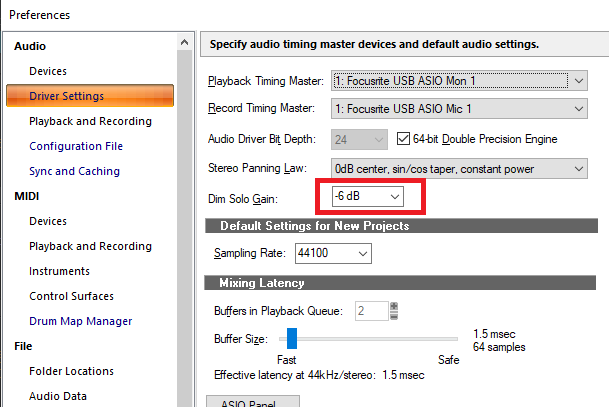
What's your dim solo level set to? The lowest level is -18db, which might be too quiet to hear depending on the project. You can change the level in Preferences- > Audio -> Driver Settings -> Dim Solo Gain:
-
Yes to both questions. 2021.12 Build 91 and above will try to divide the 5 button image into 8, and end up showing a garbage image.
-
Keep an eye on the left position of the drag indicator. It indicates the level at which the destination will be:
-
That I'm not sure about, as its a change to an existing image - no new image resources have been added.
-
I think the auto track naming is confusing things here. If you change the name of your tracks then it might become clearer: So, step 4: Step 6 is a limitation of the drag/drop when moving into folders. You cannot currently move into a folder and keep the existing vertical position:
-
Top 2 Most Wanted Missing Features of CBB
msmcleod replied to Mark Morgon-Shaw's topic in Feedback Loop
Aha - forgot about that one - cheers @scook ! -
Top 2 Most Wanted Missing Features of CBB
msmcleod replied to Mark Morgon-Shaw's topic in Feedback Loop
The only advantage I can see with VCA faders vs CbB grouping is that with VCA faders, you can adjust the other tracks independently from the VCA fader. In CbB to do this, you need to first remove the fader from the group, make the adjustment, then add it back. E.g.: Yes, this can be a pain, but I normally get around this by grouping the automation R/W buttons too. This way I don't forget! -
My old location recording rig was running on an old laptop with a 1280 x 1024 screen. I used a combination of @Colin Nicholls suggestion and screensets, e.g: ScreenSet 1: No browser, No track inspector, track view fully maximised ScreenSet 2: No browser, Half width track inspector, console fully maximized with narrow strips ScreenSet 3: No browser, Half width track inspector, track view fully maximized For screensets 1 & 3, I used custom control manager settings to minimise widgets available.
-
Just a heads up... any custom themes will need the Archive button updated to work with CbB 2021.12 EA (build 91 / 93). It's now a tri-state button similar to the mute button (i.e. 8 images), in order for folders to indicate that some of the tracks are archived. Old Button: New Button:


-
MixCraft is a great little DAW, and really easy to use. It's particularly good when working with video.


