


msmcleod
-
Posts
7,212 -
Joined
-
Last visited
-
Days Won
39
Everything posted by msmcleod
-
I personally use CloneZilla which is completely free. I burn the ISO image to a CD, then boot off the CD to make the images. Because CloneZilla is Linux based, it doesn't get upset if you've got multiple drives with the same Windows partition on it. This animated gif is a bit old, but AFAIK the instructions are pretty much the same in the latest version: Drive Backup: Restore:
-
Just to add to @Lord Tim's solution... If you first save the tracks from the old project as a track template, insert the track template into the new project, then copy the tracks from the old project on to the tracks you created via the template, you'll preserve any automation/routing from the old project. The selection in the old project will be preserved during the process, so: In the old project: 1. Select the tracks you want to transfer over 2. Save as a track template In the new project: 3. Insert the track template you saved in step 2 In the old project: 4. Copy Special In the new project: 5. Click on the first track inserted by the track template to make it the active track, and make sure the Now Time is at time zero 6. Paste Special In some cases, you might get extra blank tracks created at the end of your tracks - you can just delete these.
-
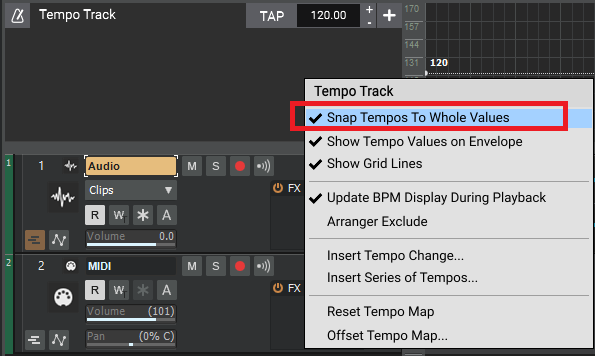
If you enable "Snap Tempos To Whole Values", it'll always use integers regardless of the scale:
-

Reproducible bug: Synth automation not automatically visible
msmcleod replied to GreenLight's topic in Cakewalk by BandLab
The issue is now fixed and will be available in the next release.- 25 replies
-
- 3
-

-

-
- bug report
- fixed
- (and 1 more)
-
Reproducible bug: Synth automation not automatically visible
msmcleod replied to GreenLight's topic in Cakewalk by BandLab
@GreenLight - I can reproduce the issue. We'll look into it.- 25 replies
-
- 1
-
-
- bug report
- fixed
- (and 1 more)
-
@pulsewalk - can you PM @Jonathan Sasor a link to your project, along with a video showing the repro? I can recommend ScreenToGif for screen captures.
-
PRV Controller Events Editing with the Smart Tool Issue
msmcleod replied to murat k.'s topic in Feedback Loop
There's no real automation in the PRV - what you're actually doing is adding MIDI Control Change events. As each control change is an individual event, the snap settings are applied to it. You can either continue to use CC events in the PRV with snap off (which by the way will potentially add hundreds of CC events), or use actual MIDI automation in an automation lane in the tracks view. -
I tend to just use clip gain automation, normally after consolidating all my comps to a single clip.
-
@pulsewalk - I can't see any bug here. If you have "Select Track Envelopes with Clips" enabled, when you select a clip, any track envelopes are selected for the time range the selected clip occupies. So doing a CTRL + drag to copy the clip, will also copy the track envelopes. However, lanes are only created for parameters that actually exist for the envelopes in the destination track.
-
You can only use ports from one ASIO driver at a time. In order to change ASIO device, you need to uncheck all of your existing ASIO ports first. You'll then be able to choose another ASIO device.
-
Clip Automation belongs to the clip, not the track, which is why it's being copied along with the clip. If the other automation lanes are track automation, then this explains why they don't get copied too.
-
When to do "Render in real-time"?
msmcleod replied to A Tolerable Quietude's topic in Cakewalk by BandLab
There are probably only a handful of plugins that don't support high speed bounce, but if the plugin is written properly, it should support bouncing at high speed. Unfortunately it's a matter of trial and error to find out which ones don't behave - some crash, some give unexpected results. -
Midi and audio sync is off only while recording
msmcleod replied to Paul Ertel's topic in Cakewalk by BandLab
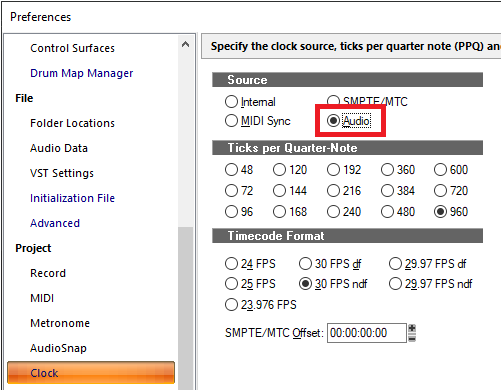
For Cakewalk to record in sync, it needs a reliable clock. The most reliable clock is the one from your audio interface, so make sure... 1. Before you start recording MIDI, make sure you have at least one audio track or instrument track in your project - it's fine if it's and empty track. As long as there is an audio track, the audio engine will be engaged and Cakewalk can get its timing from this. 2. Your record/playback timers are set to the correct audio device in preferences: 3. Your project clock is set to Audio: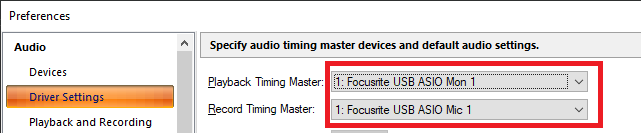
-
Ample Guitar VST3 pitch bending not working
msmcleod replied to Humair Ijaz's topic in Cakewalk by BandLab
Check that Pitch Wheel messages are enabled in preferences: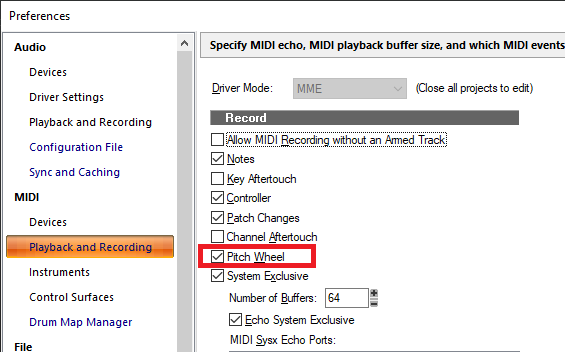
-
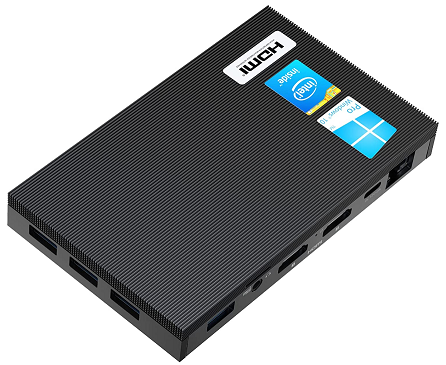
FWIW - I tried a MeLE Silent PC running at 2GHz + 8GB RAM with a 1st gen 18i8, recording 16 simultaneous tracks whilst playing back 32 tracks I'd previously recorded. The MeLE had zero problems with the recordings. Obviously this is nowhere near powerful to mix on (I didn't even bother trying to add plugins), but for straight multi-track recording, it did the job with no issues. Considering this thing is only slightly larger than an old cassette case and has literally no moving parts, I was impressed. I tried recording both to the internal SSD and an external SDD connected via USB3 - it was fine in both scenarios. This is the rig I used for recording:
-
There is no facility in the PRV to edit Poly Aftertouch. The only way to edit Poly Aftertouch is via the Events List View. I'm sure adding something to the PRV has been discussed in the past, but since the majority of keyboards don't even support channel aftertouch, let alone poly aftertouch, it was probably deemed too much effort vs the number of users who'd benefit.
-
This is possible, but not while Cakewalk is running. You'd need to: 1. Shutdown Cakewalk 2. Unplug your nanoKONTROL Studio, then plug it back in setting the new mode 3. Make a backup your ctrlsurface.dat, then delete the original 4. Start Cakewalk, and set up your nanoKONTROL Studio as a different control surface within Cakewalk again. Also, given how Windows does it's port indexing, there's a likelihood that any other hardware ports would now be renumbered, so you may have to go into MIDI devices in preferences and re-order the MIDI Output ports appropriately. The alternative is to reboot your PC after step 3. So while technically possible, it's really not practical.
-
Please explain how/why this is a security issue? Because due to security issues, OAuth no longer supports general request/responses - well, not easily. Google has disabled the use of embedded browsers, and raw traffic over http - unless you specifically create an "application" within the developer section of your google account, and supply the host application with the unique application/security keys. Each individual user would have to go through this process. By contrast, opening a browser and listening for the response is now the preferred method, as it benefits from security updates to both the operating system and the browser.
-
Yes, this is the case. The Mackie Control Universal, and control surfaces that emulate it are tied to specific functions. Moreover the MIDI ports connected to Mackie devices are exclusively grabbed by the Cakewalk's "Mackie Control" surface DLL, so MIDI data is not available to the rest of Cakewalk. Given how the MCU protocol works, this makes sense - buttons are generally Note On messages, and the slider/V-pot movements are not easily translated into simple CC messages. For MIDI learn, you need a generic controller. If you're only going to do one parameter at a time, then using MIDI learn on you're MIDI keyboard's Modulation wheel can be handy - you can always unlearn it afterwards and use it again for something else. Personally, for adhoc assignments I use a Philip Rees C16 for this as it has 16 assignable sliders and a pretty small footprint. I've also used a KORG nanoKONTROL 2 in CC mode, but the sliders are not great for detailed movements. The Akai MIDIMix is a decent modern alternative.
-
@Jim Fogle - this type of toolbar is shown whenever a plugin is wrapped by BitBridge: It's got the BitBridge icon in the top left hand corner, and doesn't have any of the options or menus that appear when using a plugin directly.

-
There's a few ways I can think of doing this: 1. Create additional buses, one for each of the groups you've listed. The buses would normally be muted, but if you wanted to solo a particular set of instruments, you'd just exclusive solo that bus; or 2. Use the Track Manager to create presets to show only the tracks in your groups. Once switching to a preset, you can then select all, quick-group mute/solo them, then go back to the Track Manager to unhide the other tracks. 3. Use Mix Recall to switch between different mixes with various groups of tracks muted and/or solo'd. For this, you probably want your Mix Recall settings are set to only include solo/mute. 4. Use Track Folders / Sub-Folders - mute/soloing the folder will mute/solo all the tracks within it. Clever arrangement of the folders might get you close to what you want.
-
Can Korg nanoKontrol Studio play nice with Arturia Keylab MKII? [SOLVED]
msmcleod replied to Salvatore Sorice's question in Q&A
@Sal Sorice - try using MMcL Mackie Control #2 for the KeyLab and see if this makes a difference. It's strange you're seeing issues though, as I've got a similar set up in my studio: I'm using Mackie Control / Mackie Control XT / Mackie Control C4 for my MCU/XT/C4 on my studio desk, and MMcL Mackie Control #1 for my nanoKONTROL 2 which is mounted on the wall next to my vocal mic. At one point I also had a Behringer BCF2000 using MMcL Mackie Control #2, which I used exclusively for controlling buses (leaving the MCU/XT/C4 controlling tracks). -
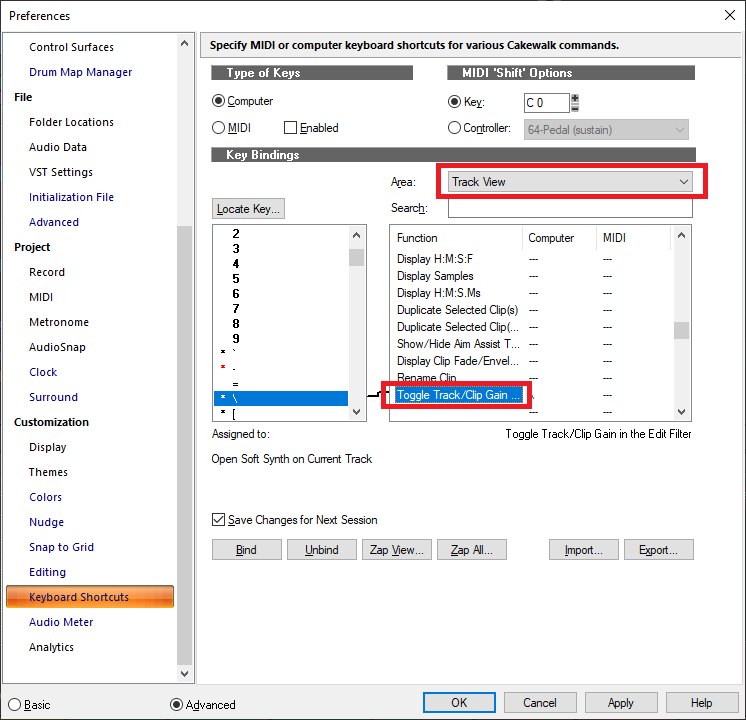
@Bill Phillips - your video example shows the track edit filter as "Clip Automation", whereas the CTRL + drag in lower part is the smart-tool behaviour for clip-gain when the track filter is set to "Clips" (step 1 in your highlighted part of the documentation). The smart tool behaviour is as follows: Track Filter = "Clips": CTRL + drag in the lower part of the clip to alter the level of the ENTIRE clip-gain envelope Track Filter = "Clip Automation": Select the area at the lower part of the clip, then drag from top using the shelf tool - no modifiers are involved. BTW - the way I'm switching the track edit filter between "Clips" and "Clip Gain Automation" is by using the "Toggle Track/Clip Gain in the Edit Filter" key binding in the "Track View" area. I've got this set to the key between SHIFT and Z - this is "\" on a UK keyboard. IIRC, this is " ` " (backward single quote) on a US keyboard:
-
Can Korg nanoKontrol Studio play nice with Arturia Keylab MKII? [SOLVED]
msmcleod replied to Salvatore Sorice's question in Q&A
It looks like you're using the wrong MIDI ports on the KeyLab II - you've got it set for KeyLab port 1 for MIDI IN, and Port 2 for MIDI OUT. They should both be using the same port - I suspect it should be MIDIIN2 (Keylab mkII 88) and MIDIOUT2 (Keylab mkII 88)
