


-
Posts
6,920 -
Joined
-
Last visited
-
Days Won
21
Everything posted by Starship Krupa
-

HELP! PRV Snap Resolution not working!!
Starship Krupa replied to Corey McNulty's topic in Cakewalk by BandLab
I use Brave, which is another Chrome derivative. I've never had an issue seeing images in the online documentation (although I typically stick with the Reference Guide), but Steve's image shows as broken. I tried allowing insecure content from www.cakewalk.com and it didn't help. What finally started working for me is that whatever program I'm in to edit the picture, or even straight from the screen grabber, I just copy it from there and paste it directly into my post. -
Audio Clips have weird iridescent color
Starship Krupa replied to Jerry Pellegrino's topic in Cakewalk by BandLab
During comping, both. During (and after) mixing, the latter. 😁 I also turn on waveform preview to reassure me that I'm actually recording sound. Bitter experience suggests that this is a good idea. 😏 -
I so agree. I've requested this feature in the past. It's up there with "replace effect" and "open UI on replace synth" on my list of ways to eliminate needless clicks.
-
Anyone may request any feature. This one....I just accept it as a good incentive to remember to set Group All Clips before I start my sessions! 😄
-
Once you set up your templates with Group all clips it will happen transparently and automatically. After you get used to selecting takes with the Control key, grouping and ungrouping clips will go a lot faster. It's going to take some time, no doubt, but I do think you'll be able to get very close to that Logic comping workflow. Who knows, you might find other tricks that only Cakewalk can do. Another hint: if you find yourself getting unexpected results while comping, right click on the Smart Tool icon and turn off "Comp." That makes the Smart Tool behave closer to comping methods used in other programs. With it turned on, Cakewalk assumes you want the Speed Comping workflow, which to me, was like trying to ride a MotoGP bike after riding nothing but street bikes. Also experiment with switching the Edit Tool to the Comping Tool (hit F8 a few times).
-
Simplest way: From the Browser (over at the right edge of the main UI) with the list of VSTi plug-ins, Double-click on the instrument you want to use. A dialog will come up, make sure that "MIDI Source" (this creates the MIDI track) and "First Synth Audio Output" are checked. Also check Open These Windows/Synth Property Page if you want to see the synth UI right away. (the next time you open this dialog, your choices will be checked) Click OK That's it. When you want to open the synth's UI, click on either the synth track's or the MIDI track's icon. As John mentions, there are at least 8 other ways to accomplish this, and no, I don't think that's a good thing. Some of those methods are needlessly complicated/clumsy, and it's possible to learn one of those first and keep doing it that way when simpler ones are available.
-
Detect and shift the pitch of an audio track
Starship Krupa replied to Starship Krupa's topic in Production Techniques
Don't have. Won't buy, based on how unintuitive I find the Essentials version. So far, if I were to buy more software, a license for FL Studio seems like the most direct route. Not so great for the detection part of the task, unfortunately. And with the latter, I don't have the facilities to press a disc. 😄 -
Rigid Audio Drum One FREE for Newsletter Subscribers
Starship Krupa replied to cclarry's topic in Deals
RFK. -
Yeah, unfortunately I've been on it through v3 and that does seem to be the case. The free Antares app does a better job, so far. It seems like a task that....I dunno, isn't it "sit there recognizing notes for a minute or so, then compare the list of notes to known scales/keys/modes?" It's what hackers call a "dictionary" attack.
-
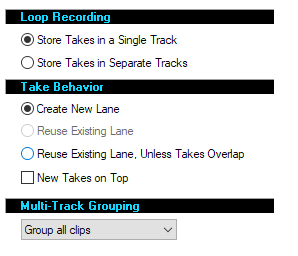
If you right click on the Record button in Transport module, you'll see this section of Preferences: What you want is Group all clips. As you see, there's also a choice to put each take in its own track. I'm pretty sure you can accomplish this workflow with Cakewalk.
-
That is very similar to Cakewalk's Speed Comping Although this video is kind of old, and uses SONAR X3, it describes the speed comping workflow:
-
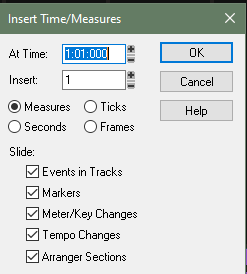
Are you using this dialog? (Project/Insert Time/Measures): Checking the "Markers" box should take care of moving them to the right. I think Ripple Edit All will help in other scenarios.
-
New Insert Instrument Dialogue needs work.
Starship Krupa replied to John Vere's topic in Feedback Loop
Somehow it tickles me that to John, this dialog is the "new" one, when it's all I've seen in my 3 1/2 years of using the program. Of course, he's right, how else are you going to describe it? Anyway, yes, clicking on the "+" sign in the Synth Rack, Insert/Soft Synth from the Main menu, double-click from the Browser, drag and drop from the Browser, and whatever the other ways it can be done (NOT, unfortunately in Piano Roll Track Pane), they all pop up the old verbose dialog. I've wondered in the past why those advanced options....aren't under the Advanced Options section of the flyout. -
That is pretty similar to how Cakewalk does it as well. Cakewalk even lets you automatically group the clips from each take. For instance, if you have a 4-mic drum recording, and your drummer tries 3 takes, there will be 3 groups of OHRt, OHLft, Kick and Snare, one group from each take. Then, when it's time for editing and comping, edit moves applied to OHRt. (take 1) will be applied to OHLft. (take 1), Kick (take 1), and Snare (take 1). It sounds like perhaps you want edits to be applied to every take across every lane in every track, but that's not really what that feature is for (although you can do it if you group all of the clips across all of the lanes), and the Logic video you linked to does not show the guy doing it. Most comping workflows are designed with the idea that each take lane is for a take, and that you'll combine the different takes into a single one for each track. Cakewalk has a feature called Speed Comping that can do it really quickly, including automatically adding the crossfades like Logic does. It can be tricky to navigate at first, though. If you want to use more than one of your takes in the finished product, you can move or copy one or more take lanes to another track. You can even have Cakewalk do this at record time, put each take in its own track. I think this latter choice might be better for what you wish to do. It makes it more flexible, especially for things like guitar and vocals, you can pan and effect and EQ them individually. I like to do this with my doubled guitar parts, pan them at 25L and 25R so that it sounds bigger. If you already know about the things I told you, and you don't think they work well enough or you're having a hard time, please reply in greater detail, if possible.
-
When the user selects Add Track/Instrument via the flyout menu, it's possible to choose "MIDI only" as a track type. I'd like there to be a way to choose "Soft Synth only," with corresponding choice of which synth you wish to use.
-
Insert Soft Synth command (for Custom module and keystroke)
Starship Krupa replied to Starship Krupa's topic in Feedback Loop
My apologies. I just made an (incorrect) assumption. Silly of me. And if you call it the Main menu, I'm pretty sure you know what you're talking about. You tend to know what you're talking about. 😄 There's the aforementioned quick auditioning of alternate synths. It's good for a situation where I have one synth all tweaked up, and then want to experiment with replacing it. I can set up several synth tracks and just switch my MIDI track between them. Also, since Cakewalk can't route its MIDI tracks to more than one synth at a time, there is the situation where I must duplicate a MIDI track. After I've done that, I'm left with either a lonely MIDI track or, alternately, if I duped both of them, an extra synth track where I have to replace the synth. I prefer the lonely MIDI track option, followed by Insert/Soft Synth. Ah, excellent idea! I'll make a separate FR for that one. It was actually @scook who turned me on to the usefulness of Insert/Soft Synth. I had been ranting about things in Cakewalk's menu system that I find confusing and inconsistent. One of those things is all of the view-specific commands that are up there in the Main Menu. I forget exactly what I said about it, maybe that the commands up there were duplicated by the Add Track Flyout, and he pointed out that no, they are not all duplicated, that it's the only menu that lets you do just that. I still think that the Main Insert and Process menus would work better in the individual views. I think maybe why the veterans don't get my rap about this is that for a lot of people, the Main window is synonymous with Track View. When to me, there's the Main Window and a bunch of other views, one of which is the Track View, which can only be displayed in the Main Window. I work all the time with the Multidock maximized in the Main window. And of course you can drag the Multidock up so that Track View shifts down to the bottom. My idea is that the Main menu should have mostly things that apply to a project or the program as a whole, and the individual views' menus should have things that apply to elements you're working in in the view. So for instance, Piano Roll should have a Process menu with the MIDI stuff rather than having to go over or up to Main. Track View should have its own that includes the Process commands that apply to it. And so on. Track View's Insert menu would get most of the "Project" commands. But those are all suggestions for another time. -
Show Clip Outlines in Tungsten and derivatives
Starship Krupa replied to Starship Krupa's topic in UI Themes
Which dots? -
Detect and shift the pitch of an audio track
Starship Krupa replied to Starship Krupa's topic in Production Techniques
Something that came up while I was searching for ways to do this is that FL Studio (not surprising) has tools for doing this as part of their built-in sampler. So if the day ever comes that Cakewalk gets its integrated sampler, best believe I'll be advocating strongly for it to incorporate those useful features. -
Detect and shift the pitch of an audio track
Starship Krupa replied to Starship Krupa's topic in Production Techniques
I have more than one key detector, and Hornet's is one of them. My favorite is actually Antares', which runs on my iPhone. Hold your phone up to the monitor and hit play. I also have enough musical theory and a good enough ear to work out a song's key by playing along on piano or organ. I usually don't need key detection if the thing's in concert pitch. Where I have trouble is, if I hear that it's off, figuring how far high or low the whole thing is. It seems like the tools for "pitch correcting" that I have access to are about idetecting and correcting performances where notes here or there can be out of tune. It's when I get into the area of the whole song or phrase being sharp or flat due to the performer having an out of tune instrument or the song having been deliberately pitched up/down at mastering time. I'm just surprised that this task isn't more common; given the hip hop producers, crate diggers, people pulling samples off of old vinyl records that I imagine. Seems like a pretty basic question: "I want to use this sample, but it's out of tune with the rest of my song. How can I fix that?" I don't know if it's just me, but it's been difficult to find information on standard methods for this. There are tools for finding a song's key, but for checking to see if it's in concert pitch, not so much. I know right away if it is once I try to start jamming along with it or matching it to other samples. But in which direction and how far? I guess if you want to make sure your song won't be used by me in a mash-up, pitch it up or down by a couple of cents before you send it out. -
Audio - Change pitch to standard tuning?
Starship Krupa replied to sadicus's topic in Cakewalk by BandLab
You can change pitch in Loop Construction view. Open the Loop Construction view for the clip, then from the Clip menu, select Loop Properties. Check the "Stretch to project tempo" box and then you will have access to the options at the bottom to adjust the pitch. -
I've only seen it when importing clips I started in Piano Roll View. If you work entirely in Step Sequencer, you're more likely to just see 5/6. I got lucky, I just happened to have a clip loaded with the contiguous cells. The variance in the button shapes is so slight, what really matters is that 5,7,9, and 11 should share the same color, and 6,8,10 and 12 share another. I just use the default Mercury or Tungsten images as a template and paint bucket in the colors I want.
-
Insert Soft Synth command (for Custom module and keystroke)
Starship Krupa replied to Starship Krupa's topic in Feedback Loop
As far as I can tell, there is a key sequence that will open it (which you kindly detailed), but it can't be bound to a keystroke (combo or single) or placed in the Custom Module. What I want is for it to be able to be bound to a keystroke or assigned to a Custom module button, like Insert Surround Bus now is. I insert soft synths way more often than I insert surround buses. If you were going to say "Global Menu," that's the name I use for the menu at the top of the main Cakewalk window (shows Track View by default). It might be called "Main Menu?" I haven't run across the nomenclature in the documentation. My guess is that you know, so please fill me in if you are inclined. It contains several items that IMO would be handier in the Track View, Console View and/or Piano Roll View menus, where they'd be closer to the action. I wind up having to switch from view to view to access certain menus, which is unnecessarily confusing. -
One of my favorite ways to add tracks is via the Global menu's "Insert Soft Synth" command. It's the only way to add a soft synth without also creating either a MIDI track or making it a simple instrument track. It's in a clunky location, all the way up in the Global menu. I've combed through the custom keystrokes editor and the list of commands available for Custom module, but this one isn't in there. It should be, I'd use it all the time.
-
Aye, this. A peeve of mine for sure. It really hurts usability because when we're learning how to do something, we figure out how to do something and then tuck that information away for future use. If there are multiple ways to do the same thing, scattered across multiple menus, we can have all of those multiple paths cluttering up our memory. If we've half-forgotten something, then next time do it via the different steps, those two mess with each other. Even once we have it down, our brain is still asking, "how do we do it this time?" Adding instruments is the prime example, and then you have the thing where the spiffy newer dialog spawns the "Windows 98 called and wants its dialog box back" window. One of my favorite ways to add synths is the "Insert Soft Synth" command way up in the Global menu, because it's the only way I know of to add only a synth track, without an accompanying MIDI track (or as a simple instrument). I'd like to have that available as a Custom Module and keystroke command.
-
Event List is something I haven't spent much time with in theming, looks like deeper diving is in order.


