


msmcleod
-
Posts
6,935 -
Joined
-
Last visited
-
Days Won
36
Everything posted by msmcleod
-
Apart from Revalver, the only other ampsim company that I've seen doing Laney is Overloud TH-U - their British Classics rig has the Laney GH100L and Laney Ironheart... no Supergroup though.
-

How do I get louder volume without clipping?
msmcleod replied to T Boog's topic in Cakewalk by BandLab
Have you checked your master output level (they're the ones with the red faders) ? Click on your master bus, and check the levels in the inspector: Also, keeping these at unity gain will ensure the volume you hear in Cakewalk is the volume you'll hear when you export as audio.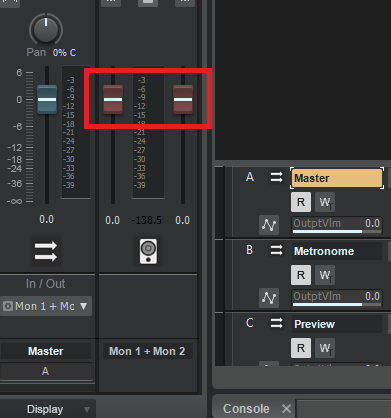
-
This could be a real issue with larger sets with a lot of VSTi's. Personally, I don't use Cakewalk live, but what I have done is sampled all my hardware / software synth sounds so I can play them all on my SMPro V-Machine ( a ridiculously underpowered hardware VST host). Unless you need real time control of multiple synth parameters, using sampled versions of your sounds is far less resource dependent and you can get away with one VSTi (the sample player), and use program changes to swap sounds as and when needed. The downside is the time taken to sample all your synths. As a indication, it takes me on average a full 24 hours to sample 128 synth sounds using SampleRobot. There's about an hour or two's worth of prep to be done before-hand, but after that I can leave SampleRobot to do the rest automatically. Using something like GigPerformer or Cantable would be the other route. Cantable certainly supports MediaPlayer tracks for your backing, so I'm sure GigPerformer has something similar. As both of these are specifically tailored to live use, they may be better options.
-
How do I get louder volume without clipping?
msmcleod replied to T Boog's topic in Cakewalk by BandLab
Also check your low frequencies - there could be a bunch of low level information in some tracks that are inaudible, but pushing the signal to peak. I find putting a high pass filter on most of my tracks solves this... just move the frequency up until you just hear a difference, then back it off again slightly. Doing it at the track level means you get rid of far more of the frequencies you don't need. -
+1 to this. Apart from the nightmare upgrading to 2020H1, Windows 10 has been a dream for me... and the refusal to upgrade to 2020H1 ended up being 3rd party drivers: one of them a Korg driver, the other a Native Instruments ISO reader driver that was no longer used/required. Funny you should mention a Core 2 system with 4GB RAM - I've got a dual boot Vostro 1700 Core Duo (2.2Ghz, 4GB RAM). One boot is Windows 10 64 bit, the other Windows 7 32 bit. I use the Windows 7 32 bit with my Yamaha 01X because it's rock solid, but I'm tied to using SONAR Platinum 32 bit. Windows 10 in general works marginally better, but the Yamaha MLAN drivers require Windows to be run in test mode and BSOD every time it shuts down... not a huge hassle for Windows 10, but the Windows 7 boot then insists on a full chkdsk on ALL drives on reboot. IMO the only reason to stay on Windows 7 is drivers and/or old applications. I've got a Windows 7 32 bit boot on my DAW PC simply to support my DS2416 cards and older 16 bit software (old patch editor software). My Windows 7 64 bit boot is pretty much never used now, apart from doing a quick smoke test on new CbB builds. Windows 7 is slowly becoming unusable. Many websites have updated security that older Chrome/The Edge/IE versions won't support. Firefox seems to be the only browser that continues to update on Windows 7, but who knows for how much longer. As far as CbB is concerned, Windows 7 does work still, but it may not in the future.
-
Compatible chord progression maker
msmcleod replied to colandee@yahoo.co.uk's topic in Cakewalk by BandLab
Band in a box is the best out there for what you describe: https://www.pgmusic.com/bbwin.htm -
Another tip - if you're going to use TTS-1 make sure it's the first thing you add to your project. I've no way of confirming this (it's Roland's code, and we don't have it), but I suspect somewhere they're using 32 bit pointers to store 64 bit addresses. If the address is a low enough number, it'll get away with it... otherwise it'll definitely crash.
-
Right click on any blank space on the control bar (even the small blank space between modules), then select "Dock Control Bar at Top" or "Dock Control Bar at Bottom".
-
So a trumpet in Bb, means when you play a C on it a Bb comes out. If you're using a VSTi, then obviously everything is non-transposed so... So to get the notes right, you need to: - Transpose the MIDI up 2 semitones, so all Bb's look like C's in the PRV / Staff View. Then to get it note sounding at the right pitch: - Use Key +/- down 2 semitones.
-
The Side Chain input of Pro-Q appears as an additional output for use in other tracks. You need to either set the output of an additional track to this output, or use a send to this output from an additional track: http://www.cakewalk.com/Documentation?product=Cakewalk&language=3&help=Mixing.31.html
-
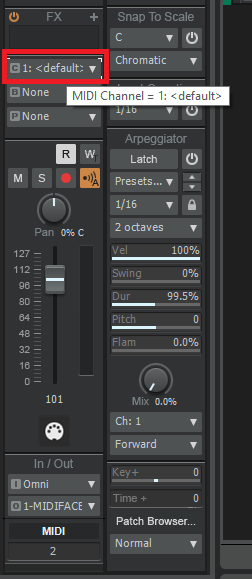
Cakewalk stores all of the MIDI channel information within each MIDI clip. However, each track has a "MIDI Channel override" - when set to "None", the clip MIDI channel information is respected, otherwise it's overridden to the channel specified: This allows you to force the MIDI channel regardless of what your controller keyboard channel is set to, or what channel the original clip's events were recorded in - useful for copying parts to different tracks. By default: - A Simple Instrument Track is always set to "None", meaning it'll send on all MIDI channels. - A Per-Output Instrument Track is always set to a channel number - it starts at Channel 1, and continues up to Channel 16 (this is also true with the audio channels for Per-Output Instrument tracks).
-
The old way of doing things live with Cakewalk was playlists. This is still a convenient way of going through multiple songs if each song is a separate project. For seamless transitions however, I'd recommend creating a new "live" project from the exported audio from each project - i.e. one project that contains all of the songs. There are several advantages here: 1. The stress on the system is far less, as it's dealing with just audio. This enables you to have a raw audio tracks for backing, and add soft-synths to other tracks to play real-time. 2. There's no loading time between songs. 3. By marking each song using the Arranger, then using multiple Arrangements to define different set-list orders, you have total control over the song order - all within a single project (vs having to save different playlists). Also, inserting an MCI command in a MIDI track with "pause" as the text will cause Cakewalk to pause playback at that point. You can then hit the spacebar to continue playing. You can position this command either at the end or beginning of a section, or half-way through a song - whichever suits. Within Keyboard Shortcuts in Preferences, you can bind commands such as Next/Previous Arranger Section, Play/Pause/Continue etc to MIDI events so you can use an external controller to control Cakewalk. Basically anything that can be bound to a key, can be bound to a MIDI event.
-
If you're seeing weirdness with track visibility and you've ruled out screensets/workspaces, this is almost certainly the cause. There have been a bunch of template bug fixes since 2020.09, especially with Track Templates, and of course there's now the nested folder functionality, so I'd highly recommend re-creating your templates if possible. Another thing that might fix things in a project would be to move all of your tracks into a single parent folder, then move them back out again - do another move operation, not an undo. This will force a recalculation of the folder hierarchy that might be enough to fix any anomalies. If Cakewalk crashes while doing this, then that would certainly point to some corruption in the existing track folder hierarchy/visibility states. FYI since the introduction of Folder Tracks long ago, there has always been a placeholder for a parent folder - it just wasn't used. If for some reason this had a value in it, that could certainly cause tracks to appear/disappear randomly, as a track's visibility is related to the visibility/expanded status of its parent folder. The next version of Cakewalk will have some improvements for managing track visibility. Also, there were a bunch of weird issues with track visibility when "Keep track/console visibility states in sync" was unchecked in Track Manager, and the console view had to rely on the tracks view for visibility state of tracks within folders. These issues have been there for a long time, but have been fixed in the next version.
-
Band in a Box to help with writing?
msmcleod replied to Salvatore Sorice's topic in The Coffee House
A couple of FYI's if you're using BiaB to generate specific parts, where you've already got tracks in CbB: You want to generate a part half way through a song that starts on a tempo change, or contains tempo changes: BiaB follows the song tempo from start to finish, so it can get confused if you want sections generated out of place and the tempo is different. There are two options: 1. Enter the chords in BiaB for the whole song, and just make everything silent in BiaB until it gets to the part you want; or 2. Either in a new CbB project or in the standalone BiaB app, create a small song that covers just the section you want at the required tempo(s)... then drag the audio into your main CbB project (FWIW this is what I do). Using a temporary CbB project is definitely the easiest way to go if you have further tempo changes within that section. Uncommon Time signatures are handled badly This is probably my biggest gripe - common time signatures such as 2/4, 3/4, 4/4, & 6/8 are fine... but once you get to 5/4 or 7/8 it gets ugly. It treats two bars of 7/8 as a bar of 4/4 followed by a bar of 3/4. Sometimes this works fine, but other times not so much - e.g. you actually wanted a 3/4 followed by 4/4 feel. There are four options here: 1. Allow BiaB to do it's 4/4, 3/4 thing... it may be fine 2. Use RealBand (which comes with BiaB) - this does support uncommon time signatures, so you can use that, but it's a bit more work. 3. In BiaB, use a combination of syncopated pushes/holds and time signature changes, but there are limitations to this.... not all RealTracks support pushes & holds. 4. Don't use 7/8 in CbB, but instead use a combination of 3/4 and 4/4 in CbB itself - you may also need to double or half the tempo depending on how BiaB interprets this. It's also worth noting that apart from the "About Time" style set (which is MIDI only), none of the RealStyles natively support 7/4 or 7/8 - so you may get odd results. If you're generating guitar solos, you may get better results by generating the whole solo in 4/4 ,and selectively chop out an 8th note from each bar where it's most appropriate. -
AFAIK ( @Noel Borthwick - please correct me if I'm wrong here), there is a time limit where older versions of CbB can no longer be re-authorized. It would be better to work out why the latest version is giving you so many issues. Given that I'm running with an 11 year old 3rd gen i7 CPU, I seriously doubt it's an aging PC issue. The main feature that was added in 2020.10 was Articulation Maps. This is based on the same UI technology as the Arranger, so in theory if 2020.09 is working, there shouldn't be any real difference for you. In saying that, it could be that there's a configuration issue on your machine that is causing it problems. It might be worth running dxdiag.exe - just press Windows Key + R, then type dxdiag and press the OK button. The diagnostics should run automatically. Once it's finished, click on each of the tabs (Display 1, Display 2) etc and check in the notes box at the bottom of each tab to see if any problems were identified.
-
Having tried out some of the stem splitters, I found the results to be surprisingly good bearing in mind what they're doing, but rarely perfect - you'll always get artefacts. If the goal is to rebalance/remix, or perhaps add/replace parts, then it's usually fine. However, if your goal is to use a stem in isolation, you may find the artefacts are too obvious to use.
-
Band in a Box to help with writing?
msmcleod replied to Salvatore Sorice's topic in The Coffee House
I use it quite a bit - normally for filling in parts, or coming up with parts I wouldn't have thought up myself. In this sense it's like collaborating with a bunch of other musicians. There's nothing wrong with the music / realism quality of BiaB. The parts are expertly played, but for me the styles are a bit middle of the road. In saying that, taking a part out of context can give fantastic results. As far as audio sound quality is concerned, I'd definitely go for the audiophile edition if you can afford it. I've got the Ultrapack, which is essentially the same but using lossy compressed audio. The compressed audio quality isn't at all bad (in fact is very good), but to the trained ear you'll be able to tell the difference: if you can tell the difference between a good quality mp3 or song streamed on Spotify, vs a CD then go for the audiophile edition. I tend not to use the BiaB generated tracks in final songs in any case. I use them for ideas and re-record the parts myself. -
Cakewalk 2022.11 by Bandlab more efficient than PT 2022
msmcleod replied to Dagg M.'s topic in Cakewalk by BandLab
For the most part, I get the track volumes at a ball park, then route everything to buses - usually no more than 8 of them (although tracks may go through intermediate buses to get to the final eight). If a combination of tracks need some detailed volume changes, I'll either draw or record volume automation. I'll then ride the faders on my control surface as the song plays, recording volume automation for the buses. If it's 99% of the way there, I'll manually tweak... otherwise I'll play it through / record automation again. -
a way to add plugs to several channel strips at once?
msmcleod replied to charles kasler's topic in Cakewalk by BandLab
1. Select the tracks Then either: 1. Start dragging the effect from the browser, then hold down CTRL as you drop it on one of the tracks; OR 2. If using the track fx bin context menu, hold down CTRL when picking the effect from the menu. -
ai software that turns midi notes into a complete song
msmcleod replied to צביקה שמואלי's topic in Instruments & Effects
Band in a Box will do this: https://www.pgmusic.com/ Pick a Jazz or Blues style, then click the Reharmonist button is the one you want - it'll auto-generate chords from a melody with full backing using the style you've chosen. The individual tracks can then be dragged/dropped into Cakewalk. -
AFAIK I don't think the timing of topology change messages has changed much since X2, apart from the obvious introduction of Aux Tracks & Patch Points. Basically ANYTHING that changes the routing will trigger a topology graph change, so that includes: - Adding/Removing Tracks, Buses, Patch-points or Aux Tracks - Adding/Removing Sends - Changing any inputs or outputs - Adding/Removing Effects - Enabling/Disabling input or output ports This particular scenario was different, as the routing itself hadn't actually changed - only the name of the ports had. The control surface cache is reset: - Any time the topology changes - Any time the track or bus ordering changes and in the next release... - Any time a bus, aux track or patch-point is renamed As far as controlling sends are concerned. You can't change the destination of the sends via the API, but you can: - Enable/Disable a send - Change the send level - Change the send pan - Change it to pre/post
-
Activating Cakewalk Software
msmcleod replied to Noel Borthwick's topic in Frequently Asked Questions
@alan j. wilson - it looks like your default browser is set to Internet Explorer. I suspect that's your issue. IE has been deprecated by Microsoft, and doesn't support the most up to date security settings most modern websites require. Microsoft Edge, Chrome or Firefox should work fine. Opera may be fine too, but I've not personally tested that one. It looks like you've got Chrome & Edge installed - set one of them to be your default browser. -
Dropouts/Stuttering (yes, I've tried everything)
msmcleod replied to Peter Van Valkenburg's topic in Cakewalk by BandLab
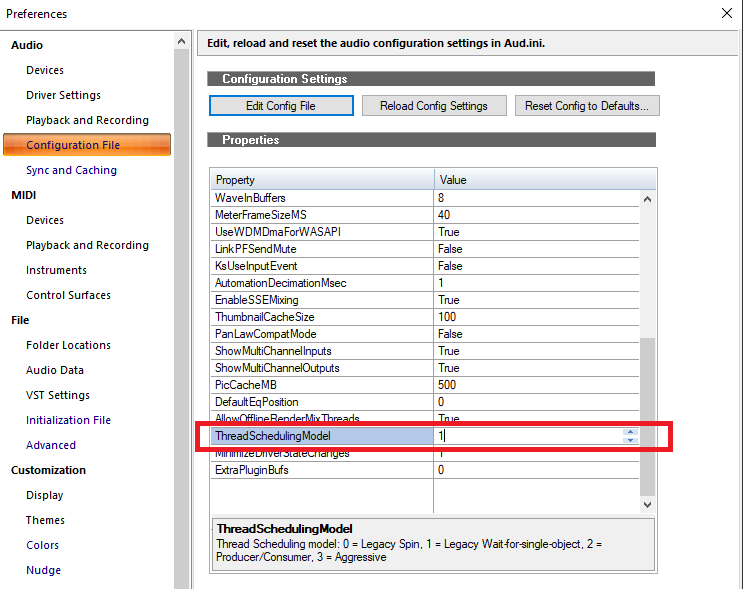
Have you tried checking "Enable MCSS for ASIO Driver" in Preferences ? This was actually introduced in 2022.09, and defaults to unchecked as some drivers got upset when the DAW tried to override their setting. Prior to 2022.09 it would have been effectively "checked" as long as "Use MMCSS" was checked. You could also try turning off "Plugin Load Balancing" - as a processor with a high number of threads and using a small buffer size may actually spend far more resources context switching than it saves by balancing the load. The other thing to check is your ThreadSchedulingModel. Compare this to what you have set in X3.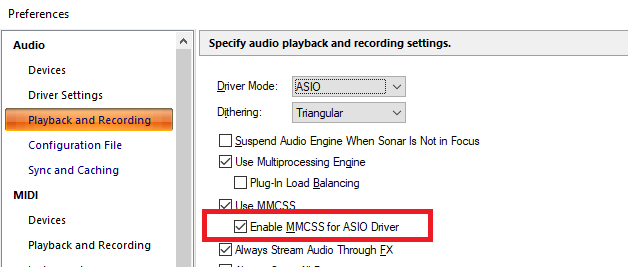
-
Given that you had a "Create Process failed; code 740" (which is to do with the process needing greater privileges), and Cakewalk runs as admin, it sounds to me like there's a permissions issue with your normal account. Until you narrow it down, you could run Cakewalk as admin. You could also try creating a new user account on the PC and see if that has better luck?
-
It looks like you've zoomed the clip area so that some notes are out of view - double click the area between the clips view and the track headers ( where the keyboard scale is) and that will reset the zoom.


