


msmcleod
-
Posts
7,209 -
Joined
-
Last visited
-
Days Won
39
Everything posted by msmcleod
-
Get the person who's introducing the song to nod to the drummer, and get the drummer to start the performance. Instead of having bar 1 as you describe, have the drummer get an extra 1, 2... 1,2,3,4. If the drummer is in charge of starting it - or at least prompting you, then he shouldn't miss the 1st beat. Even if he does, when it doubles in the 2nd bar, he'll know where he is. The way I used to do it was a bar of 1/4 notes then a bar of 1/8 notes (with the 1/4 notes accented)... so 1,2,3,4... 1 and 2 and 3 and 4 and. The different feel/tempo thing is really just down to practice. If the drummer really has issues with changing tempo between songs, he could get a digital metronome and set it to the tempo of the song and listen to it for 10-20 seconds before starting the song.
-
 Articulations aren't really designed for sending continuous events - this is more in the domain of envelopes. Not saying it can't be done... but it'd be tricky given the current implementation. It does seem useful in some circumstances though, so we'll give it some consideration.
 -
Exactly this thing was happening to me a few years ago on my i5-3570. I tried literally everything to try to get to the bottom of it - in the end it was a bad memory DIMM, and the reason it only happened in Cakewalk was because it was the only app I ran on that machine that actually used enough memory to have it access the bad memory. The thing that pointed me to the memory was when I checked the BIOS, and it was identifying one DIMM as having a slightly different speed from the others. As they're all identical, this look suspicious. You may not have such an obvious indication though. What you could do is take all of the memory out, and run it one 8GB DIMM at a time (I'm assuming you've got 4 x 8GB modules). Create a relatively modest project in Cakewalk that causes your memory usage to go around 75% - 80%. Save this project and shut down your computer. Swap out the DIMM's one at a time, and try loading the project... if one crashes and the others don't, then you know it's a memory issue.
-
MIDI Devices under the Preferences menu question
msmcleod replied to timboalogo's topic in Cakewalk by BandLab
@timboalogo - the additional MIDI IN/OUT ports are for transmitting control data, should you need it to be separate from the main MIDI port. For example, you can assign the transport controls to send MIDI CC messages on MIDI Port B (MIDI IN 2) , then use CbB's ACT Control Surface to map those messages to CbB's transport controls. If your MIDI track is set to only receive from MIDI IN 1, it won't record those messages to your MIDI track. Another example might be to assign the rotary controls to MIDI CC messages on MIDI Port C (MIDI IN 3), and use CbB's ACT Learn to assign them to plugin parameters. -
These are just suggested specs. FWIW, I recorded 16 simultaneous tracks in Next while playing back an existing 32 tracks on a 2.0Ghz / 4 core Intel Celeron J4125 with 8GB of RAM... and this was to an external USB 3 SSD. No plugins though. I did the same in CbB and had no issues there either. The specs are intentionally on the higher side, as people generally want to load their project up with plugins.
- 78 replies
-
- 12
-

-
There's a strong possibility that full Theme Editing won't be available in the first release, as it won't be an overhaul - it'll be a complete rewrite.
-
There will definitely be new features, and a fair few have already been baked. How many more we'll be able to implement before release is limited by the effort taken in the new UI work.
-
I think the whole premise of the question is kinda flawed here. The assumption is that you need EQ, compression or a bunch of effects in order to mix a song. This may turn out to be true in the end, but the assumption that you need to EQ all your tracks is starting out on the wrong foot IMO. EQ and compression should be viewed as problem solvers, i.e.: EQ - to make space in tracks so they don't clash with other ones and allow each part to be heard; remove frequencies that are problematic or too dominant Compression - reduce dynamic range to give a more even performance and/or add punch; add glue to the mix bus Start off with just using the faders and pan knobs to create a good balance. Then listen. Only then use EQ and/or compression where it's needed.
-
A while back, I went through the process of upgrading all of my old projects to SONAR Platinum. A fair amount of them dated back to CWPA 9. While the projects would open directly, some were problematic - mainly due to 32 bit plugins, or old 32 bit DX plugins that were no longer available. There were also some UI/routing issues due to the differences in Skylight vs the old UI. The most reliable way I found to deal with older projects was: 1. Create a new project using the Basic template - if nothing else, this ensures a Master, Preview and Metronome bus is created. 2. Navigate to your project in the Browser, and drag the project on to a blank area in the clips view. 3. Tidy up any blank tracks. 4. Save as a new project.
- 8 replies
-
- 1
-
-
- sonar 7
- windows xp
- (and 2 more)
-
When opening MIDI files, normally a single instance of TTS-1 is created along with a standard MIDI track for each of the MIDI tracks within the MIDI file. If this is a type 0 file, a track will be created for each MIDI channel. Note that these are normal MIDI tracks - not instrument tracks. Opening a MIDI file (vs importing one), will also import any tempo changes, markers etc. The first step is to insert your MODO bass as an instrument track, then go to the bass MIDI track and set its output to point to your MODO bass. The easiest place to set the output is via the track inspector. At this point, I'd normally clean things up by selecting all the MIDI clips in the original bass track, SHIFT + drag the MIDI clips from the original bass track onto the MODO bass track, and delete the original bass track. You can repeat this process for all your other tracks. Importing MIDI files into an existing project will not bring in any tempo/markers etc (the reasoning being, that you've got an existing project and you want to keep your project's tempo/markers as is). Also, type 0 files will not be split up into separate tracks for each channel, and will be inserted into the target MIDI track as is.
-
Just to add to this... practice here is really the key. In my experience, there are two things that affect your tuning: 1. Weak muscles, making it difficult for you to control/sustain your tuning. 2. An untrained ear for tuning when singing. I was very ill a few years ago and required a pretty aggressive course of steroids which weakened pretty much every muscle in my body (seriously there are muscles in places you didn't know you have). My ability to sing in tune was pretty much destroyed. I don't sing that much nowadays, so it is getting better over time slowly, but the more those muscles get used, the easier it is to hold my tuning. Oh, and singing standing up is way easier than sitting down. Investing in a singing course, or at least doing some decent warm-up exercises is well worth it. These work for me: 1. Start with the lowest note you can sing and gently hum 5 notes of a scale up and down. 2. Now start on the next lowest note and gently hum 5 notes of a scale up and down. 3. Repeat until you get to the highest note you can sing comfortably - don't strain to sing too high, but do allow yourself to naturally transition into falsetto. 4. Repeat steps 1 - 3, using "N" sounds, then rolling "R" sounds (like you're doing a machine gun sound) 5. Finally, repeat steps 1-3 using "B" sounds - kind of like blowing a raspberry with your lips flapping. Gently hold your teeth together, and put your forefinger and thumb around the sides of your mouth to stabilise your lips while they flap about. The vibration of this final exercise on your vocal chords will massage them and slowly extend your upper range. It'll also relax your vocal chords making it way easier to sing afterwards. As far as actually singing in tune in the first place, here's a tip - sing with a pitch correction plugin on and set the mix so you can here both the treated and untreated version of your voice. Over a few weeks or months, you'll automatically correct yourself. I noticed a similar phenomena when using the rasp effect on my TC Helicon VoicePrism: singing with the rasp effect on caused my voice to automatically produce the rasp itself without me thinking about it.
-
You make an arranger track the active one by clicking its header. Right clicking on the inspector "A" tab icon will list all of the sections in the active arrangement allowing you to jump directly to it.
-
Gear4Music are probably now the biggest musical instrument retailer in the UK nowadays. I get most of my stuff from them now, unless something is significantly cheaper elsewhere. BTW - their SubZero SZM-10 is possibly the best SM57 clone I've ever heard. I think people have realised it, because it's now 50% more expensive than it was when I bought a load of them.
-
How to assign Cakewalk to use all the CPU cores
msmcleod replied to George D's topic in Cakewalk by BandLab
It's worth mentioning, that it's not possible to always use all cores all the time. Depending on the routing of your project, it may or may not be possible to spread the load. Some things have to be done in a certain order, which will inevitably mean that there will be bottlenecks in the chain. On top of that, there are certain tasks that just can't be parallelised. Some resources can't be shared, and some resources can be to an extent, but can only allow one process to have exclusive access at a time. Context switching to give multiple threads access to resources adds additional CPU time, so in some cases it actually takes more time to spread the load that it would just letting a single thread do its thing. CPU speed is the generally the biggest factor when processing plugins. Having multiple cores will help, but only in the situations where processing can actually be done in parallel. Obviously UI and Audio Processing can be done in parallel (so a minimum of 2 cores is a must), but there are limits to what parts of the audio processing can be done in parallel. As a simple analogy, you may be able to get 16 people to wash 16 mugs at the same time, but you can't get 16 people to wash the same single mug at the same time. IMHO, a CPU running at 2.6Ghz with at least 4 cores is the bare minimum for any DAW. Ideally you want 3.4Ghz or more. I've certainly run Cakewalk on much less than this, but that's generally been for tracking only, and with no plugins. -
Personally, I love this plugin. It's true that you can get the same results by doing everything yourself with EQ, so it's not something I reach for often. But if you've tried EQ'ing yourself and you're still struggling trying to get something to fit in the mix, it can save you hours of tweaking.
-
I'm pretty sure Cantabile can play MIDI files: Cantablie Media Players
-
I'd wondering if Cakewalk really the best tool for this job? Although Cakewalk does have some live features, it's certainly not the tool best suited for live use - especially if you're unloading / loading large VSTi's for each song. Personally, I'd take a look at something like Cantable, which is specifically designed for live use. I'm not sure if the free version (Cantable Lite) has the "this synth was used in the previous song, so I won't bother unloading it and just keep it for this one" feature, but at least one of the paid tiers does.
-
Please, help applying tempo map from Melodyne to a project SOLVED
msmcleod replied to Billy86's topic in Cakewalk by BandLab
AFAIK Cakewalk's tempo extraction always uses Melodyne's automatic tempo detection, rather than any corrections you make within Melodyne itself. The most common way to transfer tempo maps between applications is via a MIDI file, so the following steps should work: 1. In Melodyne, export the tempo map as a MIDI file. 2. Open Cakewalk (with no project loaded), ensuring "Allow Only One Open Project at a Time" is unchecked within Preferences->File->Advanced 3. In Cakewalk open the MIDI file you exported in step 1 using File->Open 4. Open your other project. 5. In the MIDI file project, open the Tempo Track Inspector and select all the tempos 6. Use Copy Special to copy the tempos (i.e. select only the tempos in the dialog) 7. In your other project, set the Now Time to time zero then use Paste Special to paste the tempos. -
FWIW Sonar will have true Start/End markers.
-
[SOLVED] Auto Crossfade not working like I expect
msmcleod replied to Christian Jones's topic in Cakewalk by BandLab
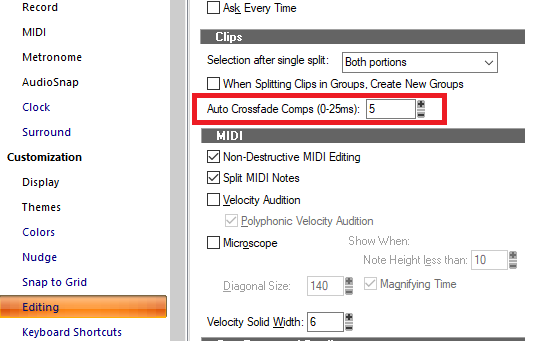
First check auto-crossfade is actually enabled: Second, check your auto-crossfade times in preferences: Lastly, currently auto-crossfades only work for splitting when using the mouse tool (i.e. ALT + left click). Using the "S" shortcut to split doesn't auto-crossfade - this has been fixed for the next CbB update.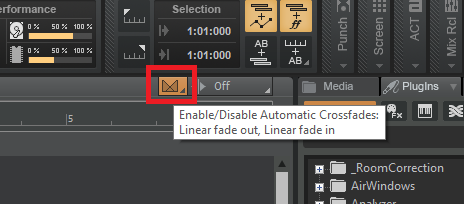
-
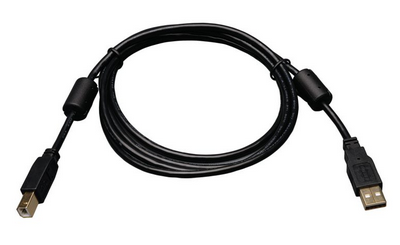
Ticking can be caused by electrical interference. If your audio interface is USB, try using a cable with at least one ferrite choke on it, e.g:
-
Ability to disable channel/track selection on faders?
msmcleod replied to Geoff Merson's question in Q&A
The only other solution I can provide is another control surface. The KORG nanoKONTROL 2 is a pretty cheap solution, and works extremely well with CbB. I've got one attached to the wall in my studio by my vocal booth area so I can easily adjust things, start/stop, and undo/redo takes without having to move from my position. The only downside is the faders are quite small. The nanoKONTROL Studio works equally well and has much bigger faders and has select buttons, but it's more expensive. If you have an Android tablet/phone there's also TouchDAW, and there's TouchOSC for the iPhone/iPad. TouchDAW is a faithful emulation of the Mackie Control, whereas TouchOSC is fully configurable. I've used TouchDAW a few times and it works very well. The only reason I stopped using it was because I preferred the tactile control of a real Mackie Control rather than a touch-screen. Other than that, the only thing I can suggest is to try to find a desktop app that emulates a MIDI controller. Anything that can bind on-screen faders/knobs to MIDI CC's would work, and you could set up a profile using the ACT Control Surface. All of the software options above require you to use a MIDI Loopback driver such as loopMIDI or loopBe. -
The UI is being updated to use vector graphics so it can be scalable and DPI aware. The button icons will likely be updated but will all be in the same place as before, so there should be zero changes to your workflow.
-
SI-BASS, SI-STRING - USE OF SAMPLES IN CHORD PROGRESSION
msmcleod replied to Milton Sica's question in Q&A
Try this one: Using pitch markers in the Track view -
To me, the biggest differences in modern sounding prog (and by that I mean modern prog rock bands such as Spock's Beard, Big Big Train, The Flower Kings etc.. rather than prog metal), are the vocals and drums. The vocals in many 70's recordings are generally quieter in the mix than the up-front vocals of modern recordings. Also the way the vocals are treated e.g. tight delay's or obvious reverbs in the 70's compared to the more detailed, drier (but not dry-sounding) vocals of today. The drums, again, are not only quite often way back in the mix, they're also pretty cluttered/mono sounding (probably due to recording constraints and a bounce or two). The kick and snare are far more prominent in modern productions, and the rest of the kit makes better use of the stereo space. I was just listening to the 2004 remix of Genesis' Cinema Show (from "The Platinum Collection"), and it's far more modern sounding than the original 1973 recording. Despite all the instrumentation being the same, it certainly doesn't sound old to me in the way the original does.

