


Andres Medina
-
Posts
729 -
Joined
-
Last visited
Everything posted by Andres Medina
-
Didn't know. I find it very useful and will try on my projects. Thanks!
-
Oh, I just read your last part, the notes area... THERE IS A NOTES AREA!! - This is new to me. Good! Thanks. Keep thinking that for capturing comp takes still there is room for improvement. . What about a new button with a flag or a color that you just click once to select the comp track (or three buttons color coded to quick mark a take with one clik), + some system to sort or filter only the flagged takes? Just dreaming -
-
Thanks! Yes, it will work fine to select one of the takes after recording. However, I often I find myself recording performances in different parts of a song (i.e, Verse+Chorus), inside the same track, for a matter of speed in a session (say a vocal take). If I go ahead to a different section, the soloed track is not that useful because it would be preventing me from monitoring a new comp take. Any suggestions? Thanks again -
-
I wonder if this functionality has been requested. Anyway, here it is: Would be nice to have a way to quick-flag comp takes that you feel are best, right after pressing stop. I mean, using 1 click and it's flagged for future reference. When you make a bunch of takes is easy to get lost afterwards. Additionally, not knowing if this is feasible from a programmer standpoint of view, would also be nice to be able to sort or filter those flagged takes when selecting the best takes.
-
If they are moving, I guess they are somehow linked : I'm aware of this options: The tracks are Ctrl+Selected The tracks are grouped Hope it helps -
-

CW continually saving, driving me mad!!
Andres Medina replied to Jono J Grant's topic in Cakewalk by BandLab
Try this, under Preferences: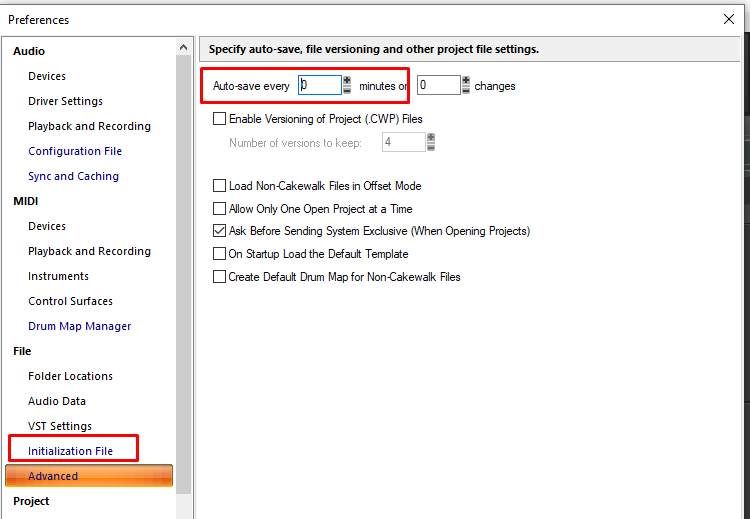
-
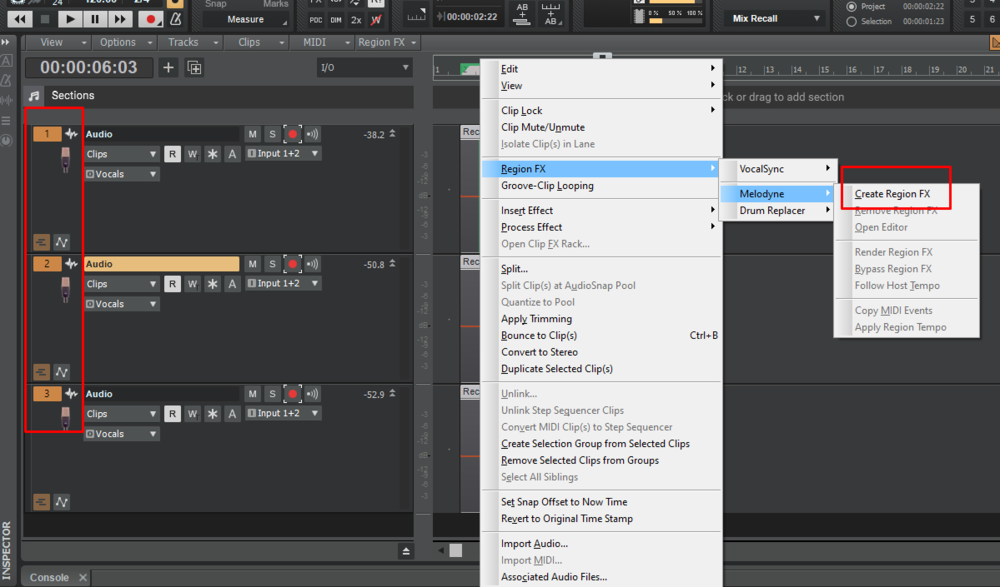
uh... never happened here By glitchy you mean there are glitches on playback? (if so, you can change your driver configuration to increase the driver buffer size) - may be a playback issue rather than Melodyne? Melodyne prompts you to update when available.
-
It's faster to analyze all tracks at once that one by one (select all tracks - apply Melodyne) . Once analyzed you just select the track for editing within Melodyne or from CW (depending on your Melodyne version).
-
Are you creating a Region Fx on the selected tracks? If so, it should analyze all tracks. At least here it is working fine.
-
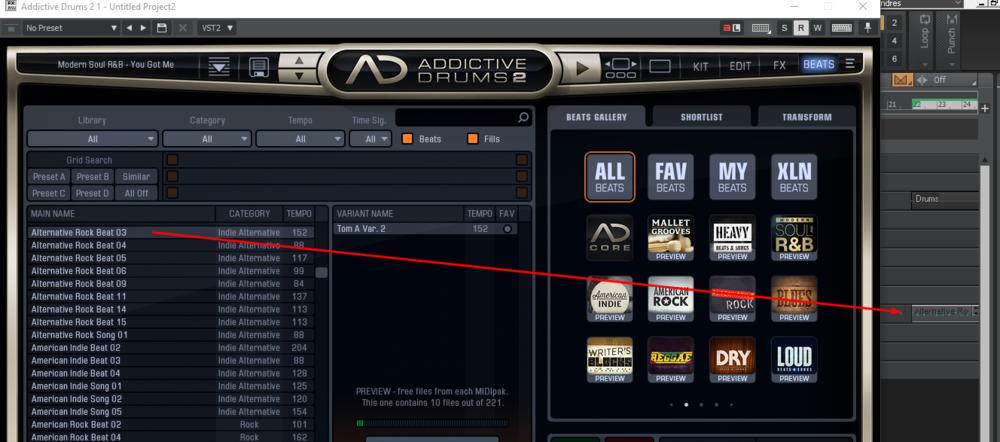
Echo on addictive drums2 when I copy and paste
Andres Medina replied to RICHARD HUTCHINS's topic in Cakewalk by BandLab
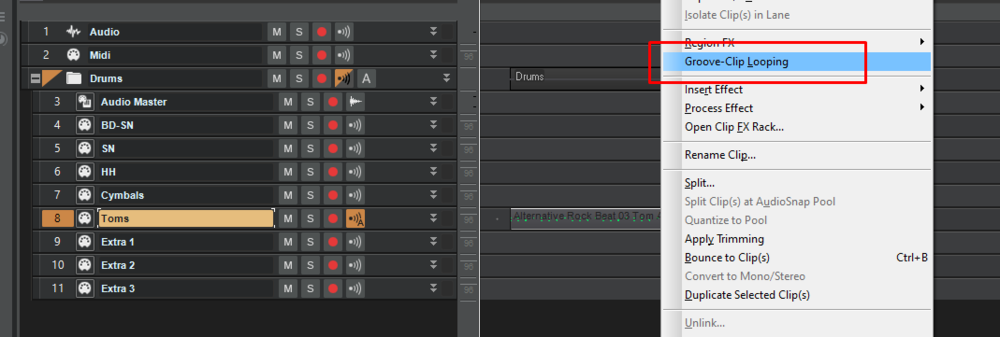
I use AD2 a lot. I think you are duplicating clips without intending to do so. Try using groove looping again, BUT take this precautions: The first clip (original clip) is perfectly aligned to the grid Groove Clip Grooving is enabled See images and video Video_1.mp4
-
No idea why are you having this issue... If it's not a CW related issue, consider contacting support at Celemony. They are very responsive.
-
I would check this: That the two tracks plays well in playback (to rule out automations, etc) That you are selecting the right selection before exporting If 1. is ok, I would check the configuration of the export process (there are a lot of options while exporting - only tracks/buses/whole mix, etc,), to see if a particular setup produces de error.
-
Are your tracks audio tracks, midi tracks or Instrument tracks?
-
Yes, I did a quick test and midi notes are still locked to tempo change after changing the clip properties to absolute time. Tried to lock clip data and position - and then change the tempo, and no luck. Still follows tempo changes. Not sure if there is a way to unlock midi data from tempo changes. Not aware of that function... I guess you will have to use the other way (creating it in a external project)
-
And on the low budget end, I already bought a Behringer B1. Very quiet, no added noise, large diaphragme. Not very crisp, but works well. I use also an AKG 414-B, which is phenomenal, so in comparison, the Behringer is a little dull.
-
A friend bought the Shure Beta87: the sound is bright and crisp, BUT has a noticeable hiss, not very good for studio recording. She is a Voice Actor, and she is asked to send her files over, so she is going to change it.
-
I see. Sorry! Too fast -
-
You already got a solution..
-
There it is. Brilliant! Not tried it either...!
-
which discards my suggestion.
-
On second thoughts, if you just place the notes say a quarter apart, quantized 100% on the grid, and just draw a straight line in the tempo view, I think you'll get what you want, as the result would be a perfect gradually increasing/decreasing of the space between notes.
-
I get what you are asking. It's a mathematical spacing of the notes, that increases the distance between notes by a kind of algorithmic pattern. Never thought about that option, but now I'm curious - jeje. Don't know of a plugin that do that, but certainly someone somewhere have had the same curiosity and came up with a plugin or a method... I guess you can use the help of a mathematician to figure out the distance of the notes correlated to a 120 bpm tempo, and draw them manually (if the length of the musical phrase is not too long)?
-
Help with Acoustic Guitar Recording - Workflow
Andres Medina replied to Marcel Manzardo's topic in Cakewalk by BandLab
Thanks for your insights! There are endless ways to get the work done, for sure. I try to get the best individual sound from each mic (one AKG 414 - really good condenser -, and the other a Behringer B-1 - good, but not as much as the AKG), and then blend them together in a stereo image, 40% pan L, 40% pan R. It sounds pretty good, and translate fine to mono as well, specially for classical guitar. Creates a nice spacey vibe, that mono recording does not provide, despite the use of good convolution reverbs+algorythmic reverbs. For steel string guitars I found the stereo image unnecessary and get a bit blurred audio image, but for a simple voice+guitar setting it makes the guitar fuller. -
Help with Acoustic Guitar Recording - Workflow
Andres Medina replied to Marcel Manzardo's topic in Cakewalk by BandLab
After reading the different approaches to this, I made a few tests, and found out that as bdickens said, having two mono tracks can be better for controlling the stereo image of each mono track (Compressor-Eq), and the spread of the stereo image when mixing. Of course, recording stereo doubles the work in many ways...! Regarding comping: as long as you configure the comp options to "Group all clips", as said above, it's kind of the same process that comping mono. And, depending of the particular piece of music, having a large, big, stereo guitar can be a huge improvement or a huge waste... jeje - --- Here is a thing I haven't been able to properly to figure out: When using the spaced mics approach (2 mics on the sides) , to avoid phase issues, you have to keep the two mics at least 3x the distance from the mics to the guitar. It means that you have to mic really close to the instrument (I don't like this because it picks a lot of unwanted noise; breathing, the tapping of the fingers on the fretboard, etc), to get a small distance between mics. But if you mic a bit further away, let's say 12 inches, this distance increases a lot (36 inches), and the mics cannot point close to the body of the guitar, but in an angle, because of the increased distance. Is this ok? -
[SOLVED] Noise introduced recording two tracks simultaneously
Andres Medina replied to petemus's topic in Feedback Loop
I'm starting to record guitars in stereo, using the same audio card, with two different microphones. Based on this thread solution, I'm not sure now if I should tick the Remove DC Offset During Record on or off. Haven't heard noise in my recordings so far. Any suggestions? Thanks!


