


msmcleod
-
Posts
7,212 -
Joined
-
Last visited
-
Days Won
39
Everything posted by msmcleod
-

Please add colour customization at least for PRV
msmcleod replied to Maria P's topic in Feedback Loop
You're probably thinking of Bars & Pipes Professional by Blue Ribbon Software on the Amiga... They were working on a Windows version (for win3.1 IIRC) when Microsoft bought them out; nothing ever came of the software except that the first (maybe first few) DirectX SDKs included some version of it for devs to implement things with (but I didn't find out about that till much later, after I was using Cakewalk 3 for windows, or I would've found a way to get that SDK just to use the B&P) I don't know CB's full history, but I thought they were concurrent with B&P's time, but CB was on the AtariST? The pre-cursor to Cubase was Steinberg Pro24, which definitely was on the Atari ST. IIRC Cubase 3 was the last version on the Atari. -
Meter changes always need to be on a measure boundary - they don't make sense otherwise. So unless everything lines up with measure boundaries both before & after the paste, the meter map may not match what you expect. Also, be mindful of what you're copying pasting... by default, copying/pasting a clip will NOT copy the meter changes with it. For example:
-
We've identified the cause of this issue, and will issue a fix with the next update.
-
Please add colour customization at least for PRV
msmcleod replied to Maria P's topic in Feedback Loop
More colour customisation is coming: -
Sonar Not Saving Instrument When Exporting Track Template (Resolved)
msmcleod replied to henkejs's topic in Cakewalk Sonar
Working fine here... Not sure what to suggest here. May be try a full VST scan in case your plugin catalog has somehow gotten corrupt? -
The "generic low latency driver" is an aggregate driver - i.e. it's a wrapper around the WDM driver. It may behave like an ASIO driver, but it's talking to the WDM driver rather than the audio interface hardware directly. Sonar enumerates the drivers and their capabilities by opening each driver and determining the modes that are supported. This is done on start up of the application. When it opens the generic driver, the driver opens the device (and all other devices) using WDM. It then closes the driver in order to open the next ASIO device. The problem arises when, after closing the driver, and the driver doesn't let go of the WDM driver properly. You then get issues when opening the real ASIO device, as it may be using a different bit/sample rate than the one it's trying to use in ASIO, and although the drivers are separate, it's still just the one audio interface - e.g. it can't be at 16 bit/44.1K and 24 bit/48K at the same time. ASIO4ALL certainly is designed to be this way - i.e. when closed, it stays alive in the system tray with the WDM drivers open. The generic low latency driver (which I believe is a Steinberg device?) should behave more gracefully, however it's still at the mercy of how well the WDM drivers were written. The easiest thing is just not to use wrapper drivers, and stick to the manufacturer's genuine ASIO drivers.
-
Please add colour customization at least for PRV
msmcleod replied to Maria P's topic in Feedback Loop
-
There is no imposed device limit in Cakewalk or Sonar - they simply list the devices available from Windows. I've got 22 MIDI input/output devices listed on my office PC. I'm using MME as my MIDI driver mode.
-
From Google AI: The 16-device limit is a legacy problem often caused by "ghosted" or duplicate MIDI drivers in Windows' Device Manager, not a true Windows limit. To resolve it, you must show hidden devices in Device Manager (by typing set devmgr_show_nonpresent_devices=1 in Command Prompt) and then uninstall the greyed-out, unused MIDI devices. After deleting the duplicates, restart your computer to fix the limit and allow more devices to be connected. Steps to Fix the Limit Open Command Prompt as Administrator: Search for "CMD", right-click it, and select "Run as administrator". Enable Showing Hidden Devices: Type the command set devmgr_show_nonpresent_devices=1 and press Enter. Open Device Manager: Search for "Device Manager" and open it. Show All Devices: Click on the "View" menu and select "Show Hidden Devices". Locate and Uninstall Ghosted MIDI Devices: Expand the "Sound, video and game controllers" section. You will find greyed-out entries for unused MIDI or USB audio devices. Right-click on these greyed-out devices and select "Uninstall". In the dialog box that appears, make sure the option to delete the driver software is unchecked to keep the "real" port working. Delete Duplicate Entries: You may find multiple duplicate entries for a single device; delete the greyed-out ones. Restart Your Computer: After deleting the ghosted devices, restart your PC. Why This Happens Driver Duplication: When you uninstall a MIDI device, sometimes Windows doesn't fully remove its driver. Each time you reinstall the device, a new driver entry is created, leading to duplicates. Ghosted Devices: These duplicate entries count against a hidden device limit, even though the device is no longer in use. Legacy Limitation: This is often a remnant from older system designs and not a fundamental Windows limitation on the number of devices you can connect. FWIW - I've had a similar issue before, and the easiest way to stop it is to always use the same USB port for each device every time. A switched USB hub (i.e. with switches on each USB port) can help with this, as you can leave them plugged in and just use the switch to switch them on as needed. Just make sure it's just your MIDI devices on the hub, and not your audio interface!
-
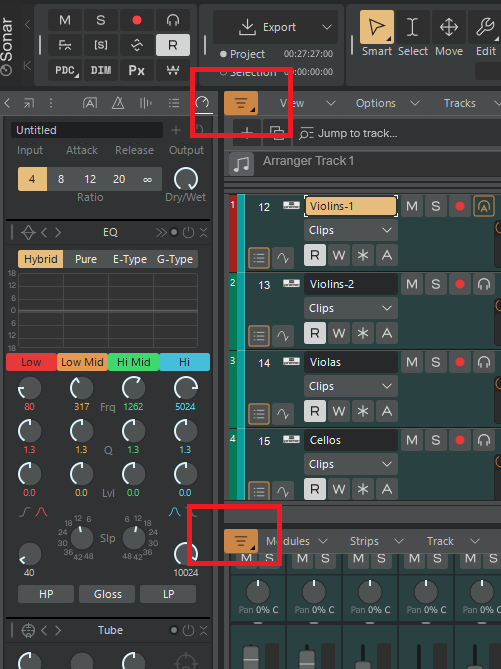
If tracks are hidden, the track manager button will be lit. Clicking on it will unhide all hidden tracks; clicking again will hide the any tracks that were previously hidden. FYI - any hidden track presets you make in the track manager can be accessed quickly by right clicking this button:

-
The Sonitus plugins will remain in your plugin library as long as the operating system supports them. If your "Replace if possible on Project Load" setting with Preferences->File->VST Settings is unchecked, then your existing Sonitus plugins will remain unaffected. You'll be free to use either the old Sonitus plugins or the new ones. If your "Replace if possible on Project Load" setting with Preferences->File->VST Settings is checked, then loading any project with the old Sonitus plugins will result in them being replaced with the new Core plugins. Even if you had this checked, and migrated the Sonitus plugins to the new Core plugins in a particular project, there's nothing stopping you inserting the old Sonitus DX plugins... however these will be replaced with the Core plugins if that setting is checked when you next load the project.
-
Don't confuse the list of tempos in the Tempo Inspector with the tempo map - they're not the same. The list of tempos in the Tempo Inspector is a representation of the nodes / curves within the tempo track envelope. In most cases, the tempo map itself is then derived from that envelope, although there are exceptions: - When detecting tempo via Melodyne - When importing a MIDI file - When using "Set Beat at Now" - When using "Fit to Improvisation" - When loading an older pre-tempo track project ... in these five scenarios the tempo envelope is constructed from the tempo map. In saying that, there should be no issues inserting multiple tempos of the same value if you use the tempo track:
-
Resolved: Sonar Platinum Volume Automation question
msmcleod replied to Larry T.'s topic in Cakewalk Sonar
@Larry T. maybe I'm not fully understanding the issue, but what @Amberwolf says is correct: adjusting/automating the volume level alters volume by that amount, not to that amount. So the only time you'd see the db levels match between the volume fader and the meter readout is if the audio clip is at 0db. In saying that, it could be a completely different issue - have you checked you've not engaged offset mode at any point? -
^^^ this Set your workspace to None
-
I think it's worth mentioning that unless you're adding MIDI parts or need a Sonar-generated click-track, it's not always necessary to have a tempo map. Even if you're adding MIDI parts, it doesn't really matter unless you need to edit them. You can have tempo set at 120bpm for the whole song, and the audio going between 85bpm and 90bpm, and it won't make a blind bit of difference. The only thing is that the time-ruler in M:B:T won't match the material. If I've got a live band recording with only audio tracks, for the most part I don't care about beats/measures. I'll just set the time ruler to H:M:S:F and mark out verses/choruses with arranger sections (with the arranger track in absolute time). That way I can easily navigate throughout the song and never need to worry about bars & beats. Where it does get useful is if you want to vary / correct timing. But there's nothing stopping you doing the tempo map later only if you actually need it. What I would recommend though, is if you are correcting timing by nudging the odd snare beat around, do all of your timing tweaks before you define the tempo map.
-
The way Set-Beat-At-Now (SBAN) works, is you set the now time at, say, measure 2 then tell Sonar that is measure 2. It takes the time in seconds/fractions of a second, and works out what tempo the song needs to be prior to that point (but only from the previous tempo change if there is one) to make measure 2 land at exactly that point in time. As you keep doing that throughout the song, the tempo map is built up. You can do this at whatever granularity you need - either by beat, measure or even every "n" measures. If the tempo of the audio is fairly consistent, you may get away with using SBAN every 4 bars or so; if it's varying wildly, you may need to do it every bar or even every beat. In saying that, even if the tempo on the performance does vary wildly, if you only ever need the bars lining up rather than each beat, you could get away with just doing it on a per bar basis - it would just mean that some 1/4 notes may not line up exactly on the timeline.
-
Looks like a good choice. Also take a look at the Zoom LiveTrak L-20R, which does a similar job and is around £200 cheaper. The thing that stands out for me on the Zoom is the 6 independent headphone mixes, which may remove the need for separate headphone amps and saves the complexity of setting up separate headphone mixes in the DAW. The choice here however maybe the quality of the pre-amps. The quality of modern Zoom preamps is streets ahead compared to the R16/R24 days, however I suspect the Studer designed pre-amps on the Soundcraft may be better. In saying that, while Zoom build quality/reliability has steadily improved over the years, Soundcraft seems to be moving the other way - at least one user on this forum has had a Soundcraft MTK die on them. I guess for rack-mounted gear, this may be less of a concern - but even so, If I opted for either of these, I'd build myself a separate XLR input panel so that it would take the wear of constant plugging in and out, rather than the unit itself. Unfortunately a lot of these modern devices have the sockets mounted directly on the circuit-board, and all it takes is a slightly loose mounting screw for the board to start feeling the strain. As a completely different alternative, maybe take a look at the RME Digiface USB. It has 4 ADAT input / output ports, and a stereo TRS output for headphones/speakers. This plus an ADAT interface such as a Behringer ADA8200 or Focusrite Octopre for each ADAT port will give you up to 32 inputs and 32 outputs. The advantage here is you can choose which preamps you want, and upgrade/expand as required - and of course RME drivers are arguably the best in the industry.
-
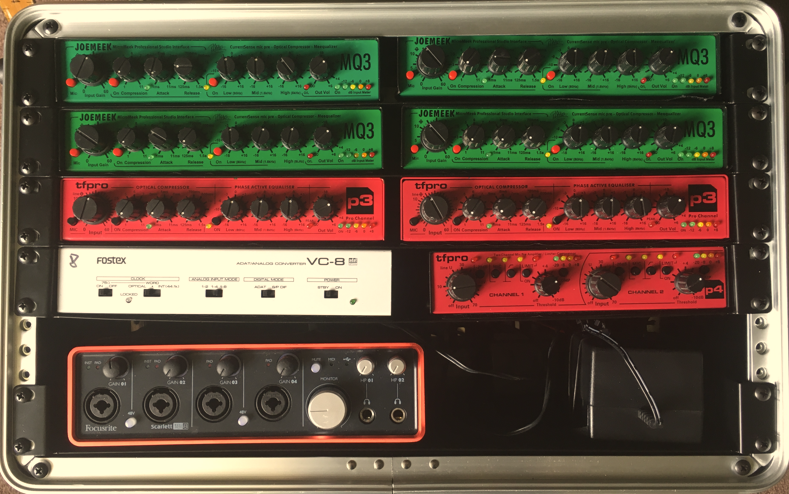
The only other one I came across is the Zoom Livetrak L20. This is a digital mixer though, but metering is much better. The plus for the L20 is the 6 separate headphone mixes and the fact you can save/recall complete scenes. There's also the Soundcraft Signature 22 MTK, but there's no SD card recording on that one, and all recording captured pre EQ/Fader. I guess there's also the Tascam DP-24 / DP-32... but they're prosumer rather than pro devices, and limited to recording 8 tracks at a time. They also have a weird track layout making the DP-24 actually slightly better than the DP-32 if you're recording mono sources. In my studio I use an Allen and Heath Mix Wizard WZ3, connected to 2 x Fostex VC-8's via its 16 direct outs. Metering is pretty poor, but sound-wise it's excellent. It is rack mountable, but it's damn heavy, and obviously there's the hassle of looms, and the extra rack containing the VC-8 ADAT ADC's and audio interface.
-
Actually, I was gonna say... if I was to do it all again, I'd just go for a Tascam Model 2400. This gives me the choice of using a DAW or not, and also the option of committing EQ changes while recording (which the old Model 24 didn't do - hence my current setup).
-
You might want to consider a small 4 channel mixer with built-in effects for the vocalist: - vocal mic goes into the mixer - output to the DAW is either by the insert send, or an FX send on that channel. - backing track output from the DAW goes in to inputs 3 & 4. - vocalist plugs their headphones into the mixer The only downside is, you're then at the mercy of the quality of the mixer pre-amps... but I guess you could go directly into the audio interface, then take a direct out from the audio interface into the mixer. This should have zero latency, and the vocalist can play with the backing / vocal balance to their heart's content without ever affecting what you're recording. All of my JoeMeek/TFPro pre-amps have two line outs, so I've got a spare output on each one for that kind of thing.
-
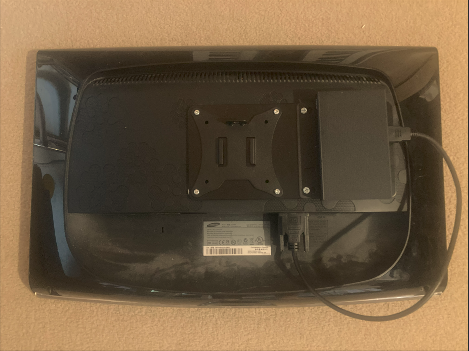
The MeLE has both an internal SSD drive, and optionally an internal flash drive - it also has a micro SD socket for an additional storage. My 4C has a 256GB internal SSD (C drive), an internal 256GB flash drive (D drive), and a 512GB micro SD card inserted. It attaches to a VESA mount via a supplied bracket. I've gone one step further, and used a VESA extension plate as well so I can mount it to a VESA mount on the wall whilst still having the 4C attached (this is actually a 2C, but it's exactly the same size): It's worth mentioning that the 4C's case is also its heatsink - and it does get quite hot... not enough to burn you, but certainly as hot as a radiator. This is by design. Oh, and my recording tests were actually done to an external SSD connected via USB 3. Typically, I use it with this setup: All of the Joemeek/TFPro preamps go to into the VC-8, which is connected to the 18i8 via ADAT. The 18i8 has another 4 line inputs on the back, giving me a total of 16 inputs.
-
I think in the end, without knowing exactly what the mobile setup is meant to achieve, there's no real way of recommending anything. e.g. - are you just recording? Do you need to record through VST's (guitar sims etc)? Do you need to mix on it? What I do know is: Recording 16 simultaneous tracks even through a USB 2 interface uses very little RAM/CPU. I was recording 16 simultaneous tracks (24bit 48Khz) on a P166 with 256MB RAM on to E-IDE HDD's back in the 90's. As soon as you start adding VST's, you're going to need more CPU power. For 16 tracks using stock FX plugins, and maybe one or two lightweight VSTi's, anything over 2.6Ghz will probably cope without issue. A 3.4Ghz processor will definitely be fine. Any laptop will be noisy due to the fan. Mid to high gaming laptops do pretty well as DAW machines as they're pretty powerful, but the noise may be a real issue unless you're only using it for close-mic'd drums. For an acoustic guitar - forget it. Laptops may seem handy and portable due to their size, but really, a small fan-less PC connected to the back of a 19" or 23" monitor is nothing really compared to the golf-caddy size bags for your mic stands, and your boxes of mic-cables / mics / DI boxes etc. My 23" monitor with the PC attached at the back lies quite comfortably on top of the cables inside its plastic case.
-
You can delete the old cwp file without damaging the recovered one, however... the recovered cwp file will likely have less in it than the old one. Obviously if the old file is genuinely damaged or corrupted, then you've no choice but to use the the recovered one. However, if after sending the dump file to us, we find a genuine bug then subsequently fix it, you'd probably be able to open the old file without issue. So I'd recommend holding on to the original cwp file until you're sure there's no hope in opening it. Even if you abandon the old cwp file and continue working with the recovered one, being able to open the old file will serve as a verification that any fix is good.
-
@Pathfinder - There are a number of things that could cause Sonar to be slow / hang on shutdown: 1. Plugins with large sample libraries taking ages to unload their samples (Kontakt is known for this) 2. Plugins hanging during unload 3. Audio or MIDI Drivers hanging when attempting to close them 4. Anti-virus / Cloud sync software hijacking files Sonar is trying to write to 5. A bug within Sonar itself. if it happens again, please give it 10 minutes or so to check that it's not reason 1. If it's still not closed down, use these instructions to grab a dump file, upload it to a filesharing size (it'll be BIG), and PM the link to @Jonathan Sasor. This should enable us to isolate where it's hanging, which will help us find the cause.
-
The "There is not enough memory available" error in respect to MIDI devices almost always means another application has the MIDI device open. Please check that there are no other applications using the MIDI port. If another application has crashed, it may be it crashed without properly closing the MIDI port - if this is the case, reboot your PC.


