


msmcleod
-
Posts
7,212 -
Joined
-
Last visited
-
Days Won
39
Everything posted by msmcleod
-
 That is what dragging to the time ruler does - it uses Melodyne to extract the tempo from the audio. This is why you need Melodyne installed for this functionality to work.
 -
Some MIDI files cannot produce sound in Sonar's instrument tracks
msmcleod replied to xiao wenn's topic in Cakewalk Sonar
Remove the RPN events, and it'll work with SI Piano. With any external MIDI file, you should check the MIDI events and their values are actually supported by the synth you're using. Also, the velocity of the notes is very quiet. -
Ripple edit nudge moves clips but not volume automation
msmcleod replied to T Boog's topic in Cakewalk Sonar
Are you sure you're using Ripple Edit ALL ? It sounds like you're using Ripple Edit Selection, with "When clips are selected, select track automation too" setting turned off. -
Fixed for the next update.
- 1 reply
-
- 4
-

-

-
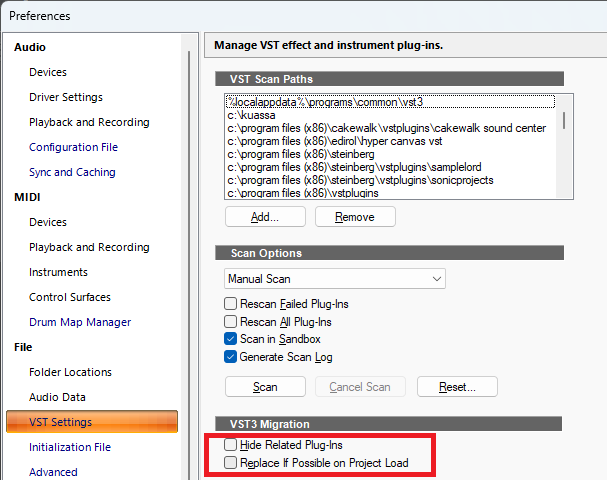
You need to uncheck both of these in preferences, and do another VST scan:
-
I quite like the Cerberus Bass Amp from Kuassa.
-
Can't Import Audio anymore - Unspecified Error
msmcleod replied to evanking345's topic in Cakewalk Sonar
Just imported 20 audio files here at once without issue. It worked both from Windows explorer, and the browser. On new projects, audio is stored in the Global Audio Directory until you save the project. Double check that you've got enough space on that drive, and the directory is excluded from anti-virus programs. If drive space is the issue, you can always move this directory to another drive.
- 1 reply
-
- 1
-
-
The first verse sounds fine without bass - it's a good contrast to the intro, but I'd bring one in after that.
-
September update has screwed everything up
msmcleod replied to Steve Moddelmog's topic in Cakewalk Sonar
The link @Ashwin Rao posted is a link to the update installer. This won't work if you've already installed 2025.09. The full installer for 2025.08 can be found here -
Is it ever a good idea to record the vocals first?
msmcleod replied to Michael Hopcroft's topic in Production Techniques
The main reason for not recording the vocal first is that: 1. Without a rhythmic reference, most people's timing won't be consistent 2. Without a harmonic reference, most people's tuning won't be consistent This is why most singer/songwriters record their vocals with an acoustic guitar or piano as backing, as it provides both a rhythmic and harmonic reference. While you can use melodyne to fix any tuning inconsistencies, vocals tend to lack any meaningful transient information to extract a tempo map. I'd at least recommend singing along to a drum beat or metronome. -
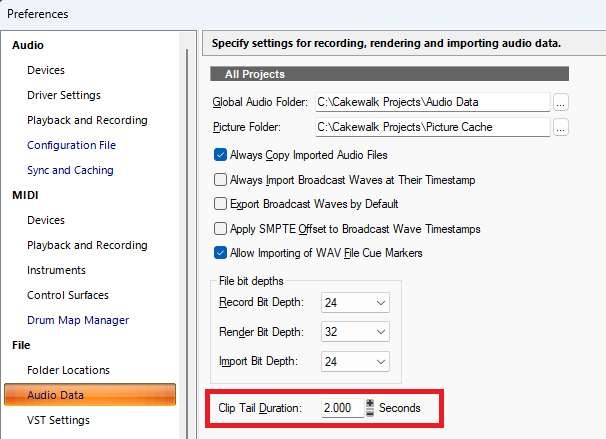
Most likely this setting: The intention of this setting is to prevent reverb/delay tails being cut off abruptly. Adjust as required.
-
1. Select all the tracks you want to rename 2. Open the track inspector 3. Type in the new name in the track inspector
-
The keyboard binding is there, but it was missing from the preferences dialog. It's been added for the next release.
-
From what I can see, Screenset Lock/Unlock is still active.
-
A couple of things to bear in mind: 1. Keyboard shortcuts are basically a mapping between a key and command ID. Whilst command ID's don't change, some are deprecated over time as new features make older ones obsolete. All this means is, that a keyboard shortcut bound to a deprecated command ID won't do anything. 2. Keyboard shortcuts are view dependent, with the current view being the one that has focus. Key Down/Key Up events are windows messages that are sent to a particular window (a Sonar view is basically a window). This is usually the window that has focus, unless whatever is sending the event has been coded to send to a specific window. I'm not sure what options Auto HotKey has for sending to specific windows or changing window focus, but unless it can do this, it will limit what can do. Based on the amount of sleep commands I see in the scripts I've seen, I suspect it's relying on waiting for a particular window to gain focus, or for an operation to complete, so that when it sends the key event, it's being sent to the correct window. Obviously the sleep time is going to be dependent on how fast your particular machine is, and in some cases how big / complicated your project is. Normally making the sleep time longer will help to avoid any potential target window "misses", at the expense of the script taking longer to complete. Finally, having the same key combination doing different things for different views should be avoided. It's certainly possible, but it's dangerous in an Auto HotKey situation as you can't guarantee a particular view will have focus just relying on sleeps - and you certainly don't want a key combination being mapped for global and also mapped for a particular view.
-
There are two separate MIDI messages: - All Notes Off: turns off all notes - Reset Controllers: resets all continuous controllers "Zero All Controllers" sends the latter, which has no effect on Notes, unless there's a sustain CC event that hasn't been reset. For hardware MIDI devices both these messages are sent out. Obviously it's up to those synths to respond appropriately. For software synths, it's slightly different when Zero All Controllers is enabled. Pitch Bend, Modulation and Sustain are always reset. Reset Controllers is only sent out to soft synths if the Cakewalk.ini setting SendResetsToSoftSynths is set to 1. However again, it's up to those synths to respond appropriately.
-
Everything prior to SONAR Platinum has a serial number and authorisation key. SONAR Platinum has to be authorised using the very latest version of Cakewalk Command Center: https://legacy.cakewalk.com/Command-Center For SONAR 8 through to SONAR X3, your serial number and authorisation key should be displayed on your product page once you log on to legacy.cakewalk.com. For earlier versions of SONAR, your serial number will be on your product page, and your authorisation key should be with your original CD/DVD's.
-
The short answer is yes (up to a point), however as always the devil is in the details. First of all, you need to make sure you have access to your old cakewalk account at legacy.cakewalk.com in order to download your old products. Your username / password will be the same as what you use for the Cakewalk Command Center. This may be different to your BandLab username/password that is used in Sonar / Cakewalk Product Center. If you've forgotten this, or have problems accessing your products/service packs, contact support@cakewalk.com Secondly, I doubt you'll need to go as far back as 2000 - you probably only need to as far back as Sonar X1 (released Dec 2010). Older versions (pre Sonar 8 ) may have compatibility issues with Windows 11. These older versions of Sonar rely on older versions for the Microsoft VC++ distributables which, while still available, may not be fully compatible with Windows 11. You can download all of the VC++ redists from Microsoft here: https://learn.microsoft.com/en-us/cpp/windows/latest-supported-vc-redist?view=msvc-170 . You shouldn't have issues installing these (and you may need them for earlier versions of Sonar to run at all), but don't expect them to work 100%. Finally, I'd recommend installing the VC++ redists first, then install the versions of Sonar in order (i.e. earliest first). If you really need the earlier versions of Sonar installed, consider installing Windows XP 32 bit (or even Windows 7 32 bit if you can get it to authorise) on a separate disk. This is what I've done. Unfortunately if you're using GPT formatted disks, you won't see your 32 bit versions on the boot screen on a dual boot, but you can press F8 every second or so on start up to pick the disk with Windows XP on it.
-
FYI: - Melodyne 4 runs on Windows 7 and Windows 10, not Windows 11 - Melodyne 5 runs on Windows 10 and Windows 11, not Windows 7 If you're using trying to use Melodyne 4 on Windows 11, that could be your issue. You'll need to upgrade to Melodyne 5.
-
BBC Symphonic synth Freeze not sounding the same
msmcleod replied to cabrol's topic in Cakewalk Sonar
I've just tried a similar thing with BBC SO, and the frozen result is the same as the live MIDI. Could you send a copy of your project to @Jonathan Sasor? We can take a closer look at what is going on. -
Cakewalk Sonar Default virtual piano keyboard
msmcleod replied to August Spencer's topic in Cakewalk Sonar
Can you let us know your monitor configuration - e.g.: Primary Monitor 1920 x 1080, 100% scaling (left), Secondary 3840 x 2160, 175% scaling (right) -
Opening multiple projects in free version of Sonar
msmcleod replied to IainThompson's topic in Cakewalk Sonar
To have more than one project open at a time, you need to uncheck this in Preferences: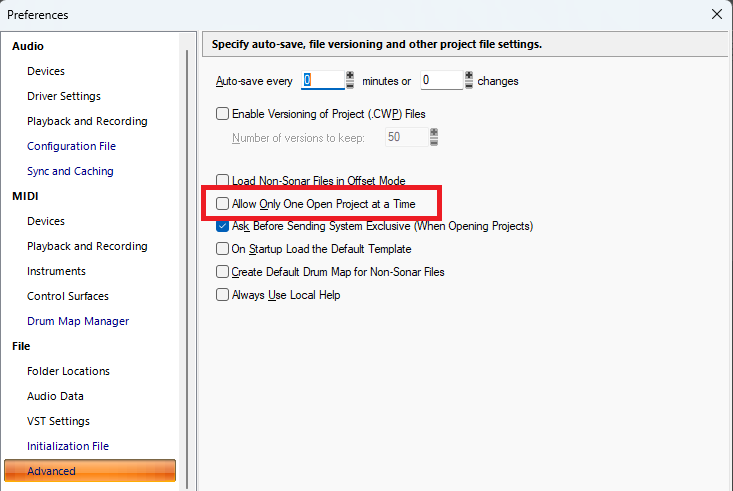
-
BassMidi VSTI is missing instrument names/patches
msmcleod replied to RobertWS's topic in Cakewalk Sonar
It looks like BassMidi doesn't expose its patch list through the VST API. To get around this, you can use the Patch Browser in the inspector: 1. Select your Instrument / MIDI Track 2. If using an Instrument track, click on the MIDI tab in the inspector 3. Click on the "Patch Browser" button 4. Use the "List Patches From" dropdown to select the instrument definition you wish to use 5. Select the patch from the list by double clicking it -
To exclude a plugin: 1. Select "Cakewalk Plugin Manager" from the Utilities menu 2. Go to VST3 Instruments and navigate to the plugin you wish to exclude 3. Click "Exclude Plugin" 4. Click Close