msmcleod
-
Posts
7,212 -
Joined
-
Last visited
-
Days Won
39
Everything posted by msmcleod
-

Weird Meter Behavior - or is it normal?
msmcleod replied to Salvatore Sorice's topic in Cakewalk Sonar
The meter options are likely different. The "missing" bits you're seeing are the peak holds. There are a BUNCH of different metering options, and it looks like you've got the inspector / console view set to different settings (which is a perfectly normal thing to do). For example, here's the options for the playback meters within the Inspector: There are equivalent options in the Console View and Track View, for Record, Track, Bus and Hardware Output metering.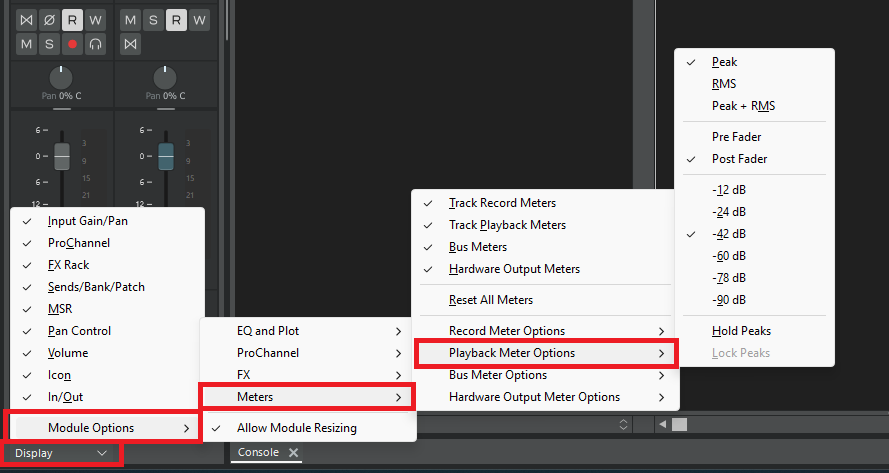
-
The time ruler completely disappeared.
msmcleod replied to Claude Boisvert's topic in Cakewalk by BandLab
What screen resolution / display scaling are you using? Looks like you've gone beyond the minimum required resolution. -
way to find clips that need the "bounce to clip" function?
msmcleod replied to LNovik@aol.com's question in Q&A
All the warning is saying, is that Transient information will be lost. If you've bounced all your clips, then any stretched audio will be fine. Audio Groove clips however, need their transient information to work properly, and this information is lost in the CWB file format. My recommendation is not to use CWB, and instead either: 1. Use the new CWZ format that Sonar uses; or 2. Simply Zip up the project's folder and send that. This is in effect what CWZ is doing. FWIW, both the above will result in a far smaller file than a CWB file. -
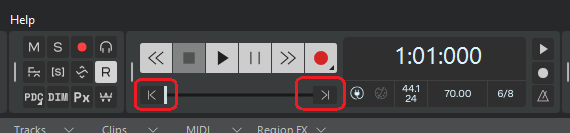
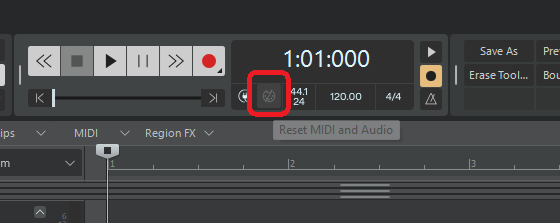
Click on the MIDI icon in the Transport Module:
-
How to change whole project tempo and stretch audio tracks to fit?
msmcleod replied to saxon1066's topic in Cakewalk Sonar
This is the method I use on more complex projects. Note: Do this BEFORE you change tempo. Also, check you've not got any existing stretched clips - if you have, do step 9 followed by step 11, so any existing stretches are committed before proceeding. 1. Ensure your the Time Base for all your audio clips is set to "Musical". CTRL + A and check the Time Base in the Clip Properties Inspector. This ensures that the start times of your clips are aligned to their original measures after changing tempo. If it says "(Multi)" that means some are different, so select Musical so its the same for all. 2. BEFORE you change tempo, pick ONE clip, select it, and extend the end of the clip by dragging it to the nearest measure, taking note of the measure you chose (e.g. 94). 3. Change your tempo 4. On the clip you chose in step 2, hold down CTRL+SHIFT and drag the end to stretch it so that its end is at the measure in step 2. 5. Within the clip selected, expand the AudioSnap section in the clip properties, and take note of the Stretch Amount(%) - e.g. 77.88% 6. Press CTRL + A to select all. 7. CTRL + click the clip you chose in step 2 to de-select it. 8. Use CTRL + SHIFT to stretch the selection by a small amount - e.g. 99% 9. Edit -> Select -> All AudioSnapped / Slipstretched 10. With the selection intact, edit the Stretch Amount in the Clip Inspector and set it to the value in step 5 (e.g. 77.88%). 11. Right click on any clip, then choose "Bounce to Clip(s)" - this ensures the clips are rendered using the Offline Render method (e.g. Elastique Pro). -
Bass tracks do not have as clean a sound as other instrument tracks.
msmcleod replied to Gerry 1943's topic in Cakewalk Sonar
@Gerry 1943 - try adding a reference track (i.e. any commercial song in a similar genre to your song), and play that. If the buzzing/vibration is also apparent on that, then it's something wrong with your monitor system - speakers, any EQ that's on them etc. If it goes away, then look at your mix. Try to match your bass to the reference track. Bass is notoriously difficult to get right, especially if your room/monitors aren't up to the job. I'm sure it's got more difficult now that everything is digital, and I guess it makes sense - back in my 4-track/8-track cassette days, the bass would start to roll off at 40Hz, so it kind of corrected itself. Smaller speakers will struggle to reproduce 40Hz (a low E on a bass guitar is 41.2Hz), and what you're actually hearing is harmonics and your brain is making up the rest. This is how earbuds / small headphones / iPhone speakers give the illusion of bass. Typically a small amount of saturation/distortion on the bass is enough to let those harmonics poke out. However, it might not actually be the bass track that is the issue. Your other tracks may have a bunch of bass information that is interfering with the bass in the mix, and you're having to boost the bass track way too much to hear it. Try using a high pass (low cut) filter on any non-bass tracks. What I tend to do is, for each track: 1. Solo the track 2. Using the ProChannel EQ, engage the High Pass Filter and slowly raise the frequency until I can hear a difference 3. Back off the frequency back slightly so that difference is gone 4. Repeat for all the other tracks. Note that this is just a starting point. You may want to high pass further, (or even low pass in some instances) or use the EQ to carve out frequencies to thin out some tracks / boost certain frequencies to make them more prominent - but only do these further refinements with all the rest of the tracks playing. -
It already does this (unless you exclude the Tempo Track from the arranger). But the OP wanted the same section to be played at different tempos... so you'd need to "roll out" the arrangement first.
-
Having fall back backing tracks should you lose your voice half way through a show, or even a tour seems a sensible thing to do. No need to cancel the gigs, and 99% of the audience wouldn't notice in any case. I suspect they'd prefer this to having the show cancelled. Far better than what they used to do in the 50's, which was to stick some guy who "looked the part" up front miming, while a completely different singer was hiding behind a curtain.
-
When creating an arrangement, all you're doing is marking sections of your existing project. You can then "Preview" the arrangement, which essentially moves the Now Time around, or you can commit the arrangement. Committing an arrangement is essentially big cut & paste operation on steroids, either replacing your existing project with the arranged song, or inserting your arranged song at a different point in the timeline. For what you want to do, I'd advise the following: 1. Commit your arrangement to a point after the end of your song. 2. Set your Project Start Marker to where your arranged song starts 3. Use the Tempo Track to alter the tempo as required for the part of your project now containing the arranged song Once you're happy with your arrangement you can then use Ripple Edit to delete everything before the Project Start Marker.
-
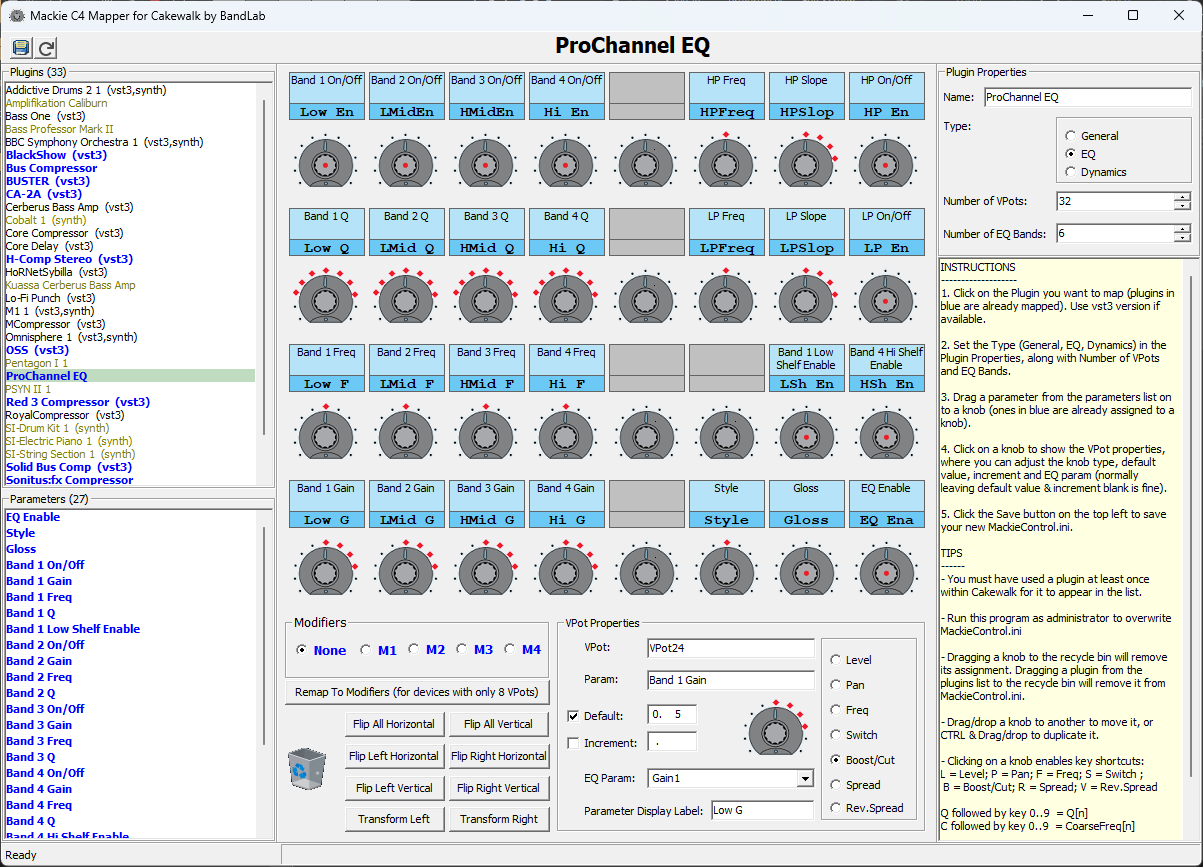
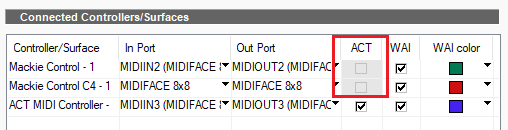
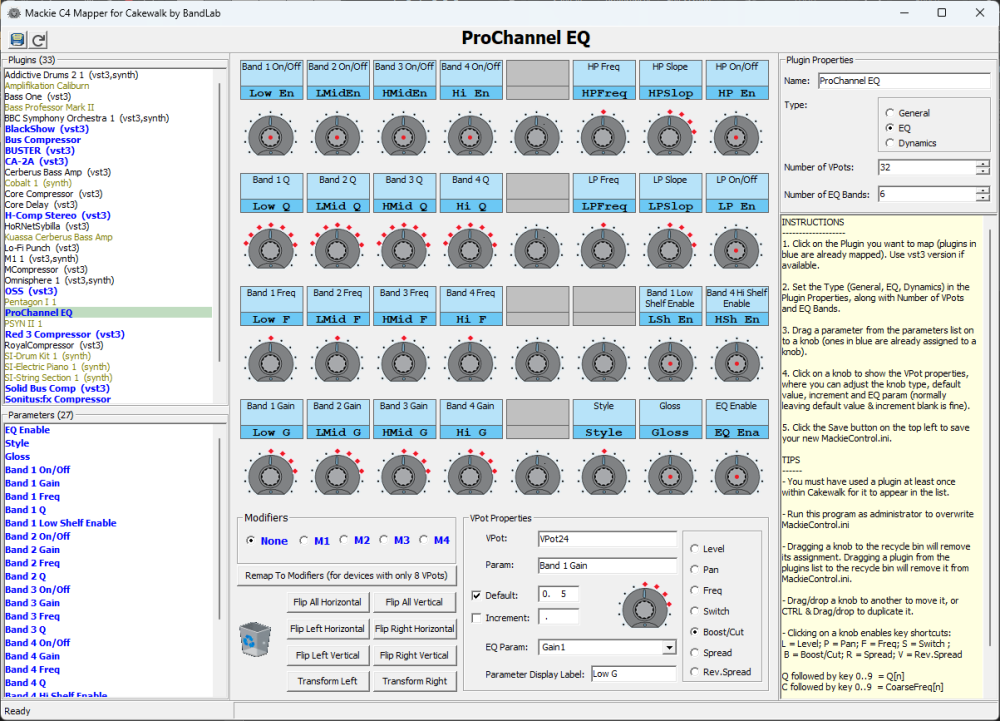
Just FYI - the Mackie Control is not compatible with ACT, and instead uses a different method for controlling plugins - if you look at the Control Surface page in preferences, you'll see that the ACT checkbox is greyed out for Mackie Control: Plugin parameter mapping on the Mackie is defined in MackieControl.ini ( usually in C:\Program Files\Cakewalk\Shared Surfaces ). If no mapping is defined for a plugin, the parameters are just presented in parameter order. You can edit MackieControl.ini to define your mapping, but it's time consuming, so I wrote the C4 Mapper utility to edit MackieControl.ini for you: Although it's called C4 Mapper, it works with the main Mackie Control too - you just need to set "Number of VPots" to 8, and restrict your mapping to the top row of pots. Note: C4 Mapper uses the %APPDATA%\Cakewalk\ACT Data\genericpluginparams.xml file to determine what plugins/parameters are available. This file is only populated AFTER you've added a control surface in preferences, and is updated when you exit Sonar/CbB. So if you're not seeing a plugin in the list: Open Sonar, add that plugin to an audio track, then quit Sonar. If you want C4 Mapper to be added to Sonar/CbB's Utilities menu, just run this .reg file: c4mapper.reg Windows Registry Editor Version 5.00 [HKEY_LOCAL_MACHINE\SOFTWARE\Cakewalk Music Software\Tools Menu\C4 Mapper] "Type"="Generic" "ExePath"="C:\\Program Files\\Cakewalk\\Shared Surfaces\\C4Mapper.exe" "MenuText"="C4 Mapper"
-
You're correct. My bad. I haven't recorded drums in years, so I'd forgotten about the change they made, and I wouldn't be surprised if my kvetching had something to do with their taking it up. My memory ain't what it used to be.... Actually, it was something that had been bugging me for ages, but I think your input gave me the motivation to do something about it. I'm not hugely into comping, but I do stick things on loop record when recording guitar solos and drum parts (I get by on them both, but I'm no guitarist or drummer). Typically I'd just keep loop recording 10 - 20 takes until I get it right. It's impossible to stop recording dead-on the start or end of the loop, so you end up stopping half a measure or so into the loop after the final take. With the previous behaviour this always ended up causing an unwanted split, which was a pain to get rid of. It's even more of a pain when multi-tracking drums with grouped clips. Having identical splits across all takes is essential for comping to work correctly, so the sensible thing to my mind was to simply extend the last take to avoid the unwanted split.
-
Recommendations for multi-output USB audio interfaces
msmcleod replied to X1_BGD's topic in Instruments & Effects
I'm always on a budget (it's in the genes)... but for FWIW I've got: Scarlett 18i20 - on its own you get 8 analog inputs and 8 analog outputs; with something like a Behringer ADA8200, you'll get 16 analog inputs and 16 analog outputs. RME Digiface USB - this has 4 ADAT inputs and 4 ADAT outputs, giving 32 inputs and 32 outputs (plus an additional 2 outputs for your main stereo mix). As ADAT is the ONLY input format, you'll need at least one ADAT I/O interface (e.g. Behringer ADA8200, Focusrite Octopre etc). The advantage of the DigiFace is that you can upgrade your converters/mic-pre's as needed. At present, I'm using my 18i20 as one bank of 8 inputs, and 3 x Fostex VC8's. Two of them (16 inputs) come from the direct outs from my A&H MixWizard WZ3, and the other is switchable between a bunch of pre's... JoeMeek MQ3/TFPro P3, GA Pre 73, and an Alice 828. I've got another Digiface connected to the 32 direct outs from an A&H GL2400-32 via 4 x Fostex VC-8's. I'd like better converters than the VC-8's, but to be honest, they sound great as they are. -
[not FIXED] "MOTU Has Been Disconnected or Turned Off"??
msmcleod replied to sjoens's topic in Cakewalk by BandLab
@sjoens - you may need to disable USB sleep in the Windows Device Manager. I tend to check in two places: - The Windows Power Plan - The Device Manager for that particular device. Also, some motherboards allow you to disable it in the BIOS, which can save you having to change it elsewhere. -
Confused about pitch bend values vs. RPN (Pitch Bend Sens)
msmcleod replied to Dave G's topic in Cakewalk by BandLab
Although RPN #0 #0 is the standard for Pitch Bend sensitivity, there's no standard as to what the ranges actually mean. Some synths have a maximum of two semi-tones for pitch bend range, so the RPN values will be totally dependent on what the synth supports. When using this RPN, the 14-bit range -8912 to 8911, or 0 to 16383 will be for the maximum range the synth supports. So if the synth support 2 semi-tones, either 8911 or 16833 will be 2 semi-tones; if the synth supports and octave, then 8911 or 16383 will mean an octave. You'll need to refer to the synth's documentation to be sure. -
You can always try the Yamaha S-YXG50 - it's 32 bit though, and JBridge is recommended when using it: Yamaha S-YXG50 Portable VSTi v1.0.0
-
The 64-bit Double Precision Engine has nothing to do with the 64-bit architecture. It's to do with the precision of audio data during Sonar's internal mixing. With this unchecked, all audio read from your tracks (or live input) is converted to 32 bit floating point inside Sonar's audio engine. Once all plugin processing/mixing has been done, it's then is converted back to 16 bit or 24 bit (depending on your audio interface settings) when sending to the hardware outputs. With it checked, it uses 64 bit floating point instead. Some plugins however do not work properly with 64 bit audio. Fixed point audio (e.g. 16 bit or 24 bit) has an effective ceiling of 0dB. Floating point however, can go to 100's of dB without ever clipping. 32 bit float has an effective dynamic range equal to 24bit audio, but unlike 24 bit, it maintains this at any volume. 64 bit float has a much, much higher dynamic range. In practise, 32 bit float should be more than enough.
-
How do I change the 'Track Control Manager' default value.
msmcleod replied to AdrianNewington's topic in Cakewalk Sonar
Or change custom so it looks like ALL. You can add as many new ones as you like, so you'd not be losing anything. -
Will there still be a latency after the plugin is closed?
msmcleod replied to xiao wenn's topic in Cakewalk Sonar
I think it's just badly translated - the plugin is clearly disabled in the screenshot. -
@MozartMan - Sonar Free Tier will receive updates at the same frequency as the Premium version - it's exactly the same application. New features may not be available in the Free version, but all of the bug fixes will. That's not to say that the free version won't receive new features - just not all of them.
-
Is this on every project load, or only on the first time you start Sonar?
-
There are usually options in these VSTi's to control how samples are loaded. Most have the ability to limit the memory they use for samples, and also how they load or stream samples - e.g. do they load the libraries up front, or load (or over just stream) the samples they need on demand. Certainly in Kontakt, if you set it to load on demand, and purge all samples before saving your project, the project will open extremely quickly. If you set it to load all libraries, it'll take much longer to load the project. The downside of load-on-demand, is you may have to play your project all the way through so it picks up the samples it needs, and you can expect glitches during this first playback if the libraries are large. Ensuring your sample library is on an SSD makes a huge difference. Loading a large patch in Omnisphere went from 45 seconds to 2-3 seconds when I moved from HD to SSD (although most patches load in less than a second). You can tweak your memory limit/preview size/streaming settings to optimise this. With the exception of streaming, there's no getting around the fact that those samples need to be loaded however, and they're going to take time to load, so really it's up to you when you want that to be. If you're going to use sample based instruments (and especially if you're streaming), you need plenty of memory and a fast SSD to store the samples to get optimum performance. For streaming, you'll need a faster PC too. Some even go the extra mile and use Vienna Sound Library with their samples on a separate PC dedicated to hosting the samples.
-
@tdehan - please save your project as a .cwz file, and send a link to it to @Jonathan Sasor.
-
Will there still be a latency after the plugin is closed?
msmcleod replied to xiao wenn's topic in Cakewalk Sonar
Delay compensation is still in place when you bypass a plugin, otherwise you'd get glitches every time you toggle bypass/enable. -
Check your PM.