


msmcleod
-
Posts
7,191 -
Joined
-
Last visited
-
Days Won
39
Everything posted by msmcleod
-

SOLVED: How to Split Keyboard to Play 2 or More Instruments?
msmcleod replied to Stephen Power's question in Q&A
Not easily... and you'll need a pretty good understanding of MIDI to do it. You could use Drum Maps to route notes lower than a particular note to one instrument, and the rest to another. Alternatively, if you want it to go to the same instrument on different channels you could use articulation map transforms. -
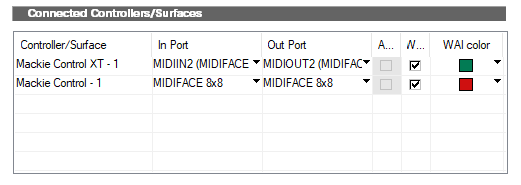
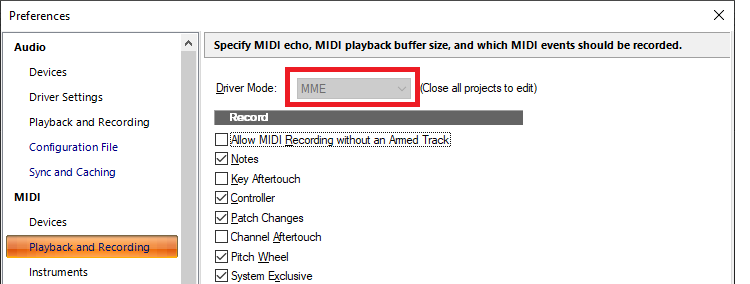
So it sounds like at least data is getting from Cakewalk to the R24. Double check the MIDI input device settings in Preferences->Control Surfaces. Also make sure all the MIDI event types are checked in the Record section of Preferences->MIDI ->Playback and Recording. Finally, in the Mackie Control Surface dialog, try setting it to Cubase emulation. To be honest, it shouldn't really matter as the transport/fader controls are standard across all DAWs, but the R24 manual only shows examples for Cubase LE (which I assume was shipped with it), so it was obviously designed to work with Cubase.
-
The easiest way is to add the extender first in the control surfaces preferences, e.g.:
-
Honestly, I think the best solution is a CAL script. I used to record MIDI drums on my external Alesis DM5, then use a CAL script to split the drums to separate tracks, solo and record the audio for each one, then mix as if they were live drums.
-
Is there a way to import a tempo map into Bandlab?
msmcleod replied to GTsongwriter's topic in General Music Discussion
Depending on how the guitar is played, for a simple guitar / vocal recording, it's unlikely that tempo detection will give accurate results. So... BandLab only supports a single tempo. If you absolutely have to fit stuff to a grid, then you'll need to provide the tempos manually. 1. "Set Beat At Now" is probably the easiest way to do this. Essentially, you're going through the song and telling Cakewalk "This is measure 1, beat 1", "This measure 2, beat 1" etc. As you go through the process, a tempo map will be built up. ..as alternative to this, you can record a single MIDI track where you play a single note every 1/4 note, select that clip, then use "Fit to Improvisation". 2. Next, you want to set the audio files to stretch to tempo. 3. Finally, open the tempo inspector, delete all the tempos and set a single project tempo. At this point the audio files should be playing in time with the single tempo, and on grid. If the audio quality suffers from the stretching, it may be worth looking at using the Loop Construction View. This allows you to specify the individual measures/beats within the audio clip itself, and can help to inform the stretching algorithm as to what bits to stretch/leave alone. In other words, if it can achieve the desired tempo by reducing/increasing the gaps between audio it will do, instead of stretching the actual audio. It's also worth reading up about online vs offline stretch render algorithms. TDLR - online algorithms don't sound as good quality wise as they're designed to give you quick results while you focus on timing. -
If you like the layout of the Basic workspace, make a copy of it then edit your custom workspace it to show the extra functions.
-
Switch your workspace either to Advanced or None. The Basic workspace hides a number of options, including Sysex.
-
Not that I know of... but you could try using this DXi to VST wrapper then use it with SaviHost: https://craiganderton.org/how-to-use-dx-plug-ins-with-vst-only-daws/
-
First of all, are you sure Sonar has fully shut down before starting it up again? Restart your PC if you're unsure. Also what MIDI driver mode are you using?
-
Is there a way to import a tempo map into Bandlab?
msmcleod replied to GTsongwriter's topic in General Music Discussion
As far as I know, the BandLab app only supports a single project tempo. -
send an email to support@cakewalk.com
-
How to turn off / on ALL FX plugins applied to all tracks at once.
msmcleod replied to Edward Allen's question in Q&A
Either use the global bypass FX button, or alternatively the track FX bin bypass switch supports quick grouping - i.e. select your tracks, then while holding CTRL click one of the track's FX Bin's bypass button. -
SOLVED...Cake and MODO Drums 1.5 from IK...Still not working
msmcleod replied to Steve Patrick's topic in Cakewalk by BandLab
Have you updated VSTScan ? -
I suspect Concrete Limiter is tied to a particular release of SONAR Platinum/Professional. So the "re-install right version" is probably referring to SONAR Platinum/Professional. I'd recommend re-installing SONAR Platinum/Professional, installing Concrete Limiter, then re-installing CbB.
-
It looks like you had 32 bit plugins running under bit-bridge, Cakewalk didn't shut down properly leaving bit-bridge running, then you restarted Cakewalk and tried to load a project that uses 32 bit plugins running under bit-bridge. BitBridge was only really meant as a stop-gap while people were migrating from 32 bit to 64 bit operating systems. IIRC it was targeted mainly at Windows XP, but there have been several Windows versions since then. I'd recommend either ditching the 32 bit plugins for 64 bit replacements, or investing in JBridge. JBridge plays far more nicely with modern operating systems, and gives you a bunch of options to mitigate problems with older plugins.
-
Imported audio also inserting silence in all the other tracks
msmcleod replied to Carll's topic in Cakewalk by BandLab
I'm guessing "Always Import Broadcast Waves at Their Timestamp" was checked? -
Not that it's a bad idea to export all your projects to a common format, but we've no immediate plans to discontinue Cakewalk. In any case, the new Sonar is 100% compatible with all Cakewalk by BandLab projects.
-
Maybe you changed this in the past, and it somehow got reset?
-
New computer - Melodyne Assistant badly crashing
msmcleod replied to gmp's topic in Cakewalk by BandLab
^^^This. Melodyne 4 doesn't work with Windows 11. FYI: Windows 7: works with Melodyne 4 only. Windows 10: works with Melodyne 4 or Melodyne 5. Windows 11: works with Melodyne 5 only. -
Send an email to support@cakewalk.com
-
Have you tried re-installing the Visual C++ redists? https://aka.ms/vs/17/release/vc_redist.x64.exe (link taken from this page: https://learn.microsoft.com/en-us/cpp/windows/latest-supported-vc-redist?view=msvc-170 )
-
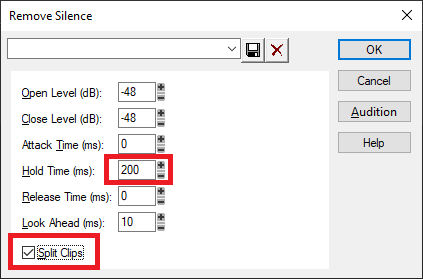
1. Record your notes in a single audio clip. 2. Process->Apply Effect->Remove Silence Be mindful of the settings here.. in particular, your hold time HAS to be less than the gap in time between the notes. If in doubt, make it zero and increase as necessary. 3. Select all the clips in that track 4. File -> Export -> Audio and choose a source category of "Clips". Set something like {trackname}{clipindex} as your filename
-
@gimmexlz1 - thanks for pointing this one out. It's been fixed and will be available in the next update.
- 3 replies
-
- 10
-

-

-
What is in your audio file is largely irrelevant during playback, as everything is clamped to 0db at the point it gets sent to your audio interface, as it needs to be converted to either 24 bit or 16 bit (depending on what your audio interface is set to).
-
There's no real advantage in exporting at 32 bit vs 24 bit. 32 bit is a floating point format, whereas 24 bit is an integer format... so although 32 bit may technically support a greater dynamic range, for all practical purposes in a final export, they're equivalent in quality. 32 bit has an advantage when recording/mixing, because it's basically impossible to clip even when going to 1000's dB, and you can go incredibly quiet without losing information. This is why all DAW's use either 32 bit float / 64 bit float internally. This is essential when mixing multiple tracks, but of little use with a single exported file - unless of course the file is incredibly loud or incredibly quiet. In 99.9% of cases, your final export will be in the normal dynamic range of human hearing. So 24 bit is fine. In fact I'd argue that 16 bit is more than adequate as a final export format, as it more than surpasses the dynamic range of human hearing.
