


Andres Medina
-
Posts
645 -
Joined
-
Last visited
Everything posted by Andres Medina
-
As far as I remember, the fx bin automatically adjust it's height to the number of plugins used.
-
Sorry, it was meant to Billy86.
-
The pause key is on your computer keyboard, usually on the right upper corner, next to the NUM Pad.
-
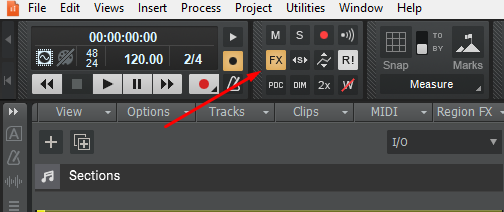
I definitely would check that the EQ plugin is not causing the delay. You could temporarily bypass it, or, as other user suggested, bypass all Fx, to make sure some of them are not interfering. Check the Mix Module. See pic.
-
There is even a Full Screen option, that fits the entire screen. Also, experiment with the Stretch Options that suit your needs.
-
Another possible explanation: if you have inserted at some point in the audio chain a "look ahead" plugin like EQ or Limiter (like Adaptive Limiter or LP EQ), you can experience this lack of sync. It happened to me once, and just turning off the plugin make it work fine again.
-

Change clip speed as with a turntable
Andres Medina replied to Bronxio's topic in Cakewalk by BandLab
mmm... couldn't produce the spin up - Once stopped after a spin out, I get no audio from the plugin... -
Change clip speed as with a turntable
Andres Medina replied to Bronxio's topic in Cakewalk by BandLab
Thanks! Right, all the artifacts that simulates scratches and everything are always playing. And, if you engaged the Spindown button, there will not be any audio from the audio track unless you turn the button off again. -
Change clip speed as with a turntable
Andres Medina replied to Bronxio's topic in Cakewalk by BandLab
I did try the free plugin, and works GREAT. Among other features, the spindown is very good! -
I know, it can be confusing! Think of buses not only as mix buses, just a multipurpose super track that you can configure to receive from and send to whatever you like. That's why is important to understand the concept first. Check the documentation here: the concept and the detalis are explained very well: https://www.cakewalk.com/Documentation?product=Cakewalk&language=3&help=Mixing.10.html --- In my setup: (Hardware/audio card) 1+2 (means audio out 1+Audio out 2) = Main Out (this is the signal that gets "printed" when you export your mix) (Hardware/audio card) 3+4 = audio signal that goes to my speakers (from my audio card outs 3+4, via audio cable to my speakers). I want to be able to control my speakers volume without affecting the main signal. I also use a dedicated plugin that "fine tune" my speakers according to my control room, and this is something that I don't need in my exported mix, it's just for monitoring. (Hardware/audio card) 5+6 = I can use a separate out to connect a headphone amplifier, and for example configure this bus to output a mono signal, that many musicians prefers to use while recording their parts. So, this audio feed need some particular setup that I don't want in my exported audio. --- [Also, if I put a reference track in my DAW, can I create a Reference bus to play it through? ]: of course. This way you can control the reference track levels directly from the console, or use several reference tracks all routed to your same "Reference" bus. No need to adjust the volume of each one separately.
-
In reality, once you understand the concept, you can use busses in a very flexible way, depending on your needs and your hardware. The first one can be project specific. Think of them as "super tracks" that sums several audio tracks into one. Keep in mind that a bus can be routed to another bus, which comprises several busses into a "super bus", and so on. I, for example, use a lot of busses to "group" instruments or families of instruments (Brass-Woodwinds-Percussion, and so on), that goes to my Master Bus, that goes to my hardware audio outs 1+2. However, I need a secondary mix that goes to my speakers (hardware audio outs 3+4), because I need to process the audio that goes to the speakers in a different way that the "main" audio. Hence the use of a secondary "Main" bus. This one is fed by the Master Bus 1. You can configure yet another Master Bus that goes to a headphone amp, and so on. As you can see, busses can be very helpful, if properly used. Hope this helps -
-
If you are not playing your midi keyboard and the leds shows activity, I means your keyboard is transmitting some kind of midi messages (typically a faulty hardware control)
-
Yes, I was a huge fan of Bundle files, until I didn't! jeje Nowadays is a far better choice, less problematic, to use the "Copy All Audio with Project" option in the Save window. You can either work in a regular project file without the audio, and when finishing your session or your project create a new file with the audio embedded. I prefer to use the general wav location for the sessions, and the "Copy All Audio with Project" option for archiving and backup, but it's just my personal preferred workflow. Regarding [When I go to open a bundle file it always ask if I want to save audio to a folder. I DON'T WANT THIS TO HAPPEN}, you will always get this prompt because CW needs to know where you are going to locate your audio. As far as I remember, you were able to overwrite a bundle file only after saving it for the first time, as long as the project was still open, and not even sure it was so. Reopening a bundle always gave me the prompt you don't want.
-
If you accidentally erased this folders, I still have the original project templates. Or I guess if you reinstall CW it will re-write the Cakewalk content.
-
Good to know! Yes, latency is much better now, but still... there IS latency.
-
So, playing live, you just matched the tempo of the synth and the DAW, and it worked fine, but using the CW arpeggiator does not. mmmm, I'm not sure about what is going on, but I would check your audio driver buffer settings, as it really affects the minimum but at times noticeable delay between hitting your keyboard and the actual sound produced. If your settings are too high (over 128 samples), this latency could be the reason why you hear a difference between you hardware synth (which has 0 latency), and the DAW. Not 100% sure about this, but is worth a try.
-
Hi, I do use your same Midi controller (UMX610). I did a few tests and found out this: 1. If I play the keyboard with the arpeggiator engaged, it follows the tempo without issues, AS LONG as my playing is accurate. In fact, I got better results by playing a little ahead of the metronome (like 1/16 ahead). Arpeggiators needs perfect input to work right. For playing live I guess you really have to master your playing technique to get consistent results. 2. I got even better results if I engaged the input quantize, for the above reason. I tried several tempos and it followed the tempo without issues, even using tempo changes created in the tempo track. Hope it helps to narrow down the culprit...!
-
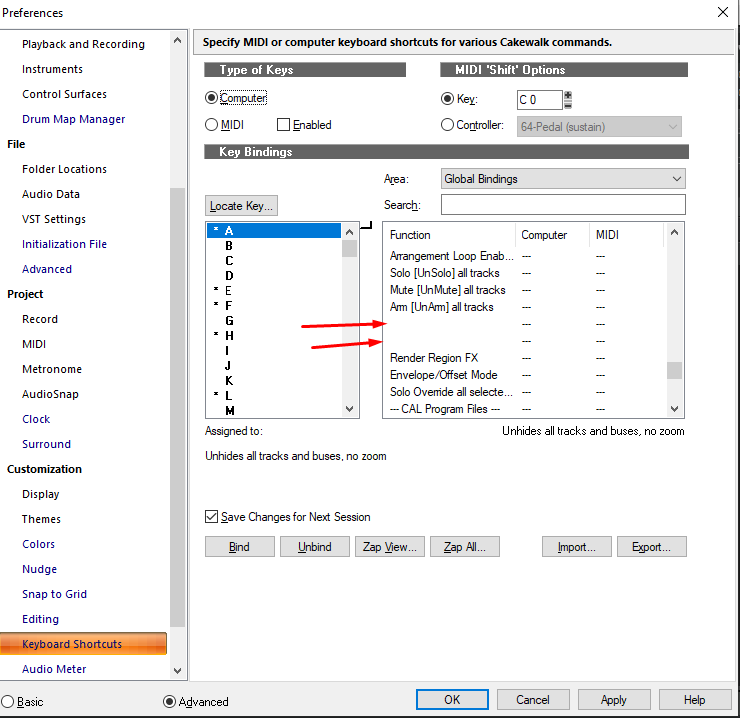
Thanks! I had configured this shortcut since old Sonar days, and for some reason I never changed it, so it got stuck as a it was, until I tried to change it now. I see in the selection options that there are some blank spaces... could be it, I don't know.
-
Please make "Archive track" available for keyboard shortcuts
Andres Medina replied to GreenLight's topic in Feedback Loop
Same here. It's a really important function. -
Hi, I'm trying to create a shortcut to ARCHIVE track(s). I couldn't find the corresponding item in the Key Bindings area. I checked all the categories. It should be under Global Bindings I guess. Last saved shortcut had the text "Set All Selected Tracks to Archived Status", which I didn't find. Any suggestions? Thanks!
-
Automation Envlelopes: Colors and View/Hide
Andres Medina replied to johnegenes@gmail.com's question in Q&A
Mmmm... yes, you are right. I can't find a way to do that. Sorry! Workaround: use the X shortcut to use the Assist Line to help align precise changes on a lane with the audio clip while automation lanes are open? -
Automation Envlelopes: Colors and View/Hide
Andres Medina replied to johnegenes@gmail.com's question in Q&A
Regarding hiding envelopes: just click the minus when the Automation lanes are displayed, AND the "Display Ghosted Data" is OFF: the envelope disappear from sight completely, with the automation lanes open or closed. To show again an envelope: click the plus sign (apparently, CW remembers the envelopes used...!) --- Colors: have no idea how to change the envelope colors! - someone will have the answer thou.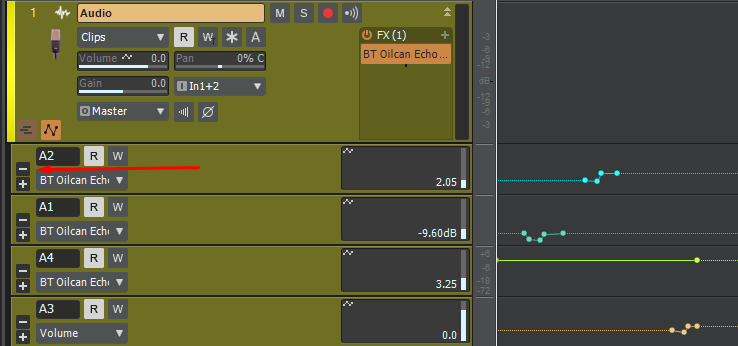
-
[SOLVED] Quick retuning of an old 432 hz recording?
Andres Medina replied to Andres Medina's question in Q&A
Spot On! it worked just fine. Yes, it took me a while to read the OPEN THE LOOP CONSTRUCTION VIEW b ... jeje Yes, I struggled a little bit with Loop construction, but made it work. Yes, there is a limit in the audio length: in my case, it worked splitting the long clip in two, each one around 7 minutes long (it's a lot! - this was a whole movement of a Beethoven Symphony). I did all the steps and was able to fine tune by pitch cents (-23 cents), and voilá... the audio matched my VSTs. Thanks a lot! -
[SOLVED] Quick retuning of an old 432 hz recording?
Andres Medina replied to Andres Medina's question in Q&A
Great...! I'll give it a try. -
Hi, I need to adjust the tuning of an old recording in which the orchestra was tuned to 432 hz. I need to adjust the whole tuning to 440 hz (today's standard), but didn't find a way using Melodyne Studio, nor using the transpose audio commend, which goes in half steps. Any suggestions? Thanks!

