


Craig Anderton
-
Posts
870 -
Joined
-
Last visited
-
Days Won
7
Everything posted by Craig Anderton
-
 I still use Cakewalk. And I still use Studio One, Ableton Live, and Pro Tools I also do occasional forays into Cubase and DP. Right tool for the right job, and all that. I used to participate in this forum more when I'd look at the topics, and see a question that didn't have a response. If I could answer it, I would. These days, questions get answered fast and comprehensively by other people so I don't really need to add anything. It's good to see that Cakewalk continues to thrive. Props to Meng, Noel, and the rest of the team.
 -
Specific DAWs (including Cakewalk) have specialized features that other DAWs don't have. Unless you need a feature that can be found only in one DAW, Cakewalk will do pretty much anything you want it to do, and do it well. Of course, the biggest advantage is the money you would normally spend on a DAW, you can spend on plug-ins to supplement what comes with the program.
-
What about the Proteus libraries from Digital Sound Factory? They're available in Kontakt format only, but I assume they would work with the free Kontakt player.
-
Cakewalk Bundles: Can they Be Used With Other Programs?
Craig Anderton replied to Annabelle's topic in Cakewalk by BandLab
A few point...when you import into your target DAW, check that it has the same pan law settings as what you used in Sonar or CbB. -
Also remember that everything has a failure mode. You can usually count on DVDs or Blu-Ray (which I prefer) for 5 years if stored properly, but they don't last forever. Flash drives and SSDs have redundancy built in because they're constantly deteriorating, and over time, they will fail. Hard drives can last for 10 or more years - if they don't fail in the first six months. Linear tape is still the preferred backup medium for most large companies, supplemented by the cloud. The to key to storage is the same as investing: a diversified portfolio If you have data on a hard drive, an SSD, the cloud, and a Blu-Ray in a bank's safe deposit box, hopefully you're covered.
-
Very cool (as usual), Azslow3. FWIW, for S-series keyboards, I wrote How to Use Cakewalk with Komplete Kontrol. However it doesn't cover the M or A-series keyboards.
-
And companies certainly didn't want you to! It's not like the Sony CD players had big stickers on them saying "New! Now not with 16-bit resolution!" But yes, the dynamic range of today's music is so limited that even 10 bits seems generous. That gives approximately the same noise floor as tape recorders without noise reduction, or AM radio, so at those levels, you probably won't notice distortion all that much.
-
A lot of early CD players used 12-bit DACs, which gave about 10 bits of "real" resolution. But I do think that might be why people didn't think CDs sounded as good as viny when CDs first came out. Even though people may not have consciously noticed the degradation, it may have been something they sensed nonetheless..."I dunno, it just doesn't sound right." As to the OP, although it's risky to say something will "never" happen, once your noise floor is the sound of electrons bumping into each other, you're not going to get better resolution than that. Unless, of course, Noel comes up with electrons 2.0
-
+1. However, there's one reason I would recommend aiming for a relatively consistent level - e.g., not have some tracks peaking at -3, and others at -18, etc. Compressors, amp sims, and other level-sensitive effects are affected by input level, because that determines how often the signal level goes over the threshold or starts saturating. For example, my amp sim presets assume an input level that peaks around -3 dB. That way if I normalize the guitar to -3 dB before mixing, then I know the amp sim preset will sound as intended. With compressors, I include the intended amount of gain reduction in the preset name, like "Warm vocal -6." Then I know to adjust the level coming in to provide maximum gain reduction of 6 dB. That doesn't mean I won't tweak the compression threshold, but it gives a consistent starting point.
-
There's also a free version of AmpliTube that has lots of gear in it.
-
No, they are not. I'll send you a PM as to why However, I will be doing a desktop mastering eBook in the future. Thanks for your interest!
-
Ha! Brings back memories FWIW I'm planning on releasing a MIDI 2.0 book in 2023 if MIDI 2.0 has gotten enough traction by then. It will be for Sweetwater Publishing, like all my other books (except for the Cakewalk one).
-
Thanks for the props!!
-
Old sonar 8.5. pro compatibility and support.
Craig Anderton replied to dasGiddydrummer's topic in Cakewalk by BandLab
I always took the cautious approach, but in practice, found it wasn't really necessary. Cakewalk is remarkably tolerant when it comes to backward compatibility. -
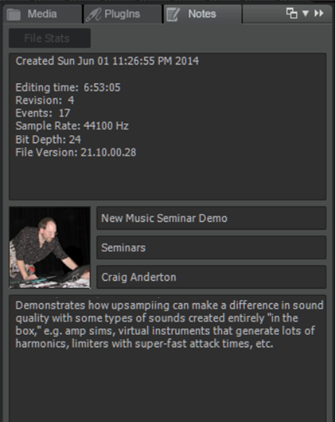
Here's some excerpts from the The Huge Book of Cakewalk by BandLab Tips eBook that you might find helpful, because it lists the actual character counts and text editing protocols. It's part of a longer tip called "The Virtual Back of the Tape Box," which goes into finding file attributes and such. The Various “Notepads" Cakewalk by BandLab makes it easy to take notes on individual tracks, takes, and track folders. However, as with Project Info, there are no text formatting options. To take notes on Tracks, click the Track tab in the Inspector. You can enter around 1,000 characters in the description field. To take notes on Takes, double-click in the rectangle toward the right of the Take header (e.g., to the right of the Take’s record button). This can also store about 1,000 characters. You can enter line breaks in the Take Lane notes section by holding Ctrl and pressing Enter, which is immensely useful when making time-based notes on takes like… 00:00-00:50 Good 00:51-00:55 Mistake 00:56-1:30 Final (C1) To take notes on Track Folders, double-click in the rectangle below the listing of the number and types of tracks contained in the folder. Track names can hold 128 characters. You can’t see them all at once, but if you double-click as if you were doing text entry, you can use the right and left arrow keys to scroll through what you entered. Or, hover the cursor over the track name, you’ll see a label that gives the full title. The Browser also contains a section for Notes. This text editor can hold over 29,000 characters—almost 5,000 words. To provide perspective, that’s like a two-page magazine article...which should be enough to hold you! You can do the usual cut/copy/paste commands, but there’s no formatting (font, size, bold, etc.). Also, there’s no scroll bar, so you need to use the up and down arrow keys to move through the text. One considerate feature is that when entering text, it becomes larger and bolder so it’s easier to read. You can also show/hide file stats with the File Stats button, as well as upload an image (like album art). Note that if you used Project Info in older versions of SONAR, that info will be imported into the Notes tab in Cakewalk by BandLab.

-
Also you can make really long track names that go into quite a bit of detail.
-
Reaper now has built-in oversampling
Craig Anderton replied to LittleStudios's topic in Cakewalk by BandLab
I've only seen a few of his videos, but I like them a lot. I think the biggest deal with Reaper in this case is being to do oversampling once for an entire effects chain. That said...my primary instrument is guitar, and I want the lowest possible latency for real-time playing. My experience with real-time oversampling is that it causes a major hit to your CPU, and you have to increase latency to compensate. So, for the moment, I think I'll be sticking to "render-listen-keep or toss." -
Reaper now has built-in oversampling
Craig Anderton replied to LittleStudios's topic in Cakewalk by BandLab
It's definitely an edge case, no argument there! The main point I keep trying to make is listen, and if something sounds better, use what sounds better (which may be the version with aliasing). It's easy enough to raise the project sample rate, render, go back to the lower sample rate, and compare. Most of the time there will be no audible difference. But then out of seemingly nowhere, you hear a difference. The problem I encounter is that there are a lot of variables, like what waveform the synth is using, and whether the real-time oversampling algorithm is as detailed as the offline one. I would like to think that I could simply identify particular synths as needing or not needing oversampling, but that hasn't been the case. Same with amp sims. Sometimes it makes a difference on high-gain amps, most of the time it does not. But I still check anyway, just in case. -
Having been burned by this problem a few times, part of my backing up process involves exporting the processed audio from a track as well as the raw audio.
-
Reaper now has built-in oversampling
Craig Anderton replied to LittleStudios's topic in Cakewalk by BandLab
But the problem is, it's impossible to know whether or not oversampling will make a difference, until you compare original and oversampled versions. This instructional video (hey, it embedded...cool!) is only one minute, but it will show you exactly why I say that it's difficult to predict whether oversampling will have no effect at all, or a huge effect. In this case, it's not a variation on a sound, it's an entirely different sound - it's like a totally different synth preset. -
Reaper now has built-in oversampling
Craig Anderton replied to LittleStudios's topic in Cakewalk by BandLab
Okay - I'm able to reproduce it! Originally, I activated and de-activated the 2X button while the file was playing, because I thought that would be a harder test. However, that did not cause any problems. What DID cause the problem is if I started playback from the stopped position while 2X was enabled. Try this workaround: 1. Start playback with 2X disabled. 2. Enable 2X during playback. 3. Without stopping, hit Ctrl+Home (go to start). Playback starts from the beginning, with 2X oversampling. Or if you want to start from the middle of a song, start with 2X off, enable it, then place the cursor where you want playback to begin, without stopping in between. However, I don't know if that means it's really oversampling or just that the 2X button is lit. But it does seem to be doing its thing. So yes, this appears to be a bug, and it looks like it's sidechain-specific. I tried using a patch point instead of a send to drive the sidechain to see if that would make a difference, and I also tried sending to a bus and then using the bus output to feed the sidechain, but neither of them made any difference. I know workarounds aren't the most elegant option ("why don't they just fix the darn thing?"), and you shouldn't have to click a button in the middle of playback to initiate a function, but the above does seem to work reliably. Besides, when reporting a bug, sometimes reporting a workaround gives a hint as to what a potential fix might be. Thanks for your persistence, so I could figure out what was going on. -
Reaper now has built-in oversampling
Craig Anderton replied to LittleStudios's topic in Cakewalk by BandLab
Great question. My attitude is to use oversampling if I can hear a difference. I prefer not to run high-sample-rate sessions (unless requested by clients), because of the CPU overhead. I certainly don't want to run sessions at 192 kHz! But I have noticed with some instruments that changing the project sample rate temporarily to 192 kHz, rendering as audio, then bringing back into a lower-sample-rate project does sound better. Bear in mind that the audible difference can be non-existent (most of the time), subtle (sometimes), or dramatic (occasionally). Here's a good example of how much sample rate can change a virtual instrument's sound. I think you'll be shocked. If you can't hear the difference, stop reading this post immediately, and make an appointment with an audiologist However, note that this is the most extreme example I could find. https://www.instagram.com/p/B2MXG6rgalg/ -
Reaper now has built-in oversampling
Craig Anderton replied to LittleStudios's topic in Cakewalk by BandLab
I did look at your videos, but didn't quite get the point. So I looked at the one you referenced above again, and it seems the main issue is the sidechain. So, I tried a new test where I fed a drum track into the Waves Metafilter's sidechain, which was processing a guitar track. I figured this would be a good test because the Metafilter has internal oversampling you can turn on and off. I wanted to see whether upsampling an oversampled plug-in broke the process. Regardless of whether Metafilter had oversampling turned on and off, or the PDC status, upsample on playback worked fine. It also apparently upsampled correctly when rendered, however I couldn't just bounce to clip, because the bounce wouldn't take the sidechain signal into account. I had to export the rendered file, then bring it back into the project. Mostly I'm looking for a) a repeatable problem in Cakewalk so that if I run into it, I'll know it's not pilot error, and b) of course I'm always interested in something if it truly is game-changing. However, I suppose there are too many variables (for example, I don't have the plug-ins you used, there's VST2 vs. VST3, the extent to which an oversampled plugin is oversampling, etc.), and I guess I just keep hitting on combinations that work. If I run into a situation where the upsampling in Cakewalk doesn't work, I'll look into it further. -
Reaper now has built-in oversampling
Craig Anderton replied to LittleStudios's topic in Cakewalk by BandLab
I repeated the same test with Waves Sibilance Live, which they claim has no latency or lookahead, and is suitable for live use. I obtained the same results, regardless of whether PDC was enabled or not. So at least in these two basic, intended use cases (playback and rendering, which is how I use upsampling), I still don't know how to introduce buggy behavior so I can experience what the problem is. Upsampling seems to do what it's supposed to do. -
Reaper now has built-in oversampling
Craig Anderton replied to LittleStudios's topic in Cakewalk by BandLab
Well, it nulled, so what can I say? Maybe PDC is being applied properly to the dry track, which I believe is the way it should work. It's not hard to reproduce the test if you want to see if I'm doing something wrong in the test itself.


