


-
Posts
6,920 -
Joined
-
Last visited
-
Days Won
21
Everything posted by Starship Krupa
-
One word of caution: I hope this means they've given more attention to their engine, because with the other stuff I have from them (notably Serenity Pro), they're kind of resource-y. Which for a ROMpler, is perplexing.
-
What I mean by "dry" is that I want no added reverb. Clean, mostly close mic'd hits. I'm picky about reverb, I use Exponential Audio and Meldaproduction's top of the line stuff. I'm usually trying for a sonic landscape where everything sounds like it's in the same space, and for me, that's harder to do if individual instruments are doing their own reverb thing. And with most (not all) VSTi's, the built-in reverb sounds to me like the onboard FX in a practice amp. This goes for virtual drum machines, too. I always go through and turn off all of the 'verb effects. I think companies load their VSTi's with internal reverb so that the patches will sound attractive when auditioning them. I'm looking at you, A|A|S.
-
I hear ya. From my POV, they're surely not all created equal. I like iZotope's, it checks for updates and downloads them, also keeping individual installers in your Downloads folder. Arturia's seems to work similarly. IK Multimedia's Product Manager is about the worst. Since they instituted it, I don't think I've had a single experience where it worked smoothly; I still have to fire up Authorization Manager and dance around to get everything to work. PA's is fine, but it doesn't do update checking, which is odd. Native Access would be okay if it didn't insist on spamming my drive with redundant copies of the plug-ins. I can delete the 32-bit and VST2 ones by hand, but then it complains that the installation is corrupt. I suppose that for safety's sake I should download and archive all of the individual installers for my PA stuff, but that's getting to be a pretty long list.
-
Fixed.
-
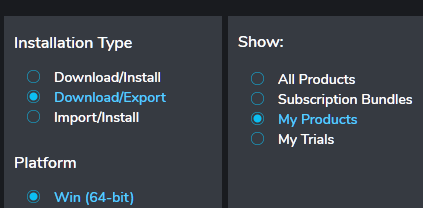
Indeed, and versatile as well. One concern might be that the individual installers might not be available for local archiving or reduction in download time/bandwidth. You can get around those concerns by using the Download/Export+Import/Install feature. Download/Export downloads whatever bundle you build, then you Import/Install using the Manager. A nice solution for people who want to have an archive of "the last version that worked without upside-down meters" or just don't feel like downloading everything over and over. I used it to snag only the Unfiltered Audio stuff after PA finally posted their 2021 builds. You still have to enter credentials and be validated via 'net to run the Manager, so it doesn't make for a completely offline solution. Smokin' pile of freebies. I only had one overlap, after mentally tossing the coin between Masterdesk and Refinement, I went with Masterdesk in the last sale, thereby helping to fund the giveaway. 😄
-
Ha, I should have refreshed my browser, I guess. I knew there was no way I was firsties on this. 😄
-
The scoop goes to Yan! Whompin' collection of freebies from PA, plus one each from NI and iZotope: https://www.plugin-alliance.com/en/blog/blogpost/items/introducing-soundwide.html
- 1 reply
-
- 6
-

-

-

-

freeze/unfreeze multiple tracks at once
Starship Krupa replied to John Bradley's topic in Feedback Loop
If something's not obeying Quick Group rules, it should be "bug reported."😄 -
Wow, I think I may have started using Brave because of your endorsement of it. I do see the page o'gobbledygook sometimes when I click on the results of a Google search, but I read up on it and Brave does that because it doesn't like Google Ad Services or something. Other than that Brave seems to be working quite well for me. Sometimes I have to tell it "shields down," so that I can get an ad-dependent site to let me aboard, but that's about it. It does sound like something unsavory crept onto your system, but I have no idea what could be done other than what you've already tried. The idea of getting web cooties that Malware Bytes can't handle is unpleasant.
-
Glitch: Clip Moving Violation When Snap Is On
Starship Krupa replied to sjoens's topic in Feedback Loop
I guess we'll watch and see if we can get a repro condition for the devs to work with. Heaven only knows why the program would suddenly start tripping over snap settings. -
freeze/unfreeze multiple tracks at once
Starship Krupa replied to John Bradley's topic in Feedback Loop
Yes, as there is room for one more button on Audio strips. Get that asterisk down there! -
This is especially a bugaboo for plug-in 'ho's like I admittedly am. Some manufacturers use the "Category" flags, which apparently never included "compressor," so compressors auto-sort into the "dynamics" category. It's actually easier when they don't, because I can look for the new plug-ins in the "uncategorized" category. I would love for recently installed plug-ins to be highlighted for, say the first 5 program starts after they are first scanned.
-
Glitch: Clip Moving Violation When Snap Is On
Starship Krupa replied to sjoens's topic in Feedback Loop
I think I saw this behavior just recently, and I think I solved it by changing my Snap settings. It may have been set to "By" when I wanted "To" or the value was set too high for the accuracy I wanted. Not 100% sure about this, but I do notice that your grid there looks like it's set to a whole note, which seems kinda big for moving clips with precision. I'd try turning off snap for a sec and then see what happens. -
What is the name of this term in Cakeland? (the wall)
Starship Krupa replied to Starship Krupa's question in Q&A
Yes, that's what I meant. Not what the graphical element is called, but rather the position. I apologize for not making that clearer and I thank everyone who responded. As in if I say "insert 2 measures at 1:01:00" Or "drag those clips to 1:01:00" I was wondering if there were a more colloquial term for "1:01:00." Nomenclature if you will. If I were to say "the beginning of the timeline" would that be accurate and understood? That's the basic issue, I just want to use the term that's most likely to be understood by other users of the program. I thought it might be "zero," due to the "RTZ" function, but really, there is no "zero," Cakewalk's timeline starts with "1:01:00." (I don't care for "the Wall" either, because to me, that's when my system has run out of resources to process audio. It "hits the wall" and I better either start freezing those synth tracks or change up what instrument I'm using. The only source I've heard it from was a friend of mine whose DAW is Pro Tools. He may have made it up himself for all I know, but he taught me a lot about using DAW's.) -
This is probably specific to different models of laptop, but my Dell Latitude also has the Intel graphics plus an extra nVidia GPU. It's set to run everything from the nVidia GPU, including Windows itself and all programs. If I remember correctly, it's a BIOS setting, to tell it that the nVidia is the primary GPU. Also, I think that's the default setting, otherwise, why even have a dedicated GPU? Do a Google search for your model of laptop with the question "how do I force XXX to use the nVidia GPU?" or similar. You will see better performance when using the GTX 1060; as mentioned earlier, some plug-ins, like Meldaproduction's and Newfangled Audio's, can use OpenGL for graphics processing, and since the 1060 likely supports a higher version of Direct X, anything that displays graphics will benefit. It won't necessarily "free up processing power," but just from the greater amount of video memory, and the faster speed of the video memory, things will draw more quickly. On my main system, I notice a marked difference in drawing speed between using my GTX 550 Ti and the onboard Intel HD graphics. With the Intel graphics, if I float the Multidock or individual views, they'll go black for a moment when I switch back and forth.
-
What I would like to see is the ability to drag the module separators up and down to resize. Or at least the separator between the Fader and Sends modules. These are all places where the user could resize, depending on their current need to view these modules (14" laptop screen like mine, or dual 23" monitors like mine): Currently, you can choose to hide or show certain modules, but that doesn't result in getting extra real estate for the faders. For me, the fader and pan controls are the most important ones on the console strips.

-
It's in every DAW, some call it "zero" or "the wall." The far left boundary of the timeline, beyond which you can't drag anything, yada yada. Don't say "Track Header," because the Track Header (or the Audio Scale, depending) is what is immediately to the left of it. What's it called in the Cakeverse?
-
I've taken to hiding my Audio Scale with the shortcut Shift+S (get it? It Shifts the Scale out of sight!) so that I can have that little bit of real estate back and because the only thing I ever do with the Audio Scale is drag it up and down to change the size of events. I've heard the starting point or left edge or whatever called "the wall," but there doesn't seem to be a canonical term for it in Cakewalkia. The Audio Scale is, technically, the element that's displayed immediately to the left of "the wall" in Cakewalk (unless I've Shifted it out of Sight).
-
Well, specifically, I want them to be at the leftmost visible area of the clip header. So if a clip starts somewhere to right of the audio scale bar, it will show its name wherever it starts. That part is how it is now, and that's good, as shown in my screen grab. However, if that area is "behind" the track headers, the clip/group name(s) should slide to the right to remain visible. There shouldn't be any circumstance, short of there not being enough room, where you can't see the clip name and/or group number. Basically, there's no good reason for them to disappear when the left edge of the clip scrolls off screen. IMO, this would be a very useful enhancement to comping, especially with multiple tracks. When you're working multitracked grouped clips, it's important to know which groups (and takes) you're working with. (most of my comping-related feature requests come up when I've tracked drums and am trying to edit the takes)
-
Ah, I see. So the OP's "I've been wrestling with Cakewalk for years" comment takes on new meaning.
-
The issue is that they apparently host the images on an unsecure server, which most browsers these days block by default. Yes, it needs to be fixed on the BandLab end, but there's a way to remedy it on the browser end as well.
-
This depends on what hardware you have (as in audio interface, or built-in sound chip), and what you're trying to do. My method is to leave things at their defaults until I've learnt my way around a bit, then hit the Cakewalk Reference Guide or press the Help button in whatever Preferences page I'm looking at. You've already found the best resource I know of for getting answers, this forum, so ask away. On each track header (the box at the far left of each track with all the buttons and stuff) and Console strip is a box that says "FX" above it. Toward the top right side of this box is a "+" sign. Click on that and you'll get dialogs for adding FX. Also, you may drag and drop effects from the Plug-In Browser that by default sits at the right edge of the Track View. A plug-in is a smaller program separate from the main program that performs a specific function that's not built into the main program. An accessory, if you will. They come in 2 categories in Cakewalk, audio (or MIDI) processors, aka "FX" and software instruments, or "VSTi's." You access plug-ins from the aforementioned Plug-In Browser and FX rack, and if they are instruments, you choose one when creating an instrument track. In addition to the excellent FX built into Cakewalk's Console, Cakewalk comes with a small variety of plug-ins, 3 virtual instruments and a dozen or so FX that are really all you need to get started with mixing. As for how to make use of them once you've put them on a track, well, that topic is worthy of several books and is really a subject for independent study, like YouTube, magazines, classes, forums (like this one and others). The best way, IMO, to obtain more plug-ins is first to download Meldaproduction's a free suite of 37 FX and utilities, some of which are, IMO, the best on the market at any price. Then read the two "favorite freeware" threads from this forum for freeware plug-ins that users have tested with Cakewalk: https://discuss.cakewalk.com/index.php?/topic/5064-favorite-freeware-fx-thread/ https://discuss.cakewalk.com/index.php?/topic/5229-freeware-instruments-thread/ It's my opinion that one can put together a great digital audio studio without spending a dime on software. I myself have spent many dimes on software, but that's because I like pretty, shiny gadgets. 😁 Ripple editing means to adjust the position of a clip in the Track view, and automatically adjust the start position of all subsequent clips to compensate for the change. It's a convenient way to arrange clips without leaving unintended gaps between them. What "All" means is that you can choose to ripple edit just you've selected, or all tracks plus meter/key changes, tempo changes, and markers. The Multidock is a pane where the Console, Piano Roll, Staff View, Events View, Matrix View, Step Sequencer Views, and others appear by default when you open them. You can have multiple of these views in your Multidock and navigate among them using tabs, and you may also drag these views out of the Multidock. The Multidock can be floated outside the main window (common use is 2nd monitor) or docked within it. Cakewalk Template. You see a list of those in your Start Screen when you tell Cakewalk you want to create a new project. These are all plug-ins that are included with the Cakewalk download package. Specifically a bitcrusher, a high frequency "exciter" and a compressor. My installation has no "TH2 Creator," so I can't answer that one. TH3 is a guitar amp simulation plug-in. Me too. 😉 However, I recommend the Cakewalk Reference Guide which is 1,942 PDF pages of answers to questions like these and more. Up at the top of this forum, click on the Cakewalk by BandLab tab and download it. Also, if you learn well from reading, Craig Anderton's Huge Book of Cakewalk Tips is well worth its cover price. You'll need certain hardware for that. At minimum something like a Presonus Studio 2|4 or Focusrite Scarlett 2i2. They go for about $150 new and have 2 mic inputs, which for recording music, you should have. Single input interfaces are for voiceover or podcasting work. I have a Studio 2|4 I use with my laptop and can heartily recommend, but both of the ones I listed are great. They can even plug into your smartphone. The Presonae come with a license for Studio One Artist, which you can try and see if you like better than Cakewalk. I don't, but de gustibus. After that, at least one good mic, the classic starters (that will never become not useful in your studio as you build up a collection of mics) are the Shure SM58 and the Audio Technica AT2020, either of which can be had for a little under a hundy new. If you're recording acoustic string or wind instruments, get the AT2020. All of these items may be had used for much less, which is how I got mine. For example, Reverb.com has used AT2020's for about $60. Story of my life. 😄 Depending on your learning style, there are multiple channels on YouTube, I agree with @bdickens' suggestion to start with the forum's own @John Vere, also all the other previous suggestions. The fact that John has already posted in your thread should let you know what a helpful cat he is. One I recommend to absolute newcomers to digital audio recording (specifically with Cakewalk) is The Produce Aisle. She is a relative beginner herself, but I've learned a thing or two from Lorene and she has a charming attitude about making mistakes and having fun. Her style may not be for everyone, but check it out and see. As for classes, there's a nice chap named @Robert McClellan whose YouTube channel is called Home Studio Simplified and who also offers more in-depth courses and consultation for a fee. Welcome and good luck!
-
Interested to know what genre(s) of music you are producing. Some of the most iconic beats ever were programmed into machines that fell far short of their original goal of sounding like a live drummer. When I'm working with sampled drums, I like 'em dry as a bone, so I can add my own FX. But I don't try for verisimilitude. My programmed beats are gonna sound like programmed beats regardless of what sample library I'm using. As a drummer myself, I can usually tell the difference between programmed drums and ones that were played by a person in real time, although these days with drum "replacers" and whatnots and people thinking that every note has to sit exactly where expected on the grid, "real" performances can be made to sound less so....
-
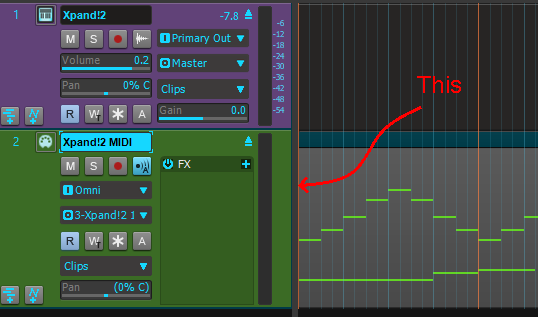
I'll preface this by suggesting that this is probably one of those features that has been requested many times. But that doesn't mean the Cakewalk by BandLab developers remember everything from 5 years ago before the decks were washed clean, so here goes. As long as I'm zoomed out to the point where the left edge of all clips is visible on screen, I can read the clip name and group number, which is important info (especially when comping from multiple takes). However, if I scroll to the right and/or zoom in enough that the left edge of a clip is no longer visible on screen, I can't read the clip info any more. As in this screenshot, where I have a couple of clips that are in Group 3 and from the take "Record 2, Take 1." However, the clips in the lanes below them don't have this info available. Why, o why? I would like that information to be visible on the far left of the visible portion of every clip header, regardless of the position of the clip's left edge. It should scoot to the right as I scroll right or zoom in. It shouldn't get covered up or go away until the clip gets too narrow and there aren't enough pixels. Please comment if you like this idea. If you don't like this idea, also please say why, unless the reason is "I think the developers should spend their person-hours on something else first."😄

-
Are you cozy with Windows' Resource Monitor? Open Task Manager, click on the Performance tab, and down at the bottom, there's a button for Open Resource Monitor. It lets you see in detail what processes are hogging CPU, memory, disk activity and, network traffic. When I first installed Windows 10, I ran it and saw that Windows Defender was scanning every disk read in real time, which led me to figure out how to exclude directories from being scanned (also how to turn off that realtime scanning entirely, but that's another story). It also led to my discovery that on playback, Cakewalk streams every audio track in the project as long as any of it is in a clip, regardless of mute status. I found this out after a friend had done over a dozen takes of multiple mic'd drums. I saw that all 60 or so files were being read even though their lanes were muted. The only way to stop it is to archive your unused takes (or delete them). That can add up to a LOT of disk read activity. I've been advocating for an "archive take" feature ever since.


