msmcleod
-
Posts
6,905 -
Joined
-
Last visited
-
Days Won
35
Everything posted by msmcleod
-
Are you maybe talking about this?
-

FR: When will we have the ability to replace FX?
msmcleod replied to Bruno de Souza Lino's topic in Feedback Loop
Everyone can be forgiven for not knowing about this one.... I found it by accident... but you can actually replace an effect: 1. Right click on the effect you want to replace, and pick Insert Audio FX... 2. Hold down ALT when choosing the new effect. The downside is there's no quick grouping across tracks, so you can't, for example, use it to replace all your SSL EQ's with API EQ's. -
This is a quirk of MIDI clips. The selection is shrunk to the extent of the notes before the ripple edit operation takes place. I've never really got a definitive answer from the team as to why the selection shrinking happens, apart from it was done that way by request of users a long time ago - certainly as far back as the Cakewalk Pro Audio days. This certainly caused issues when trying to sort out the split/comping behaviour when doing MIDI loop recording for the 2022.06 release. It is something I'd personally like to have changed, or at least make it a preference. The main obstacle is that it's baked so deeply in the code, it's difficult to ascertain where it's happening and under what circumstances. There's also the danger that there's other code that relies on this behaviour. We'll try to make time to look at this again.
- 1 reply
-
- 2
-

-
@Starship Krupa - have you put the nanoKONTROL 2 into CC mode? CC mode (for ACT): While pressing and holding down the SET MARKER and CYCLE buttons, connect the USB cable from your computer to the nanoKONTROL2 and engage CC mode. The Korg editor can then be used to change which CC's each control sends out. Mackie mode for SONAR/Cakewalk: While pressing and holding down the SET MARKER and REC buttons, connect the USB cable from your computer to the nanoKONTROL2. Mackie mode for Cubase: While pressing and holding down the SET MARKER and REW buttons, connect the USB cable from your computer to the nanoKONTROL2.
-
Is Github Control Surface SDK still valid
msmcleod replied to EduCampi's topic in Cakewalk by BandLab
The bottom line is, the nanoKONTROL 2 is using potentiometers to emulate rotary encoders, and furthermore, they're not motorized. Decades ago I had a Fostex MixTab / DCM100 that was potentiometer based, and not motorized, but it had a mode that allowed you to adjust the faders & pots to match the current values. Once you'd matched them, you'd exit that mode. However, this was implemented in the control surface hardware itself - something that the nanoKONTROL 2 doesn't do. What I tend to do when using the nanoKONTROL is to match the pan knobs within Cakewalk to what the nanoKONTROL is currently showing, then move the knobs on the nanoKONTROL back to where I think they should be. You could also temporarily go into preferences, and change the input MIDI device, then move the pan knobs to where you think they should be. However as soon as you shift banks, you're stuck with the same problem. The only real solution is a controller with motorized faders & rotary encoders. -
Is Github Control Surface SDK still valid
msmcleod replied to EduCampi's topic in Cakewalk by BandLab
I don't understand what you're trying to do here. 1. The Korg Editor isn't involved when using the Mackie Control protocol as the protocol is fixed (i.e. prescribed by Mackie and not alterable). 2. All control surface settings are stored in CtrlSurface.dat - this is not human readable, and contains the settings from all control surfaces (not just Mackie).. look at the persistence code to see the implementation. Also, be aware that the Pan knobs on the nanoKONTROL 2 are actually potentiometers trying to emulate rotary controllers. A real rotary controller just sends "turned left" / "turned right" information. A rotary controller also has no position as it can be turned infinitely. -
No - once you've closed / re-opened a project, the undo history is lost. You can unbind keyboard shortcuts in Preferences->Customization->Keyboard Shortcuts.
-
I use Crucial MX500's almost exclusively - they're rock solid. My current DAW has the MX500 2TB partitioned in two (C for OS and E for libraries), an MX500 1TB drive for my dev OS, and an MX500 500GB for projects.
-
ALT+ Z will undo zoom/sizing operations, ALT + SHIFT + Z will redo zoom/sizing operations.
-
Is Github Control Surface SDK still valid
msmcleod replied to EduCampi's topic in Cakewalk by BandLab
What set up are you using with your nanoKONTROL 2 - i.e. are you using SONAR mode with MackieControl, or some other configuration? -
Is Github Control Surface SDK still valid
msmcleod replied to EduCampi's topic in Cakewalk by BandLab
@EduCampi / @azslow3 It's up to date now. The main change apart from the Mackie changes, are the new commands in CommandIDs.h -
Is there a way of doing what used to be called Auto Level Adjust
msmcleod replied to jade's topic in Cakewalk by BandLab
You could try an auto-leveller plugin, such as Melda's MAutoVolume, or HoRNet's AutoGain. These plugins automatically adjust the level so that it falls within a specified range. -
FWIW, I had some success with voice control using a Raspberry Pi, with a mic plugged into it and a USB MIDI interface (controlling Cakewalk via ACT). I just flung together some python scripts to map voice commands to MIDI messages. It was a good few years ago when I did this, but IIRC the way the voice recognition worked, was you recorded your own voice up front, and then ran it through a script to "profile" the voice command. From then on it would recognise that command. I wrote some custom code to send out different MIDI messages for each command. Most of the code was put together from examples online. If the mic plugged into the Pi has a switch, you could stop it from triggering commands when you didn't want it to. To be honest, I didn't find it particularly useful in the end, and opted instead for a Korg nanoKONTROL 2 mounted on the wall next to my vocal mic, connected to the PC via a 5m USB cable.
-
Is Github Control Surface SDK still valid
msmcleod replied to EduCampi's topic in Cakewalk by BandLab
Yes, the code is still valid. The public repo is missing some of the latest Mackie Control enhancements, but those enhancements are specific to the Mackie Control surface dll. -
The Mackie MCU does not send out simple CC messages. Most of the buttons send out note on messages, but the protocol itself is quite complex and isn't suited to generic ACT control. The faders and v-pots are more complex, sending out combinations of messages. The nanoKontrol 2 supports HUI, MCU and CC modes, so for transport control, best results are with the nanoKONTROL 2 in MCU/SONAR mode and using Cakewalk's "Mackie Control" control surface. IIRC however, the nanoKontrol v1 supports either HUI or CC modes - so for transport control, I'd recommend using Cakewalk's "Mackie Control" control surface with both set to HUI mode. If you want support for ACT learn, and on-the-fly plugin control, you're better off setting the nanoKONTROL to CC mode and using the ACT surface controller.
-
Import Audio - stretch to project tempo
msmcleod replied to glen dale's topic in Cakewalk by BandLab
To import, just drag the audio file from Windows Explorer on to the audio track. To stretch, hold down CTRL + SHIFT, then drag the end of the audio clip. -
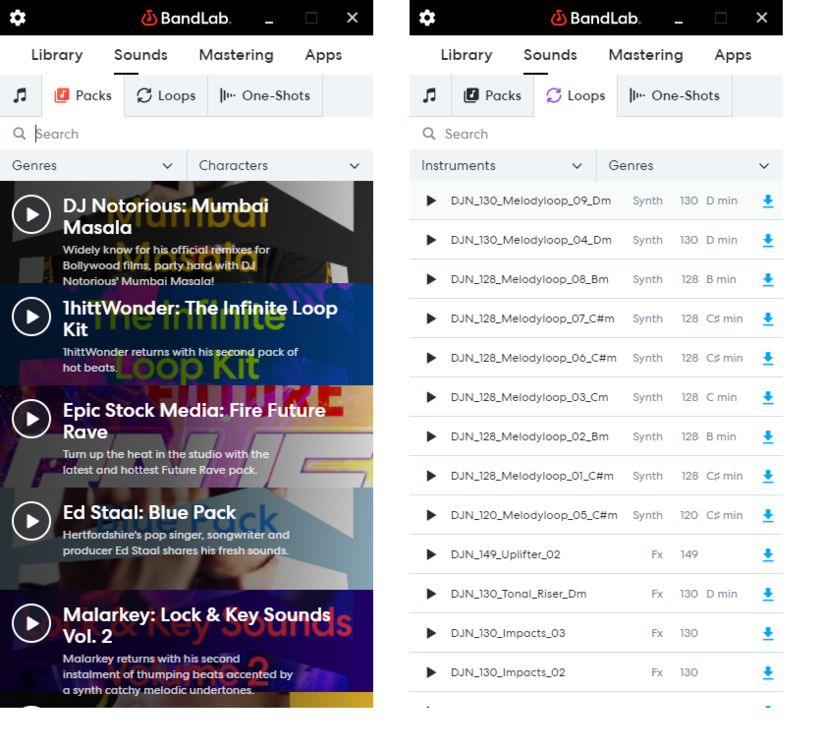
BandLab Assistant gives access to thousands of royalty-free loops. New loops are added all the time. You can drag them directly on to a track within Cakewalk, or download them to your hard-disk:
-
This should have been fixed in 2022.09. The issue was that by making a selection using the time ruler it was also selecting any tempo-track nodes in that time range (which is correct), however the shelf tool should have been ignoring the tempo track nodes when using the shelf tool on another automation envelope. The code detected that it was about to alter nodes that it shouldn't be and was bailing out to avoid messing up your project. The fix was to ignore any tempo track nodes when using the shelf tool on another envelope. However, the original check/bail-out is still there - so if at any point the shelf tool stops working, it's likely you've got more in your selection that you intended. To be honest, selecting a time range using the time ruler is pretty dangerous if your intention is to select a specific set of nodes, as it'll select everything in that time range. It's much safer to use the bottom half of the clip or envelope to select your time range, so you're only selecting exactly what you're about to modify.
-
bus automation lanes missing. how to get them back?
msmcleod replied to Pascal Auger's topic in Cakewalk by BandLab
Holding down SHIFT when clicking the automation lanes button should recreate any missing lanes. You should double check the lane parameter assignment though, as any automation that was orphaned (e.g. because you've deleted the plugin which it was automating), will be assigned to another available parameter. -
You probably want to copy over the following: C:\Cakewalk Content\Cakewalk Core\FX Chain Presets C:\Cakewalk Content\Cakewalk Core\ProChannel Presets %APPDATA%\Cakewalk\Shared Presets\ %APPDATA%\Cakewalk\Cakewalk Core\Drump Maps And these, assuming you've not changed their directory: C:\Cakewalk Content\Cakewalk Core\Project Templates C:\Cakewalk Content\Cakewalk Core\Track Templates And obviously your project folders. You also will want to export / import the following registry key: Computer\HKEY_CURRENT_USER\SOFTWARE\Cakewalk Music Software\Cakewalk\Core\Presets You should also make sure you install any VST's to the same directory as you did before. I find Belarc advisor useful for listing what I software have installed. Also, I believe @scook has a tool for listing what VST's you have and where they are installed. [EDIT] - For @scook's VST Inventory tool, download CbB Tools from his Google Page: https://docs.google.com/document/d/1eiVH_I1clbbRtWFh4-3Mo7HANjCxR8SwqHJtYXy19gw/pub
-
@Helene Kolpakova - I've just tried this on my laptop using the trackpad (before I was using my trackball), and I see what you're getting at. The trick is to: 1. Left mouse button down to add the node... but don't release it 2. Move the mouse left or right very slightly so it snaps 3. Release the mouse button. I must have been doing this for so long it's in muscle memory, and I wasn't consciously aware of it.
-
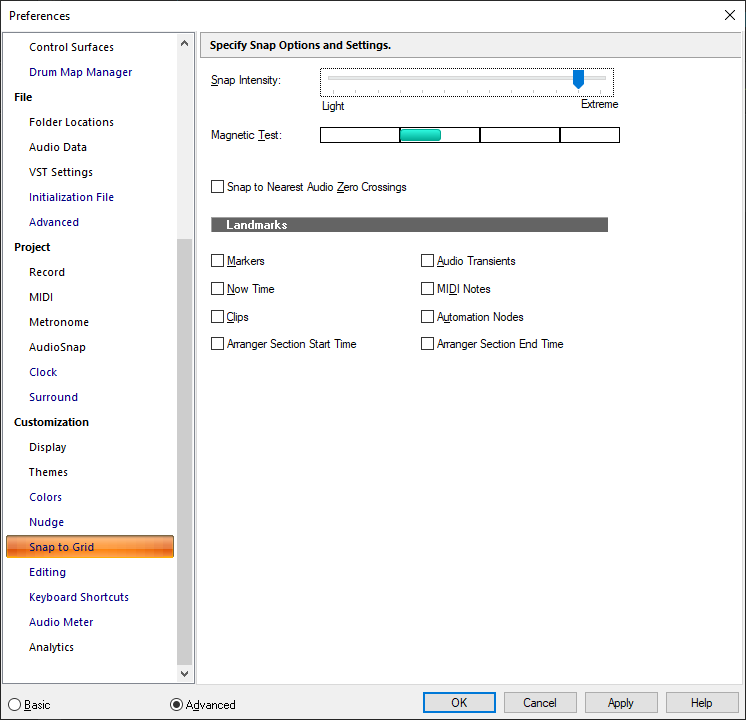
I'm not seeing this issue. Automation nodes snap fine for me, however I have got my snap intensity turned fairly high:
-
We did have something that did that using an off-the-shelf algorithm to detect whether to use black text or white text, however it got it wrong so often, we abandoned it in favour of picking a standard palette that would support white text. It's worth revisiting though... maybe we can find a better algorithm or solution.
-
REQUEST: Button To Easily Toggle Between Two Buffer Rates
msmcleod replied to CJ Melisma's topic in Feedback Loop
Clicking on the sample rate/bit size display on the control bar will take you directly to the correct page within Preferences: However, not all audio drivers support adjusting the buffer size from within Cakewalk - with some you need to use their own ASIO panel.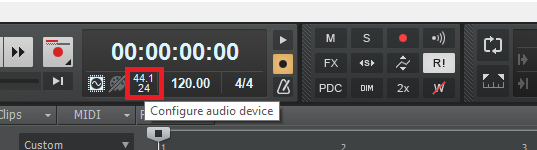
- 1 reply
-
- 1
-

-
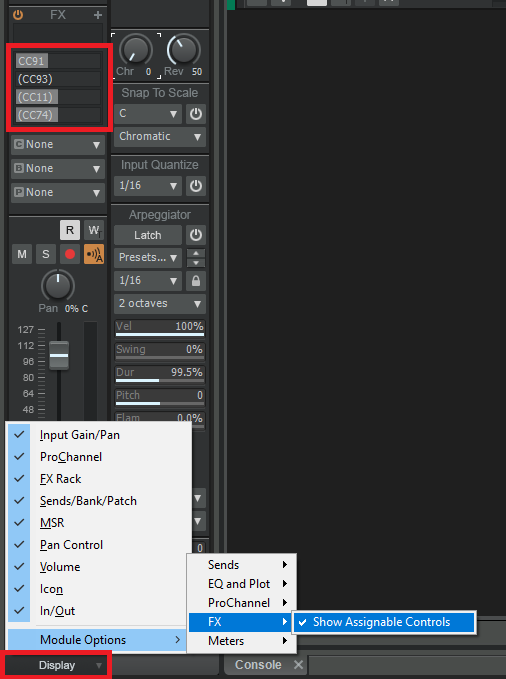
Chorus and Reverb ( CC91 / CC93 ) are already on the MIDI Track. If you enable Assignable Controls, you can control up to another 4 of them - not your whole list obviously, but at least you'll get 6 of them. Saving the track as a track template will retain the assignable controls: