msmcleod
-
Posts
6,931 -
Joined
-
Last visited
-
Days Won
36
Everything posted by msmcleod
-
Right click on the track, and choose "Replace Synth..." from the context menu.
-
 Given that the arranger section seeking uses exactly the same mechanism as looping, I can't see having an inverted loop would help if you're having issues with the arranger.
 -
You could apply trimming to the clips to shorten them to their new extents. Just right click on the clip and select "Apply Trimming". This command is selection based, so if you want to apply to more than one clip, just select the other clips before executing the command.
-
The only time I've seen this behaviour is when some other process is trying to access the files that Cakewalk is writing to during record. Anti-virus / Cloud Sync programs are the typical culprits. Make sure you've got your Cakewalk Projects directory and Global Audio folder excluded from any of these type of apps.
-
Sounds like you've installed an earlier version of Sonar after you installed Cakewalk by BandLab. Uninstalling/Re-installing Cakewalk should solve this. Doing this won't remove any of your settings.
-
Any bugs in subfolders would present themselves as UI issues - i.e. the track may appear in the wrong place, or be invisible. The folder ownership is purely a UI property, and is completely separate from the track's data model. The only bug I'm aware of that could cause corruption is to undoing a Ripple Delete with MIDI in lanes. It's hard one to reproduce, and we've yet to identify the cause.
-
I stand corrected... IIRC it was certainly an issue with earlier Roland hardware, so I probably just assumed it was the same with the TTS-1, which emulates the hardware.
-
The issues you describe definitely sound more like project corruption than bugs. If it's a bug, it will be for the most part repeatable every time. And for us to fix it we need a recipe to follow, because not only do we need to see what happens when a project is in a particular state, we also need to know how it got into that state in the first place - and that "how" is usually the bug. Before I joined the team, I was a beta tester, and I spent far more time trying to reproduce bugs from a fresh project than actually finding the bugs themselves. If the dev team can follow the steps and reproduce the issue, then there's a > 95% chance we'll be able to fix it. It's also much quicker to identify an issue in a project with one track, than debugging a project with 20 or more tracks in it. Project corruption is a different scenario though. Sometimes a project becomes corrupt due to bugs, but this is very rare - the code is littered with checks to ensure this doesn't happen, and also every user would be experiencing the same issue. So that leaves plugins... We all know that some plugins crash with a 0xc0000005 error - this is when a bug in the plugin tries to write to memory it doesn't have access to. However, the plugin is running in the same processor space as Cakewalk, so it has access to all of the memory Cakewalk is using. So what happens when it writes to the wrong part of memory, but this time it's memory it does have access to? Well, chances are that memory is your project, and it'll end up either corrupting the project or the state of other plugins. If you can, try to reproduce the issue in a fresh project with steps that are repeatable every time - then send that recipe to us.
-
Lower the volume on buses/tracks with automation on them
msmcleod replied to Manolo's topic in Cakewalk by BandLab
You can also use the shelf tool: -
@Kinn2021 - two other possibilities: 1. What anti-virus program are you using? There's a possibility it could be picking it up as a false positive and removing it. Try adding Cakewalk's folders (and especially your Cakewalk Project folders) to the exclude list. 2. Do you have OneDrive running? I've seen OneDrive get very confused and try to revert some folders to a previous state. Personally I've disabled OneDrive, but alternatively you can tell OneDrive to exclude directories. I'd advise excluding Cakewalk's folders, and especially your Cakewalk Project folders to the exclude list.
- 12 replies
-
- 1
-

-
- pc2a leveler
- bug report
- (and 1 more)
-
One thing you should be aware of regarding MIDI volume (CC #7) - this not only applies to the TTS-1, but many other synths. Changing MIDI volume will affect notes played after the volume change. It will not change the volume of notes that are already playing. You can get around this by using expression instead (CC#11), however you can't increase volume with expression, only decrease it, so it can get a bit messy controlling both. Given that the TTS-1 is a software synth, you may want to consider using volume automation on the TTS-1 audio track. The TTS-1 can utilize up to four stereo outputs, so four instances of TTS-1 can be used to give 16 channels each with their own independent audio output. This will also enable you to add standard audio VST effects on each of your TTS-1 channels, and use the ProChannel on each of them too. Here's an example of how to set up TTS-1 in this manner:
-
One thing I know that can cause problems with the built-in ProChannel modules is if the directory is compressed. Check if C:\Program Files\Cakewalk\Shared Utilities\Internal is compressed or not, and if it is mark it as uncompressed, ensuring it also applies to the subfolders.
- 12 replies
-
- 1
-
-
- pc2a leveler
- bug report
- (and 1 more)
-
This tutorial is very good:
-
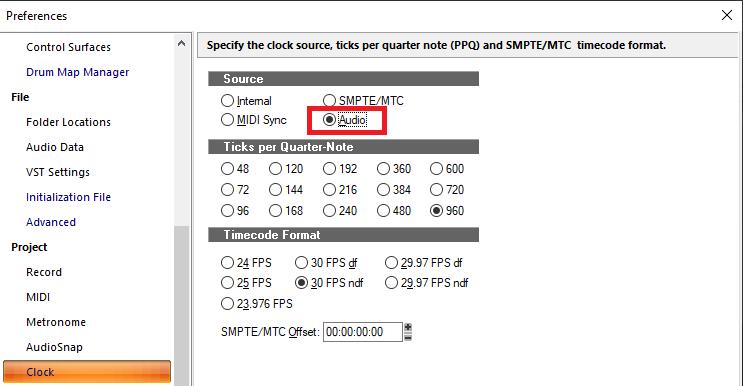
The only time I've seen this happen is when using a project with only MIDI tracks that are exclusively using hardware MIDI outs - i.e. no soft synths or audio at all. By default, the clock timing is derived from the Audio source: However, if you've no audio tracks / soft-synths, there's no audio to sync, to which causes the timing issues. There are two ways of solving this: 1. Simply insert an empty audio track 2. Change the Source to Internal. Personally, I prefer inserting an audio track as you will get timing issues if you subsequently add an audio track or soft-synth and you forget the timing is still set to internal.
-
Re-install the Microsoft VC++ redistributables:
-
Tempomapping for an all over the place song (8 tracks)
msmcleod replied to Andreas Leimer's question in Q&A
If it's good enough to tap along to, consider using "Fit Improvisation". To do this: 1. Insert a MIDI track and make sure it's the only track armed. 2. Start recording and tap a single note to each beat of the song until the end. 3. Select the MIDI track, then Process->Fit Improvisation. Cakewalk will create a tempo map based on what you tapped in. -
How do I get a copy of the Sonar X3e upgrade (fix)
msmcleod replied to Dan Laskowski's question in Q&A
BandLab Mix Editor( the web based DAW), and Cakewalk by BandLab (CbB) are two completely different products. CbB is a continuation of the SONAR product line, and is based on the same code base as SONAR. Although there is the capability to publish / download projects from the BandLab community, the vast majority of CbB users do not use this integration. CbB is the equivalent of Platinum/Producer version of SONAR plus over 3000 bug fixes and new features. The only thing you don't get with CbB is the third party plugins bundled with SONAR Platinum - although there are exceptions such as Overloud TH3 which is included in CbB. I've PM'd you a link to the Sonar X3e Studio patch. -
I tried it on a selection of audio tracks, and it's working fine for me.
-
Look at Customization->Keyboard Shortcuts in preferences. There you can bind any MIDI note or CC to a command, or get it to run a CAL script.
-
First of all, the neural network technology currently in use was developed around 50 years ago. I remember studying it at university (and that was a long time ago too!). It's only now however, that computers are fast enough to leverage it effectively (apart from maybe applications such as AutoRoute which have been using it for decades). But the requirement for speed is especially the case in deep learning, where the AI solution is left to work it out for itself rather than giving it pre-labelled data. ChatGPT is designed as a chat application. It is not a catch-all AI app that does everything you need. Fine if you're feeling lonely in the middle of a mixing session and fancy a chat, but not so useful for musical applications. All it will ever give you is an amalgamation of things it's scraped from the internet (and we all know how contradictory that can be), and the things it's learned from experts correcting the answers it gives. The results from ChatGPT may look impressive, but are suspect when looking at the detail. I had a lengthy "chat" with ChatGPT on a chord transformation algorithm, and the answers were best described as naive. There were way too many assumptions regarding implementation details (e.g. how to distinguish between the fundamental pitch of a quieter sound and the harmonics of a louder sound), and when pushed further, I basically got "There's been lots of research on this but I don't know the answer". I ended up suggesting a possible algorithm, and even then the results were flawed. In general, there are three types of AI applications for audio: 1. Classification - this is by far the most prevalent, and includes genre classification (as used by Spotify), or chord/key recognition. 2. Transformation - where you give it audio, and it does something to it rather like a VST effect. Izotope Nectar 3 or their mastering suite is a good example here, as well as the stem separation utilities. 3. Generation - where you give it something basic, be it a melody or just some descriptions, and it generates music (either MIDI or audio) based on the input. None of these applications are suitable for ChatGPT, and all of them need a vast amount of training data to be effective.
-
The biggest issue with AI is the amount of data that is needed for it to be effective, and more importantly the fact that the results are so incredibly skewed to the data that you give it... which of course means, a lot more data, and a lot more varied data. Personally I think AI in music has huge potential, but as far as the Cakewalk team is concerned I'm almost certain we couldn't spare the resources to collect enough quality data to get anything useable (well, not unless you'd all be happy to sacrifice any Cakewalk updates for a year or two). And even if you consider BandLab as a whole, who you could argue has access to a lot of material to use as source material for learning, is it varied enough to become usable in all genres? Here's a good example of not only how AI works, but also how inaccurate it can be - even when given 1000's of examples. BTW - if you're into AI in music, or even basic music DSP, this guy really does know his stuff - it's worth watching the whole series. But having watched hours of these videos, it's clear that you can get impressive results, but in order to do so you need a vast amount of good quality, and preferable pre-labelled data.
-
You can reset Cakewalk to it's default settings by holding down CTRL while opening Cakewalk.
-
If at any time you want to see all of the projects that are loaded, choose "Tile in Columns" from the main "Window Menu" You can tell Cakewalk to only allow one project at a time by checking "Allow Only One Open Project at a Time" within File->Advanced in preferences.
-
No, because they're running as different processes... but they could be running on the same core.
-
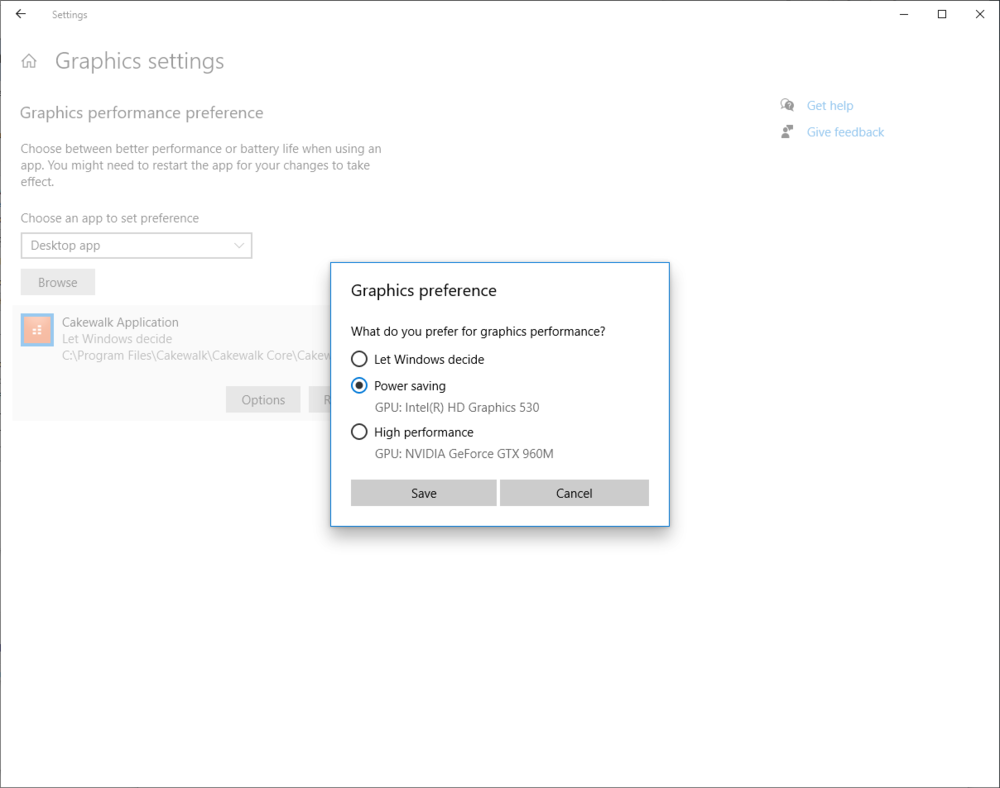
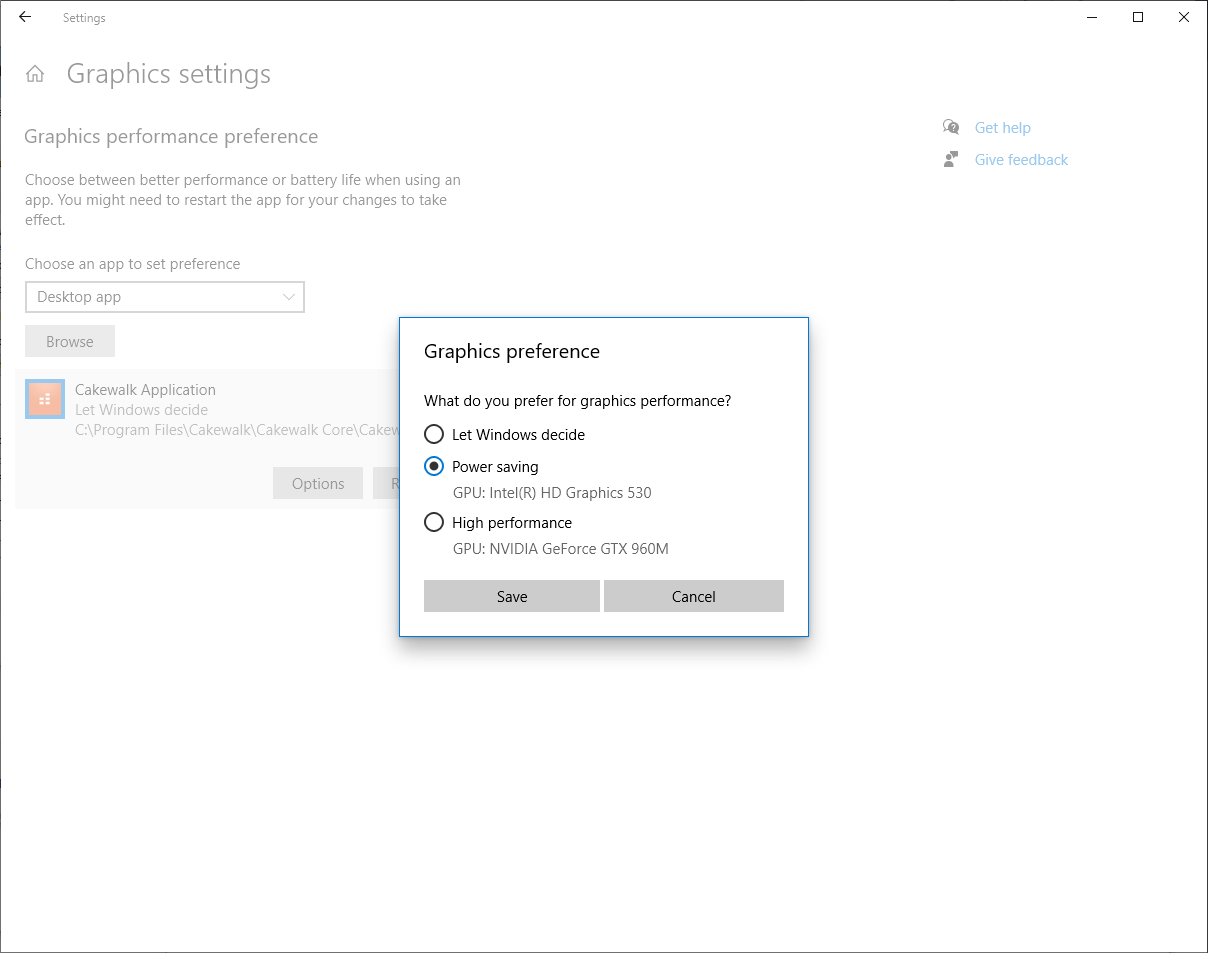
You should be able to force Cakewalk to use the Intel graphics instead. That's what I did on my gaming laptop, as there were a few plugins that weren't compatible with the its NVIDIA card: