msmcleod
-
Posts
6,898 -
Joined
-
Last visited
-
Days Won
35
Everything posted by msmcleod
-
As mentioned above, a tremolo effect would be best. However, a quick and dirty way would be to add clip gain or track volume automation, and use the "Sine" draw tool. The snap resolution will dictate the frequency of the sine wave. Personally, I'd go for clip gain automation as this leaves track volume for normal mixing duties.
-

Possible Bug in "Hide Tracks" option
msmcleod replied to Jerry Gerber's topic in Cakewalk by BandLab
The bug has been fixed, and will be available in the next update. -
Given that there are known issues with EastWest and CbB, one thing you could try out is BlueCat's PatchWork, which is a VSTi that can host other VSTi's:: https://www.bluecataudio.com/Products/Product_PatchWork/ Basically, you insert PatchWork Synth as your synth, then load EastWest inside PatchWork. This means that EastWest is no longer talking to Cakewalk directly, but instead talking to PatchWork. There may be sufficient differences in the way that PatchWork leverages the VST3 API to keep EastWest happy. It's not a cheap plugin, but it does allow you to do a host of parallel processing that you couldn't otherwise do in Cakewalk natively. They provide a demo download, so please try that out and check that it works before committing to buying it.
-
You should be able to do that with Screensets - i.e. each screenset has it's own things in the Multidock.
-
I suspect there might be a modal dialog hidden behind something that needs closing. Use CTRL + TAB to switch to Next, then use CTRL + TAB to cycle through any dialogs being shown.
-
Deleting it should be fine - as long as Cakewalk isn't running at the time. Cakewalk will create a new empty one when you restart. The presets are stored elsewhere, so any presets you've saved will still be available.
-
Windows assigns an incrementing device ID for each MIDI device as it discovers it on start up, so the best advice I can give is to always use the same USB ports for all your equipment, and ensure they're all plugged in before you power up your PC. This will help to ensure that Windows picks them up in the same order every time. Unfortunately despite requests over at least two decades, Windows provides no unique identifier for a MIDI device. The only thing Cakewalk can go on is the device ID and the device name. What I can tell you is that the new Sonar does a better job of checking that the ports are the same as they were previously. If the port isn't available at all, it'll disable the control surface and notify you (rather than steal a random port instead!). As for fixing your existing issue: renaming or deleting ctrlsurface.dat within %APPDATA%\Cakewalk\Cakewalk Core\ will essentially reset everything and you can configure it again from scratch.
-
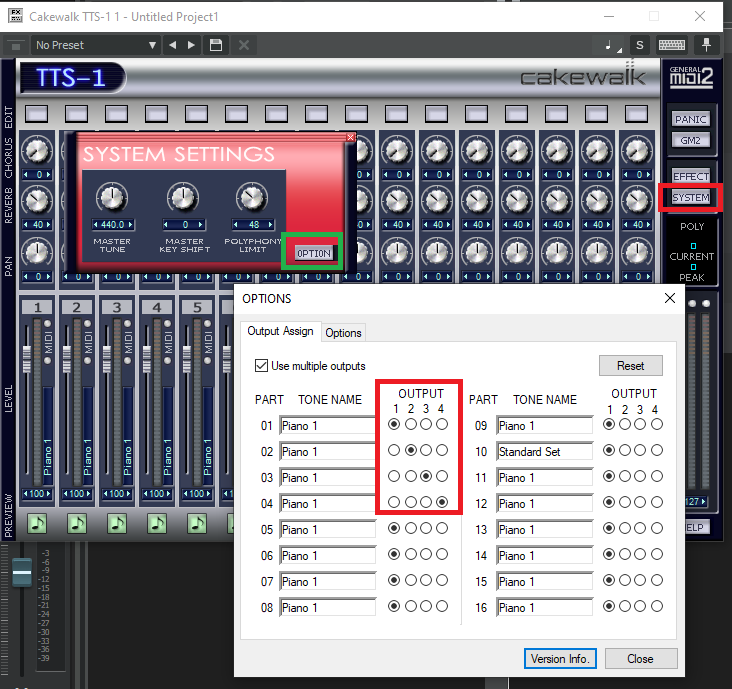
BTW, by far the easiest way of doing this is by using Per-Output instrument tracks: Each track will have its own separate audio output, so you can add FX on each track / automation without it effecting any other track.
-
... don't forget to also assign the outputs in TTS-1 itself!
-
I still use that (using CbB's JBridge wrapper support) and it works fine in 2023.09.
-
Gear that you DON'T miss or regret having to say farewell to
msmcleod replied to Rain's topic in The Coffee House
I've only sold two bits of gear (not counting the ones I sold and later bought again), but the one I don't regret selling is my Kawai K4R. On paper this thing is miles better than the K1 / K1R, but in practice I couldn't get any sound I liked out of it. Just goes to show that with romplers the set of samples shipped with it is far more important than the feature set. -
FYI, continuous controllers such as Modulation send out MIDI messages continuously - the only exception being when their value is zero. I had exactly the same issue with the modulation wheel on an keyboard of mine. The issue turned out to be dust in the potentiometer, which was causing it to read some resistance and was continuously sending out messages when it was set at zero. Cleaning it with WD-40 fixed it. Just as a side note... avoid using contact cleaner/switch cleaner for cleaning sliders or pots, as it can strip away the carbon strip. Either use a cleaner specifically for sliders, or use standard WD-40.
-
Drum programming shortcuts/alternatives?
msmcleod replied to BassMasterGeneral's topic in Cakewalk by BandLab
You should check out MT Power Drum Kit: https://www.powerdrumkit.com/ Not only does it sound great, it's free and has a bunch of grooves you can drag on to your track then edit in the PRV. -
In my experience, BIAB is second to none for realism and quality for automatic backing generation. The only complaints I have are: 1. The styles are very middle of the road 2. Handling of anything but common time signatures isn't great (i.e. it kind of works, but is a bit of a hack to be honest). For me it's a blocker when using time signatures of 5/4 or 7/8. 3. Unless you have the audiophile edition, the audio quality is good but not great. I've got the ultrapack, and the backing does have an "mp3" type quality to it. However, I have had some great results taking single parts and putting them into a completely different musical context. This works particularly well for acoustic/rhythm guitar parts - i.e. you generate a guitar part using a country or latin style, then use it in a rock context. Also using only one or two parts from BIAB alongside your own ones does go some way to hiding the audio quality shortcomings if you've not got the audiophile edition.
-
AudioSnap is designed specifically for this task. There are various YouTube tutorials covering this. First you need to decide whether to (1) snap the grid to the band, or (2) snap the band to the grid. For option 1: https://youtu.be/I7D3wZldUJw?si=wWmHI8Sv7uXPJIo3 For option 2: There are plenty of YouTube videos covering this: https://youtu.be/9rg5c-4QiEg?si=YWXGaT4Yff6Fv90X https://youtu.be/d5Vpyj4dkQs?si=pmHIEgYEPMDpfU5V https://youtu.be/SyKEMul_VGA?si=joDJqObAs5Dv0QO8 You can of course use a combination of 1 & 2 - i.e. use option 1 to create a varying tempo map that matches what the band is playing, then edit the tempo map and use option 2 to align everything to a steady tempo.
-
Phase & Latency for Overhead / Snare / Kit recording
msmcleod replied to Edward Allen's question in Q&A
You've got 4 options really: 1. Do nothing 2. Flip the phase of the overheads and see if it sounds better. 3. Move the O/H clips so they better align with the other tracks (you can combine this with (2) to limit the amount you need to move the clip by) 4. Use a phase alignment plugin, e.g. MAutoAlign or MFreeformPhase from MeldaProduction However the issue with trying to correct the phase by any of the methods, is that although you might get say the snare to align, other drums may then be out of phase. This is pretty much unavoidable, but the quieter a drum is in your overheads, the less of a problem it'll be for that drum. Another option: if you've got samples of the original drums in isolation, you could "reinforce" the sounds of any problem parts that have phase issues. It's a bit of a fiddly job, although drum replacement plugins on a copy of the track might help. Really, the best solution is to adjust your overhead mic placement so you don't get the issue in the first place. -
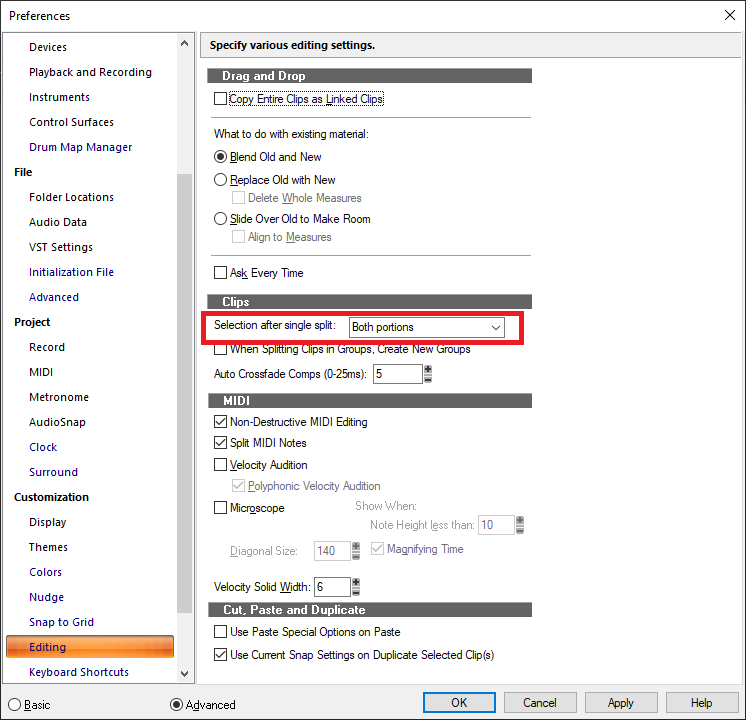
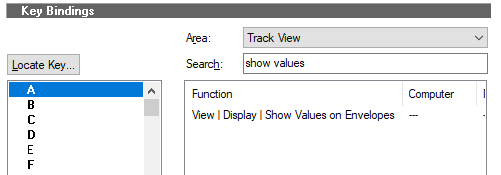
This is due to the position of the nodes relative to the boundaries of the lane. By default, the value is always shown above the node - unless there's not enough room, in which case it'll show it below. Also, not all values are shown if it would cause them to draw on top of each other. The solution to both issues is either to zoom in, or turn off showing values.
-
CbB Templates - can they be imported into Sonar?
msmcleod replied to HOOK's topic in Cakewalk by BandLab
Just to confirm - CbB project templates will be compatible with the new Sonar. With very few exceptions, CbB/SONAR/Sonar projects are both forward and backwards compatible. Templates are definitely forward & backwards compatible. -
@David Pollock - PM me a copy of your .cwp file and a brief recipe for getting the crash (i.e. which track you think may be causing it) and we'll take a look. A minidump file may be too big to attach, but if you could upload one somewhere and send a link that would also be helpful.
-
Is it possible some audio related device is going to sleep? This could cause a driver to crash, or Cakewalk to crash if it wasn't notified of it going away. Check your USB sleep settings just in case.
-
Request: Could you add an RTZ flag to the articulation maps
msmcleod replied to SloHand Solo's topic in Feedback Loop
You can already do this:
-
Keyboard Controller Designed Specifically for Cakewalk
msmcleod replied to RexRed's topic in Instruments & Effects
As far as I know, there are no Cakewalk specific hardware controllers (unless you include the now discontinued controllers from the Roland era). It should be pretty easy to set-up an ACT controller to at least get one way control from any MIDI controller though. If you need two way control, check out @azslow3's AZController - he's got a bunch of presets for various controllers on his forum. As far as stickers are concerned, I used to use them (in fact exactly the same ones as posted) but have stopped for a few reasons: They come off after around 6 months (although super-glue will give them another year's life) They're pretty "busy" and hard to read 9/10 you get to know the shortcuts by heart in any case They're useless if you change your shortcuts, or create new ones Really, you're much better off with a chart on the wall: when you find yourself using a particular function often, find out what shortcut it is and add it to your list. You'll commit it to memory soon enough. -
Phase issue: should the image of the wave invert on-screen when you hit the "phase" icon?
msmcleod replied to Edward Allen's question in Q&A
The phase and interleave are applied at the track level just after the track input gain. What is shown on the clips view, is a view of the clip. The only thing that affects the clip display is clip gain and pan automation, which happens before any clip effects and any phase/interleave on the track. -
It's a config setting: