


msmcleod
-
Posts
7,191 -
Joined
-
Last visited
-
Days Won
39
Everything posted by msmcleod
-
FWIW the soon-to-be-included Tungsten Classic theme has distinct button backgrounds, rather than the transparent background of the newer themes - it's no where near as flat/2D looking. It's not exactly the same as CbB, but when running the two apps side by side, they look very similar.
- 11 replies
-
- 11
-

-
 There's no hard & fast rule for specs, as it's totally dependent on what you're doing. As a general rule however: If you're low on RAM, avoid any sample based synths or any plugin that loads lots into memory. Also Save / Reload your project regularly (or clear your undo history). If you're low on CPU/cores, limit your plugins (that includes soft synths), and avoid CPU hungry reverbs - maybe consider a hardware synth module Also, once you start running out of memory, you'll see a drastic drop in CPU performance as it attempts to swap blocks of memory to/from your HDD. So don't assume a CPU problem is to do with plugin CPU usage - it could be caused by low memory. I would say the bare minimum is 4GB / 2Ghz / 4 Core... but only if you're recording just audio, using hardware MIDI, and/or using very CPU-lite soft synths that are either not sample-based, or have a very small sample set (e.g. TTS-1, S-YXG50 etc ). The ProChannel / Sonitus suite should be fine for FX for most purposes. I managed to record 16 simultaneous audio tracks while playing back 32 audio tracks (20 mins worth), on a 8GB/2Ghz /4 core MeLe silent PC (only slightly larger than a compact cassette case). I did this using both CbB and Next. I've also done the same on a 4GB/2.2Ghz/dual core laptop... but this was running Sonar Platinum 32 bit.
 -
I'm pretty sure you can't. The file format is different. However, if you're hosting a VST3 inside a VST2 plugin like Patchwork, then saving the Patchwork state as a preset should also save the state of all VST3 plugins its hosting.
-
Not Liking the look of the New Sonar Interface
msmcleod replied to mark foster's topic in Cakewalk by BandLab
The fix will be based on DPI rather than resolution, so yes, it should. -
I've tried this in the past, and it works a treat... it's difficult to unlearn 40 years of bad habits tho!
-
Not Liking the look of the New Sonar Interface
msmcleod replied to mark foster's topic in Cakewalk by BandLab
@norfolkmastering / @Sal Sorice / @Heinz Hupfer There are a couple of things in the pipeline that should improve the look of Sonar vs CbB. 1. We'll be including a "Tungsten Classic" theme that more closely matches the colours of CbB, and certainly to my eyes has a more preferable contrast to the new Tungsten. 2. We're using a different graphics framework not only for the vector images, but also for drawing text. This is the same framework we're using in Next for cross-platform support. Unfortunately, because it's cross-platform, the text rendering doesn't look as good on 1080P as it did in CbB. We have a plan to fix this and will be addressing it very soon.- 223 replies
-
- 17
-

-
-
I don't think you'll be able to do this with a single pedal, but you could probably do it with two: 1. In Preferences->MIDI->Playback and Recording: Make sure "Allow MIDI Recording without an Armed Track" is checked 2. In Keyboard shortcuts: assign one MIDI note to "Insert->MIDI Track", and another to "Record". You should make the keys as high as possible (e.g. F#9 / G9 ), as low keys are quite often used a key switches. 3. Assign your pedal to send out the notes assigned in (2) Now you'll be able to hit one pedal to insert the MIDI track, and the other to record. Of course if your MIDI pedal device can send out one note, wait 0.5 secs, then send the other note all from a single pedal, then you'll be able to do it with a single pedal.
-
This has been fixed now (it was reported by the beta team). I think a new BSP release went out yesterday with this fix... if not, it'll be imminent.
-
I don't practice nearly enough to play barre chords perfectly every time, but one thing I have found is that they're not always desirable in the context of the song - so quite often I avoid them, preferring to limit my chords to 3 or 4 strings. If you've a bass guitar is dictating the root or inversion of the chord, question whether you need the guitar to double that up. If you've got a keyboard pad going on as well, even more so. Also from a mixing point of view, having less instruments fighting for the same frequencies can make the whole mixing process much simpler.
-
Windows 7 does support VST3, however Sonar 8.5 does not. IIRC, Sonar X3 was the first version of Sonar to support VST3. You might be able to use something like the VST2 version of Blue Cat's Patchwork to wrap it up for use in Sonar 8.5, but I can't say for sure without trying it. I'm also not sure if Speakerphone will work properly when hosted this way. [EDIT] - At least in SONAR X2, the VST2 version of Patchwork will host VST3 plugins.
-
FYI - before soft synths were a thing, and multi-timbral modules were king... Cakewalk had this for Windows 95, that would do the "two-finger" trick and play a backing to the speed of your playing. It didn't need to be a two finger thing either - if your part was already in 8th notes, that would be enough for it to work it out.
-
New "Add Track" dialog - "instrument track per output" is always grayed out?
msmcleod replied to Salvatore Sorice's question in Q&A
It has been fixed in Sonar too, but is much less likely to happen if you either have TTS-1 installed already, or have a default synth set. To set the default synth, just insert a Simple Instrument Track, right click on either the synth rack entry, or the track itself and select "Set as Default Synth" in the context menu. -
Also, just to clarify: Melodyne 5 does not work with Windows 7 Melodyne 4 does not work with Windows 11 The only OS that works with both v4 & 5 is Windows 10.
-
@David Baay is correct - but it's only the first occurrence of those CC's / Program Change messages that is transferred to the track controls. Any subsequent events are left intact.
-
In order to use any plugin that uses iLok, you need the iLok License Manager installed. As part of that installation, it installs the iLok drivers, which usually requires a reboot. You can download the installer here: https://www.ilok.com/#!license-manager
-
@wolfstudios53 - you also need to make sure the Faderport itself is configured for SONAR/Cakewalk, not just the MCU/Sonar option within Cakewalk.
-
I think this could get complicated very quickly... for example, a simple InvertSelection method on the selection class could literally invert the selection, but I doubt it would do what you want. For example... you've got a bunch of notes selected. You invert the selection, and now all your arranger sections, tempo/automation envelopes, tracks/buses, notes in other tracks, meters, markers etc are now selected because they weren't before. So context is now important, because I bet that's not what you wanted. And now that context is involved, it suddenly gets way more complex. So I guess you could limit it to what is currently selected... so say notes are selected. Does that mean that when you invert the selection, no CC's are included... or articulation sections? How about notes on other tracks? (these are rhetorical questions of course!) And that's just the selected notes case..
-
Shhh! Don't tell anyone. Sonar is now available
msmcleod replied to John Vere's topic in Cakewalk by BandLab
TTS-1 has been removed... it's just that Sonar will default to TTS-1 if it's already installed. Sonar has the option to choose a default synth, so it will be the one shown in the Add Track HUD dialog on new sessions. Until you set a default synth , TTS-1 will be chosen if installed, or a MIDI only track if not. -
Am I reading the “tea leaves” right? (Sonar Activation)
msmcleod replied to DeeringAmps's topic in Cakewalk by BandLab
Thanks for pointing that out... I think people forget this! -
I did originally write a lengthy reply to this thread detailing how to group assignable controls, however there are a few issues: 1. The group assignment is lost on save/reload 2. The assignable controls don't always work with groups - i.e. sometimes they affect all grouped VST parameters, sometimes not. 3. The assignable controls seemed to be fixed to the first four parameters for DX effects, and can't be re-assigned. I'll get bugs raised for these, but can't make any estimate as to when they'll be fixed. Most people don't know the assignable controls even exist, so it's a pretty niche set of bugs compared to the other bugs in the queue.
-
@John Vere - DXi synths running in CbB are never 32 bit. 64 bit applications can only use 64 bit DXi's, and 32 bit applications can only use 32 bit DXis.
-
New "Add Track" dialog - "instrument track per output" is always grayed out?
msmcleod replied to Salvatore Sorice's question in Q&A
I've pushed a fix for this issue, but I can't give any time-frame as to when an update with the fix will be available (hopefully soon, but it's not my call). In the meantime, the old Insert->Soft Synth synth dialog will allow you to pick this option. -
Output 3 different midi tracks to separate audio tracks
msmcleod replied to Frank DeFede's topic in Cakewalk by BandLab
To use multiple outputs on the TTS-1, you have to route the MIDI channels to the audio outputs within TTS-1 itself, as by default all MIDI channels route to the main stereo outputs.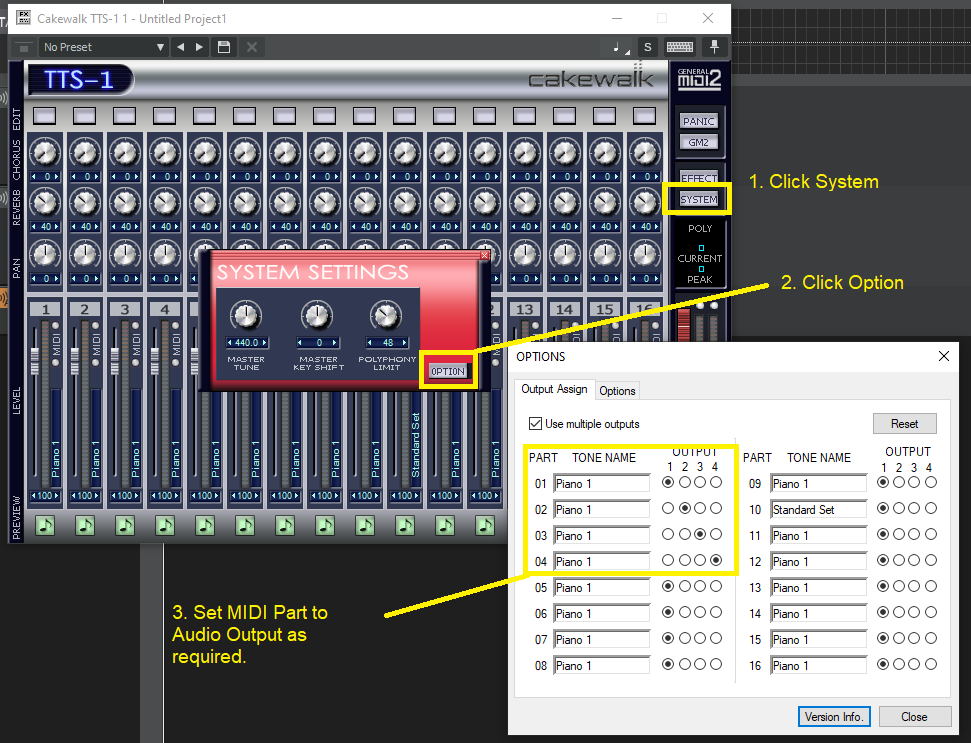
-
New "Add Track" dialog - "instrument track per output" is always grayed out?
msmcleod replied to Salvatore Sorice's question in Q&A
AFAIK there is nothing that could grey that out - even if you picked an instrument with only a single stereo output, it would just create multiple instances if you asked for more than one track. -
It's only lossy at extreme values, which in audio terms wouldn't really happen - i.e. the quietest sounds would literally be inaudible, and the loudest orders of magnitude times the pain barrier. The max db range is over 1500 db (compared to 144db of 24 bit, which is still massive), but in reality what you get is greater granularity over a smaller db range (similar to the 144db range of 24 bit), because the point "floats". The reason audio engines prefer 32 bit floating point (or 64 bit floating point), is because it effectively means you can never clip internally - only once you convert back to 24 bit for rendering in the audio interface.
