msmcleod
-
Posts
7,191 -
Joined
-
Last visited
-
Days Won
39
Everything posted by msmcleod
-
 I did try this in the past, but audio was pretty much a non-starter as although I did get it working (with WASAPI), it killed performance. I've tried both VNC and Windows RDP - both worked ok, although performance wasn't stellar (mind you, my network was only 100MB rather than 1GB). Nowadays I just keep my projects sync'd to the cloud so I can access them anywhere - it does mean my laptop needs all the plugins installed though. If your studio is in the same property as your office, you could try a more lo-tech solution like splitting your audio output and either using bluetooth transmitter/receiver, or a long audio cable. You may find VNC / Windows RDP is fine for video / keyboard / mouse control, otherwise there are similar lo-tech solutions for video (both wired & wireless). For keyboard/mouse, any remote software KVM solution will work without any real performance issues.
 -
New interface device is not recognized by Bandlab
msmcleod replied to Jeff Marzolla's question in Q&A
I suspect the 32 channel / 24 channel interfaces use the same underlying driver, and Cakewalk thinks nothing has changed so doesn't bother querying it for more channels. After closing Cakewalk, try deleting AUD.INI from %APPDATA%\Cakewalk\Cakewalk Core - it will be recreated when you next start Cakewalk. -
New Sonar - Few things noticed, observations and some suggestion...
msmcleod replied to Shaan's topic in Cakewalk by BandLab
Although technically possible, it's not really feasible from a performance point of view - it would mean checking the current strips hidden status matches the presets and/or "Show only" options every time the menu is opened, or any time it evaluates whether a command can be processed. -
IIRC... MAGIX had a product called Movie Maker... they then rebadged it as Movie Studio. Then they bought Vegas, and released a "lite" version and called it Movie Studio, and renamed the previous Movie Studio back to Movie Maker. Then the Vegas team found maintaining two versions of Vegas was seriously hampering their productivity, so Movie Studio became the next upgrade to Movie Maker, and Vegas stayed as a single product. TLDR: Movie Studio 2022 was Vegas lite, Movie Studio 2023 is essentially Movie Maker Pro. IMO both are good products in their own right. I'm guessing it's no co-incidence that they're going for insolvency - the particular type of insolvency they're doing is the German equivalent of U.S. Chapter 11 - i.e. the bank/investors give them a year to reduce the number of products, streamline the organisation, and hope they're in profit in a year's time. FWIW, I had the opposite experience... I upgraded my old "Movie Maker" version of Movie Studio a few years back, only to find I'd been sold a dumbed down Vegas. I'm actually pretty happy it's back to Movie Maker - it might not be as powerful as Vegas, but for me it's way easier to use.
-
Not Liking the look of the New Sonar Interface
msmcleod replied to mark foster's topic in Cakewalk by BandLab
Apologies... looks like it's only in beta builds at the moment. Anyhow, at least you know it's coming.... ?- 223 replies
-
- 12
-

-

-

-
Looks like holding CTRL allows you to quick group "Hide Track" in the Track View, but not in the Console View. I'm on vacation at the moment, but I've let the team know. We should get this fixed.
-
Not Liking the look of the New Sonar Interface
msmcleod replied to mark foster's topic in Cakewalk by BandLab
There is actually - check out the slider at the bottom of Customization->Display within Preferences. -
It's now been implemented in the latest version of Sonar - i.e. you can now edit the External Insert description from within the plugin dialog, and it'll update the name in the FX bin when you close the dialog.
-
When Live Articulations are active on a track, any MIDI Transform articulations at the current Now Time will be applied to live MIDI input. This is useful for auditioning, and overdubbing on existing MIDI tracks with articulations. MIDI Trigger based articulations (i.e. key-switches) are not affected by this button. When the transport is running, they'll be sent out as usual - when the transport is stopped, they can be applied by clicking on the articulation section itself.
-
Who has a good video on ripple editing ? -solved-
msmcleod replied to mark skinner's question in Q&A
FWIW if I'm moving everything in time by a few bars, I find Project->Insert Time does the job for me. Under the hood, it's a far simpler operation than ripple edit, so there's much less chance of something going wrong. Another option is to use the arranger. -
I'd suggest: - Come up with a common list of plugins, and create a custom plugin layout that only uses those plugins. Make sure you're all only using those in your projects. - If you're using Sonar, use the new CWZ format for sharing, otherwise zip your project folder up - store this file in a common cloud location. Depending on your amount of cloud storage, you could consider using a naming convention for each version of the project, e.g.: 2024-03-26_15:40_XYZ ... where XYZ are the initials of the band member. This has a few advantages: 1. When ordered alphabetically, they're also in date order 2. Doing a "Save As" to this new filename will automatically "clean up" the audio files so your project zips will be smaller. 3. You can open several versions in CbB/Sonar at once, then pick & choose which tracks you want to keep.
-
Pressing F1 in the Mackie Control Dialog ( Utilities Menu -> Mackie Control 1 ) will show CbB's Mackie Control help. It's worth mentioning that the button mapping is different for each DAW, so what is labelled on your x-touch may not match what Cakewalk expects. For the full-size x-touch, and MCU / MCU Pro, you would normally use an overlay that fits over the buttons to relabel them. Several companies do them ( check eBay!) - but here's one example: https://store.birchwoodstudioandevents.com/Sonar-Overlay
-
Bear in mind that your reference track is likely a fully mastered track. Most mixed tracks are quieter than a mastered track in order to give headroom for the mastering process. Rather than trying to match the levels of your reference track, lower the volume of your reference track to match your song ( say around 3db - 6db ). This will give you plenty of room to play with when you come to master your song.
-
This can happen if you changed the USB port from the one you plugged the device into originally. Windows associates the driver with the original port, and gives this a new name because it's now in a different port.
-
The range of the pitch wheel is fixed between -8192 and + 8191. How this is interpreted as far as pitch changes is up to the synth - it could be either a per patch or global setting. Most default to 2 semi-tones. Not all synth plugins allow you to change the pitch wheel range, and not all will allow up to an octave.
-
Another option is to record with a piezo pickup, then run the audio through an IR to emulate it going through a mic. Something like this will do the job: https://pasttofuturereverbs.gumroad.com/l/ovkEn?layout=profile Any reverb or cabinet plugin that supports IR's will do the job, although I found I had to increase the gain to the plugin significantly (using an FX chain gives you up to +12db pre/post gain).
-
Clips with audio playing showing as flat lines in track view
msmcleod replied to EDT's topic in Cakewalk by BandLab
Your picture cache directory is probably full. The picture folder is specified in Preferences->File->Audio Data. Go to this folder in Windows explorer, and delete all the .WOV and .TR2 files in there. Any waveform pictures that were in there will be recreated the next time you open a project. -
In general Microsoft is very good with backwards compatibility of software. SONAR makes extensive use of Microsoft libraries, which makes compatibility far more likely. I've running SONAR Platinum on Windows 11 without issue. Device drivers for your audio device might be a different matter however, so best to double check there are Windows 11 compatible drivers for your audio interface.
-
New Sonar and negative track delay articulations
msmcleod replied to Steve Harder's topic in Cakewalk by BandLab
Not only can you have different delay times for different instruments, you can have different delay times for different note ranges and/or velocity ranges within the same instrument. This can be useful if you have a string sound that has a slower attack at lower velocities. -
Not Liking the look of the New Sonar Interface
msmcleod replied to mark foster's topic in Cakewalk by BandLab
It's in the oven....- 223 replies
-
- 15
-
-

-
-
Exporting Time Signatures in MIDI (for Beat Buddy)?
msmcleod replied to Theodore Kloba's topic in Cakewalk by BandLab
If you want to keep meta data such as tempo, time signature or key signature, don't export as MIDI - "Save As" instead using the Standard MIDI File format. -
Sonar will refuse to install on Windows 7. The new scalable UI relies on Windows API's that are only available in Windows 10 ( version 20H2 I think) and above.
-
The cheapest interface that will give you acceptable results is probably the Behringer UMC22. Personally, I'd avoid it and go for a second-hand Focusrite Scarlett 2i2 or Scarlett Solo. I'm still using 1st generation Scarlett interfaces (2i2, 6i6, 18i8 and 18i20), and they're solid good sounding interfaces. The 2i2 is now on the 4th generation, and they're also (apparently) the world's most popular interface... so finding a 1st or 2nd gen interface on eBay or Reverb should be easy. Also, if your guitar has a single-coil pickup and you're less than 2 - 3ft from your laptop/PC, you will likely get a buzzing noise - this is the guitar pickup picking up RF interference from the PC. It's even worse if you're using an old CRT monitor. Sometimes, running on battery (if it's a laptop) can help, but ensuring you're a couple of metres/6ft or so away from your PC will solve it.
-
IIRC, I think the answer is either no, or at the very least it won't affect everything. I think it's an overhang from the pre skylight interface days. Maybe @Ben Staton can clarify?
-
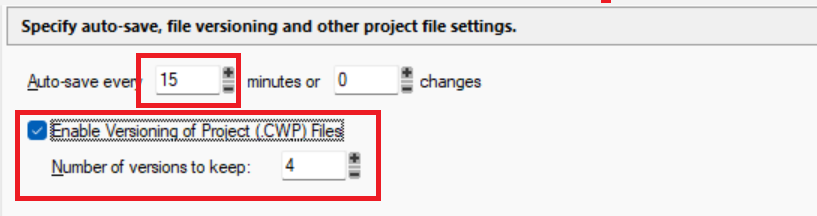
Auto-save works in two ways: 1. Automatic saving based on time and/or changes The automatic saving will save a temp copy called "Auto-save Copy of myproject.cwp" when the auto-save criteria kicks in. It leaves the original copy of your project alone, but the "Auto-save Copy of..." file is overwritten with the latest version every time it auto-saves. Due to how some plugins are (badly) implemented, it's probably best to leave the "changes" at zero, and stick to a time-based auto save. 2. Project versioning Project versioning works slightly differently. Every time you manually save, it'll rename your current project file on disk (adding it's last modified date/time as a file extension), and saves your current project using the original project filename. You can specify how many versions of the project you want to keep on disk - older versions will be deleted once it gets beyond the number of versions specified. There's nothing stopping you using both methods at the same time. These options can be found under Preferences->File->Advanced: I've often questioned why these methods are separate, but actually the more I think about it, it does makes sense: The auto-save is a backup copy you can go back to if something goes wrong (e.g. crash/power outage etc) The project versioning is a deliberate history of your saves, allowing you to essentially "check-point" your project every time you decide to save. If auto-save was also using project versioning, there would always be the danger of either filling your disk up with loads of project files, or deleting an older version of the project that you really wanted to keep.