-
Posts
643 -
Joined
-
Last visited
Everything posted by Chaps
-
 Try this. Open the Options menu at the top of the Console and make sure Allow Module Resizing is NOT checked.
 -
The icon shaped like a gear will open the insert soft synth options window, the icon shaped like two horizontal lines labeled properties will open the synth you've selected in the synth rack and its controls, if I understand your question correctly.
-
The synth rack only shows the synths I have added to my project, but its tools icon opens the synth properties window.
-
Maybe it's opening undocked and is hidden? The Keyboard shortcut for the synth rack view is alt+9 and that works for me, too. Does your browser open when you press b?
-
I rarely use the synth rack so I might be missing something, but I can open it from the Views menu.
-
Will there be a separate Sonar Free forum ?
Chaps replied to Sidney Earl Goodroe's topic in Cakewalk Sonar
After several years of frequenting this, and the legacy, forum my opinion is that the more sub-forums and threads there are the more likely it is that someone will post to the wrong one. There may not be an elegant solution to this problem, especially since the components of the free and subscription models are still fluid. -
Log out and then log in again if you haven't already. Those modules should show up and be available after you log in after installing them.
-
The download links are are the bottom of the page. Sonar X3e Updates
-
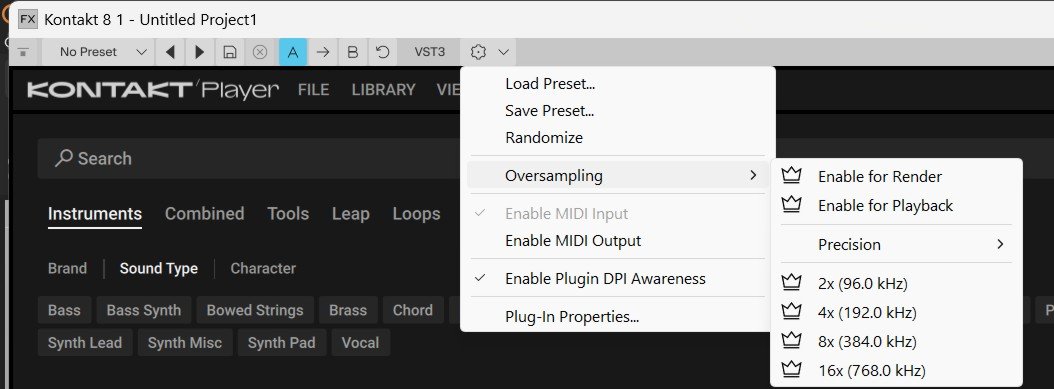
Enable/Bypass Plugin Oversampling Documentation
Chaps replied to timboalogo's topic in Cakewalk Sonar
I meant the oversampling feature. When I try to use it it takes me to the Get Membership screen.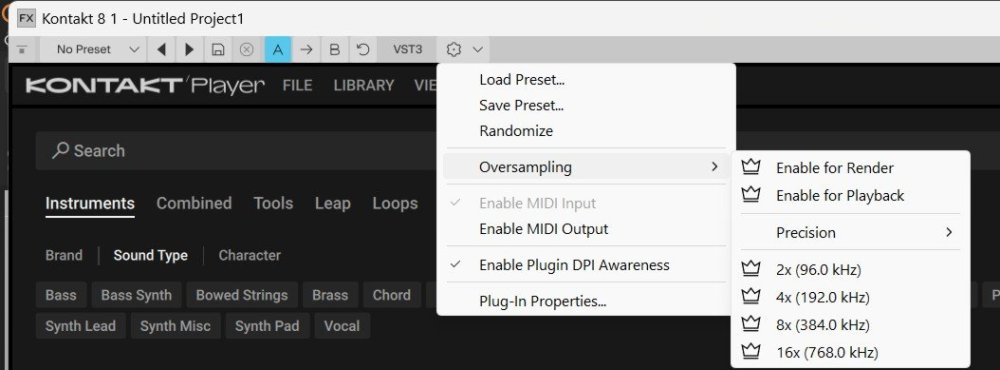
-
Enable/Bypass Plugin Oversampling Documentation
Chaps replied to timboalogo's topic in Cakewalk Sonar
Unfortunately, this feature is not available in the free tier. -
Session Drummer no longer installed with free tier?
Chaps replied to Chaps's topic in Cakewalk Sonar
Ah, okay. Thanks for clearing up my confusion. -
I installed the latest Sonar update today with the Product Center and now Cakewalk Session Drummer has a little crown on it denoting that it is a premium addon now. I have Session Drummer 3 VST2 in projects and they still load and play fine, I assume because I had it already because I have X3 Producer installed. Is the new 'premium' Session Drummer VST3 and how will this affect those who only had Session Drummer through an earlier Sonar installation where it was free?
-
I've never had any problems signing in to Bandlab for CbBL activation (did it 1 minute ago) so my advice is mostly theoretical based on my experiences with browsers and other users' comments. First, I would clear Bandlab cookies from the browser and clear the cache. Then I would try to sign in from Cakewalk by Bandlab's Help menu. That should take you to your account at Bandlab where you can sign in and activate CbBL. That process always works for me, anyway. Alternately, sign out in the Cakewalk Product Center and then click the Please sign in to BandLab banner in the Cakewalk Product Center. This will also open the Bandlab login page at the BandLab website. If you can successfully login to BandLab that way I would reinstall Cakewalk by Bandlab using the Cakewalk Product Center. Maybe you've already done all that but I always fall back on the basics when something goes wrong for me on my computer.
-
For sure use the Product Center. If that does no good then John Vere's post is your only recourse.
-
This is one of my favorites from Eva Cassidy.
-
I've never seen that behavior before but what I would do is to reinstall everything with the Cakewalk Product Center and reboot.
-
That's great but I prefer
-
If I recall correctly, the default location for Cakewalk projects is C:\Cakewalk Projects . All versions should have this as the default. You can change the location in Edit>Preference>File> Folder Locations (as I have done) if you want them on a different drive, for instance. If you are saving the audio ( Copy all audio with project ) I don't see why there would be any problems or conflicts. The projects in the Cakewalk Projects folder are the ones that will show in the start screen.
- 1 reply
-
- 1
-

-
Old projects created in SONAR professional using TH3 from overloud
Chaps replied to warrickhale's topic in Cakewalk Sonar
If it was registered and you can login to the Legacy Cakewalk website you might be able to download the program from there. If it was registered and you don't know your password Cakewalk support might be able to straighten that out for you. https://legacy.cakewalk.com/ You can check out the Overloud site to see if anything interests and you can sign up for a free account. Sometimes they offer things for free. Other companies offer free guitar sims. Here are two that I use. Guitar Rig 7 Player IK Multimedia Free Guitar Sims and Other Stuff -
Old projects created in SONAR professional using TH3 from overloud
Chaps replied to warrickhale's topic in Cakewalk Sonar
Re-install the Cakewalk version that TH3 came with. If you use the Advanced installation method you can skip installing the program files and just install the plugins that are missing. Then re-install the latest version of Sonar. That's what I would do, anyway. -
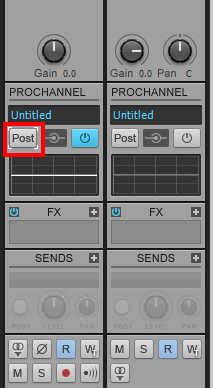
Hide the Pro Channel and the Track Inspector will have a POST button that selects if the Pro Channel is Pre or Post the FX Bin.
-
If it were me I would do three things. 1: No samples are loaded in Session Drummer until you open one at the bottom left corner where it says New Program. Click that and you should get a list of available kits. Or click PROG and load a kit from there. If that doesn't work then I would try steps 2&3. 2: I would confirm that everything (Kits, Patterns, Programs) was in the Session Drummer 3 folder at C:\Program Files\Cakewalk\VstPlugins\Session Drummer 3\Contents 3: I would confirm that the Cakewalk VST folder ( C:\Program Files\Cakewalk\VstPlugins ) was in the list of folders being scanned by the Cakewalk Plug-in Manager.
-
Cakewalk Drag & Drop Issue: Missing Plugin Properties Window
Chaps replied to Yudi Musik's question in Q&A
Which version of Cakewalk software are you using? In Cakewalk Sonar, after inserting the synth open the Synth Rack View and click the round-ish Insert soft synth options button, set the options the way you want, and then put a check in the Ask This Every Time box. Then the synth properties for the synth should open when you insert a synth. -
Ditto. Vocals sound so over-compressed that every little sound is exaggerated. No dynamics at all. I could listen to Eva Cassidy sing live with a cold all day. She sang from the heart and the recordings didn't get in the way.
-
I'm glad that helped. I learned a few things too while making it, and it probably didn't take more than half an hour or so once I got started. The note map in SSD 5.5 was very helpful, though I did have to make screen captures of the note assignments for reference because I couldn't get the SSD window to stay open while I edited the new drum map. I will probably make some more drum maps tailored to the way I use drum sounds. Like some drums, addictive Drums 2 specifically, have certain drum samples very far apart on a map where I would prefer them much closer. Another project for another day...