msmcleod
-
Posts
7,191 -
Joined
-
Last visited
-
Days Won
39
Everything posted by msmcleod
-

Making music is expensive, my RME Fireface II died...
msmcleod replied to RexRed's topic in Instruments & Effects
The sound quality difference for the preamps doesn't surprise me to be honest. The converters in the Behringer gear are absolutely fine, but the preamps themselves sound really harsh to my ears. RME on the other hand, have top of the range pre-amps. @RexRed - As long as you're recording line-level signals, the Behringer should sound fine. So if you've got any other mic-pre's you can use in the meantime, just to get it up to line level, I'd give them a try. -
@scook is correct - your system files are not in sync, either due to an incomplete Windows Update, or due to some other application/plugin installing older system files. Follow the instructions in this post here: The first step is what @scook suggested, but there are additional steps afterwards you should take to ensure your Windows installation is in sync.
-
I got it working by: 1. Running CbB as administrator inserting the synth, then closing CbB - note that I only ran it as administrator this one time. 2. Adjusting the registry permissions for HKEY_LOCAL_MACHINE\Software\rgc:audio software , giving Full Control to all of the users - i.e., you need to click on each user one by one and give them Full Control. 3. Run CbB as a normal user and insert the synth.
-
FX Chain not loading in Cakewalk by Bandlab
msmcleod replied to MattBWashington's topic in Instruments & Effects
This error is usually caused by your system files being out of sync, either by an Windows update that was only partially successful, or maybe a recent plugin install forced an install of older components. The first thing to do is to install the VC++ redist pack here: Next, I'd recommend trying the following: hold down the Windows Key and press X (which brings up a menu) then press A. This will open Windows PowerShell. enter the following: sfc /scannow this will attempt to scan and repair the windows system files. This may take a while. If this doesn't work, try entering this: DISM /Online /Cleanup-Image /ScanHealth this will try to download and replace any corrupt windows files, and may take a few minutes. Afterwards, run sfc /scannow again. -
^^ This. If you've any 3rd party anti-virus or firewall programs, disable them when downloading/installing Cakewalk.
-
CAKEWALK RECORDS OUT OF SYNC.......EVERY TIME.
msmcleod replied to CostaRicaCarl's topic in Cakewalk by BandLab
First of all, make sure you're using the manufacturer's ASIO drivers ( and not ASIO4ALL ) Secondly, make sure your Record Timing Master is set to the correct audio device. -
VS700 Functionality with Cakewalk Bandlab in Win 10
msmcleod replied to Silvan7's topic in Cakewalk by BandLab
@torerk Is your MIDI driver mode set to UWP? Try opening Cakewalk with no project loaded, and setting the MIDI driver mode to MME.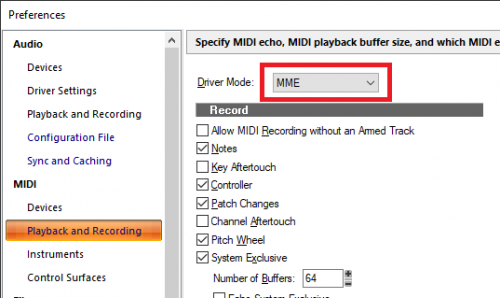
-
What are Ctrl+Page Up and Ctrl+Page Down really doing?
msmcleod replied to Sven's topic in Cakewalk by BandLab
The best way to find what a keyboard shortcut does, is by using the "Locate Key" button in the Keyboard Shortcuts page in preferences: -
Turn off Velocity Sensivity - MIDI Controller
msmcleod replied to lucas98cp's topic in Cakewalk by BandLab
I'm not in the position to try this out ( house being rewired at the moment, so I'm on a minimal setup! ), but in theory you should be able to do this by creating an extra two MIDI tracks, so: 1. Create two MIDI tracks, one for each controller. 2. Set the input of each track to only match the MIDI port / channel that each controller is on. 3. Put the Velocity MFX on the track you want velocity fixed for 4. Set the output of both MIDI tracks to the Synth you want to route it to. 5. Enable MIDI echo on both MIDI tracks. Note that the MFX applies the changes in real-time, so any MIDI data recorded will have the original velocities recorded. You can apply the velocity changes to the recorded clips by: Selecting the track by clicking on the track's number From the main menu, Process->Apply Effect->MIDI Effects If you want the velocity effect to apply to further MIDI input, uncheck the "Delete Effects from rack" checkbox Click OK on the dialog -
It should be in the Cakewalk subfolder in your Downloads folder.
- 1 reply
-
- 1
-

-
Lastest CbB installed - Sustain Pedal Issue
msmcleod replied to SonusProject's topic in Cakewalk by BandLab
Sounds like you may have a dirty USB connection, a bad USB cable, or pending USB hub failure if you use one. It could even be a power supply issue in the PC itself. I'd start by giving your USB ports / cables a clean. Electrical contact cleaner, or even WD40 should be fine for that. -
First of all, check the VST scan paths in preferences on both machines. It's likely you've added paths ( e.g. C:\Program Files\VSTPlugins or C:\Program Files\Steinberg\VSTPlugins ) on your old machine, and not added them on the new one. Native Instruments (Kontakt) may have an additional path - it does on my machine. Secondly, check that all sample libraries are in the same location on both machines, otherwise your Kontakt instruments won't load properly when transferring between machines. I've used a symlink on all of my machines to my Kontakt libraries, so they're all looking at the same "fake" directory even though the libraries are stored in different actual folders.
-
Lastest CbB installed - Sustain Pedal Issue
msmcleod replied to SonusProject's topic in Cakewalk by BandLab
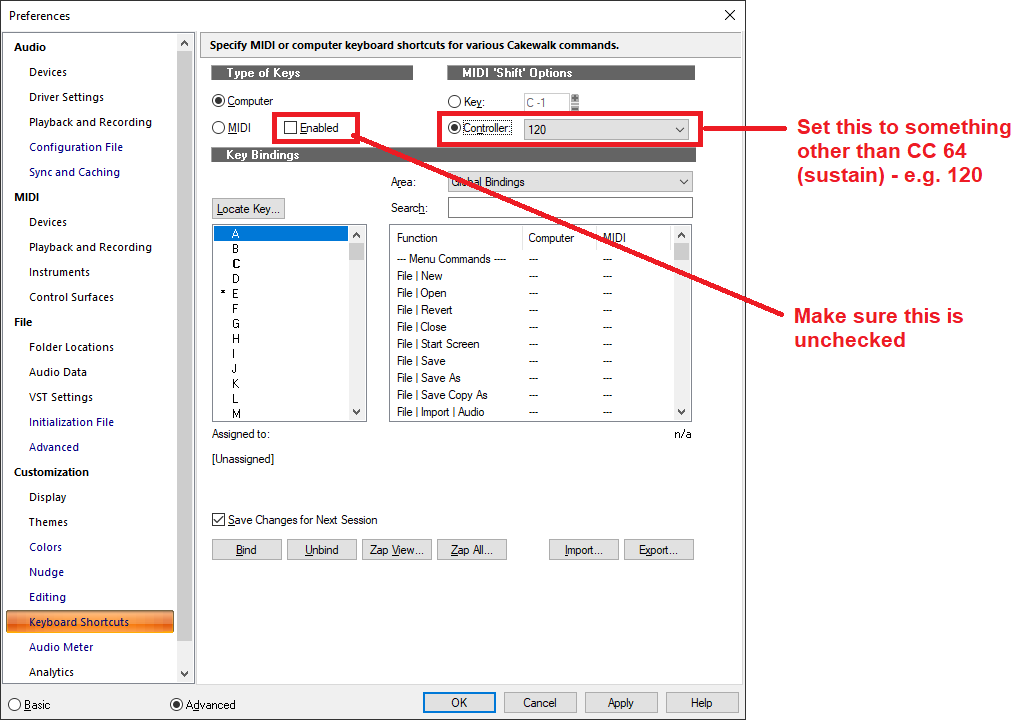
A common reason for pedals not working is because it's been set as a SHIFT key within keyboard shortcuts. Within the Preference->Keyboard Shortcuts, change the CC from 64 to something else, and uncheck "Enabled" at the top:
-
[Solved]Can't "Unmute" Punch In/Out Recordings (Version 22-06)
msmcleod replied to Heinz Hupfer's question in Q&A
Looks like small error in the logic - if you happen to have a loop end time that is smaller than the punch out time, it'll use that. Easiest way around this is to set the loop end time to your punch out time ( shouldn't matter if looping is enabled or not). -
[Solved]Can't "Unmute" Punch In/Out Recordings (Version 22-06)
msmcleod replied to Heinz Hupfer's question in Q&A
That's the comping tool you're using, and it looks like your lanes are not identical, which is likely to confuse it. Have you tried just pressing "K" to unmute them? -
Not really. I've had to do this in the past when I moved from hardware synths to VSTi's. What I did was: 1. Add the instrument tracks with the synths I wanted in the same order as the existing MIDI tracks 2. Selected all the original MIDI tracks 3. While holding down SHIFT, drag the first clip on the first original MIDI track to the first instrument track. 4. Deleted the MIDI tracks. Another way of doing it is to insert your synths without creating corresponding MIDI tracks, then just set the output of your MIDI tracks to those synths. You could then select each MIDI / Audio track pair, and make them into instrument tracks one by one, but this step isn't strictly necessary.
-
batch selection of tracks and expander output
msmcleod replied to fastdraw's topic in Cakewalk by BandLab
Select your tracks, then choose "Selected Track Outputs" from the Track View "Tracks" menu: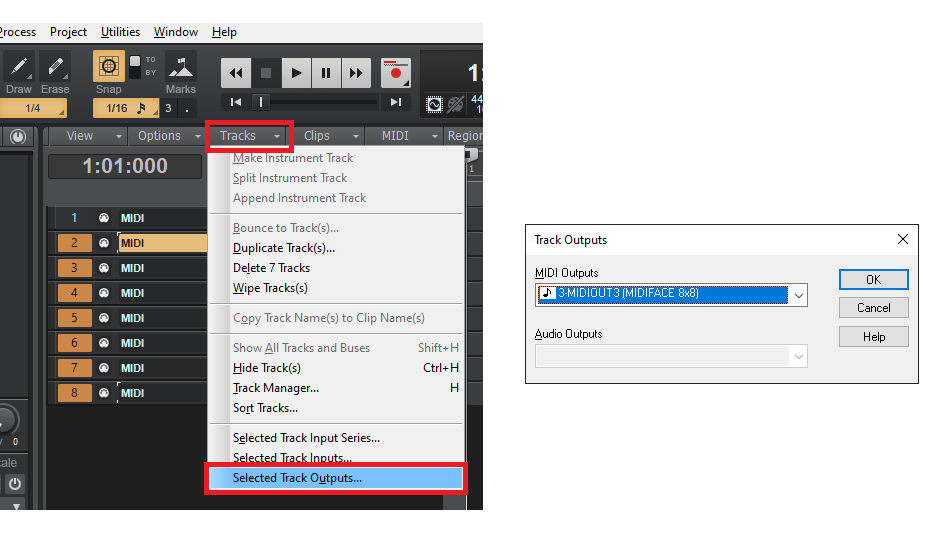
-
batch selection of tracks and expander output
msmcleod replied to fastdraw's topic in Cakewalk by BandLab
Normally holding down CTRL will group assign everything. -
The option to show/hide controllers in the clips view will be available in the next main release. The controllers will also be drawn slightly darker with the notes appearing on top at their current colour, so the notes will be far more visible.
-
I'm not sure how you've set up routing to this synth, but it sounds like there's some MIDI feedback going on. Check that none of your synths have MIDI out enabled unless you really need it, and restrict the MIDI input on the Z3ta track to only what you need.
-
What you're seeing there are CC events - not CC automation ( sorry to be pedantic! ?) Having an option in the Track View "View -> Display" submenu to show/hide CC's is certainly doable. I'm not sure having it per-track is a good idea though. Firstly, none of the other options are per track; and secondly, it would be really easy for a user to forget they'd switched it off on one track and wonder why their controller data is being shown on some tracks and not others. As a workaround in the meantime, you could always switch the track filter to "Notes".
-
A dropout has stopped the audio engine
msmcleod replied to Harley Dear's topic in Cakewalk by BandLab
You really don't want to be using the "Balanced" power scheme. If there's a "High Performance" scheme, use that one - better still, create your own with CPU min & max set to 100%, and any "turn off device after.." set to never. -
Distorted sound after dropout, highest buffer selected.
msmcleod replied to Misha's topic in Cakewalk by BandLab
You could try stopping / restarting the audio engine: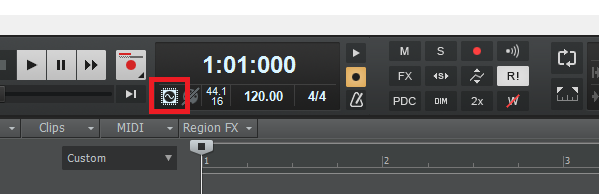
-
Process -> Length certainly does, and it'll do any articulations, and track envelopes (if selected) as well. The stretch tool only does notes + CC's, and not track envelopes.
-
Split Clips - Can I set default to 'Split at Selection'?
msmcleod replied to Sven's topic in Cakewalk by BandLab
I certainly use Split at Time - if I need to split at selection, I'll use the split tool and just drag the selection while the split tool is active (i.e. ALT + drag across the clip with the smart tool). If I need to split over all tracks, I'll normally just create an arranger section then right click->split at boundaries.