


msmcleod
-
Posts
7,191 -
Joined
-
Last visited
-
Days Won
39
Everything posted by msmcleod
-
MME is the worst performing driver mode, and is most likely your issue here. Here are the driver modes in order of best performance: ASIO - use this when your audio interface has it's own dedicated ASIO driver (except if it's an onboard Realtek device) WASAPI Exclusive - use this when using an onboard audio device. Performance should be almost as good as ASIO. WASAPI Shared - use this when using an onboard audio device that doesn't support Exclusive mode WDM - for use with very old devices MME - for use with even older devices What audio interface are you using? If we know this we may be able to suggest a solution.
-
Yes, this is correct - in essence: There is only ever one auto-save file, which is overwritten each time at either the interval, or number of changes. This is totally separate from the versioning. The versioning works for manual saves. So each time you press CTRL + S, it will rename the current .cwp file, giving it the current timestamp, and save your .cwp. Any older versioned files greater than the "number of versions to keep" will be deleted. When an auto-save interval is specified, auto-save won't kick in unless the project is dirty, but as soon as you do change something it'll auto-save right away if the previous auto-save file is older than now minus the interval time.
-
 This is the correct command for switching to the clip gain. The track filter (and the automation lanes for that matter), can show many envelopes - clip gain just happens to be one of them. We added this particular shortcut for convenience, because it's a track filter that is frequently used by users. Others find it more convenient to just add an automation lane.
 -
First of all, unless you need it, you should turn off MIDI Out on the VSTi. This can be done from the VST2 / VST3 menu on the title bar of the plugin UI window. If you do use MIDI Out on the VSTi, be selective about which MIDI IN is selected for that track - i.e. don't set it to None or Omni. If you're using a hardware controller, you should either: 1. Disable the MIDI out to your controller within Cakewalk's MIDI devices, or 2. Turn "local off" on the controller, and use MIDI echo in Cakewalk, or 3. Leave the controller as is, and turn MIDI echo off within Cakewalk. Which option you choose depends on a number of factors, but unless you need Cakewalk to output MIDI to your controller, option 1 is the easiest.
-
For un-rendered region FX, all cakewalk is doing is saving the Melodyne state along with the project. As long as you're using the same version of Melodyne, it should be safe to have projects with un-rendered region FX. The problem is, AFAIK Celemony makes no guarantees that that state will be compatible with future versions, and it's likely at some point you'll upgrade Melodyne forgetting you have older projects with un-rendered FX. This bit me when I upgraded from Melodyne v2 to v4. Nowadays I always copy the track and archive the original, then render any Melodyne edits to the copy. If I'm 100% happy with the edited track, I'll delete the original.
- 10 replies
-
- 1
-

-
- crashing
- modo drums
- (and 1 more)
-
I've got both a 2-tier stand and a 3-tier stand... it was fine with lighter keyboards, but it always felt a bit unstable to me with heavier keyboards on the tiers. I had my CZ-1 on the lower tier for a while, but it just felt scary. Hopefully you'll be able to get a rugged enough stand to take both. Nowadays, I just put my Korg X5D directly on top of my SL990 and rely on a guitar-style MIDI program change pedal for changing sounds. I've got a bank of sustain pedals and an expression pedal for any further control, and a stool I can sit on at near-standing height so I can use them with both feet without falling over! I used to use a 65W combo amp on a wedge stand, more or less next to me, positioned 45 deg between the back of the stage and to my left. This was usually loud enough to hear without blasting my ears out. I used the same amp & stand as a wedge monitor when I was doing my guitar/singer or bass/singer gigs.
-
Scrolling the Track View with Arrow Keys
msmcleod replied to jimlynch22's topic in Cakewalk by BandLab
Map the Left/Right keys to "Start/Stop Rewind" / "Start/Stop Fast Forward":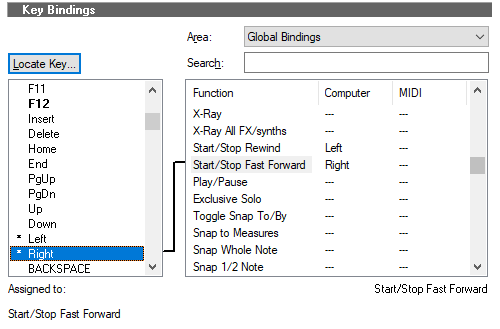
-
FR: Clearing all FX in a FX bin in audio tracks
msmcleod replied to Ricky Wayne Hunt's question in Q&A
There's no single operation to delete them all, but you can do it this way: 1. Right click -> Convert to FX Chain 2. Press the Del key That's one mouse click and one key press. I can't see how doing a multiple selection / deletion would be any quicker. -
Cakewalk needs to be re-activated at least every 6 months. Normally, updating Cakewalk from inside the application will automatically refresh activation. If you don't refresh activation, after 6 months you'll still be able to use Cakewalk, but Save and Export will be disabled. Because Cakewalk is now free, we have no sales figures to refer to, so activation is the only way we can keep a track of how many active users we have and what version they are running.
-
This is not strictly true - The correct way to chain MIDI hardware is by connecting the midi Thru from synth X to midi in on synth Y. Some synths have a "MIDI Out as thru" or merge function that merges MIDI Out with MIDI In, which allows the MIDI Out to act somewhat like a MIDI Thru. However, there are differences: MIDI THRU - echo's exactly what came in on the MIDI IN port MIDI OUT (with no thru/merge function) - only outputs what this particular synth is sending (i.e. what you're playing on the keyboard), anything that came in on the MIDI IN is not sent out. MIDI OUT (with thru/merge function) - outputs exactly what came in on the MIDI IN port as well as anything you're playing on the keyboard. Obviously, if you're not physically playing anything, in this mode its essentially the same as MIDI THRU, but be aware that some MIDI data may have been filtered out or re-ordered. You should also be aware of cable length limits when chaining synths in this way, especially when using MIDI THRU.
-
RESYNC AUDIO IN PROJECT / TAKE POSITION LISTING IN TIME
msmcleod replied to Milton Sica's question in Q&A
To be honest, I'm sceptical about relying on such information in this particular use-case. The fact that Cakewalk is saying that the files are missing even though they're not, would indicate the part of project that stores information about the clips has been corrupted, so there's a very good chance you couldn't rely on any other clip information as this may well be corrupted too. A better question would be how it got corrupted in the first place. Although it's possible it could be a Cakewalk bug, I suspect it's more likely to be a plugin overwriting memory it shouldn't be - else we'd be seeing reports of this all the time. If you want a bullet-proof backup of your audio files, maybe consider exporting the clips as broadcast waves using the Export Dialog, and using a filename such as {projectname}-{tracknumber}-{laneindex}-{clipindex}-{trackname}-{clipname} It should then be easier to drag these back into the project if necessary. -
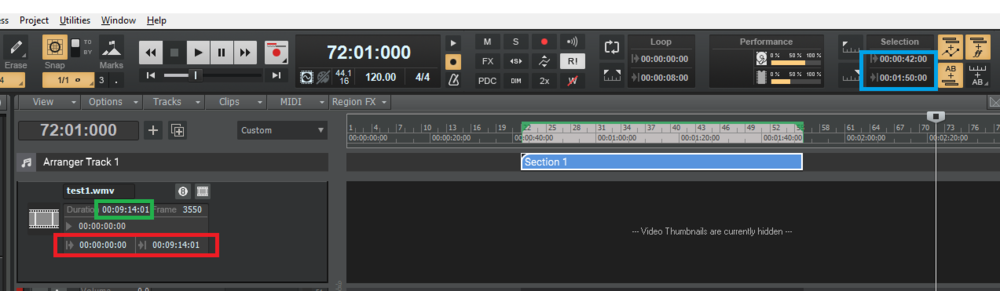
@Adam - I think I've found a workaround: 1. Make sure the Selection Module is showing as either medium or large 2. Set "Display all times as SMPTE" to checked within Preferences->Customization->Display 3. Create arranger sections for all the sections you want to export 4. Click on an arranger section, so it selects both the section and the events underneath it 5. Copy the selection start/end time (shown in blue below) to the video track start/end time (shown in red below): 6. With the selection still active, export your video 7. After exporting, set the video start time to 00:00:00:00 and the video end time to the time shown in green above. Repeat for each section. I'll make a suggestion to the team that we incorporate this somehow into the export, so this can be done for multiple sections in a batch, or at least be able to do it per section without manually having to edit the video start/end time.
-
Keyboard shortcuts don't use the character that pressing a key shows, instead they use the actual keyboard code sent from the keyboard itself. Keyboards designed for different countries may result in different codes than the ones you might expect. For example, UK keyboards while close to US keyboards, give different results on certain keys. The only sure way to find a particular key is to use the "Locate Key" button on the keyboard shortcuts screen and press the key you want to map.
-
Wishlist: contextual help, magnifier, no-docking control
msmcleod replied to Ronman's topic in Feedback Loop
For some weird reason this CTRL + ALT + L didn't work for me.... CTRL + ALT + M (which cycles through the magnifier views) did though. You're right though - Lens view is the one to use. -
Wishlist: contextual help, magnifier, no-docking control
msmcleod replied to Ronman's topic in Feedback Loop
The Help Module is context sensitive and will show a summary of the control you're hovering over. Pressing the "Y" key will bring up the help module. Pressing F1 is also context sensitive, but will go to the overall section that control lives in ( e.g. Tracks View, Clips View, PRV etc ). This is built into Windows. Press Windows Key & "+" key to enable it; Windows Key & Esc to disable it. If you just want finer control, holding the SHIFT key when moving a control will move it at a much finer level. If you don't want something docked, un-dock it, close it and save as a custom workspace. Alternatively just hit "D" to hide the multi-dock. We'll consider this. -
Maybe a plugin on your master bus that has reverted to demo mode? Major Windows updates can cause this with some plugins. Try exporting with your FX bypassed - it the problem goes away, enable FX again and disable each plugin one by one to track it down.
-
Automating the threshold control is the way I usually do it.
-
Great to hear BBT are going to continue - they're one of my favourite bands. I'm really tempted to go to that gig if I can get tickets... it's a 400 mile trip, but I have family in Aylesbury.
-
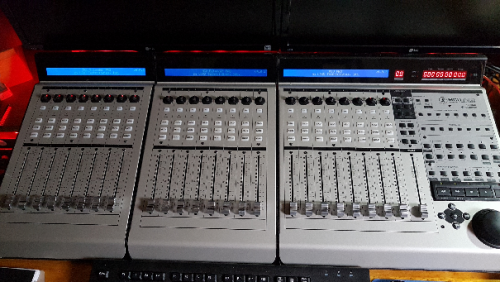
All of the M-Audio MIDISport range share the same drivers, which unfortunately are not playing well with Windows 10 any more - they suffer from lost / hung notes. MCU = Mackie Control Universal. These are the three original "MCU" units Mackie released: The MCU Pro / MCU Pro XT's look like this, and don't need MIDI interfaces as the MCU Pro has built in USB:
-
I'll probably need the zipped folder... if you have a OneDrive or other cloud account, just upload it there and PM me the link. Let me know if this doesn't work, and I'll PM you my email address.
-
I'm not sure if it was your support submission or a similar one, but I do remember looking into this issue and I couldn't find any way to reproduce it. Unfortunately with these sorts of issues, until we can get a solid repro, they're almost impossible to fix. Feel free to PM the project directly, and I can look at it again.
-
Yes, MIDI interfaces that are built into audio interfaces are fine. The MIDI ports in my Scarlett 6i6 work fine with the MCU too.
-
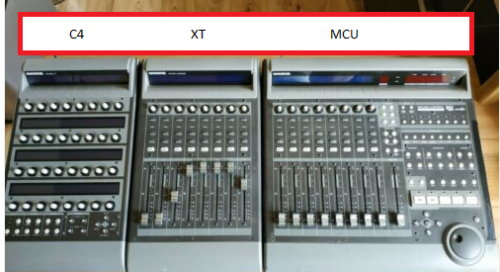
I've got an original MCU... and I've also got an identical MIDI cable to yours, and that cable does not work. The reason being that it MIDI data needs to be transmitted at 31250 baud, however it readily receives data at the USB2 speed 480Mbps. So it has to store all that data received at one speed, and slowly transmit it at another. In order to do this it has to store the data internally, however it's internal storage is literally tiny... something of the order of 8K. This may be fine for 8 to 16 notes played on a keyboard, but no where near enough for many continuous controllers, and certainly not for the traffic generated/received by the MCU. You need a much better MIDI interface for the MCU. I used to use a Midiman (M-Audio) Midisport 8x8 - this worked fine in Windows 7, but the drivers are old and too unreliable in Windows 10. The only modern interface I've found reliable enough for the MCU is the MidiTech Midiface 4x4 or Midiface 8x8. I use the Midiface 8x8, and it works perfectly with my Mackie MCU + XT + C4, as well as receiving data from my controller keyboards. At the moment, this is really the only interface I've found that works in Windows 10. I've tried a few other makes such as MidiBox, and ESI, but they all use the same chips as that MIDI cable, and won't support any busy MIDI traffic.
-
Cool free program: WavePad Sound Editor
msmcleod replied to Clint Swank's topic in Instruments & Effects
Double-clicking the task will also recall the task settings. -
Keyboard shortcut to go to first marker
msmcleod replied to norfolkmastering's topic in Cakewalk by BandLab
try: CTRL + Home then CTRL + SHIFT + Page Down


