


msmcleod
-
Posts
7,191 -
Joined
-
Last visited
-
Days Won
39
Everything posted by msmcleod
-

Arrangements: suitable for a high number of sections?
msmcleod replied to Multi-Sonik's topic in Cakewalk by BandLab
The {trackname} tag will use the section name when exporting arranger sections ( or the arrangement name when exporting arrangements )- 6 replies
-
- 2
-

-
- arranger track
- section
- (and 1 more)
-
Why Did Bandlab Change So Many Default Features From Sonar?
msmcleod replied to criticsconfession's question in Q&A
I was told the issue was that users were accidentally holding down CTRL and inadvertently changing everything when they didn't mean to, which is why it was changed to not quick group unless there was a selection. In any case, if you really do want to change everything, just press CTRL + A before you do your adjustment. -
The switches have nothing to do with how suitable it is with the DAW, it's about what combinations are most suitable to the thing you're recording. 99% of the time you want the directivity switch set to Cardioid. The hi-pass (sometimes called low cut ), rolls off lower frequencies. Unless you're recording a kick drum or a bass guitar amp, you may want to switch this on to help get rid of low-end rumble. The only thing is, it's fixed at a particular frequency, so you may find that it sounds better with this switched off, and opt to use EQ inside the DAW to deal with any unwanted low frequencies. Just use your ears on this one. Unless you're recording REALLY loud instruments, I'd advise keeping the -10dB attenuator switched off.
-
FEATURE REQ - Ability to Easily View and Edit Bank/Patch Events
msmcleod replied to Michael Ennis's topic in Feedback Loop
You can change banks in articulations. You need to use: For "normal" bank changes (i.e. MSB/LSB) - use Kind = CC 14b , Note/CC = 0, Vel/CC = your bank For Controller 32, use Kind = CC, Note/CC = 32, Vel/CC = your bank For Controller 0, use Kind = CC, Note/CC = 0, Vel/CC = your bank For "Patch 100", use Kind = Patch, Note/CC = your bank Then add your Patch event immediately afterwards. -
Thanks for the report - it's fixed for the next release.
- 5 replies
-
- 1
-
-
- inspector notes
- &
- (and 1 more)
-
It's most likely the filename you've chosen isn't resulting in a unique filename for each track, so each exported track is overwriting the previous one, leaving only one at the end. Make sure your filename has something that makes it identifiable such as {trackname} or {tracknumber} so that it'll be different for each track. I normally use this filename for track exports: {projectname}-{tracknumber}-{trackname}
-
New Korg M1 vst3 crashes every project
msmcleod replied to TVR PRODUCTIONS's topic in Instruments & Effects
@TVR PRODUCTIONS - is it only loading older projects that is the issue, or can you not use the new M1 VSTi at all ? FWIW v2.3.3.0 is working fine for me in new projects, but I can't find any older projects with M1 that have an issue. -
If Cakewalk itself is logged into BandLab, and you've got an internet connection, then it'll automatically re-activate when your activation period is close to running out, or when you install a new Cakewalk update. Alternatively, you can force re-activation by selecting "Refresh Activation" from the Help menu, which will give you another 6 months.
-
Extertnal Insert - De Coupling not working
msmcleod replied to El Gato Loco's topic in Instruments & Effects
Something isn't right here... I've set up the same myself and getting the same result. I think its a bug. I'll need to look into it further. In the meantime, if you can sacrifice input/outputs 6 and 8, just use input/outputs 5 and 7, ditch all the aux tracks, and use a separate external insert on each track. The external insert is restricted to stereo pairs, so you can use the left of 5/6 (i.e. 5) for one external insert,, and the left of 7/8 ( i.e. 7 ) on the other. -
Extertnal Insert - De Coupling not working
msmcleod replied to El Gato Loco's topic in Instruments & Effects
Is the aux track's output set to the SILENCE bus? -
Extertnal Insert - De Coupling not working
msmcleod replied to El Gato Loco's topic in Instruments & Effects
Ah, yes - you should be using the send pan feature. Set Guitar 1 to 100% L, and Guitar 2 to 100% R. Remember to set the inputs of your return tracks to DBX L / DBX R respectively. This will make them mono. If they're set to DBX S, then that's why it's coming out as hard panned. Also note the SILENCE bus to avoid the pre-compressed guitar coming out of the mains from the source tracks, and also the post-compressed sound coming out of the mains from the DBX aux track.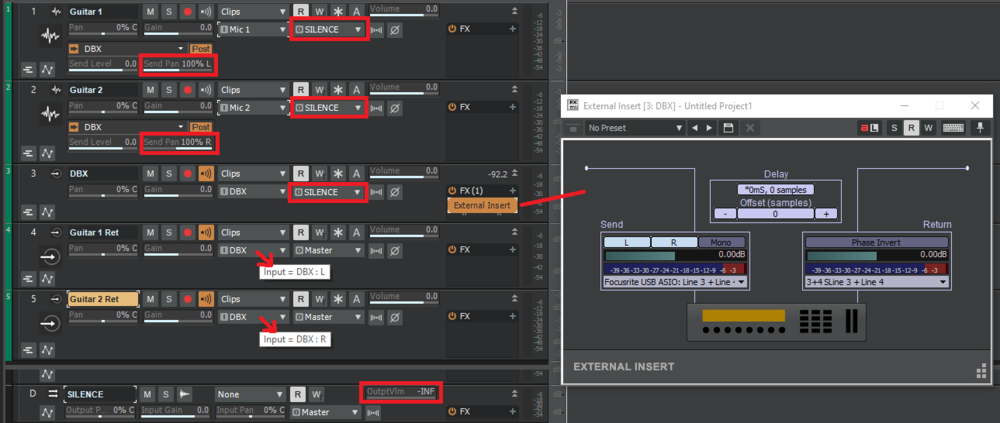
-
Extertnal Insert - De Coupling not working
msmcleod replied to El Gato Loco's topic in Instruments & Effects
I'm not sure to be honest... although I do use other DAW's from time to time, I rarely use external inserts. It's very much a limitation rather than a bug. Back when it was implemented, I suspect the primary use case was to allow the use external stereo reverbs, as reverb VST's are so CPU intensive and computers were slower; and the thought was that external inserts were the exception rather than the rule, so having to sacrifice a stereo pair for each external insert wouldn't be a huge deal. Mono inserts are in our backlog of things to do, but it's a tricky thing to implement, and I've no idea when we'll get around to implementing it. The steps I've described will however allow you to use external mono inserts, albeit with the inconvenience of having your tracks split up into two before/after the external effects. If you don't want your tracks split up, and you're not using channels 7/8 on your focusrite, then you could easily use an external insert on both tracks - i.e. your first track would use in/out 5 & 6 ( connect the dbx to in/out 5 with in/out 6 not being used), and your second track would use in/out 7 & 8 ( connect the dbx to in/out 7 with in/out 8 not being used). -
Extertnal Insert - De Coupling not working
msmcleod replied to El Gato Loco's topic in Instruments & Effects
No - this is something completely different - it is for combining several separate audio interfaces. It won't change the fact that Cakewalk's external insert is stereo only. To have two separate mono inserts, use the method I described in my earlier post. -
Extertnal Insert - De Coupling not working
msmcleod replied to El Gato Loco's topic in Instruments & Effects
This is how to do this: Let's assume you've two audio tracks: Guitar 1 and Guitar 2... 1. Set the output of Guitar 1 to a new Aux track ( Aux 1 ) 2. Rename this track to "dbx 266" 3. Now set the output of Guitar 1 to a new Bus, 4. Rename this bus to "Silent" and turn it's volume down all the way. 5. Set the output of dbx 266 and Guitar 2 to the Silent bus. 6. Create a new send on Guitar 1 to "dbx 266 L", and pan it 100% L 7. Create a new send on Guitar 2 to "dbx 266 R", and pan it 100% R 8. Put your external insert in the FX bin of the "dbx 266" aux track 9. Set the input / output of the external insert to Focusrite 5/6 10. Create two new audio tracks: "Guitar 1 ret" and "Guitar 2 ret" 11. Set the input of "Guitar 1 ret" to "dbx 266 L" 12. Set the input of "Guitar 2 ret" to "dbx 266 R" What is happening... Guitar 1 track is going to the Left input of "dbx 266", and being sent out via Focusrite output 5, and coming back in on Focusrite input 5 Guitar 2 track is going to the Right input of "dbx 266", and being sent out via Focusrite output 6, and coming back in on Focusrite input 6 "Guitar 1 ret" is getting the Left output of "dbx 266" (i.e. the effected signal coming in from Focusrite input 5) "Guitar 2 ret" is getting the Right output of "dbx 266" (i.e. the effected signal coming in from Focusrite input 6) For controlling guitar volume, use the fader on the "Guitar 1 ret" / "Guitar 2 ret" tracks. You can also use the FX bin in these tracks for any processing AFTER your dbx 266. -
It's referring to the apps tab in BandLab assistant.
-
An Aux track is simply an audio track that has a patch point as its input. You can prove this by creating a patch point and audio track separately, and then setting the input of the audio track to the patch point: One thing you might have noticed... both the send to the patch point in your audio track, and the input of the Aux track list the Patch Point Left, Right & Stereo. So to create mono aux track, you just make sure you're sending to Left from the Audio track, and have the input set to Left on your Aux track. You can also send (or have the track output) to one side of an Aux track, but have the Aux track stereo.... this can be useful if you're using an external insert with two separate mono external effects. So for example: Guitar Track -> Aux 1 Track Left Bass Track -> Aux 1 Track Right Aux 1 with External Insert in FX bin, outputting to a new stereo patch point (let's call it Patch Point 2) Now creating two audio tracks sourced from Patch Point 2 L/R, gives us the signal after the external effects. Patch Point 2 Left -> Guitar Aux Post EFX Patch Point 2 Right -> Bass Aux Post EFX
-
Using Korg nanoKONTROL2 as remote control for Cakewalk knobs, buttons, and faders
msmcleod replied to Starship Krupa's question in Q&A
Try using the ACT control surface rather than the generic one, you can then easily use ACT Learn for controlling plugins. I posted the instructions earlier this week here: -
Try this:
-
If you just want to use the nanoKONTROL 2 for controlling synth/effect parameters, you don't want the Mackie Control surface added in Cakewalk. The Mackie Control surface is designed for transport / fader / pan control, and not for generic control. To put the nanoKONTROL 2 in to CC mode: 1. Disconnect the nanoKONTROL 2 2. Hold down the SET MARKER and CYCLE buttons 3. While still holding down the above buttons, plug the nanoKONTROL 2 back in and keep the buttons held for a few seconds Next add the nanoKONTROL as an ACT control surface within Preferences->Control Surfaces. You'll need to then go to Utilties->ACT MIDI Controller to tell Cakewalk what controls are available, and save this as a preset. Details on how to do this are here: You can map specific controls in a plugin using ACT learn on the Plugin UI:
-
Hold down CTRL+SHIFT while dragging the right edge of the clip to stretch it. You want to stretch it in so it gets to 50% for double the speed.
-
The MIDI Transpose MFX will do that both in real time, and offline ( using right click on Clip -> Process Effect -> MIDI Effects -> Transpose ). To use it real time, just drag it into your MIDI FX bin.
-
How to activate Melodyne that's included with Cakewalk
msmcleod replied to Joel Stolarski's topic in Cakewalk by BandLab
As of Melodyne 5, Celemony has stopped allowing Audio -> MIDI conversion once the trial version has expired. I'm not sure about tempo extraction, but it wouldn't surprise me if the same was true for that. Upgrading to Melodyne Essential should allow you to use these functions again. If you need polyphonic audio to MIDI conversion, you'll need to buy either the Editor or Studio edition. If you've no intention of buying any of the Melodyne editions, you could uninstall Melodyne 5 and re-install the trial version of Melodyne 4 (assuming you still have the installer somewhere). -
Right - understand. It looks like the minimum length of the loop is clamped to 1/8th note. This is what is causing the jumping.
-
Strange midi sound starts randomly playing during playback..
msmcleod replied to ARK's topic in Feedback Loop
If you're using Jamstix with anything other than its built-in drum sounds ( e.g. you're using Jamstix to control Addictive Drums 2), then you need to enable MIDI output. When doing this however, you need to make sure your other MIDI / Instrument tracks, have a specific MIDI input set rather than the default "None", as this will switch to Omni when that track is active. Omni means they'll receive MIDI input from any current MIDI output, including Jamstix. Also avoid setting them to "All Inputs" as this will also mean they receive MIDI from Jamstix. You can do this by selecting all your other MIDI tracks, then from the Track's view "Tracks" menu, choosing "Selected Track Inputs". You can then pick a MIDI controller keyboard from the MIDI inputs, e.g.: This means that those MIDI tracks will only receive MIDI information from the clips on that track, or notes played on the microKEY2. Alternatively, you can choose "All External Inputs", which will mean they ignore MIDI data from any soft synths, and only listen to external controllers. Obviously the drum synth track you're using with Jamstix should have it's MIDI input set to Jamstix's MIDI output.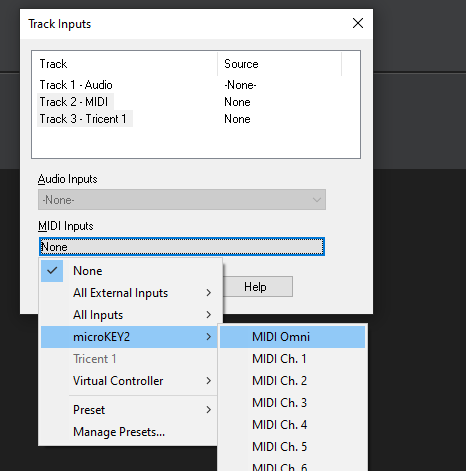
-
Works fine here:

