


msmcleod
-
Posts
7,214 -
Joined
-
Last visited
-
Days Won
39
Everything posted by msmcleod
-

My Instrument Is Popping Unintentionally
msmcleod replied to Sub to Lambfire's topic in Production Techniques
I'm not hearing the pop/crackles normally associated with low buffer sizes, but I am hearing a "click" at the start of some notes. I used to get this with the Cobalt VSTi when the VCA attack rate was set to zero. Try giving it a fast, but non-zero attack rate. You may want to do the same with the release. -
Yes, the Realtek ASIO driver is not really fit for purpose. WASAPI Exclusive will give you low latency close to ASIO, but will prevent other applications from using it for audio. WASAPI Shared has higher latency, but can share the device with other applications.
-
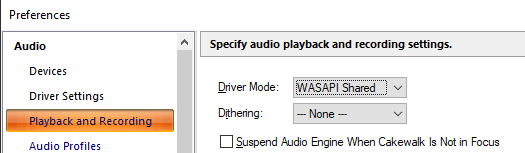
I've used the Focusrite Scarlett 2i2 with my laptop while out and about, which is great... however if I know I'll not be recording, I'll just use the internal sound card. You should be able to use your internal Realtek device with Cakewalk at the same time as long as: 1. You set Cakewalk to use WASAPI Shared 2. You set the Windows sample rate to match your Cakewalk project 3. The "Suspend Audio Engine When Cakewalk Is Not in Focus" is unchecked:
-
A lot of synths (both hardware and software based), don't respond to volume changes for notes that are already playing, and only apply the changed volume to notes played after the volume change message. In some cases, you can get around this by using CC #11 (expression) instead - which certainly worked on Roland devices, but this doesn't quite work the same as volume (the min/max is relative to the current volume, not the max volume), and isn't supported by every synth. I'd follow @Lord Tim's advice, and use fades on the audio track instead.
-
Cakewalk relies on Windows telling it a MIDI device has been connected or disconnected. If the Windows notification doesn't come through, Cakewalk won't know about it. More often than not (at least on my system), disconnected devices are recognised immediately, but some newly connected devices can take up to 30 secs to be recognised. I find it much easier to: 1. Ensure you always use the same USB ports for all your MIDI devices. 2. Ensure your MIDI devices are connected and switched on before you boot your PC up, so the MIDI device number Windows gives it is consistent each time. 3. If given the choice between a USB and 5-pin DIN connector, I always go for the 5-pin DIN - this allows me to switch off the synth/controller, but the port itself is always on. Of course you do need a good multi-port MIDI interface for this... the Miditech Midiface 8x8 has been rock solid for me. [EDIT] - Regarding class compliant MIDI interfaces vs ones with their own drivers... for the most part, MIDI interfaces with dedicated drivers have performed better for me in the past. However, they will reach a point where the drivers will stop working with the latest OS, as was the case with my Midisport 8x8. The main issue with a lot of class compliant MIDI interfaces (i.e. ones that just rely on Microsoft drivers) is that they receive MIDI data at USB speeds (i.e. 480Mbps for USB2), but send the data out at 31.25K, which is obviously much slower. In order to do this they need to "hold back" to the received MIDI data by storing it internally so they can send it out at a slower speed. Cheaper MIDI interfaces (esp the USB MIDI "cables") have a VERY small internal buffer, and will not cope with buffering SysEx or even controller/pitch wheel events in some cases. This results in stuck/lost notes, and will not cope with even a modest sysex load. Even though the Midiface is class compliant, I've not had this issue with them, so it obviously has a reasonably sized internal buffer.
-
I got stung by computers on stage a long time ago, and I've not done it since. I'm sure they're much more reliable nowadays - I know Marillion's Mark Kelly uses a PC live on stage with soft-synths, but PC's on stage isn't for me! I've not played live for a long time now, but I use one of these when I'm out of the studio: It's too under powered IMO for running most VSTi's, but I can sample all my hardware/software synths and use the V-Machine version of SampleLord to play them back. I use SampleRobot to do the sampling. I've got both 44.1Khz & 22Khz versions of most of my sampled synths, so I can choose between quality / speed of loading. It's surprising how acceptable the quality of the 22KHz versions are for live use.

-
FYI - fixed for next release.
-
@Bajan Blue - some things to bear in mind: 1. The tempo map has been replaced by a tempo track, which allows you to edit your tempo as an envelope. 2. Although the tempo inspector show a list of tempo changes, it isn't the same thing as the old tempo map. Instead it's a list representation of the tempo nodes, and the envelope shapes connecting them. If you're using jump shapes, then there's pretty much no difference between the two... however, if you have a section where you're speeding up or slowing down, the inspector will just show the start/end tempos and the curve type, rather than every single value in between like the old tempo map used to. Here's a more detailed explanation of the changes and how they work:
-
@jkoseattle - I stumbled across this post regarding E/W OPUS with Cakewalk. I believe the advice came from EastWest support. It might be worth giving the steps a try:
-
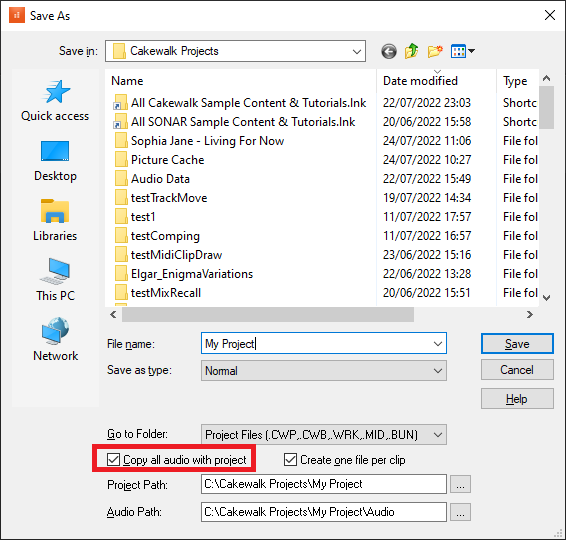
@Mo Jonez - it's worth pointing a few things out... 1. Everything in Preferences is global, apart from the pages under the "Projects" section, which is the only part that deals with per-project settings. 2. The "Wave Files" setting within File->Folder Locations refers to where the CbB Media Browser will point to when selecting "Audio Library" 3. The "Global Audio Folder" setting within File->Audio Data is where recorded audio data is saved to when you've not yet saved your project, or when you're not using per-project audio folders. 4. When you save a project, you're given the option of saving the project audio data alongside the project file. This is checked by default, and when checked will save your audio in an "Audio" subfolder in the same folder as your project file: 5. For exported audio, the default path is set to be an "Audio Export" subfolder in the same folder as the project (set within File->Folder Locations->Export Audio Files). However this can be changed within the Audio Export dialog, and the last used location for that project is saved along with the project, so it'll pick up your new location the next time the project is loaded. If you've not saved your project yet, exported audio will go to an "Audio Export" subfolder under the Global Audio Folder path.
-
-
@Paul Chan - It's possible your ctrlsurface.dat has become corrupted and that is what is preventing Cakewalk from starting. Try renaming ctrlsurface.dat to ctrlsurface.dat.old in the %APPDATA%\Cakewalk\Cakewalk Core folder.
-
It's not only Cakewalk that may be saving references to paths. Many plugins internally save paths as well. You should use Windows Disk Manager to restore the old drive letters, and use new drive letters for the new drives.
-
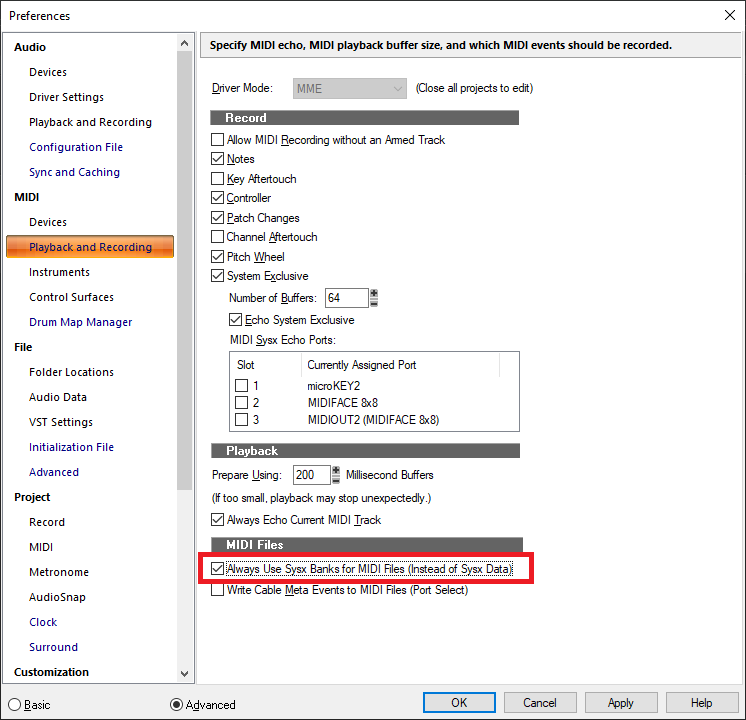
I suspect the events are being shifted to make room for the sysex events. IIRC large amounts of sysex events are spaced out so they don't flood the buffers with too much data at once. Have you tried checking "Always Use Sysx Banks for MIDI Files (Instead of Sysx Data) in preferences before loading the MIDI file?
-
MIDI Record Sync Issues - Wonder if anyone can help please?
msmcleod replied to Eyuppp's topic in Cakewalk by BandLab
If you've no audio tracks (or VSTi's), then using Full Chase Lock is what you should use for MIDI only. Alternatively you could simply add a blank audio track and set your Synchronisation to Trigger & Freewheel. That way it'll be using the audio device's clock rather than the Windows internal clock. -
It depends on the plugin. Plugins with a lot of automatable parameters and/or use a lot of memory will take longer. There are essentially 2 things that happen when a plugin is removed: 1. Any automated parameters are disconnected 2. Cakewalk asks the plugin to unload itself However.. a copy of all the automated connected that were mapped, along with a copy of the plugin's state (essentially a temporary preset) is put on the undo stack. That way, when you undo the delete, the plugin is restored to how it was. If there are a lot of automation parameters, or the plugin takes up a lot of memory, then it'll be slower. This behaviour isn't new to this release.
-
Arturia Keylab MK2 Control Mapping in Cakewalk
msmcleod replied to A Boi's topic in Cakewalk by BandLab
The latest version of Cakewalk is 2022.06, which includes the latest Mackie Control surface changes. You can do this directly within Cakewalk by selecting "Check for Updates" from the Help menu. BandLab assistant is no longer required for updates or activation. -
Arturia Keylab MK2 Control Mapping in Cakewalk
msmcleod replied to A Boi's topic in Cakewalk by BandLab
@A Boi - what version of Cakewalk does it say you've got in the About screen? -
There are 3 ways, depending on exactly what you want: 1. Drag the MIDI clip to the desktop or a folder, and it'll get saved as a .mid file. Quite often you should be able to drag/drop it directly on the other piece of software. 2. Select the clips you want to export, then from the main menu: File -> Export-> Standard Midi File 3. File->Save Copy As, then pick "Standard MIDI File" as the format. This will save all the MIDI data in the project as a single MIDI file.
-
I did take a look at this one. Windows has slightly different CTRL + TAB behaviour when a Windows browser control is involved,, which is why it's being swallowed up. It'll need further investigation.
-
Arturia Keylab MK2 Control Mapping in Cakewalk
msmcleod replied to A Boi's topic in Cakewalk by BandLab
After adding the Mackie Control surface in Preferences -> Control Surfaces, and clicking OK on the Preferences dialog, go to the Utilities menu and pick "Mackie Control - 1". The option can be selected on the Mackie Control dialog: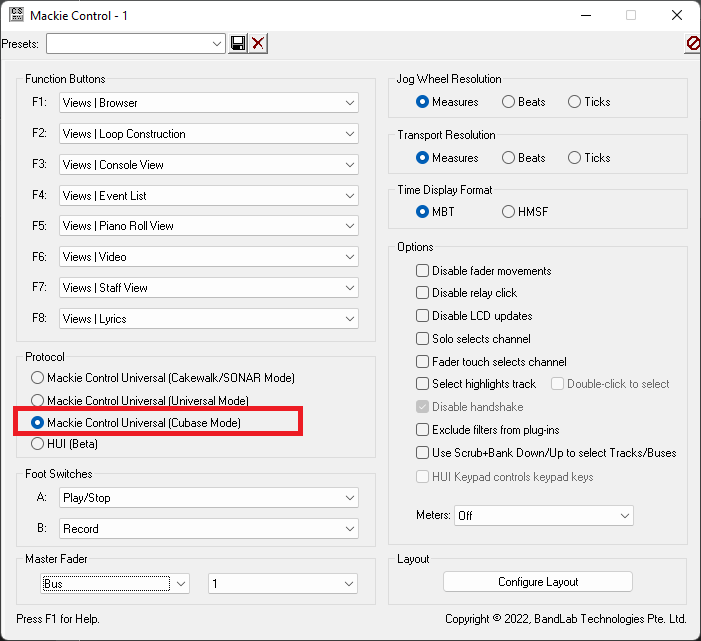
-
The file you want to delete is AUD.INI within %APPDATA%\Cakewalk\Cakewalk Core
-
Cakewalk not sharing ASIO drivers with Windows.
msmcleod replied to RexRed's topic in Cakewalk by BandLab
It all comes down to the drivers. The Focusrite Scarlett range will happily work with ASIO in CbB whilst other apps are simultaneously accessing it using WASPI/WDM. -
I almost bought a Rodecaster Pro II tonight
msmcleod replied to RexRed's topic in Instruments & Effects
I'm not sure if they do an XLR equivalent, but I'd definitely avoid getting a USB based Mic when running in Windows. The reasons... 1. You can only use one ASIO driver at once, so if you're using the Rode's ASIO interface, you can't use anything else within CbB ( this is a Steinberg/Windows restriction, not a Cakewalk one). 2. Even if you could aggregate the devices to allow both of them, there's no way to sync up the word clocks, so you'd have to fix any timing issues manually. 3. You're stuck with the pre-amp that's inside the mic. I'm not saying that the Rode pre-amp is bad, but you've got no other choice but to use it. 4. You've no idea how long the USB drivers will work with the OS. An XLR mic will last decades and will never just stop working because you've upgraded to a newer OS. -
CTRL + TAB will do nothing when it's actually docked. If it's undocked, is the PRV actually visible? It might be that it's minimized and isn't obvious you've CTRL + TAB'd to it.

