


msmcleod
-
Posts
7,215 -
Joined
-
Last visited
-
Days Won
39
Everything posted by msmcleod
-
 I've got an MT-32 and I used to have a Sound Canvas. The MT32 is an 2nd generation LA synth, where very short attack samples are combined with an early version of virtual analog synthesis. The Sound Canvas is completely sample based. Although there are sounds in the Sound Canvas that have obviously been sampled from the D50 (a 1st generation LA synth), the MT32 and Sound Canvas sound very different.
- 22 replies
-
- 1
-

-
- cakewalk crashing
- tts-1
- (and 1 more)
-
What you're describing is latency. MME has the worst latency out of all driver modes. These are the driver modes going from best to worst: ASIO WASAPI Exclusive WASAPI Shared WDM MME There's a significant jump in latency between WASAPI Exclusive and WASAPI Shared so, if possible, record using WASAPI Exclusive when using an on-board device. You also want to make sure that your recording timer master is set to the device you're recording on within Preferences->Audio->Driver Settings. If your device doesn't support WASAPI Exclusive, then WASAPI Shared is probably your next best alternative. You'll need to live with the delay on the track in that case. This delay should be constant however, so you could consider setting one of your nudge amount settings to that delay amount, so it's quick to just select that clip and nudge it accordingly.
-
FWIW, all of my Scarlett's are gen 1... I've got the 2i2 (dev laptop), 6i6 (dev desktop), 18i8 (laptop) and 18i20 (studio). The 6i6 I use daily. I normally run with an ASIO buffer of 64 on production builds without issue, although for larger projects I may increase to 128 or 256. For development, I use 256. All of my Scarletts have the latest firmware (v1056). I've not had any issues with dropouts, unless I drive my PC beyond its limit... but that's a CPU limitation, not the Focusrite. On my 18i8, I've successfully recorded 16 simultaneous tracks whilst playing back 32 - and that was on a silent PC the size of an iPhone 5 running at 2GHz. Using my laptop, it copes with far more. I'd recommend trying a different USB port - it could be that it's sharing an IRQ with another device. Also, I know this doesn't work for some people, but I have my Scarlett plugged into a USB 3 port and have zero issues.
- 28 replies
-
- 1
-
-
- firewire
- thunderbolt
- (and 1 more)
-
It's easy if you say it properly: "wooster-shur" sauce Although a lot of people just say "wooster" sauce... I don't of course, because then I'd have to say, "I'm wrong"
-
You're misunderstanding what "Entire Mix" means in the context of source category. It doesn't mean "My entire project", it means "All selected tracks and buses as heard through the hardware outputs" - in other words it's the selection through the entire mix. If all you want "Entire Mix" (i.e., entire project) or "Selected Tracks/Buses", then just use the Export Module. I'll say it again: The Export Module is designed to give quick access to the two most common workflows, the Audio Export Dialog is far more flexible and is purposely based on selection. There is however a selection flyout section that allows you to change selection while you're in the dialog. CTRL + SHIFT clicking any track or bus's checkbox within the flyout will toggle between Select All / Select None. There're also the export tasks, which you can use should you be unsure about whether something is selected or not when you re-open the dialog. If you ensure nothing is selected, then create a task for an entire mix, exporting that task will always be the entire project regardless of selection.
-
Why is Melodyne folder not used for Melodyne transfers storage?
msmcleod replied to jesse's topic in Cakewalk by BandLab
If you're using Melodyne as a RegionFX, then you're using ARA. If you've got Melodyne in an effects bin, you're not. -
To be honest, I've had much better performance with USB 2 than with Firewire. I was hoping to have an mLAN system with 01X , 2 x i88x and 1 x ADA8000 to give me 32 tracks, but it gives up at 26 tracks. My RME Digiface USB however, quite happily copes with recording 32 tracks, whilst simultaneously playing back on all 34 outputs - and that's with an ASIO buffer half the size of what my mLAN system is (64 vs 128). Other things to bear in mind... 1. Firewire is a deprecated technology - certainly mLAN is completely discontinued. The chances of it working in future Windows updates/upgrades is diminishing. 2. The quality of converters in newer gear is far better than the ones used in older interfaces. The mic inputs on my i88x for example, are the same as the Yamaha DM2000, which was their top-end digital mixer at the time, but my Focusrite Scarlett 18i20 sounds so much better. Not to say they aren't good - they certainly are - but more modern converters are likely better.
- 28 replies
-
- 1
-
-
- firewire
- thunderbolt
- (and 1 more)
-
The way to do it without losing anything is: 1. Open up both projects in CbB 2. In the old project, select the tracks you want to copy over and save them as a track template 3. In the new project, insert that track template. 4. In the old project, copy special the tracks 5. In the new project, make sure the first track of the template is the active track, then paste special. After pasting, you may get surplus empty tracks at the end of your new project - just delete these.
-
Get Sonar Platinum stuff without Platinum installed?
msmcleod replied to Salvatore Sorice's topic in Instruments & Effects
FWIW SONAR Platinum itself only takes up about 250MB - everything else is in folders shared between CbB & SONAR. The exception is C:\Cakewalk Content\SONAR Platinum which is around 1Gb... but you can point SONAR to CbB's directory ( C:\Cakewalk Content\Cakewalk Core ) within SONAR's preferences and delete the SONAR one. You may find it easier to just have them both installed. -
I do know what you mean. I was seriously considering the Tascam Model 24 or Soundcraft 22 MTK, but both tap the signal to USB pre-EQ. This is fine (probably preferable) for live, but it doesn't fit my workflow - I want to sculp sounds before I record them. I ended up getting an Allen & Heath MixWizard WZ3 (£500 used), an RME DigiFace USB (£300) and 2 x Fostex VC8 ADAT converters (around £75 each used). So around £950 ($1100 US) altogether. The WZ3 allows you to configure whether the direct outs are pre-EQ or post-fader via jumpers, but mine was already configured post-fader. The MixWizard WZ4 with the USB card would have been another way to go, but 1. it was 2 x more expensive; 2. I've no idea how good the ASIO drivers are, and 3. The USB card has now been discontinued. The biggest advantage of my current setup is that it actually supports 32 channels I/O and it's all modular. So I've also got my old Focusrite 18i20 as an additional 8 inputs, and a bunch of hardware pre's using up the final 8 channels through an additional VC8. The VC8's are probably the weakest link in the chain, but I'm free to upgrade them if I need to.
-
I wouldn't say no hope, but it's likely to be significant effort, with a good chance of failure. For me, even with detailed instructions on how to get mLAN working on Windows 10, it took literally days to get it to work on a laptop. In the end, I did get it working on Windows 10, but the BSOD on shutdown meant that every time I reboot into Windows 7, it does a chkdsk on all the drivers. You also want to make sure you backup an image of your OS before you start anything, as things don't always uninstall properly and can invalidate a new install... so every time it doesn't work, it's a case of restoring your disk from your backup and starting again. In the long run, it may be easier to just get a multi-track USB mixer - I've heard good things about the Soundcraft Signature 22 MTK, Tascam Model 12/16/24, and I think Zoom & Korg also do one.
-
I still use a Yamaha 01X / i88X and Behringer ADA8000 one of my Windows 10 rigs using mLAN over firewire. The legacy drivers worked fine on Windows 7, but not for Windows 10 - I'm using the standard Windows firewire drivers on Windows 10. Also, Windows 10 has to be run constantly in test mode, and driver signature had to be disabled during install. The biggest issue I had was finding a compatible firewire card - the Belkin F5U502 using the TI chipset works best for me with mLAN on a desktop. I've yet to find a laptop firewire card that works at all, although I did have some success with the onboard Ricoh card in my Dell Vostro 1700. The onboard interface works 100% on Windows 7 32 bit, but I get a BSOD on shut down on Windows 10. The second biggest issue was the MIDI ports all coming back with the same name. It required manually changing the names in the registry. In saying that, on my desktop it's now running like a dream on Windows 10.
-
TTS-1 is an old Roland product that was ported from 32 bit to 64 bit a while back, during the time that Roland owned Cakewalk Inc. Unfortunately, BandLab doesn't have the source-code for TTS-1, and Roland no longer support it. Given that TTS-1 tends to behave if it's loaded at the start of a project, my suspicion is that something in the code is using 32-bit variables to hold 64-bit pointers, meaning that as long as the address is "small" enough it'll get away with it - obviously I can't confirm this though. So if you're going to use TTS-1, make sure it's the very first thing you load. If you need multiple instances, fine, but load them up front. In saying that, the sound-set for TTS-1 is exactly the same as what is found in the SoundCanvas - in fact IIRC, the TTS-1 is basically emulating the original SoundCanvas hardware in places. So for a newer alternative, you could use the Roland Sound Canvas VA. Roland themselves only seem to offer this directly via their cloud subscription nowadays, but you can purchase it stand-alone elsewhere: https://www.thomannmusic.com/roland_cloud_sound_canvas_va.htm - it's around $65 US.
- 22 replies
-
- 2
-
-
- cakewalk crashing
- tts-1
- (and 1 more)
-
Sustain pedal only works in the preferecnce menu?
msmcleod replied to Sofa's topic in Cakewalk by BandLab
This is how to add sustain in the PRV: -
I'm pretty sure we're using v3.73 at the moment. The latest version is v3.76, however it's important to appreciate that a lot of enhancements/fixes in the SDK affect the VST plugins themselves, rather than VST3 hosts such as Cakewalk.
- 1 reply
-
- 1
-
-
This isn't a bug - the quick export module provides quick short-cut to the most common use-cases, i.e. exporting your entire mix, or just what you've got selected. The Audio Export Dialog however is intentionally selection based. This allows you to limit, by selection, what feeds the sources within the "What to Export" category to give maximum flexibility during export. Having something selected (either before opening the dialog, or within dialog's selection flyout), effectively results in a temporary project being created, with only the selected items in it. This then affects what is fed to the sources, and also what sources you can check within your chosen source category. For the most part, no selection is the same as everything selected, with the exception being source category "Tracks". For tracks, a time selection will export all tracks at the selection length, whereas no selection will export tracks at their actual length.
-
This is not the file to edit. This is the default sections file that is copied at installation time to your user directory. The real section types file is in %APPDATA%\Cakewalk\Cakewalk Core\Arranger\sectionTypes.json ( there's actually a separate one for each language ) But there's no real need to edit manually in any case, as you can create/edit your own section types within Cakewalk itself. Just create a section with the length / name / colour you want, then right click -> Section Type -> New. Selecting Edit from that menu will allow you to change the abbreviation as well as all the other defaults for that section type. Manually editing these files is discouraged. If you mess it up, you could lose section types in your existing projects.
-
How to master outside of Cakewalk
msmcleod replied to TVR PRODUCTIONS's topic in Cakewalk by BandLab
For mastering, you usually just need to export a stereo mix from Cakewalk and import it into Samplitude. Make sure the exported file isn't too loud - you want to give yourself a bit of headroom when mastering. -
I occasionally get this in the little finger and forefinger of my left hand. I know the little finger issue is down to me slamming bass octaves on a weighted keyboard for decades. I've no idea what causes the forefinger issue, but it is only very occasional. But anyhow, something that helps me: 1. Put your hands on a desk, spreading the fingers as wide as they'll go and hold for 30-40 secs. 2. Gradually relax your fingers and let them close into a very loose relaxed fist (kinda like a 1970's gripping hands action-man) 3. Hold that position for a minute. 4. Loosely wiggle your fingers afterwards as if you're playing notes on a keyboard.
-
sustain pedal Sustain pedal not working (c64)
msmcleod replied to Nic's topic in Instruments & Effects
A common reason for CC64 not working is: -
How do I emulate this guitar sound in Cakewalk?
msmcleod replied to Tyrone Davies's topic in Instruments & Effects
The bundled TH3 should get you pretty close, although it does depend on the guitar you're using. The "POP lover, Main Rhythm" or "POP lover, Boost" patches might be a good start - try messing with the EQ on the amps to get the tone you want. -
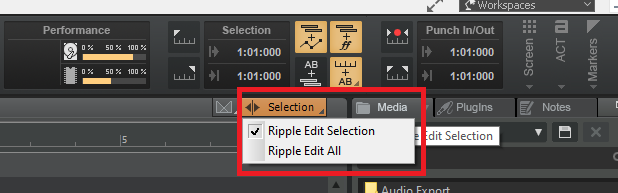
Ripple Edit will delete the hole, shifting everything along to close the gap. Use Ripple Edit selection to only affect the current / selected clips, or Ripple Edit All to affect all tracks. Remember to switch it off afterwards though!
-
Cakewalk won't send midi notes to an external synth HELP
msmcleod replied to Hubert Müller's topic in Cakewalk by BandLab
Make sure: 1. The output port of your MIDI track is set to the MIDI Output for your Volca 2. The MIDI channel of the track is set to what the Volca is expecting to receive on. This can be set either within the track header, or in the inspector: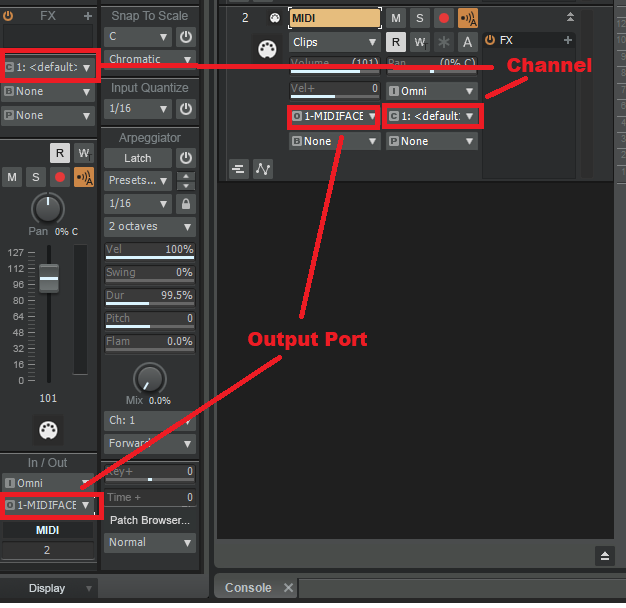
-
My Drive changes .cwb extension to .wav?
msmcleod replied to Terry Kelley's topic in Cakewalk by BandLab
This is because cwb files store the track wav files first in the file. Google is trying to be clever and identifying the file as a .wav, probably stripping out all of the project information too. I'd avoid using cwb files with cloud storage - better to zip up your project directory and store that instead. -
Put a send on each individual drum track to an aux track with a room reverb on it. Pre-fader is probably best. Adjust the send / reverb amount to suit - I'd recommend listening to other recordings of real drum mics so you have something to match.

