


msmcleod
-
Posts
7,191 -
Joined
-
Last visited
-
Days Won
39
Everything posted by msmcleod
-

Several New Instrument and Plugin Updates no longer work as VST3s
msmcleod replied to Steve Patrick's topic in Cakewalk Sonar
ok - it should say 6.0.7.0 , and the date should be 11th July 2024 (ignore my version number - it's one that was built locally). I've asked the guys to double check the installers. -
Several New Instrument and Plugin Updates no longer work as VST3s
msmcleod replied to Steve Patrick's topic in Cakewalk Sonar
What version is it showing? -
Several New Instrument and Plugin Updates no longer work as VST3s
msmcleod replied to Steve Patrick's topic in Cakewalk Sonar
All I can say is, it's working here. Are you definitely running the latest version of Cakewalk with the newest VST scanner? The error message would indicate it's looking for the VST in the wrong place - which was exactly the issue that the latest VST scanner fixes. FYI - the latest version of Cakewalk is 2024.07 build 108. You can check if you've got the latest version of VstScan.exe, by right clicking on it and choosing properties. The Details tab on the properties dialog will show you the version: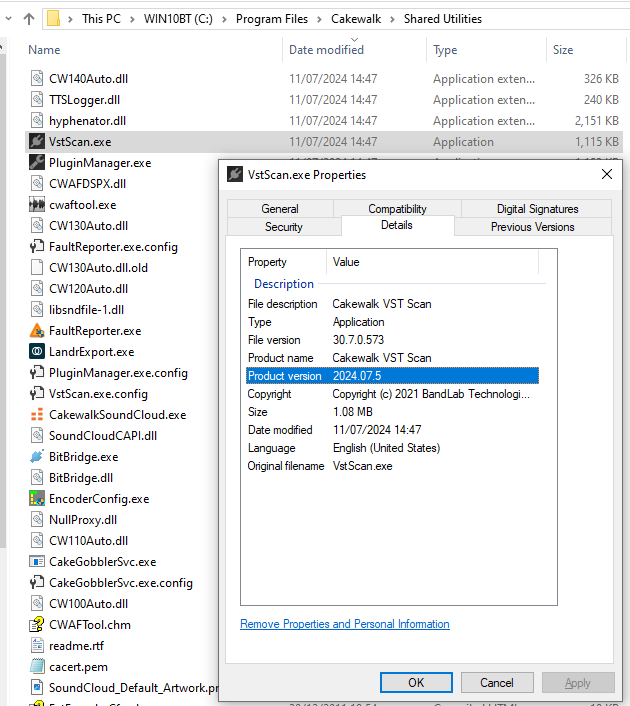
-
Several New Instrument and Plugin Updates no longer work as VST3s
msmcleod replied to Steve Patrick's topic in Cakewalk Sonar
It looks like either your MODO BASS 2 install has not worked, or you failed to do a VST Scan after updating. The correct location for the latest MODO BASS 2 should be: C:\Program Files\Common Files\VST3\MODO BASS 2.vst3\Contents\x86_64-win\MODO BASS 2.vst3 Also, make sure you're running the very latest version of CbB / Sonar - earlier versions do not correctly recognise the new VST3 standard of having .vst3 in the directory name. -
In cakewalk , using MSuper looper with multiple output / input
msmcleod replied to Riccoboni's topic in Cakewalk by BandLab
It will be in Cakewalk Sonar only. I'm not sure about Cakewalk Next. -
The Blue Cat Audio Patchwork plugin should allow you to do this, among a whole bunch of other things.
-
Help! Some projects take a long time to close.
msmcleod replied to Scott Mallard's topic in Cakewalk Sonar
This is most likely due to plugins freeing up their memory before closing - like you say, the more memory that is being used, the longer this will take. VSTi's such as Kontakt have a "purge" option to remove all samples - you could try using this before closing. You could also try setting sample based synthesisers to load samples on demand and/or limit the amount of memory they can use for samples. Not only will this speed up the closing of projects, it may also speed up project load. The only downside is possible delays in loading the samples on first playback (unless you have very fast RAM / SSD), but it is only on first playback - subsequent plays should be fine. -
In cakewalk , using MSuper looper with multiple output / input
msmcleod replied to Riccoboni's topic in Cakewalk by BandLab
Ah... of course, yes - apologies. Unfortunately, Cakewalk doesn't support multi-output effects - only synths. I'm not sure if it's actually in our to do list yet, but it's been discussed as a future feature in Sonar. -
The RockGuy pack is awesome - models of the Rockman compressor/distortion and chorus/delay mini racks.
-
In cakewalk , using MSuper looper with multiple output / input
msmcleod replied to Riccoboni's topic in Cakewalk by BandLab
Use per-output instrument tracks. -
You could use a software loopback device such as loopBe or LoopMIDI to send to multiple plugins. Once installed, they look like hardware MIDI devices. The track sending the MIDI would send to "loopBe MIDI OUT #1". The receiving tracks would all have their input set to "loopBe MIDI IN #1".
-
Melodyne 5 with Cakewalk Sonar isn't smooth...
msmcleod replied to Jaime Ramírez's topic in Cakewalk Sonar
Not seeing any cursor difference between Sonar & CbB with Melodyne 5 here - mind you, I'm running at 1080P / 100%. -
You don't need to select the track, only focus it. Clicking anywhere in the track header apart from the track number (e.g. the track name) will set the track to be the active/focused track. Clicking the track number will select the track and all its events If you need to set the active track in the PRV, expand the PRV Track Pane by clicking the expand button in the top right hand corner of the PRV. You can then choose which tracks to edit directly from the PRV.
-
When using the Mackie MCU protocol / Mackie Control Surface it needs exclusive access to the MIDI ports assigned to it, which means you can't use them for normal MIDI keyboard events. I would make no sense to allow both on the same MIDI device in any case, as button presses on the MCU are actually sent out as note events. Keyboards that support the MCU protocol normally expose more than one set of MIDI ports, one set for the keyboard and one for the MCU.
-
I had a look at the UF8 user guide, and it looks like it should work with CbB/Sonar as follows: Set the UF8 to Cubase using the MCU protocol Add the UF8 as a Mackie Control Surface Go to Utilities->Mackie Control 1 and set the protocol to "Cubase Mode"
-
As @Starship Krupa said, we really need to know more about your workflow and what you need out of the interface. If you're only ever going to record one or two audio tracks at a time, then something like a Scarlett 2i2 will do. If you need MIDI or an extra couple of audio inputs / outputs then maybe a Scarlett 6i6 will do (tip - if you ever think you'll need to use a re-amp box or external effects, then you'll need spare inputs & outputs). If you think you'll ever record live drums, then you'll need something that will take at least 8 inputs - maybe more, depending on how you want to mic it. The Scarlett 18i8 or 18i20 might be good choices in that case. Both have 8 analog inputs (plus a stereo SPDIF) and an ADAT in for a further 8 inputs. The 18i20 also has an ADAT out for 8 additional outputs. Those are just some of the options from Focusrite - most other manufacturers have similar options (e.g. Tascam, Audient, Presonus etc), and some come with extra features at the lower end of the cost scale - e.g. the Presonus Audiobox USB96 is one of the cheapest interfaces available, with 2 inputs/output (like the Scarlett 2i2), but it also has MIDI in & out. If you're used to using a mixer, then the Tascam Model 12 is a great choice (there's also the Model 16 / Model 24, but they are VERY different beasts and in some ways far more limiting with regards to routing - e.g. you can't apply the mixer's EQ / compression / fader levels to what you record on the 16 or 24, but you can on the 12). Zoom do some good interfaces too, such as the LiveTrak L8 / L20, although I would say that although they are great interfaces, their mixing duties are primarily focused on live use - i.e. you use the mixer for your live mix, and what is recorded isn't affected the mixer's EQ/faders etc. This is also true of the Tascam Model 16 & 24, and the Soundcraft MTK series. If you do go for a combined mixer/audio interface, please ensure the following: It exposes individual track outputs to the audio interface, not just a stereo output... otherwise you're back to the same issues as you've got with the Alesis. It has a decent ASIO driver, and doesn't rely on something like ASIO4ALL. You're happy with where the signal to the audio interface is picked up from - i.e. is it only just after the preamps, or can you apply the EQ/Compressor/Fader from the mixer too? If you're intending to use condenser microphones, does the mixer have 48V phantom power?
-
There's a difference between track focus and selection. The answer is simple: If you don't want the clips selected, then don't click the clips. Clicking anywhere in the track header (apart from the track number) will focus it without changing selection. I usually click the track icon, track name or the blank space underneath the MSR buttons. Clicking on the track number however, will select the track and all clips within it. This is actually my preferred way of selecting all the clips in a track - especially when used in conjunction with the PRV, as it guarantees that they're all selected - clicking on a single clip may not select others if they're hidden away in a take lane and further down in the project (unless it's the comp clip you're clicking - that's ok). If you've been used to always clicking clips, I appreciate this may take some undoing of muscle memory!
-
Add the task to your project template then. If the task is created as follows: - Nothing selected ( so CTRL + SHIFT + A before you open the export audio dialog) - Source Category = Entire Mix - Range = Entire Project ...then the task will work regardless of changing tracks/buses. Double clicking the task will recall it allowing you to edit it / create new tasks as required.
-
I'd add SynthMaster 2.9 alongside Omnisphere - it's a killer synth, with a huge library but covers a different set of sounds. If I was to choose only one purchase though, I'm pretty sure I could survive with only the Korg Collection 4 - it pretty much covers all the bases.
-
You've got the clock source the wrong way around. If the Evo SP8 is the ADAT OUT going into the Focusrite ADAT IN, then the Focusrite has to have its clock source set to ADAT.
-
My guitar recording is always early in the mix in ASIO
msmcleod replied to Freshmint Melee's question in Q&A
Check your Clock settings within Preferences->Project->Clock. Your source should be set to "Audio" in order for it to use your Focusrite for timing: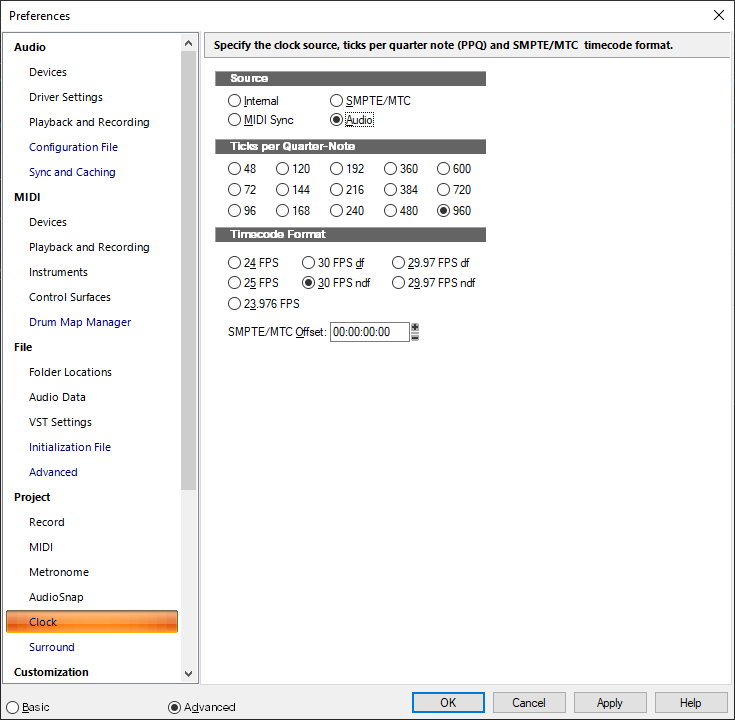
- 10 replies
-
- 2
-

-
- asio
- latency issue
- (and 1 more)
-
It's almost certainly down to one of your synths - probably a sample-based synth with a huge sample library. Most "library" based synths have the ability within the plugin itself to limit the amount of memory used and/or load samples on demand, so samples are loaded on when they are needed rather than loading everything into RAM. Loading samples on demand will not only save RAM when using the synths, but will speed up project loading time significantly. The downside is that there may be a delay in loading the samples on first playback - i.e. you may need to play your project once all of the way through to ensure every sample used is loaded into RAM. Kontakt for example can not only be configured to limit memory/load on demand, you can also "purge" the samples, effectively emptying the memory of any unused samples. You'll need to consult the documentation for the synths in question to see where these options are.
-
Sharing your Bandlab masterpiece with other musicians...
msmcleod replied to Dreamer's topic in Cakewalk by BandLab
You could always use BandLab itself? Cakewalk can upload your ideas as a new BandLab project, and you can invite others to add to it if you want. BandLab will run on most browsers, and also iPhone, iPad & Android devices. Best of all, it's free.


