


OutrageProductions
-
Posts
1,052 -
Joined
-
Last visited
Everything posted by OutrageProductions
-
Taylor Swift just bought back the rights to her first six albums released on Big Machine. If you create the art, you should own the art.
-
https://www.nytimes.com/2025/05/27/arts/music/rick-derringer-dead-hang-on-sloopy.html
-
I've been streaming several channels of SomaFM for years and love the variety!
-
I concur. The 14900k should be liquid cooled only!
-
Don't even bother trying to hold your breath on this: vector driven graphics (resizable for resolution) of Sonar are a completely different animal from the old CbB Bitmap style... in both form, function, and coding complexity.
-

Upgrading" from Win10 to Win11
OutrageProductions replied to scottcmusic's topic in Cakewalk by BandLab
The MS <PC Health Checkup> application can be DL'd & installed to check your system entirely. I have done 3 machines here in my studios without any issues. I had to add a TPM module ($14) to one MOBO, and two machines were running MBR boot formats, one of which was a RAID1 array which made me nervous, but after complete backups, I used a 3rd party app from AEOMI (partition manager) to upgrade both to GPT and it was faster and smoother than I had feared. The same app also has a much more detailed version of the MS tool mentioned above. Proper preparation is everything. And my entire desktop organization came up intact on all of them. The only thing that still bugs me (and I'm working on recode) is that the Win Explorer always opens in a place where I don't want it (but I run 4 monitors) and can't yet change that. Not mission critical, but irritating. Also HIGHLY recommend creating a W11 boot recovery drive (and learn how to utilize it) on a thumbdrive ASAP after upgrade. Saved my butt twice when I made some creative hacks to the registry... 😁 -
Split single instrument to multiple tracks/channels
OutrageProductions replied to quattj's topic in Cakewalk by BandLab
This is generally how I mockup bending double-stops on string instruments before cutting real strings from the score. Works well. -
Upgrading" from Win10 to Win11
OutrageProductions replied to scottcmusic's topic in Cakewalk by BandLab
You may lose some old 32bit VSTi or DXi instruments because of W11 security issues. It automatically removed my original installation of Dimension Pro, Rapture Pro (and a couple of others), but those instruments were cr#p sounding IMO anyway. On identical HW with similar services disabled, I actually benchmarked minor speed improvements in W11 (~4%) countered by about 900Mb increase in idle RAM consumption. And I had to do tons of tweaks to the GUI to be comfortable, but otherwise... very satisfied. I'm still running some (non-musical) software from the XP/Vista era without issues under W11. -
Upgrading" from Win10 to Win11
OutrageProductions replied to scottcmusic's topic in Cakewalk by BandLab
If your MOBO/chipset/BIOS & boot drive format are fully compatible, it's very easy to do an in-place upgrade. MS has a tool that will answer all your questions about upgrading to W11. -
Sounds like the DC coupling section in the input of your amp is kaput. Tube amps are especially susceptible to this kind of induced noise.
-
End of Windows 10 Leaves PC Charities with Tough Choice
OutrageProductions replied to kitekrazy's topic in The Coffee House
Benchmark tests on my workhorse studio machine show that W11 has a 4% increase in speed of opening & manipulation of most applications, however (with identical services disabled) it is using 900Mb more ram at idle over W10. Sort of a minor tradeoff. -
Your GPU is incapable of doing the math.
-
... but perpetual licence ... are you considering it ?
OutrageProductions replied to EnglandBross's topic in Cakewalk Sonar
As an aside: other than Mark @msmcleod, I haven't seen much presence from any of the Bakers since mid March. Either they are busy coding on the next update, or... -
Either that, or judging from his paws and the grin, he just successfully played "Great Balls of Fire" at 320BPM.

-
You should probably start HERE.
-
Switching to ASIO causes endless profile loop
OutrageProductions replied to Mark Fergel's topic in Cakewalk by BandLab
This is true for their lower end I/O's from 2021 onwards. Prior to that... not so much. Hence the A4A issues. -
Start HERE with an excellent series on the basics of the application.
-
Can I export all tracks as .wav files individually at the same time? [SOLVED]
OutrageProductions replied to tdehan's question in Q&A
Learn how to understand and use all of the options available in the Export Dialog.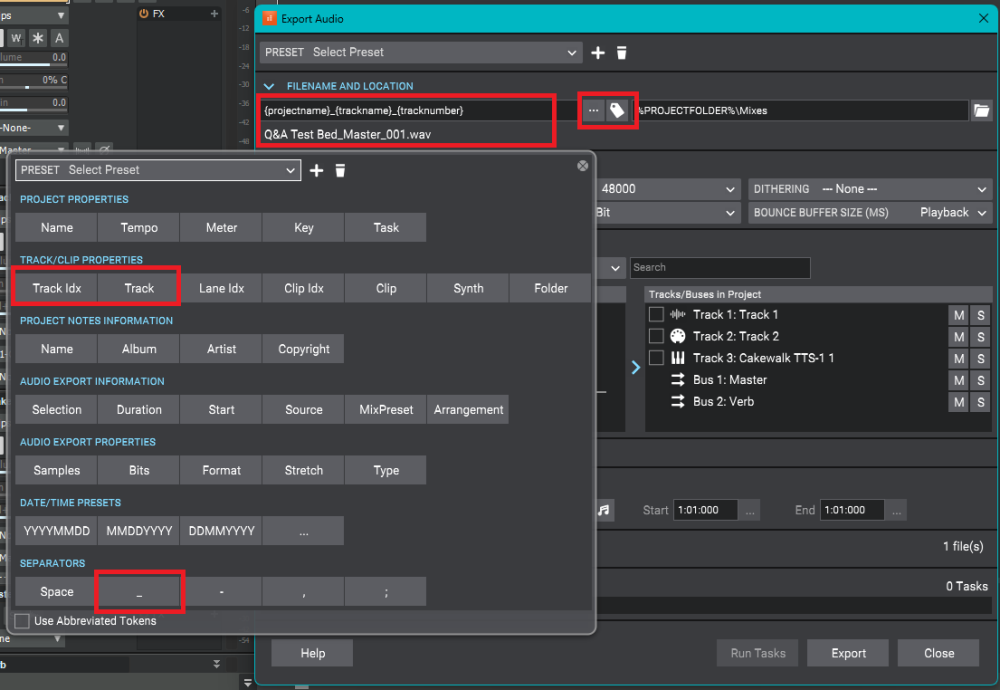
-
Can I export all tracks as .wav files individually at the same time? [SOLVED]
OutrageProductions replied to tdehan's question in Q&A

-
Switching to ASIO causes endless profile loop
OutrageProductions replied to Mark Fergel's topic in Cakewalk by BandLab
Real ASIO drivers don't go through the audio profile dialog AFAIK. Only WDM & WASAPI. There isn't currently a true ASIO driver for MOBO audio (coming soon on next gen HW tho!), only for external audio interfaces. If you have a fake (ASIO4ALL/Realtek/Behringer, et al) driver that says it's ASIO, then you're asking for problems. -
I love it so far.
-
@Tom Bednarz I run sessions that will eat up to 80-90 Gb of my 128 available, but after flushing back to just the basic OS requirements leaves me with about 4.2Gb actually in use. I've found that NI Kontakt (et al), Spitfire, and UVI have a tendency to hang around in the Standby ram waiting for cocktails or the after party for some reason, so... {Some folks have an issue with, and will argue about my method, but I've been using it for 25+ years with zero issues:} DL "Rammap(dot)exe" and unzip it somewhere convenient. Create a batch file to open a CMD window and (with echo on, and a 2 second delay between each command) run the <Empty Standby List> & <Empty Working Sets> commands to flush the ram. Store the batch file somewhere convenient like the desktop and name it "Flush Ram(dot)bat" or something. I do this after and/or between each session. Works like a charm. It has never failed. Not even once. [Here's the batch file:] ::@echo off echo cd\{YOUR EXACT LOCATION OF RAMMAP} START rammap -Et timeout/t 2 /nobreak START rammap -Ew timeout/t 2 /nobreak Exit
-
To convert an analog audio source to a digital (computer/DAW) data stream you MUST have an AD/DA audio interface. If you want to track (in real time) multiple sources (like a drum kit), said interface MUST have a discrete input channel for each microphone desired.
-
If the track you are viewing has been frozen, it will just show the latter. Unfreeze it and the keyboard comes back.
-
Not gonna happen. All DAWs that support VST3 are from 2018 or later. Deal with it as is, or upgrade.


