


reginaldStjohn
-
Posts
1,415 -
Joined
-
Last visited
Everything posted by reginaldStjohn
-
May I suggest that you ask this in the main Cakewalk by Bandlab forum or the QA one. You will get more responses. You will also need to give much more information, What have you tried? what is your audio interface? what driver mode are you using? Post some screen captures of your setting etc.
-
Well, I never used Sonar 6 but if it is anything like the current, free Bandlab version then you just arm the midi track on which you are going to record the "mod" wheel hit record and then move the mod wheel. You might have to have some existing midi notes on the track? Is this the kind of modulation you are trying to record? Make sure your keyboard is sending on the desired midi channel and that the midi track is listening on Omni or that channel. As another thought, you could install the current Bandlab version and then more people might be able to help
-
I don't completely know what you want to do but the only way I know of to assign a bpm to an audio file is in the Inspector under groove clip.
-
pg 752 of the Reference manual. See the little "floppy disk" icon. That saves your drum map preset. You can also create a new one a the top and it should save it in the list of drum maps so you can select it in the MIDI track. On thing to note. There is not standard on what midi number represents middle C. Therefore, some instruments will be off by an octave. This might be one of your issue with the wrong notes. For the wrong instance all I can say is check the out port or the midi channel.
-

Applying effects on a clip not working
reginaldStjohn replied to Juanbanzai's topic in Cakewalk by BandLab
If you have read everything on pp 853 of the Reference Manual then I don't have any other suggestions. You can also check in the inspector to see if the effect shows up in the clip's effect rack. Make sure the effect is not bypassed and make some extreme setting so you can really hear it. You could also try to bounce the clip with the effect inserted and see if that affects the waveform that is presented as well.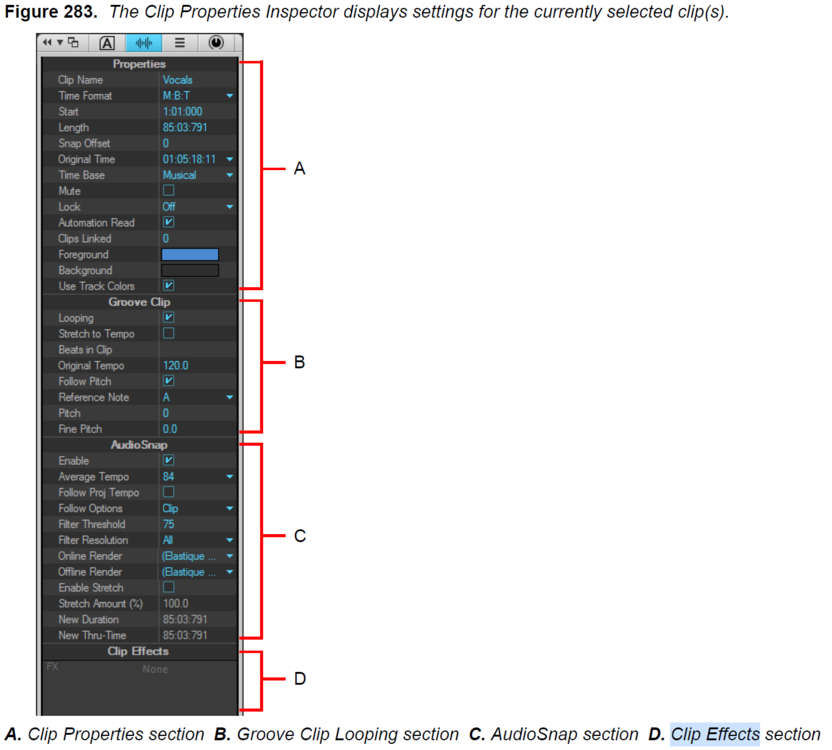
-
Maybe, it depends on if the volume slider produces a MIDI CC message when moved. You could check your digital pianos documentation to see if it sends MIDI or use a midi sniffing utility on your PC to see if it sends anything. If it does then you could set the CC value it sends to control a VSTi's parameters if supported in the synth
-
I'm not sure you would have to remix them. Just lower the volume by not pushing the brick wall limiter so hard. You will get lots of answers to how "loud" to make your mixes. Generally, making your mixes loud is the job of mastering and not mixing. If you are mastering yourself then you should insert you desired reference mixes and pull up a good metering plug-in. See how your mix compares to the references as far as long time averages as well as how high the peaks are to the average RMS level. Then use your limiter to get at approximately the same average level without smashing too many of the peaks. There is a whole art to mastering as well as mixing but you should be able to get a decent level out of your mix without it sounding too squashed. Loudness Unit Full Scale (LUFS) metering gives you some idea of how "loud" your mix is to your reference as well.
-
Does Cakewalk have MPE editing in the piano roll?
reginaldStjohn replied to Xrenyn's topic in Cakewalk by BandLab
I don't see any indication that Cakewalk supports MPE at this time. I am not expert so I could be wrong. There may be other work around ways to do something similar but I will defer to more experienced Midi-ites. -
Looks like you might need to create a bus. In the right hand pane that is empty right click and create a bus. then you route the output of the bus to one of you hardware outputs. Route your tracks to the bus.
-
Milliseconds late waveform in Froozen tracks
reginaldStjohn replied to Jaime Ramírez's topic in Instruments & Effects
It could be that the synth, or Cakewalk, is not reporting its latency correctly. You could Freeze the track and then nudge it into time. The other thing to try is to change the "prepare using ____ ms". I don't know if it will help.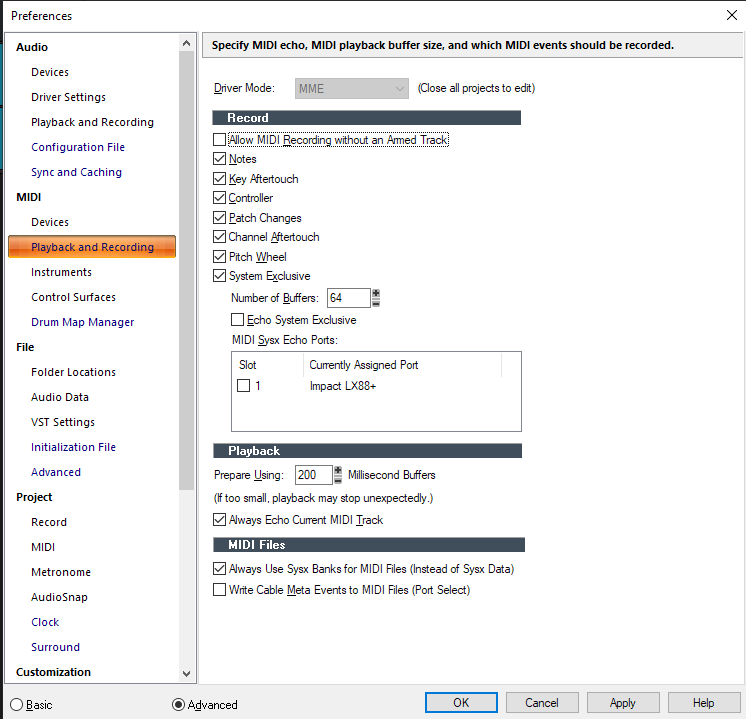
- 1 reply
-
- 1
-

-
Yes, that looks like something is messed up.
-
Prochannel and Gain Not Affecting Track Sound
reginaldStjohn replied to Helos Bonos's topic in Cakewalk by BandLab
You can try it and see. But my guess would be once you freeze the track all effects will be bounce in and you should be able to copy and move stuff around since they are just audio clips. However, if you ever unfreeze all these edits will be lost.- 16 replies
-
- 1
-
-
- prochannel
- gain
- (and 1 more)
-
You might have to give some more information. Are many people listening to this at the same time so they need to hear the drum track but you want the drummer to not hear the drums all from within Cakewalk? Do you want to export a backing track file that has all the instruments and the click but no drums to a file?
-
"Another question, how do we copy and paste automation data without having to dig in menus to command it to copy and paste?" There are probably lots of ways to do this but I usually drag around all the nodes I want to copy to select them. Then I do cntr-c to copy and cntr-v to paste. By placing the now time at a different location you can paste the automation starting at a different time.
-
Velocity Tail visible in track pane, always. Even when Velocity check off.
reginaldStjohn replied to Richard Hogg's question in Q&A
Make sure that you don't have a screen set or lens (workspace) selected. Could be a setting that is saved with one. If not then maybe contact support. -
Issue With Groove Clipping in Odd Time Signatures
reginaldStjohn replied to Xechno PSI's question in Q&A
Maybe I don't quite understand how you are doing things.. But Groove is assigned to a clip not a region in the timeline. You select a clip and make it a groove clip. Then it will follow timing adjustments in the timeline. If you want to make a drum loop in 9/8 then make a meter change in the timeline, add a clip to that location and in the inspector mark that audio clip as a groove clip. If you have put many audio clips/samples together to make your 9/8 loop then bounce them to a single clip before doing these steps. I don't think the clips know about meter only tempo. -
Prochannel and Gain Not Affecting Track Sound
reginaldStjohn replied to Helos Bonos's topic in Cakewalk by BandLab
Sometimes the region effects don't show up for me unless I bounce the clip. I think if the clip is edited in certain ways it makes the region efx unavailable. Once I bounce I can then apply the Region EFX again.- 16 replies
-
- 1
-

-
- prochannel
- gain
- (and 1 more)
-
The problem of the "Gain" process.
reginaldStjohn replied to Maxim Vasilyev's topic in Cakewalk by BandLab
I was not suggesting this was happening on purpose. It may very well be a bug and need to be reported. I was only suggesting a work around that might prevent this from happening. -
Real-Time listening to guitar-effects
reginaldStjohn replied to Thees Farich's topic in Instruments & Effects
In order to monitor the track as you record you have to enable the "input echo" button on the track. See the Cakewalk Reference Guide page 273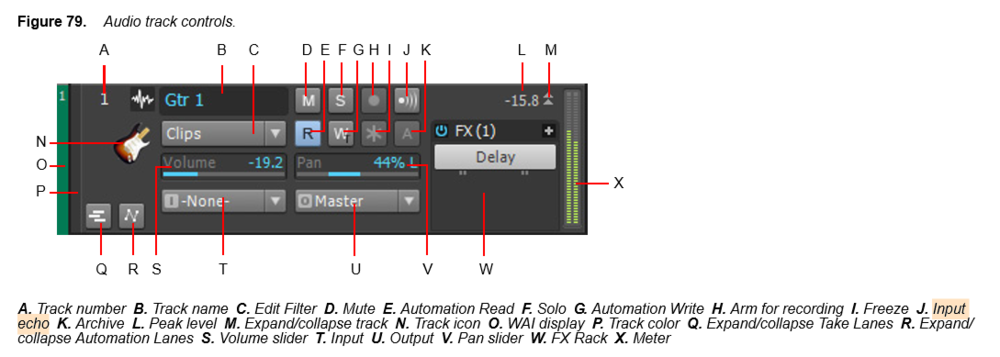
-
The problem of the "Gain" process.
reginaldStjohn replied to Maxim Vasilyev's topic in Cakewalk by BandLab
From your pictures it appears that after applying the gain that your "Audio_01_10.wave" looks to have been replaced by "Audio_01_08.wave" is that correct? I don't know why that would happen. Can you strip this project down and send it with a support ticket to Cakewalk? As work arounds you could try to bounce the clips individually before applying gain or bounce them down to one clip. -
In the track view in the track header by the name of the track. You can also shift-click the clip to select clips or if you are over automation to switch to automation.
-
I don't have melodyne 3 so I don't see that file. However, are you sure you are supposed to be scanning that dll? That might not be a plug-in dll. What directory is it in?
-
Another way to do this is to route the tracks to an auxiliary track. Then you can record the auxiliary track like you did with the bus or just hide the mono tracks and treat the auxiliary track as your stereo track. A couple of thread that explain other ways to do it as well. http://forum.cakewalk.com/How-to-convert-two-mono-tracks-into-one-stereo-track-m3556324.aspx http://forum.cakewalk.com/How-to-turn-two-mono-tracks-into-one-stereo-track-m3352697.aspx
-
in cakewalk there is audio snap. pg 599 of the Reference manual goes into great detail. Select an audio clip and hit "alt-a" to open the audio pallet. You many need to move some of the transient markers around or add some. I actually like to time most of my audio clips by hand by splitting and moving the clips into time. This avoids any artifacts.
-
2 Issues With Latest Update - Timeline & FX GUI
reginaldStjohn replied to CJ Jacobson's topic in Cakewalk by BandLab
You can always "pin" a plug-in window so it will stay visible while opening another one. There is also an option to Recycle the plugin windows or open a new one. See pg 851 of the Reference guide

