


msmcleod
-
Posts
7,215 -
Joined
-
Last visited
-
Days Won
39
Everything posted by msmcleod
-
It's a pity, because there really isn't anything out there that does the same thing - the filters are amazing, but totally proprietary. The only other option is getting a 2nd hand hardware Morpheus, UltraProteus, or Emulator E6000 - all of which are rare & expensive.
-
The answer is yes, but it's REALLY complicated to set up. It involves using MIDI loopback devices, and either aggregate ASIO drivers or audio loopback devices. First of all though, have you tried running the ProteusVX via JBridge instead of BitBridge?
-
 It's hard to give a definitive answer without knowing much more detail about your system, but the fact that you say it improved when you moved to an SSD leaves me to suspect this is simply due to some of the instrument samples having not been loaded yet. A lot of sample based VSTi's load samples on demand - i.e. they'll only load the C3 at velocity 64 sample when you actually play it. Some also have a limit as to how much memory they'll use for samples before they swap out older samples (i.e. ones that haven't been played for a while) for newer ones. This behaviour is usually configurable within the VSTi plugin itself. Although some VSTi's allow you to load ALL of the samples up front, this isn't usually desirable as: 1. It'll use up an enormous amount of memory 2. It'll take ages to load them all 3. You probably won't be using every note, at every velocity over 6-8 octaves. Well written VSTi's should remember which notes were played, and therefore which samples you actually need within a session. It should then load these samples upon opening your project. You usually have to play your project all the way through first before saving your project for it to have an accurate idea of this though.
 -
You just need to pan Channel 1 hard left, and Channel 2 hard right on the mixer. Make sure you're not using any of the mixer's in-built FX. In Cakewalk create two audio tracks, one with the input set to the Left channel only and the other to the Right channel only. Then arm them both and hit record.
-
It looks like Presonus has decided not to include a SONAR/Cakewalk mode on this interface. You could try setting it to Cubase mode on both the Presonus and through Cakewalk's Mackie Control Surface dialog.
-
Cakewalk Pro Audio 9 was designed for Windows 95, 98 and NT. Windows 95 & 98 were 16 bit, and Windows NT was 32 bit. Since NT, there has been Windows 2000 / ME, Windows XP, Windows Vista, Windows 7, Windows 10 and now Windows 11. Although CWPA9 uses standard Windows API's, those have likely changed over the past 23 years - and certainly in the case of security, significantly so. So it's not surprising that CWPA9 doesn't quite behave as expected on Windows 10. All the 32 bit versions of Windows can run both 32 bit and 16 bit programs. The 64 bit versions of Windows can only run 64 bit and 32 bit programs. I don't know if there are any 16 bit components to CWPA9, but if there are, they definitely won't work in Windows 10 64 bit. If you've got a 32 bit version of Windows 10, it may behave better. Personally, I'd stick to Windows XP if you can for running CWPA9. You can install it on a separate drive and have a dual boot with Windows 10 if necessary. You could also try running Windows XP as a virtual machine. VirtualBox by Oracle is free, and I run an XP virtual machine to run old 16 bit patch editors, and also CWPA9! The only other thing I can suggest is, in addition to running it in compatibility mode, make sure CWPA9 is running as administrator.
-
The best performing audio drivers in order are: ASIO (lowest latency [i.e. smallest delay]) WASAPI Exclusive WASAPI Shared WDM MME ASIO4ALL is simply a wrapper around WDM to make it look like an ASIO driver, but it's basically using WDM under the hood. If the manufacturer of your audio interface has a real ASIO driver, then install it and use that, otherwise try WASAPI Exclusive or WASAPI Shared. If you're using the on-board audio device in your computer, you definitely should be using one of the WASAPI modes - avoid the Realtek ASIO driver - it doesn't work. Lowering the buffer size in Preferences->Audio->Driver Settings will reduce the latency, but increases CPU usage. If the CPU usage is too high, you'll get pops & clicks and/or drop-outs. If the buffer size is too high, you'll get increased latency - in other words delay between playing a note and hearing it. For recording/playing in real-time, you want the output latency less than 10ms, ideally less than 5ms. But unless you absolutely have no other option, you should uninstall ASIO4ALL.
-
FR: Accepting comma as decimal point, and minus sign at numpad
msmcleod replied to FrankP's topic in Feedback Loop
@FrankP - AFAIK, this should work in most places assuming your language / locale are set accordingly. Is there a specific instance where it isn't working? -
You should be fine working offline. Cakewalk only needs to be re-activated once every 6 months. If your Cakewalk PC is never online, you can use BandLab Assistant on another PC that is online to do the offline activation for you. Instructions on how to do this are here: https://help.cakewalk.com/hc/en-us/articles/900006210046-Activating-Cakewalk
-
I use a 23" 1920x1080 monitor in my office (well 3 of them, but Cakewalk is only ever on one of them), and that's fine for me with my reading glasses on. I'm about 1 meter away. In the studio I use a single 27" 1920x1080 monitor at just under 1.5 meters away, which is perfect. I still have to wear my reading glasses though, as anything less than 2 meters away is a struggle without them. I did try a 32" TV at one point, but it just felt way too big.
-
MACKIE CONTROL - LAYER 2 FUNCTION KEYS MAPPING
msmcleod replied to El Gato Loco's topic in Instruments & Effects
I guess there's no technical reason why this couldn't be done, but it'd require a non-trivial amount of development work. The biggest issue would be the UI redesign... and those dropdown lists take AGES to populate, so it would take twice as long to open up the Mackie Control dialog. This IMO would override any benefit from having the extra function mappings. In saying that, there's nothing stopping someone doing this themselves - the code is on github: https://github.com/Cakewalk/Cakewalk-Control-Surface-SDK -
How do I get classic General MIDI synth sounds?
msmcleod replied to Dave G's topic in Instruments & Effects
Ah... the MT-32... I released an album back in '94 where over half the sounds were from an MT-32. The other half were from a CM-32P (the desktop version of the U110). I ended up writing my own MT-32 patch editor for the Amiga 500. I've sampled most of the MT-32 sounds I used, and still use some of them today. -
How do I get classic General MIDI synth sounds?
msmcleod replied to Dave G's topic in Instruments & Effects
I used to think that, until I realised that the only reason more modern sample-based synths sound good is because of the FX units built into them, and in the case of the soundfonts, putting them through the E-MU filters did wonders. Try listening to the raw samples of a JV1080 and you'll get what I mean. Likewise, any early to mid 80's digital synth can sound amazing just putting it through some chorus & reverb, and even better though a decent multi-fx. -
21 Sample Delay on External Pres via ADAT
msmcleod replied to Ben Chase's topic in Cakewalk by BandLab
It's a fair comment. Sound travels at 1.13 feet per millisecond. 21 samples @ 44.1K is 0.476 milliseconds. So it's the equivalent of moving a mic approx 6 inches further from your guitar cab, or you moving your head 6 inches further away from your monitors to listen to them. -
Cakewalk - the only DAW with playback delay issue?
msmcleod replied to Antre's topic in Cakewalk by BandLab
Take a look the following settings in Preferences, and see if changing them makes a difference: From the help: "Suspend Audio Engine When Cakewalk Is Not in Focus. This option allows other software to access device drivers. When this option is checked, other software can access device drivers when Cakewalk is not the focus of Windows." - If this is set to true, Cakewalk will be closing/re-opening the audio drivers every time it loses/gains focus. "Always Stream Audio Through FX. If any tracks or buses contain active plug-in effects, the audio engine will be activated and stream silence through the effects, even if the tracks have no audio data or Input Echo enabled. You will typically only disable this option if you want to conserve a bit of CPU processing if you play a project that contains lots of empty audio tracks with effects. There are several benefits to having this option enabled: Any effect with a “tail” (reverb, delay, etc.) will finish playing when playback is stopped. Effects will respond to automation envelopes, even on empty audio tracks. Many plug-ins do not update their UI properly until they receive audio input." - If this is NOT checked, then the audio engine will be disabled when you stop playback. This will create a delay when starting playback again - the length of this delay is also affected by the option below: "Always Open All Devices. With this option checked, Cakewalk opens all enabled stereo pairs of audio outputs as soon as you press play or turn on the audio engine. Any pairs that don’t have any tracks feeding them stream silence, but are still ready for use. So if you then change a track's output assignment on the fly Cakewalk doesn’t have to reopen a device, which can cause gaps in playback." - If this is checked, all device channels will be opened at once, so if you have a large number of them this could take time. As long as "Suspend Audio Engine When Cakewalk Is Not In Focus" is unchecked, and "Always Stream Audio Through FX" is checked, this shouldn't be a problem, as it's only done once. But if this isn't the case, then it could take more time to start playback. In most cases, it's preferable that this option is enabled, and you simply disable the channels you're not using.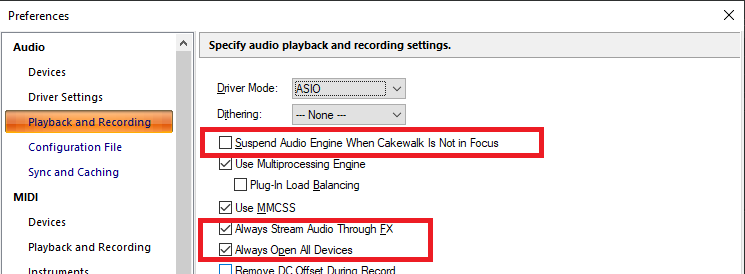
-
I can't seem to replicate this behaviour - when committing an arrangement, I end up with exactly the same amount of take lanes as I started with. It may be project specific, or perhaps some setting is causing the issue for you. Can you PM me your Cakewalk.ini file ( it's in %APPDATA%\Cakewalk\Cakewalk Core\ ), and a registry export of: Computer\HKEY_CURRENT_USER\SOFTWARE\Cakewalk Music Software\Cakewalk\Core That will allow me to replicate your current settings and hopefully reproduce the issue. If I can pin-point exactly which setting is causing this, I'll let you know. Also, can you clarify - is this audio clips that end up in new take lanes, MIDI clips, or both?
-
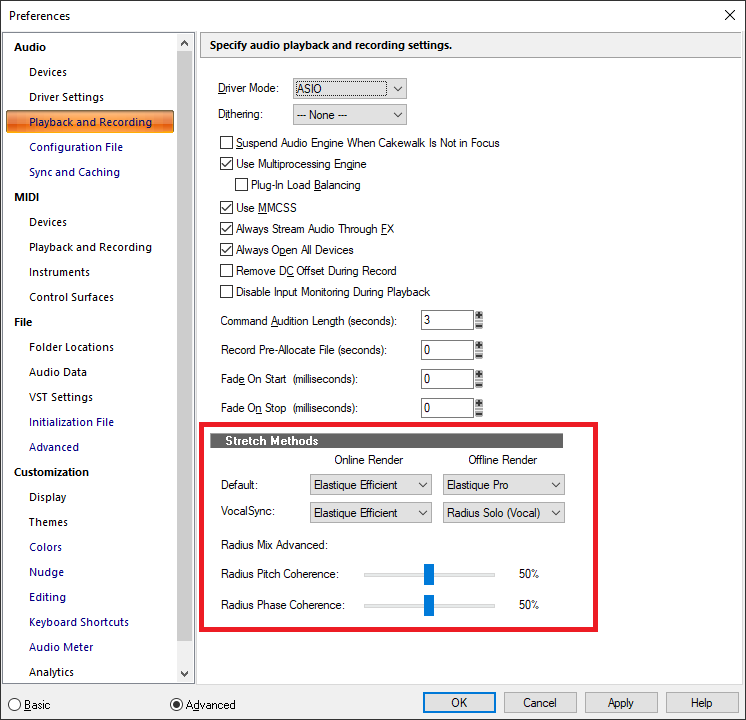
It could be that the stretch algorithm you're using isn't suitable for the material. Also, note that there can be different algorithms for "online" and "offline" stretch. Changing the tempo value in the inspector will use the "online" algorithm, which may be fast but not as good quality. Selecting the clip and selecting "Bounce to clip(s)" will commit the changes using the higher quality "offline" algorithm. Alternatively, you can set the online & offline algorithms to the same higher quality algorithm. Stretching will be slower, but will sound better and you won't need to bounce to clip(s) afterwards. You can set the algorithms in preferences:
- 3 replies
-
- 1
-

-
- audio delay
- time stretching
- (and 1 more)
-
In WASAPI Exclusive and WDM mode, you should be able to use more than one audio interface at once, however as @scook has indicated, unless they have their word-clocks synced, you're likely to have some timing issues. If you're just recording from more than one interface, this may not be too much of an issue... If you set up your channels so that each instrument goes to its own separate input, but one instrument goes to an input on both interfaces you should be able to compare the two tracks of that instrument to see how much they're out. So, for example... you've got your Focusrite set up as both recording and playback timing master. You record all of your instruments together, with say the kick drum, going to an input in the Focusrite AND an input in the M-Audio interface. When recording stops, compare the kick drum track from the Focusrite and the M-Audio interface - you'll need to zoom in enough to see the waveforms. Now select all of the tracks that were recorded on the M-Audio interface, and while looking at both of the kick drum tracks, drag all of the selected tracks together so the waveforms in both of the kick drum tracks align exactly. Now they should all be in sync. You could actually take note of the sample positions of a known peak in each kick drum track before you align them, then subtract one from the other, so you know that's the amount you need to adjust all of your M-Audio tracks by after recording. You could even set one of your Nudge amounts in preferences to this value, so you can re-use it in the future for adjusting the tracks recorded on your M-Audio. I'm not 100% sure this value will always be correct, but it should be good enough within the same session. When playing back, make sure you only playback through your Focusrite.
-
Extertnal Insert - De Coupling not working
msmcleod replied to El Gato Loco's topic in Instruments & Effects
Unfortunately it's not easy to solve. but it is high on our to-do list. -
Anything that lives in the multidock can be undocked and moved to another monitor.
-
Horrible noise after Cakewalk update 28.06.0.034
msmcleod replied to Paul George Webb's topic in Cakewalk by BandLab
ooh... this sounds like a 3rd party plugin that isn't authorized. This can happen occasionally with some plugins after a Windows update. You'll need to bypass all the plugins in the offending project and enable them one by one to find out which one is the culprit. -
We keep asking for hooter bars in Cakewalk...
msmcleod replied to Sheens's topic in The Coffee House
I use a couple of these with Cakewalk occasionally....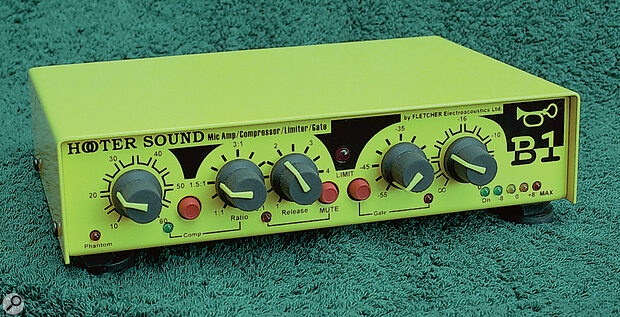
-
Horrible noise after Cakewalk update 28.06.0.034
msmcleod replied to Paul George Webb's topic in Cakewalk by BandLab
This is almost certainly nothing to do with Cakewalk, but more likely to do with a mismatch in sample rate between Cakewalk and Windows. If you've got Cakewalk is using the same audio interface as Windows is, make sure you change your sample rate and bit depth in Windows to match what is set in your Cakewalk project. If this doesn't fix it, I recommend re-installing your audio drivers. -
If you've got the space, don't discount a mixing desk with direct outs. I'm using an Allen & Heath MixWizard WZ3 for 16 inputs, which has a HPF @ 80Hz, hi/low shelving and two semi-parametric mids on each channel. The WZ4 is the updated version which retails around $1800 new, but you should be able to pick up a used WZ3 for around $500. The pre's / EQ are incredibly clean on this board, don't go for this if you want a "character" eq. For another 8 inputs, I've got an old Alice 828 with Hi/Low shelving and a parametric mid, although I mainly use this for the saturation given by the Belclere transformers. The new Mk3 will set you back around $2500 (the Mk3 has Carnhill transformers as they own Belclere now, and only 3 mono channels with EQ - the rest are stereo), but if you can find an old Mk1 or Mk2 with the full 8 channels, they go for around $1000 used. Another 6 inputs use the TFPro P3 (basically a rebadged JoeMeek MQ3), which give me an optical compressor, and 3 band EQ on each channel. These go used for around $150 - $200.
-
There are two ways of dealing with SysEx data, either in Banks or as inline events. In Preferences->MIDI->Playback and Recording, there's a "Always Use Sysx Bands for MIDI Files (Instead of Sysx Data)" setting, which I believe is checked by default. If this is checked, then any Sysex data will be moved to banks - if it's unchecked, it'll stay inline in the sequence. Banks can be easier to deal with in most cases. The only time I ever use inline events is when sending firmware updates to hardware over MIDI.


