


msmcleod
-
Posts
7,019 -
Joined
-
Last visited
-
Days Won
38
Posts posted by msmcleod
-
-
You can kind of doing what your suggesting already (minus the meta data) by creating arrangements for each individual section.
In other words, drag section 1 into arrangement 1, drag section 2 into arrangement 2 etc.. so each arrangement has only one section in it.
Make sure you rename each arrangements to match each song name.
When you select "Export as Audio" from the arrangement dropdown, you'll have the option of selecting all the arrangements (songs) and it'll export them all as individual audio files. -
@Colin Nicholls - just so I understand correctly...
Do you mean:
1. Export a stereo mix down by sections, e.g: Section1.wav, Section2.wav, Section3.wav etc..
or
2. Export multiple tracks by sections, e.g.: Section1-Track1.wav, Section1-Track2.wav, Section1-Track3.wav, Section2-Track1.wav, Section2-Track2.wav etc ? -
The "There is not enough memory" error is what Windows returns when the device is already in use. Most MIDI devices only allow one application to open the device at any one time.
The way around it is to use a loop-back device, e.g.:
https://www.tobias-erichsen.de/software/loopmidi.html
https://nerds.de/en/loopbe30.html
The loopback devices are multi-client - i.e. they can be used in more than one application at once.
You can use these either on their own, or in combination with MIDIOX if you need extra routing/processing.
What I tend to do is create two loop back devices, with the MIDI input of my hardware MIDI device routed to one loopback device, and the MIDI output of my hardware MIDI device routed to the other.
Be careful to get the loopback ports the right way around else you'll create a feedback loop.-
 1
1
-
 1
1
-
-
@Mcu pro - can you post a screen shot of the Control Surfaces page within preferences (ALT + PrtScn) ?
There were some issues with the first release of 2020.08 with the loading of presets/configuration. This was fixed in 2020.09.
Can you confirm you're using the very latest MackieControl.dll that came with 2020.09 ? -
Can you show a screen shot of the recorded waveform on the track?
-
Check your mains outputs in Cakewalk, by clicking on your master bus and looking in the Inspector - the mains outputs have red faders.
Check they're set to the same level: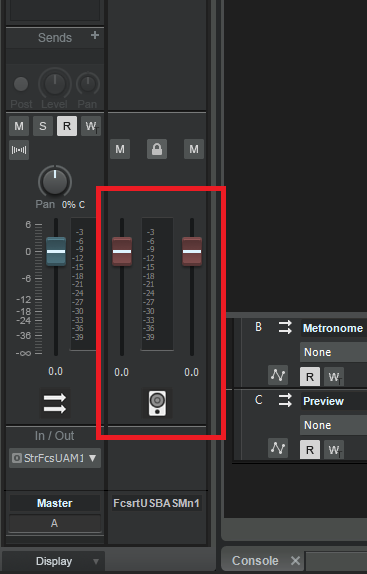
-
If you're exporting to use the audio files in another DAW or audio editor, then you might want to keep the quality of 32bit / 64bit.
However, if you're exporting to play the files, you'll need a bit depth that most sound cards support - e.g. 16 bit or 24 bit. -
This is the setting that you need to set:
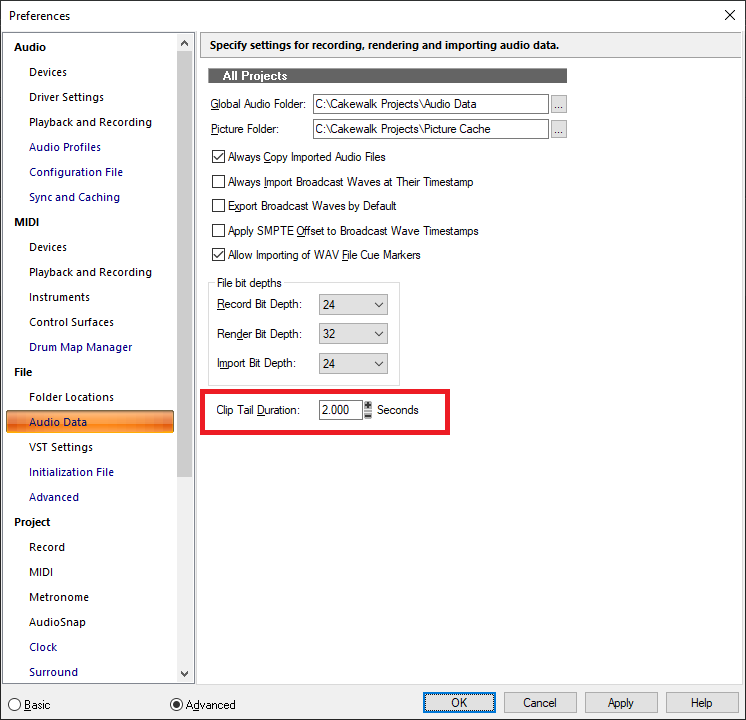
-
This disabling/enabling read automation has been fixed for the next release.
-
On 9/9/2020 at 9:07 PM, azslow3 said:
With which parameter value it works with "rack bypass"? zero and positive numbers work with particular FXes, -1 produce an error
The next CbB release will accept -1 ( e.g. 65535 for the FX #) to denote the track FX bin itself.
-
 3
3
-
-
Do they not still provide the Kontakt libaries too?
-
11 hours ago, Wibbles said:
Nobody does.
But this one, they give you a phonetic translation:
I'm pretty sure this weather guy's colleagues got him to do this hoping he'd slip up.... he pronounces it perfectly tho:
-
It's most likely not set up correctly within Focusrite Control.
You need to make sure that:1. The DAW inputs 9-16 are being fed from the ADAT inputs; and
2. The OctoPre is wordclock sync'd to the 18i20 (see page 10 of the OctaPre userguide: https://d2zjg0qo565n2.cloudfront.net/sites/default/files/focusrite/downloads/31897/scarlett-octopre-user-guidev1.pdf )
-
Your extra inputs/outputs were always "there" - they just weren't connected or routed.
Stereo Inputs 1,3,5,7 relate to the 18i20's eight inputs. Stereo inputs Digital 1,3,5,7 are your eight OctoPre inputs.
If you're using mono:
ASIO Input 1 Left = Analog Input 1 ASIO Input 9 Left = ADAT Input 1
ASIO Input 1 Right = Analog Input 2 ASIO Input 9 Right = ADAT Input 2
ASIO Input 3 Left = Analog Input 3 ASIO Input 11 Left = ADAT Input 3
ASIO Input 3 Right = Analog Input 4 ASIO Input 11 Right = ADAT Input 4
ASIO Input 5 Left = Analog Input 5 ASIO Input 13 Left = ADAT Input 5
ASIO Input 5 Right = Analog Input 6 ASIO Input 13 Right = ADAT Input 6
ASIO Input 7 Left = Analog Input 7 ASIO Input 15 Left = ADAT Input 7
ASIO Input 7 Right = Analog Input 8 ASIO Input 15 Right = ADAT Input 8
This is the standard routing, but you can obviously change this in the Focusrite Control app.
The same goes for the outputs: Stereo outputs 1,3,5,7 are the analog outputs on the 18i20; Stereo outputs 9,11,13,15 are the ADAT outputs. -
3 hours ago, Starship Krupa said:
While the suggestion to push it out from the inside is a good one, it's possible that your jacks are mounted to the PCB and not open at the tip end. In this case, there would be no way to get an implement in there to push the piece out. If this is the case, one trick of mine is to take a sheet metal screw small enough in diameter and long enough for the tip to grip the inside of the broken-off piece, carefully insert it in the jack until you feel it make contact, then turn it clockwise just enough for the tip of the screw to hook the inside of the piece. Then pull the screw out slowly with the plug tip (we hope) stuck to the end of it.
On my AX44, the jack socket was a "sealed" socket soldered directly on the PCB. Luckily the back of the socket was clipped on and could be easily removed and put back so I could push a screwdriver in:
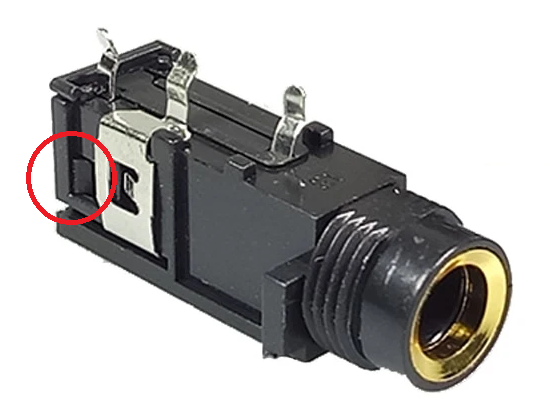
3 hours ago, Starship Krupa said:If you want to try the adhesive route, a tiny blob of 5-minute 2-part epoxy would be my suggestion. Cyanoacrylate (Super/Krazy Glue) is unlikely to stick to shiny metal very well; the most reliable applications I've found for that stuff are guitar nut slot and finish repairs and gluing human fingers to each other.
The problem I had, is that the tip had actually snapped off, so it was a blunt end that was stuck. The connector that clamps on the tip is pretty strong, which I guess is why it snapped in the first place. Cyanoacrylate didn't work at all. Epoxy resin did, but it just wasn't strong enough.
-
2
-
-
12 minutes ago, Kevin Perry said:
Can you not just fudge this with multiple instances either in separate tracks or something like BlueCat's Patchwork? More tedious, for sure...
I guess so, but AFAIK you can't import the multi patches from a sysex file... so using my existing sounds will be tricky. I'd have to export them as individual patches, then mess around with the volume balance & panning manually.
-
The problem with a lot of these cheaper mics is the "cheap" components & quality assurance. I say "cheap", but actually the issue isn't that all the components are rubbish, they're just not all tested for tolerance (this is what makes more expensive components more expensive - they test them, and discard the ones that don't hit the grade).
So one in every 1 in 100 or so, you'll actually get a pretty good mic. Very hit & miss though.
This is why they're so well suited for modding - you can upgrade the components / capsule to better quality ones... or replace the whole board & capsule.
Personally I wouldn't touch a USB mic for use in a DAW though. The pre-amps are bound to be crap, and because of the ASIO restrictions you're pretty much forced to use WDM unless all you're doing is voice-over. At least with an XLR mic you have a choice of pre-amp.
-
1
-
-
14 hours ago, Bill Phillips said:
I'm not using Workspaces. None is ticked. So that's not the problem. However, the Windows 2004 update crashed my DAW PC. So I had to clean install 2004 and formatted the System drive while I was at it. Where are the default and user Key Bindings stored? If they are on the system drive mine are gone.
Also, I keep most everything that's not installed by installers or stored in locations determined by programs on other drives to avoid losing things when the System Drive needs to be rebuilt. Is there any guidance on which folders to save periodically to avoid losing user settings, presets and etc? I understand that I'd need through the saved copies to copy and paste my user data, but that likely would be better than having to recreate them on the go.
Most of the settings are stored in the registry:
Computer\HKEY_CURRENT_USER\Software\Cakewalk Music Software\Cakewalk\Core
Although some legacy or specialized settings are stored in Cakewalk.ini
Keyboard bindings are stored here:Computer\HKEY_CURRENT_USER\Software\Cakewalk Music Software\Cakewalk\Core\Bindings
For keyboard bindings however, the recommended process is to Export them to a .kbd file from within the Preferences dialog.-
1
-
-
Firstly, what you have is technically a Logic Controller and not an MCU, so many of the messages being sent aren't Mackie MCU commands - they will be Logic commands.
What you really need is the updated firmware. The old logic controllers need the main control IC & 2 x PWM IC's swapped out. Mackie have long since discontinued the upgrade kit, but you can get a set here: https://www.ebay.co.uk/itm/Mackie-control-universal-pro-emagic-logic-control-XT-upgraded-PWM-Chips-V3-50/324107898548. This kit will essentially turn your Logic controller into a v1 MCU Pro minus the USB MIDI connectivity.
Secondly, I'm assuming you've got the SONAR lexan overlay? This relabels many of the buttons. If you're not going to upgrade your Logic controller to an MCU, you'll need to compare this overlay to the equivalent Logic overlay and "transpose" the commands accordingly.
But in answer to your questions:
1. / 2. - The code snippet for the MCS_MODIFIER_NONE is the correct one for disabling/enabling read automation. However the main CMackieControlMaster::OnSwitch section is the one that invokes it. I think you'll find the button value for MC_READ_OFF is something different on a logic controller vs MCU. Either that, or the GetModifiers(M1_TO_M4_MASK) is returning something different for a Logic controller.
FYI, I didn't actually write this code - it was written way back in 2005, but I created a fork of the original code in github before I worked for BandLab.
3. The Global View button is actually "Edit" mode. It allows you to edit the parameters (e.g. VST plugin parameters). For some reason this was left off the SONAR overlay for the original MCU - its correctly labelled on the MCU Pro version of the overlay. I used a label machine with white on black text to create a small label to stick under this button on my original MCU.
-
I've still got both a K1 & K1R - this is a pretty accurate emulation.
Pity it doesn't do Multi-mode tho - some of the stacked sounds were pretty good
-
2
-
-
Most probably the cables aren't designed to have more than one of them plugged in at the same time.
The other issue with those cables is that the internal buffer size is ridiculously small. It can't cope with receiving MIDI data at USB speeds, whilst pumping it out at MIDI speeds (which is much slower).
It'll probably be ok for one channel playing/recording notes, but as soon as you start using pitch bend or modulation, the buffer will fill up and you'll get dropped notes and missing CC changes. Forget SysEx or Aftertouch- it'll not cope at all.
Think about getting a dedicated multi-port interface - I'd have recommended the M-Audio MidiSport 4x4 but it looks like its discontinued. You might be able to get a second hand one though.
Another good one is the MidiTech MidiFace 4x4: https://www.thomann.de/gb/miditech_midiface_4x4.htmI've got the 8x8 version and it's fantastic.
Note: Not all multi-port interfaces are created equally... I've tried others that are basically using the same chip that your MIDI cable uses, and they've been essentially useless. I do know the MidiSport 4x4 and MidiFace 4x4 work well - I can't speak for other ones.
-
1
-
-
The actual patch names will be correct, but IIRC the MSB/LSB values will change depending on which slot you have the board plugged into.
The JV1080 bank select messages are defined as follows:
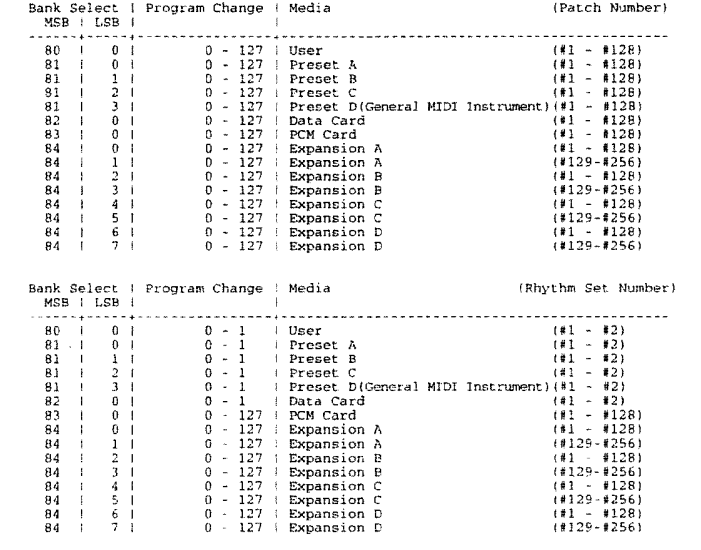
You'll have to edit your master.ins file and set the correct bank, depending on what slot you've got it plugged into.
So for example, say you've got the "SR-JV80-08 Keyboards of the 60s and 70s Expansion" card plugged into Expansion A:
For patches 1-128 : Bank MSB = 84 , LSB = 0 - so the 14 bit Bank Select is ( (84 * 128) + 0 ) = 10752
For patches 129-256: Bank MSB = 84, LSB = 1 - so the 14 bit Bank Select is ( (84 * 128) + 1 ) = 10753
Edit your master.ins file and look for the following line (if its the last thing you imported, it's probably right at the bottom of the file):[Roland SR-JV80-08 Keyboards of the 60s and 70s Expansion] Patch[1]=SR-JV80-08 Keyboards of the 60s and 70s 129-255 Patch[0]=SR-JV80-08 Keyboards of the 60s and 70s 1-128
You want to change it to :[Roland SR-JV80-08 Keyboards of the 60s and 70s Expansion] Patch[10753]=SR-JV80-08 Keyboards of the 60s and 70s 129-255 Patch[10752]=SR-JV80-08 Keyboards of the 60s and 70s 1-128
-
7 hours ago, Promidi said:
What I would love the ability to do is assign CAL scripts to menu items and toolbar buttons. At the moment, we have to use Studioware panels.
It's really a shame that, officially, CAL scripts (and Studioware panels) were depreciated... Modernising CAL scripts and being able edit Studioware panels within CbB would take CbB to a whole different level. Nothing, and I mean nothing, would be able to touch CbB for versatility if they did.You can also assign a keyboard shortcut to a CAL script.
-
The way I solved interference from other appliances was to get a pretty large online UPS. It's the kind that constantly runs off its battery and generates its own 240V sine wave. There's no physical connection to the mains, and as it always runs from the battery there's no delay on switch over if the mains is disconnected.
All my computer & audio equipment run through the UPS. My lighting, heater & de-humidifier run directly from the mains.
Not only did it fix the interference issues, there was a noticeable drop in noise on my equipment too.
These things aren't cheap though, especially the more powerful ones. I was lucky and managed to get a new, but discontinued one for 1/3rd of the price. I went for a 3000VA one (2700W) in the end. You can pick them up new for around £750 (yeah, they're not cheap).
If you do go this route, get a meter to measure just how much power you're drawing from the mains. You need to make sure the UPS is capable of delivering at least that, and if it's close to its limit you may have to power your gear on gradually to avoid an initial surge. When measuring pick a pretty meaty project to test on so your CPU load is high, and it's using as much of the PC's power as possible. Same with your monitors/amps - make sure they're actually doing some work.
The meter I got is one that just plugs into the socket, so I leave it there so I can keep an eye on it. The last thing you need is an underpowered PC - that'll cause a bunch of stability issues.
Also, if you're running anywhere near 100% capacity, don't expect much "offline" time if your power goes... You'll only get 2-3 mins to save your project & shut down gracefully before it cuts out.-
3
-
Shift-Click for envelopes & Shift click header to revert to clip
in Feedback Loop
Posted
FYI - the "=" key will toggle between the last selected track envelope filter and the clip.
Likewise SHIFT + "=" will toggle between the selected clip's gain envelope and the clip.