

-
Posts
214 -
Joined
-
Last visited
-
Days Won
8
Everything posted by Morten Saether
-
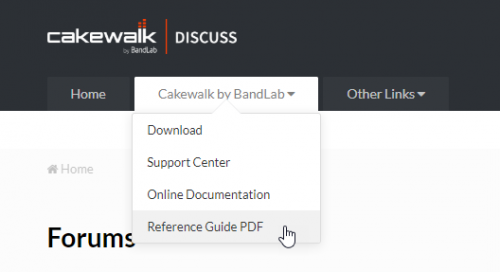
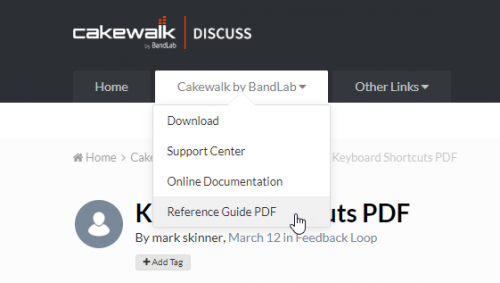
The Reference Guide PDF can now be downloaded directly from the forum menu (Cakewalk by BandLab > Reference Guide PDF).
-
You can also download the Cakewalk Reference Guide PDF. The keyboard shortcuts are listed on page 2,119. To download the PDF, click the Cakewalk by BandLab forum menu and select Reference Guide PDF.
-
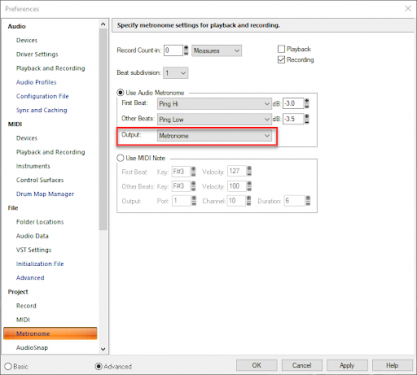
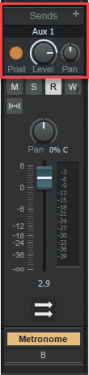
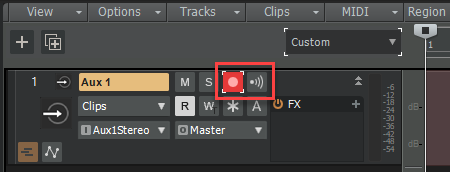
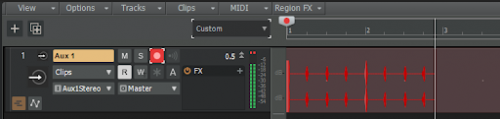
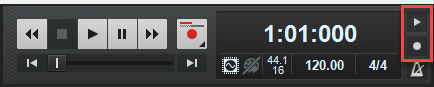
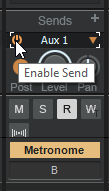
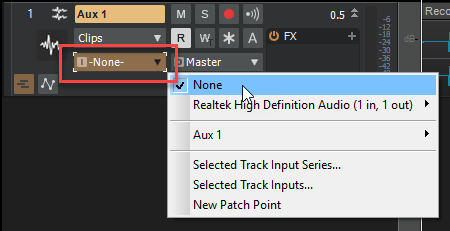
You can record the audio metronome to a track. This may be useful, for example, if you plan to work on the project in another DAW, or if you simply want more control over the metronome signal. By recording the metronome to a track, you can export the click track as a separate track when you export individual track stems. The first step is to create a new stereo bus that is dedicated to the metronome. Most of the default Cakewalk project templates already contain a Metronome bus. If your project already contains a Metronome bus, you can skip directly to step 5. If your project doesn’t contain a Metronome bus, go to Insert > Stereo Bus to insert a new stereo bus, then rename the new bus to “Metronome”. Click the Metronome icon in the Transport module to show the metronome settings (or go to Edit > Preferences > Project - Metronome). In the Preference dialog box, select Use Audio Metronome, and make sure the Output field is assigned to the Metronome bus. Click OK to close the Preferences dialog box. Right-click the Metronome bus in the Track view or Console view and select Insert Send > New Aux Track. The Metronome bus is now sending its signal to the new Aux track. Arm the new Aux track for recording and disable Input Echo . Make sure the metronome is enabled during recording (press F3 to enable/disable the record metronome). Click the Record button in the Transport module (or press R) to begin recording. The signal from the Metronome bus is recorded to the Aux track. When you are done recording the metronome, click the Stop button in the Transport module (or press SPACEBAR), then disarm the Aux track . Note: If you re-arrange the project or insert meter changes or tempo changes after the metronome has been recorded, you should re-record the metronome in order to be synchronized with the timeline. Post recording: Disable the original record metronome (press F3). This way, the metronome will only be played by the recorded Aux track. If you don’t need to record any additional metronome signals, delete or disable the Aux send on the Metronome bus. You can even mute or delete the entire Metronome bus if it is no longer needed. Assign the Aux track’s Input control to None. Finally, rename the Aux track to a more descriptive name, such as “Metronome”. That's it! You can now mute/unmute the Metronome track as needed. In summary: Create a Metronome bus and send it to a new Aux track. Record the Aux track. Mute the original metronome. Mute/unmute the Aux track when a click track is needed. For more information about the metronome, click here. For more information about Aux Tracks and Patch Points, click here. Aux Tracks & Patch Points tutorial


-
A patch point is an internal routing path used to route audio from a track output, bus output, or send to an audio track input. The virtual inputs can then be input monitored or recorded. You can think of patch points as virtual patch cables. To streamline the workflow for patch points, Cakewalk supports Aux tracks. Aux tracks are used to receive audio from other tracks, buses, or sends. Stereo buses are traditionally used for sub-grouping and effect sends, but it is possible to use Aux tracks for the same purpose. Aux tracks have the added advantage of being able to record the incoming audio (mono or stereo), and you can arrange Aux tracks adjacent to other tracks in the Track pane or Console view. For more information about Aux Tracks and Patch Points, click here.
-
ProChannel features a collection of audio processing modules that can be dynamically added, removed, and reordered per audio track, Instrument track and bus in the Inspector and Console view. Combining compression, equalization, tube saturation modeling, console emulation, tape emulation, and convolution reverb in one convenient processor, ProChannel is designed to make it fast and easy to enhance any track or bus. For more information about ProChannel, click here.
-
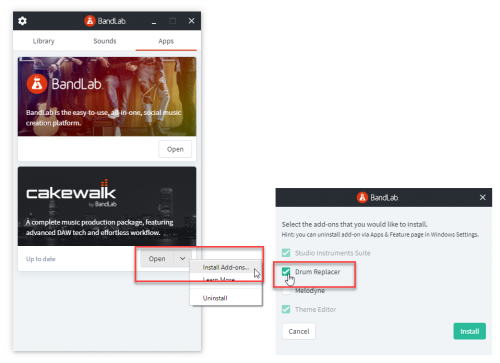
Drum Replacer is a drum replacement tool that lets you replace or reinforce individual drum sounds in existing audio tracks. For example, you can replace only the snare drum sound in a drum track, while leaving all other drum sounds intact. Drum Replacer is available as a free download in BandLab Assistant. For more information about Drum Replacer, click here.
-
Here are some useful videos for getting started with CbB. These tutorials will help you learn your way around the interface, configure your audio device and get comfortable with common track operations. Note - while many of these videos refer to SONAR, they remain 100% applicable to CbB today. Enjoy! To get Cakewalk by BandLab for free: If you haven't already done so, create your free BandLab user account. Click here to download the Cakewalk by BandLab installer. Launch Cakewalk by BandLab and sign up or log in to your BandLab account. Note: After Cakewalk by BandLab is installed, all subsequent updates can be done directly from within the application via Help > Check for Updates. Other useful resources: Cakewalk by BandLab QuickGuide Support Center Online Documentation
-

Resize Multiple Buses Similtaneously, Like Tracks
Morten Saether replied to William W. Saunders, Jr.'s topic in Feedback Loop
If you give focus to the Bus pane, you can use the CTRL+UP/DOWN keys to resize all buses simultaneously. To ensure they have the same size, start by pressing CTRL+UP until all buses are minimized, then press CTRL+DOWN to make them larger. You can also press the F key to evenly size all buses so they fill the Bus pane (this also works for tracks when the Track pane has focus). -
There are several ways to delete markers: Click (and keep the mouse button pressed) a marker in the time ruler, then press the DELETE key. Drag in the time ruler to select the markers you want to delete, then go to Edit > Delete Special and only select Markers. Note that this only works if clips overlap the selected time region. Go to Views > Markers to open the Markers view, select the markers you want to delete, then press the DELETE key. More info about markers can be found here.
-
Will and Wibbles, I don't know the history between the two of you, but let's avoid any personal attacks and keep the forums positive. If we want the coffee house to remain open, please stick to the guidelines: "Discussion of off-topic music related subjects. No politics. No religion. All love. Enjoy!" Thanks for everyone's cooperation. This topic is now locked. PM me if you want to discuss in private.
-
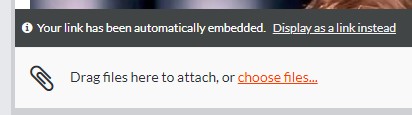
Keni, immediately after you paste a URL that gets converted, you should see Your link has been automatically embedded. Display as a link instead for a brief moment. Click Display as a link instead to revert the URL to plain text.
-
You can enable Snap to Scale to drag diatonically, then press both mouse buttons to drag chromatically. You can also use the nudge up/down keys (8 and 2 on the numeric keypad) to transpose notes up/down. Hold down the CTRL key to nudge up/down by octaves.
-
For more information about Mic Recall, go here. Yes, you can have multiple projects open simultaneously. Use the Windows menu to switch between open projects. The Clean Audio Folder function was recently updated and is now much more efficient. For details, go here.


