


Heinz Hupfer
-
Posts
508 -
Joined
-
Last visited
Posts posted by Heinz Hupfer
-
-
HI:)
Bought a 12700k 2 weeks ago and I'm very happy with it. First I got Problems with heat and a loud FAN, but I accidentically put the CPU FAN in a wrong direction on the Cooler😁
Now I have temperature form 42° to 55 ° C. I dimmed the CPU to MAX 100W and in my largest projects I have a MAX from 10 - 15% CPU Load, when I had with the same Projects 30 - 45 % Load on an 9700k.
If I need more Performance I can raise the speed and the MAX Power, but absolutely not necessary, don't think that my projects are getting bigger.
For sure the 12700 with 65 Watt will be not as "loud" , but it's only 33 dB (I'm listening at 80-85 dB) at my listening position in studio, not really loud.
I couldn't hear my 9700k, that was great, but I can live with these 33 dB;)
Greetz;)
Bassman.
-
HI:)
First of all I make a copy of the Track and Archive it!
I'm starting with Clip Gain automation for too loud and too soft pieces. Listen with the rest of the Arrangement
For Voices next I lower sharp "s", "t", "sch" and perhaps "P", not with automation.
Sometimes I cut those and put it on another track and now I can make them softer. Never heard a really good Deesser!
Then Compress everything, but not too heavy, max 3:1, 5-6 dB Gain Reduction. On Bass or Synths much more, 8:1 (10 dB)
Next Equalize it.
Effects for the Track.
Perhaps change again some pieces, with Reverb and Delay you can hear bad behaviours much more.
At the End Track Automation with the Rest Mix.
I don't like Compression so I always try to use it very subtle.
Hope that helps;)
Bassman.
-
 1
1
-
-
HI:)
Solved!
Renaming the Outputs on both PCs did the trick, I just numbered them correctly and now it works.
Thanks for pointing me in the right direction. It seems they are ordered Alphabetically!
Thanks to all for helping;)
Greetz;)
Bassman.
-
 1
1
-
-
HI:)
2 complete different Interfaces, as you can see in the pictures. Steinberg UR44C in my Office Machine and Audiobox 1818VSL in my Studio PC.
Now, yesterday I did a complete New Install of Win 11 and CbB (Studio PC) cause of some glitching Problems with a large Project and the same problem occurs with this Outputs 5 and 6, it shifts to the out 1 and 2. doesn't happen if I deactivate 5 and 6 in the device manager on the Office PC (I do not use "really" these Outputs, they are Dummy outputs for the Master Bus, muted for output)
Means, I have a Mixbus with a Send to Outputs 1 and 2 (The Send I use for Loudness of my Monitors), which goes to the Masterbus with A Loudness Meter on it, but goes to Outputs 5&6 muted.
On 3&4 I have a second Monitor Pair with a second Send(Small Speakers).
Mixloudness with Mix Fader, feeding the Loudness Meter on Masterbus.
So if I deactivate 5 and 6, the order is on both PCs the same, on activated 5 and 6 , these become 1 and 2 on the other machine.
But why?
Greetz;)
Bassman.
-
HI:)
On both are the newest drivers installed, but I can see an FL Studio driver greyed out in the audio devices in office but not in studio. Perhaps this interferes with the list? don't think so, it was installed since a year or so....
Trying out...
There's no possibilitiy to order them!
For sure I can click and reorder them in this window, but then I have to order it on every project port from office, and I do it a lot vice versa! Not very practicable!
And it always worked before...
Greetz;)
Bassman.
-
HI:)
2 PCs with different Soundcards.
Porting from my Studio to my Office all is fine, the Outputs are in correct order, look here:
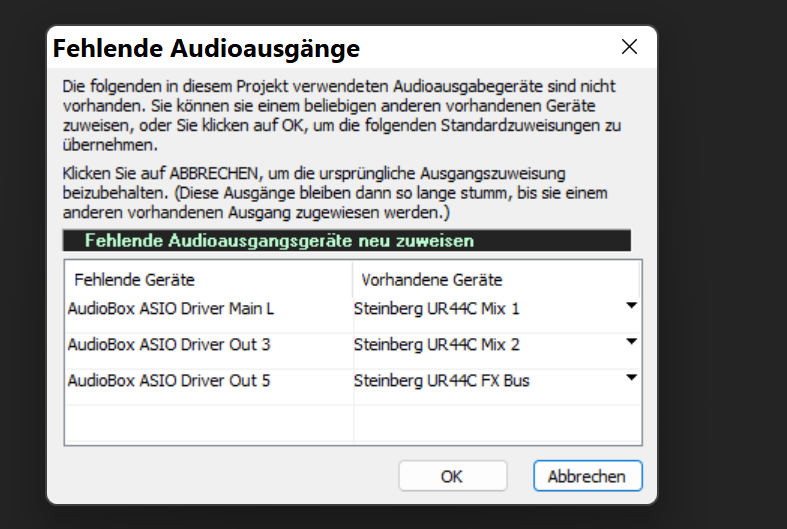
In the other direction it changes the order since the last update:
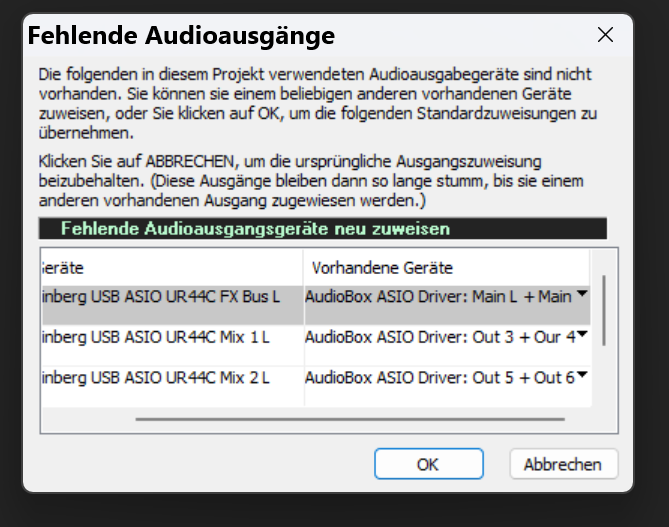
FX Bus from UR44C is in first place but it should not be, these are the Outputs 5/6 on UR44, so what happened?
Can I change this again?
Thanks;)
Bassman.
-
HI:)
This upper Song is in G Major!
So you have:
G Am Bm C D/D7 Em and F#m5-
In addition you can use the Dominant Sevenths of the "normal Chords"
D7 E7 F#7 G7 A7 B7 and C#7
In the Song is used
G B7 C Cm
So, clear is G and C as Tonic and Subdominant and B7 as Dominant of the E minor.
Unclear is Cm, but often used as a way to lead back to the Tonic G. But it sounds strange in this song...
Hope this helps;)
Bassman.
-
1
-
-
HI:)
Finally caught the Controller Problem in the PRV.
Sometimes it happens that I can't edit visible controllers. In the video you can see that the CCs on the left are editable but this one at the right not!
This happens I think on every working session I have, but I can't say when and why, it's not reproducable!
All notes are in the same clip, nothing is muted, but I know I before moved the clip 200 ticks to the left with the CCs moving along.
The only possibility is to delete it and insert a new one for this session. If I close the project and reopen it it works again!
Same with Transform Tool ( I mentioned this earlier and you got a project of this problem) , sometimes it works, sometimes not.
Thanks for eventually helping;)
Bassman.
P.S. Video from Transform Tool
1. It changes CCs even if I have not selected anything
2. I change the middle edit point and the selection goes away
3. Some other points doesn't unselectsome do unselect the data.
-
HI:)
QuoteThe problem is that if an old hand like Bassman can be confused by this, imagine how it must affect Noobs.
The Problem is, you forget about things you don't need very often. 99,9 % of using mute tool is in PRV muting midi notes, with audio I can't remember I muted any Waveform, but often Clips with "K" or the mouse.
I'm confused when I use my 3 other DAWs, Shortcuts are different, not to say everything's different. These days I wanted to work with Studio one and I couldn't figure out (for some time) how to open the Edit window for a midi(instrument track in S1) track to input some notes. That was funny🤣
The older I get, the more forgetful I get, not only my problem😁😂
I find the Mute Tool very OK how it works, if you mute the clip Midi is full red in PRV, special notes you muted are black with a red line around.
Could not be better! I have to read the manual before I use tools that I use only seldom.
Bassman.
-
HI:)
My fault!! I just clicked at the top of the clips cause I thought it mutes and unmutes the whole clip (it does). don't use the mute tool very often so I forgot that you can unmute the waveform by swiping at the top of the clip.
OK😁 Should use it more often then.
Normally I just Comp or better let sing the whole verse/chorus again.
Thank you for pointing me in the right direction and sorry for this stupidness😂
I'm getting old😒😁
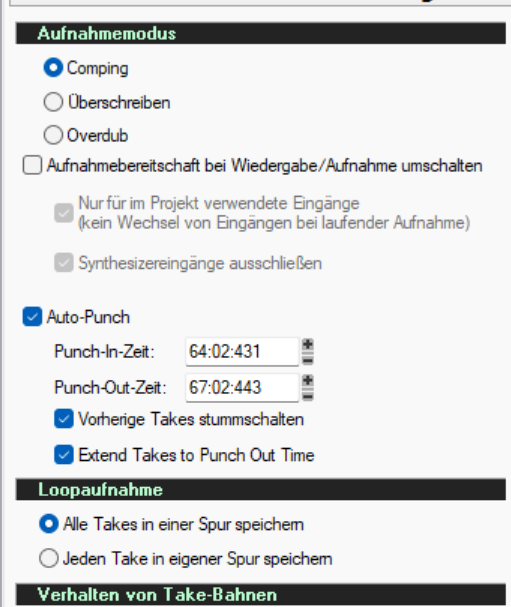
But there's one thing that didn't work for me:
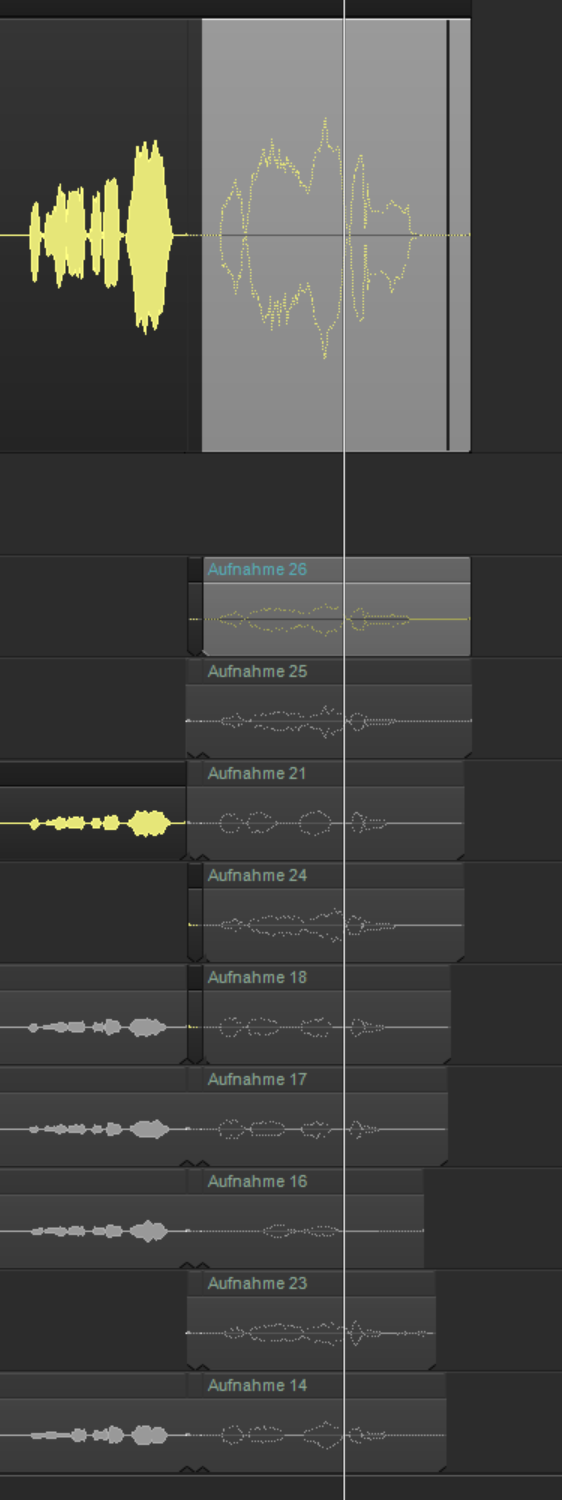
"Extend Takes to Punch Out Time"
I selected this setting but in the picture/video you can see that the beginning of the clips is the same Punch In Time, but the end of the clip is when I stopped the recording, it's not extended to the Punch Out Time.
Greetz;)
Bassman.
-
1
-
1
-
-
HI:)
Look at the video, the Mute Tool doesn't work! Neither "K" does unmute them! The Comp Tool does select them "muted".
Bassman:)
-
HI:)
I've recorded in Comping Mode, then used the Punch In at the end of the Phrase. Tried "K" at first, doesn't do anything.
There are different clip lengths at the end, cause the "Extend clip to Punch Out time" did not work as you can see. The end of the clip is where I ended the recording!
Before I Punched I used Comping to get the right Recording, then we decided to Punch in at the end, now all clips are muted and unmutable!
Not really a problem, cause the Punchrecordings are correctly on the disc and I dragged them in to new tracks, but I wonder why they in the project are unmutable!
Thanks;)
Bassman.
-
Hi:)
Problem or great problem:
Have Punchin recorded some voice tracks with following settings: (Time is not correct in the pictures, for recording it was)
After having recorded the last take and it was good I saved the project but after reload all punched recordings were muted and I'm not able to unmute them!

In the video you can see that I'm trying to comp select them and it works but the result is muted.
Trying to unmute them with the mute tool and it doesn't unmute.
What can I do???
Bassman.
P.S. The files on the disc are OK so not a big deal to drag them in again, but why are they muted? Punch in is deselected!
-
Hi:)
OK! I did a rollback for testing and you are right! February Release is as slow as the new release. I had it different in mind.
First I thought it has to do with nested folders, but:
For testing I deleted all folders and subfolders:
Surprisingly not faster than before.
Deleted some Synths (only synths, not tracks), but this has too nothing to do with it!
Closed Console View:
Wow, a huge forward! That's it, as long as the console view is opened it get's very slow!
(I have it in the multidock on the 2. Monitor) That's what I wrote in another Post.
You must not even have it visible, just present in the Multidock!
Greetz;)
Bassman.
-
HI:)
In the project with folders it was not this slow, you can try it out just with the up and down keys, switching to next track is reacting very slow so it doesn't has to do with the controller.
This wasn't before and it doesn't matter if I enable or disable the open folder option(s).
Fast as before without any folders!
Thanks;)
Bassman.
-
HI:)
QuoteTo clarify - Is it slower only when the option is enabled?
I tested 2 Projects, 1 without any Folders and 1 with many folders.
Without folders it is as fast as before, doesn't matter if the options are enabled or not!
The other project with many folders and folders in folders it is very slow and it jumps sometimes so that it is not possible to get to a specific track or you have to try it a few times up and down.
Then added some folders in the project without any folders so far and it seems that it get's slower and slower the more folders I add....
Attached the Project Templates (more than 4.88 MB):
https://1drv.ms/u/s!Al2mKojzOW0MrZgzaf6mtNjlk0m0pw?e=VxIpMT
Greetings:)
Bassman.
P.S. Forgot to say that I change tracks with AZController and a Slider, but you can easy see this with just the up and down keys (With a lot of folders it reacts very slowly!):
: Set_state PLMIN Ribbon
'PLMIN.+' : Set_state TmpCnt Next loop
'PLMIN.-' : Set_state TmpCnt Prev loop
TrSelDir.DN MO.Nor TmpCnt.2 : Sel_strip Strip StrTy Current 1 Volume
TrSelDir.UP MO.Nor TmpCnt.2 : Sel_strip Strip StrTy Current -1 Volume
TrSelDir.DN MO.Nor TmpCnt.2 : Set_state TrCo Next loop
TrSelDir.UP MO.Nor TmpCnt.2 : Set_state TrCo Prev loop
TrSelDir.DN MO.Nor TmpCnt.2 : CALL _fTrCoPlDN
TrSelDir.UP MO.Nor TmpCnt.2 : CALL _fTrCoMiUP
MO.Nor TmpCnt.2 : Func 6 'Select Strip'
MO.Nor TmpCnt.2 * Set_state TmpCnt.0
-
HI:)
QuoteThe Track view Options menu contains a new Expand Track Folder on Track Focus option, which automatically opens the focused track’s parent folder if it’s currently closed. This behavior may be desirable when using control surfaces or changing track focus via the Console view.
Thanks for this, it's very helpful with Midi Controllers.
But now changing Tracks in the Track view with controller is slower than before.
It was very fast before.
Was slower when opening Multidock with Console, now with console it is VERY slow
But OK for working cause I don't need Console. (Very seldom)
QuoteOption to automatically extend final take when punch recording
Great, this is much better than before.
As far as I can see all Projects are opening and playing without any issues with this update.
Thanks for it Bakers;)
Bassman.
-
HI:)
This sometiomes happen to me and I don't know why!
Confirmed!
Bassman.
-
1
-
-
HI:)
I set up 3 Pads for 1,2 and 3dB and 1 Toggle Button for Plus or Minus:
Description down below the video.
Description:
(You can directly run the Gainscripts from the pads, I do use the pads with
other software on focus too! So run the scripts from added translations)C4,Cs4 and D4 (Pads)
On Focus "Cakewalk" Gain_1, Gain_2 or Gain_3 script is running.
PlusMinus (Togglebutton)If the value of the button is 127, the variable %PlusMinus is Plus,
if the value is 0 the variable is Minus
Gain_1, Gain_2 and Gain_3 (3 Pads C4,Cs4 and D4)If %PlusMinus is Plus, Louder_1, Louder_2 or Louder_3 script is running.
If %PlusMinus is Minus, Softer_1, Softer_2 or Softer_3 script is running.
Louder_1, 2 and 3There you have to change the coordinates:
movemouse (($x) - 100),250
(This moves the mouse inside of the selection and down to the beginning of
possible automation edit)
click left (($x) - 100),250 DOWN
(Clicks and holds the mouse button)
movemouse ($x),187
(Moves the mouse up 1,2 or 3 dB)
click left ($x),187 UP
(Clicks 1 time so the automation edit is done)
movemouse ($x),1640
(Moves the mouse back to the bottom of the clip, where it is best to make the selection)
Softer_1, 2 and 3
(Same as Louder_1, 2 and 3 but - 1, 2 and 3 dB, if the PlusMinus Value is 0)
So, Select a portion of audio and press the PlusMinus Button for Plus or don't press if
you do not use Plus and press one of the pads.You can use the mouse helper with Ctrl+Menu+I in CoyoteMidi for the Mouse Coordinates.
That's it
Greetz;)
Bassman.-
1
-
-
Hi:)
The "~" is only availabe with the AltGr(Ctrl+Alt(Menu)) Key right beside the space key. Alt+126.
Same Key as + and * on my Keyboard.
Not possible to use it in Shortcuts here in Germany!
Bassman.
-
1
-
-
Hi:)
He can test it! Just write Alt+60 and Alt +62 and see if it is "<" and ">". Alt+65 should be an "A".
Bassman.
-
HI:)
"<" and ">" never worked for me with German Keyboard and Shortcuts in Cakewalk!
Bassman.
-
1
-
-
HI:) (Not a Tutorial but perhaps it can help others)
I get the Clip into the whole window, select a portion and hit a Midibutton. That's it. Set it up for -3dB but I'll use more buttons for that.
Set up another Midibutton for press and hold the Ctrl Key on value 127 and release it on value 0 so you can stay with Controller and Mouse and move the Audio Data to the left or right.
It is much faster and you don't have to move the mouse always up and down.
Done with CoyoteMidi!
For Video look at --> next Post
Greetz;)
Bassman.
-
Hi😊
In AZController you can set points in the timeline where you can GoTo with 1 Midibutton, but it‘s not saved with the project so you have to save the point on every start of the project with a button and then you can recall it as long the project is in work.
Bassman.
Improve the sound of the electric bass to hear it better on mobile phones
in Production Techniques
Posted
HI:)
On small speakers it's not possible to hear frequencies under 100 Hz for example.
So instead of rasing 80 Hz (Key of E) on the Bass, use the first, second and third Overtone in the mix.
160, 240 and 320 Hertz, depends on the Key the song is, so in "G" the frequencies are around 100, 150 and 200 Hz.
(Just download a frequency table, 1.Overtone x2, 2. x2,5, 3. x4)
Try it out;)
Greetz,
Bassman.